1. הקדמה
This manual provides detailed instructions for the installation, operation, and maintenance of your Xigmatek Aqua V AIR Arctic Mid-Tower PC Case. Please read this manual thoroughly before beginning any installation to ensure proper setup and safe operation. Retain this manual for future reference.
2. זיכערקייַט אינפֿאָרמאַציע
אָבסערווירן די פאלגענדע זיכערהייט מיטלען בעת ינסטאַלירונג און אָפּעראַציע:
- שטענדיק אָפּשטעקן די מאַכט צושטעל פון די וואַנט אַוטלעט איידער איר ינסטאַלירן אָדער אַראָפּנעמען קיין קאָמפּאָנענטן.
- טראָגט אַן אַנטי-סטאַטישן האַנטגעלענק-רימען צו פאַרמייַדן עלעקטראָסטאַטישן אָפּלאָד (ESD) שאָדן צו סענסיטיווע קאָמפּאָנענטן.
- Handle components carefully. Avoid touching pins or circuit boards directly.
- זאָרגט פֿאַר געהעריקע ווענטילאַציע אַרום דעם פּיסי קעסטל כּדי צו פֿאַרמייַדן איבערהיצונג.
- האַלטן קליין טיילן און מכשירים אַוועק פון קינדער.
- פרובירט נישט צו מאדיפיצירן דעם קעיס אדער זיינע קאמפאנענטן, ווייל דאס קען בטל מאכן אייער גאראנטיע און שאפן זיכערהייט ריזיקעס.
3. פּעקל אינהאַלט
באַשטעטיקן אַז אַלע זאכן זענען פאַראַן אין פּעקל:
- Xigmatek Aqua V AIR Arctic Mid-Tower PC Case
- Accessory kit (screws, standoffs, cable ties)
- באַניצער מאַנואַל (דעם דאָקומענט)
If any items are missing or damaged, contact your retailer or Xigmatek support.
4. פּראָדוקט איבערview
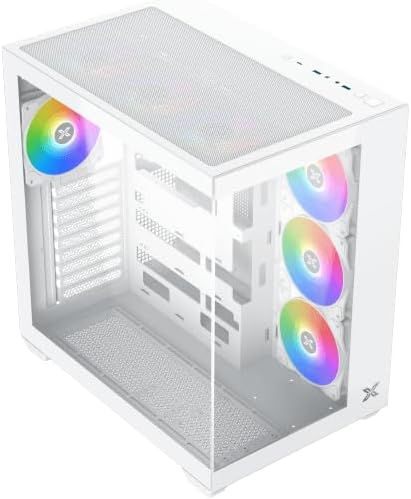
The Xigmatek Aqua V AIR Arctic is a mid-tower PC case designed for high-performance gaming configurations. It features tempered glass panels for component visibility and optimized airflow with pre-installed ARGB fans.

פיגור 4.1: פראָנט-לינקס view of the Xigmatek Aqua V AIR Arctic PC case, showcasing the tempered glass front and side panels, and the pre-installed ARGB fans.

פיגורע 4.2: דערציען view of the PC case, showing the I/O shield cutout, expansion slots, and rear fan mount.
פיגור 4.3: אויבן-אראפ ווינקלעד view, highlighting the top mesh panel for additional cooling and the internal layout.
5. סעטאַפּ און ייַנמאָנטירונג
Follow these steps to install your PC components into the Xigmatek Aqua V AIR Arctic case.
5.1. צוגרייטן דעם פאַל
- שטעלט דעם קעסטל אויף א פלאַכער, סטאַבילער ייבערפלאַך.
- Remove the tempered glass side panel by unscrewing the thumb screws at the rear and carefully sliding it off. Place it on a soft, non-abrasive surface to prevent scratches.
- Remove the opposite steel side panel by unscrewing the thumb screws and sliding it off.
5.2. מאָטהערבאָאַרד ינסטאַללאַטיאָן
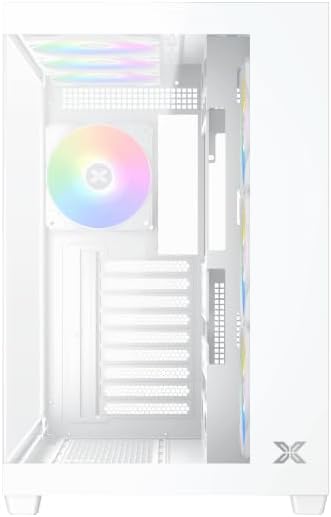
פיגורע 5.1: ינלענדיש view of the case, illustrating the motherboard mounting area and cable routing cutouts.
- אינסטאלירט דעם I/O שילד אין דעם אויסשניט אויף דער הינטערשטער זייט פון דעם קעיס.
- Align your motherboard with the pre-installed standoffs. Ensure the standoffs match your motherboard's form factor (ATX, Micro ATX).
- Secure the motherboard using the provided screws from the accessory kit. Do not overtighten.
5.3. מאַכט צושטעלן אַפּאַראַט (PSU) ינסטאַלירונג
- Locate the PSU mounting bracket at the bottom rear of the case.
- Slide your PSU into the designated compartment from the rear of the case.
- באַפֿעסטיקן די PSU צום קעיס מיט די שרויפֿן וואָס זענען צוגעשטעלט געוואָרן מיט אייער מאַכט צושטעל.
5.4. סטאָרידזש דרייוו אינסטאַלאַציע
The case supports multiple storage drives:
- 2.5" SSDs: Mount directly to the SSD trays located behind the motherboard tray. Secure with screws.
- 3.5" האַרט דיסקס: Install into the drive cage located beneath the PSU shroud. Slide the drive into the tray and secure with screws.
5.5. גראַפיקס קאַרטל (GPU) און יקספּאַנשאַן קאַרטל ינסטאַלירונג
- אַראָפּנעמען די נייטיקע יקספּאַנשאַן סלאָט דעקל אויף די הינטערשטע טייל פון די קעסטל.
- אַרײַנשטעלן אײַער גראַפיקס קאַרטל אָדער אַנדערע יקספּאַנשאַן קאַרדס אין די פּאַסיק PCIe סלאָץ אויף דער מוטערבאָרד.
- Secure the cards with the provided screws.
5.6. קאַבלע מאַנאַגעמענט

פיגורע 5.2: View behind the motherboard tray, illustrating the ample space and tie-down points for effective cable management.
ניצט די קאַבל רוטינג אויסשניטן און בינדפּונקטן הינטערן מאַדערבאָרד טאַץ צו אָרגאַניזירן קאַבלען. דאָס פֿאַרבעסערט לופֿטפֿלוס און עסטעטיק.
- Connect all necessary power cables from the PSU to the motherboard, GPU, and storage drives.
- Connect front panel cables (USB, audio, power/reset switches, LED indicators) to the corresponding headers on your motherboard. Refer to your motherboard manual for specific header locations.
- Connect the ARGB fan cables to the integrated fan controller or directly to your motherboard's ARGB headers if available.
5.7. Fan and Radiator Support
The Xigmatek Aqua V AIR Arctic comes with 7 pre-installed 120mm ARGB fans. Additional cooling options are available:
- פראָנט: Supports up to 3 x 120mm or 2 x 140mm fans / 240mm, 280mm, 360mm radiators.
- אויבן: Supports up to 3 x 120mm or 2 x 140mm fans / 240mm, 280mm, 360mm radiators.
- הינטן: Supports 1 x 120mm fan.
- דנאָ: שטיצט ביז 3 x 120 מם פאַנס.
Ensure proper fan orientation for optimal airflow (intake at front/bottom, exhaust at rear/top).
6. אָפּערייטינג
Once all components are installed and cables are connected, replace the side panels. Connect your monitor, keyboard, mouse, and power cable. Press the power button on the front panel to start your system.
The pre-installed ARGB fans can be controlled via the integrated controller (if present) or through compatible motherboard software, allowing customization of lighting effects and fan speeds.
7. וישאַלט
רעגולערע אויפהאלטונג העלפט זיכער מאכן די בעסטע פאָרשטעלונג און לאַנגלעבעדיקייט פון אייערע פּיסי קאָמפּאָנענטן.
- שטויב רייניקונג: Periodically clean dust filters (top, front, bottom) to maintain good airflow. Use compressed air to remove dust from inside the case and components.
- עקסטעריאָר רייניקונג: ווישן די יקסטיריער סערפאַסיז מיט אַ ווייך, דamp שטאָף. פֿאַרמײַדט אַברייסיוו רייניגער אָדער סאָלווענטן.
- קאַבל פאַרוואַלטונג קאָנטראָל: Occasionally check cable routing to ensure no cables are obstructing fans or airflow.
8. טראָובלעשאָאָטינג
אויב איר טרעפט פּראָבלעמען, זעט די פאלגענדע געוויינטלעכע טראָובלעשווטינג טריט:
- סיסטעם צינדט זיך נישט אן:
- זיכער מאַכן אַז די PSU איז אנגעצינדן און ריכטיק פארבונדן צו דער וואַנט ווענטיל.
- Verify all power cables (24-pin ATX, 8-pin CPU, PCIe, SATA) are securely connected.
- Check front panel power switch connections to the motherboard.
- קיין אַרויסווייַזונג רעזולטאַט:
- Ensure the monitor cable is connected to the graphics card (not the motherboard I/O if using a dedicated GPU).
- לייג צוריק די גראַפיקס קאַרטל און ראַם מאָדולן.
- Fans not spinning or ARGB not working:
- Check fan power connections to the motherboard or fan controller.
- Verify ARGB connections to the controller or motherboard headers.
- Ensure any fan control software or BIOS settings are correctly configured.
For more complex issues, consult your component manuals or contact Xigmatek technical support.
9. ספּעסאַפאַקיישאַנז
| שטריך | דעטאַל |
|---|---|
| מאָדעל נאָמען | Aqua V AIR Arctic |
| מאָדעל נומער | EN45837 |
| טיפּ פון קאַסטן | מיטן טורעם |
| מאָטהערבאָאַרד קאַמפּאַטאַבילאַטי | אַטקס, מיקראָ אַטקס |
| מאַטעריאַל | Steel Alloy, Tempered Glass |
| קאָליר | ווייַס |
| פאַר-אינסטאַלירן פאַנס | 7 X 120 מם אַרגב פאַנס |
| מאַקסימום גפּו לענג | 410 מם |
| וסב פּאָרץ | 3 |
| וואָג | 8.8 קילאָגראַמס |
10. וואָראַנטי און שטיצן
Xigmatek products are manufactured to high quality standards. For warranty information, please refer to the warranty card included with your product or visit the official Xigmatek website. For technical support or inquiries, please contact Xigmatek customer service through their official channels.
באַאַמטער Webפּלאַץ: www.xigmatek.com


