הקדמה
This manual provides detailed instructions for the safe installation, operation, and maintenance of your UFESA CFNP Ceiling Fan with Light. Please read this manual thoroughly before installation and use, and keep it for future reference.
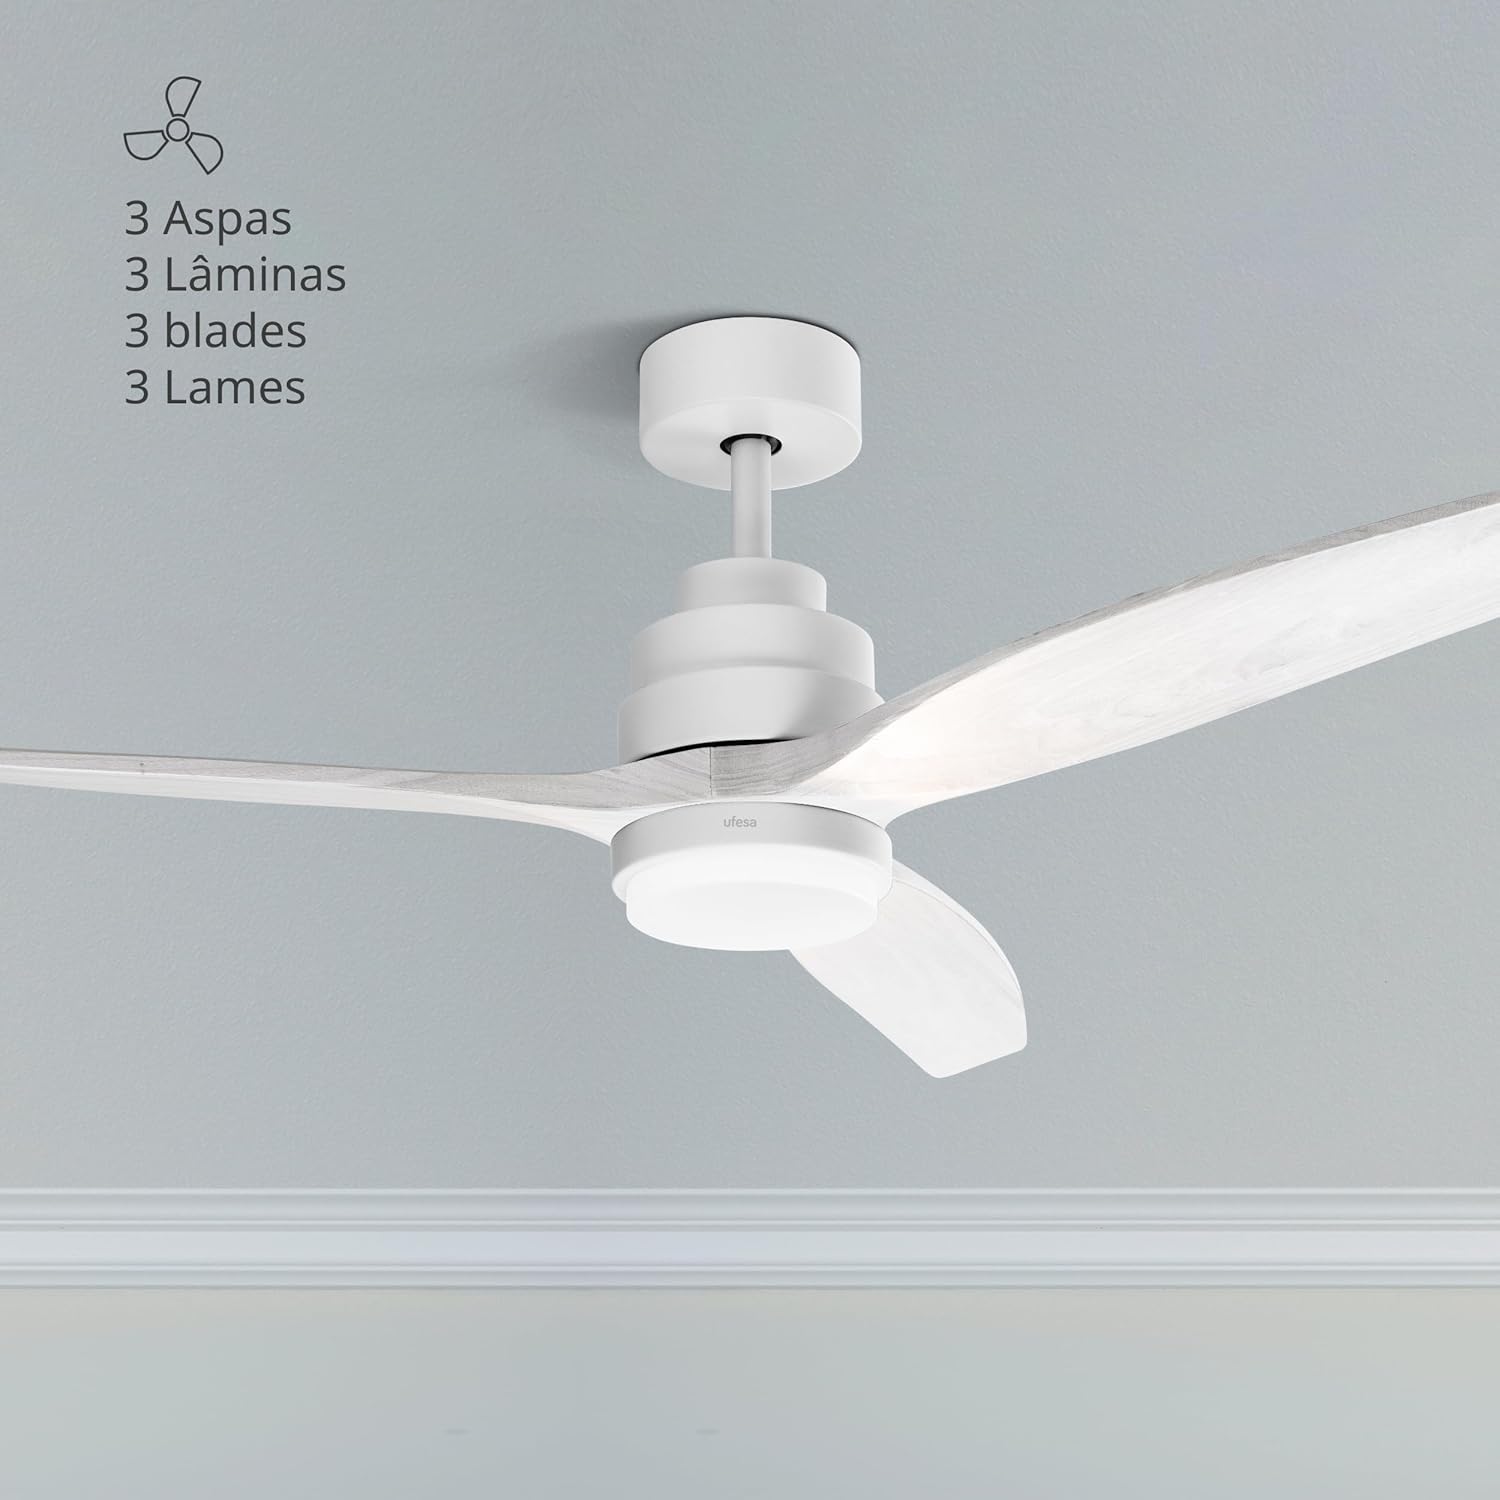
The UFESA CFNP Ceiling Fan with Light installed in a room, showcasing its three natural wood blades and integrated light.
זיכערקייַט אינסטרוקציעס
שטענדיק פֿאָלגן די גרונטלעכע זיכערהייט מיטלען ווען איר ניצט עלעקטרישע אַפּאַראַטן צו רעדוצירן דעם ריזיקאָ פֿון פֿײַער, עלעקטרישן קלאַפּ און פּערזענלעכע שאָדן.
אַלגעמיינע סאַפעטי
- Ensure the ceiling fan is installed by a qualified electrician in accordance with local electrical codes.
- Disconnect power at the main circuit breaker before installation, cleaning, or any maintenance.
- Do not operate the fan with damaged blades or housing. Inspect regularly for any signs of wear or damage.
- Keep hands, hair, and clothing away from moving fan blades during operation.
- דער אַפּפּליאַנסע איז נישט בדעה פֿאַר נוצן דורך מענטשן (אַרייַנגערעכנט קינדער) מיט רידוסט פיזיש, סענסערי אָדער גייַסטיק קייפּאַבילאַטיז, אָדער פעלן פון דערפאַרונג און וויסן, סייַדן זיי האָבן באקומען השגחה אָדער לימעד וועגן די נוצן פון דעם אַפּפּליאַנסע דורך אַ מענטש פאַראַנטוואָרטלעך פֿאַר זייער זיכערקייַט. .
- קינדער זאָל זיין סופּערווייזד צו ענשור אַז זיי טאָן ניט שפּילן מיט די אַפּפּליאַנסע.
עלעקטריקאַל סאַפעטי
- באַשטעטיקן אַז די Voltagזאָל די ע וואָס איז אָנגעגעבן אויפן ווענטילאַטאָר שטימען מיט אייער לאָקאַלער מאַכט צושטעל איידער איר קאַנעקט עס.
- אַלע וויירינג מוזן זיין אין לויט מיט נאַציאָנאַלע און לאָקאַלע עלעקטרישע קאָודן.
- פאַרזיכערן געהעריק גראַונדינג צו פאַרמייַדן עלעקטריש קלאַפּ.
- דו זאלסט נישט נוצן די פאָכער אין דamp or wet locations, or where it may be exposed to water.
פּעקל אינהאַלט
Carefully unpack all components and ensure all items are present and undamaged. If any parts are missing or damaged, contact Ufesa customer service.

A close-up of the fan's motor housing and a blade, representing the main components.
The package should typically include:
- 3 Natural Wood Blades
- מאָטאָר אַסעמבלי
- Downrod (typically 15cm and 25cm options)
- Mounting Bracket + Canopy
- Integrated LED Light Kit / Lampשאָטן
- קאָנטראָללער אַסעמבלי
- יאָך קאָווער
- ווייַט קאָנטראָל
- מאָנטירונג האַרדווער (שרויף, אַנקערס)
סעטאַפּ און ינסטאַלירונג
Important: Disconnect power at the circuit breaker before beginning any installation work.
שריט 1: אָנקלאַפּן די בראַקאַץ
Fix the fan's mounting bracket to the ceiling. Use a pencil to mark the drilling points. Ensure the bracket is securely fastened to a structural beam or a suitable ceiling electrical box capable of supporting the fan's weight.
שריט 2: בויער האָלעס
באָרט לעכער אין די אָנגעצייכנטע פונקטן מיט אַ פּאַסיקן בויער ביט פֿאַר אייער דאַך מאַטעריאַל.
שריט 3: אַרייַנלייגן אַנגקערז
Insert the provided ceiling anchors into the drilled holes. Tap gently with a hammer if necessary to ensure they are flush with the ceiling surface.
שריט 4: זיכערן קלאַמער
Align the mounting bracket with the anchors and secure it firmly with the provided screws. Ensure it is stable and does not wobble.
Step 5: Connect Light Wiring
Connect the light wires from the fan to the terminal block on the mounting bracket. Match colors (e.g., blue to blue, brown to brown, etc.) according to the wiring diagram in the full manual.
Step 6: Connect Controller Wiring
Connect the wiring from the light kit to the fan's controller. Ensure all connections are tight and secure.
Step 7: Assemble Fan Base
Assemble the fan base by attaching the chosen downrod (15cm or 25cm) to the motor assembly. Secure it with the provided pin and screw.
Step 8: Hang Fan Base
Carefully lift the assembled fan base and hang it onto the hook or support provided on the ceiling mounting bracket. This allows you to work on wiring with the fan temporarily supported.
Step 9: Connect Base Wiring to Controller
Connect the main power wiring from the ceiling to the fan's controller, and then connect the controller to the fan motor wiring. Ensure all connections are correct and secure.
Step 10: Position Controller and Cables
Carefully tuck the controller and all excess cables into the opening of the ceiling support bracket, ensuring no wires are pinched.
שריט 11: קאָננעקט ערד דראָט
Connect the ground wire (usually green/yellow) from the fan base to the ground terminal on the mounting bracket or ceiling wiring.
Step 12: Install Canopy
Slide the canopy up to the ceiling and secure it to the mounting bracket with the provided screws. Ensure it covers all wiring connections.
שריט 13: צוטשעפּען בליידז
Attach the three natural wood blades to the fan motor assembly using the provided screws. Ensure they are tightened evenly to prevent wobbling.
Step 14: Install Light Kit
Remove the small screws from the base of the fan's light housing. Place the LED light support, screw it into place, and then attach the light cover (lampshade) by twisting or securing it as per the design.
אַפּערייטינג ינסטראַקשאַנז
Your UFESA CFNP ceiling fan is controlled by the included remote control. Ensure batteries are installed correctly in the remote.

The remote control allows easy access to all fan and light functions.
מאַכט אויף / אַוועק
דרוק דעם מאַכט קנעפּל (⏻) on the remote control to turn the fan and light on or off.
פאָכער ספּיד קאָנטראָל
The fan offers 6 adjustable speeds. Use the numbered speed buttons (1-6) on the remote to select your desired airflow intensity. Speed 1 is the lowest, and Speed 6 is the highest.

The fan features 6 speeds and an 8-hour timer function.
ליכט קאָנטראָל
The integrated LED light has 3 selectable color temperatures: natural light, cold light, and warm light. Use the light button (💡) on the remote to cycle through these settings to create the desired ambiance.

The fan light offers natural, warm, and cold light options.
זומער / ווינטער פֿונקציע
This fan features a reversible motor for year-round comfort. Use the summer/winter button (⟳) on the remote to switch between modes.
- זומער מאָדע (אַראָפּגאַנג לופטפלוס): Blades rotate counter-clockwise, creating a downward breeze that cools the room.
- ווינטער מאָדע (אויפֿגייענדיקער לופֿטפֿלוס): Blades rotate clockwise, circulating warm air trapped near the ceiling downwards without creating a direct draft, helping to distribute heat more evenly.

Visual representation of the summer and winter airflow directions.
טייַמער פֿונקציע
Set the fan to automatically turn off after a specified period using the timer buttons (1H, 4H, 8H) on the remote control. This is useful for energy saving or for use during sleep.
וישאַלט
רעגולערע אויפהאלטונג גאראנטירט אפטימאלע פאָרשטעלונג און פארלענגערט די לעבנסדויער פון אייער סופיט ווענטילאַטאָר.
רייניקונג
- שטענדיק דיסקאַנעקט מאַכט איידער רייניקונג.
- Regularly clean the fan blades and motor housing with a soft, damp שטאָף. ניצט נישט קיין שרײַבנדיקע רייניגער, סאָלווענטן, אדער שטרענגע כעמיקאַלן, ווײַל די קענען שאַטן די ענדיקונג.
- Ensure the fan is completely dry before restoring power and operating.
בלייד ינספּעקטיאָן
- Periodically check that all blade screws are tight. Over time, they may loosen, causing the fan to wobble or create noise.
- Ensure blades are free from cracks or damage. Replace damaged blades immediately.
טראָובלעשאָאָטינג
אויב איר טרעפט פראבלעמען מיט אייער פען, זעט די פאלגנדע אלגעמיינע פראבלעמען און לייזונגען:
פאָכער טוט ניט אָנהייבן
- Check if the main power supply to the fan is connected and turned on.
- Ensure the circuit breaker for the fan is in the 'ON' position.
- Verify all electrical connections are secure and correctly wired.
- קאָנטראָלירט די באַטעריע פֿון דער ווײַטקאָנטראָל און פֿאַרבײַטט אויב נייטיק.
פאָכער וואָבבלעס
- Ensure all blade screws are tightened evenly. Loose screws can cause imbalance.
- Check that the mounting bracket is securely fastened to the ceiling and that the downrod is properly seated.
- Verify that the blades are not bent or damaged.
ליכט טוט נישט אַרבעטן
- Check the light wiring connections within the fan housing.
- Ensure the light kit is properly installed and connected to the fan's electrical system.
- If the light is LED and not replaceable by the user, a faulty LED module may require professional service.
ווייַט קאָנטראָל איז נישט ארבעטן
- פאַרבייַטן די באַטעריז אין די ווייַט קאָנטראָל מיט נייַע.
- Ensure there are no obstructions between the remote control and the fan's receiver.
- Confirm the remote control is paired with the fan (refer to specific pairing instructions if available in the full manual).
ספּעסאַפאַקיישאַנז

The fan has a diameter of 132 cm, suitable for various room sizes.
| שטריך | באַשרייַבונג |
|---|---|
| מאָדעל נומער | CFNP |
| מאַכט | 40 וו |
| ספּידז | 6 |
| בלייד מאַטעריאַל | נאַטירלעך האָלץ |
| פאָכער דיאַמעטער | 132 סענטימעטער |
| ליכט לעוועלס | 3 (Natural, Cold, Warm) |
| טיימער | אַרויף צו 8 שעה |
| ספּעציעלע פֿעיִקייטן | Ultra-silent DC motor, Summer/Winter function, Remote control |
| דימענסיעס (L X W X H) | 25.5 X 68.5 X 32.5 סענטימעטער |
| וואָג | 5.63 קג |
| מאַכט מקור | עלעקטריק קאַבלע |
| סערטיפיקאַטיאָנס | סע, UL |
וואָראַנטי און שטיצן
For detailed warranty information, including terms, conditions, and duration, please refer to the warranty card included with your product. You can also find this information on the official Ufesa webפּלאַץ.
For customer support, technical assistance, or to inquire about replacement parts, please visit the Ufesa website or contact their customer service department directly. Have your product model number (CFNP) and purchase date ready when contacting support.
Official Ufesa Webפּלאַץ: www.ufesa.es


