1. הקדמה
Thank you for choosing the Hoco QS2 Portable Smart Air Pump & Emergency Start-Up Power Bank. This device is a multi-functional tool designed to provide reliable assistance in various situations, including jump-starting vehicles, inflating tires, and charging electronic devices. Please read this manual thoroughly before use to ensure proper operation and to maximize the lifespan of your device.
2. זיכערקייַט פּריקאָשאַנז
Always observe the following safety guidelines to prevent injury or damage to the device and property.
- Do not expose the device to extreme temperatures, direct sunlight, or fire.
- האַלטן אויס פון דערגרייכן פון קינדער.
- נעמט נישט אויס, מאדיפיצירט נישט, אדער פרובירט נישט צו פאררעכטן דאס אפאראט אליין. קאנטאקטירט קוואליפיצירטע סערוויס פערסאנעל.
- Ensure proper ventilation during operation, especially when using the air pump or jump start function.
- ויסמיידן קורץ-סירקוטינג די רעזולטאַט טערמינאַלס.
- ניצט נישט דעם דזשאַמפּ סטאַרטער אויב די באַטאַרייע איז צעבראָכןampס אָדער קייבאַלז זענען דאַמידזשד.
- When jump-starting, ensure the vehicle's ignition is off and all accessories are unplugged.
- Do not over-inflate tires. Always refer to the recommended tire pressure for your vehicle.
- If the device becomes excessively hot during use, discontinue operation immediately.
3. פּעקל אינהאַלט
ביטע אָפּהאַקן דאָס קעסטל פֿאַר די פֿאָלגנדיקע זאַכן:
- 1 x Hoco QS2 8000 mAh Portable Smart Air Pump Emergency Start-Up Power Bank
- 1 x Jump Start Cables (Red and Black Clamps)
- 1 x Air Hose with Valve Connector
- Various Nozzle Adapters (e.g., for bicycles, balls)
- 1 רענטגענ וסב טיפּ- C טשאַרדזשינג קאַבלע

Figure 1: Hoco QS2 and its complete set of accessories.
4. פּראָדוקט קאַמפּאָונאַנץ
Familiarize yourself with the different parts of your Hoco QS2 device.
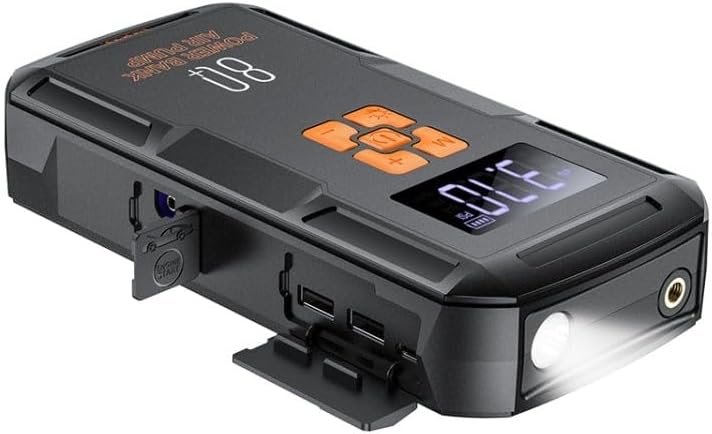
פיגורע 2: איבערview of the Hoco QS2 device.
- דיגיטאַל ווייַז: Shows current pressure, battery level, and selected mode.
- קאָנטראָל קנעפּלעך: Power, Mode selection, Increase/Decrease pressure.
- לופט שלאַנג פּאָרט: Connects the inflation hose.
- דזשאַמפּ סטאַרט פּאָרט: Connects the jump start cables.
- USB Output Ports (2x): For charging external devices (5V/2.4A).
- טיפּ-C אַרייַנשרייַב פּאָרט: For charging the Hoco QS2 itself (5V/2.4A).
- LED פלאַשליגהט: גיט באַלויכטונג.
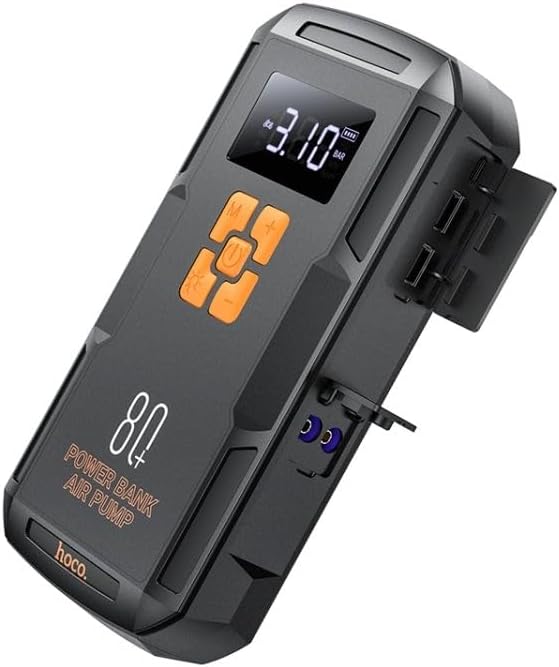
פיגורע 3: זייַט view of the Hoco QS2 with ports visible.
5. סעטאַפּ און טשאַרדזשינג
5.1 Charging the Hoco QS2
Before first use, fully charge the Hoco QS2. It is recommended to keep the device charged above 50% for optimal performance, especially for jump-starting.
- Connect the provided USB Type-C charging cable to the Type-C input port on the Hoco QS2.
- Connect the other end of the USB cable to a 5V/2.4A USB wall adapter (not included) or a compatible USB port.
- The digital display will indicate the charging status and battery level.
- טשאַרדזשינג צייט קען בייַטן דיפּענדינג אויף די מאַכט מקור.
6. אַפּערייטינג ינסטרוקטיאָנס
6.1 Jump Start Function
The Hoco QS2 can jump-start vehicles with up to 4.0L gasoline or 2.0L diesel engines.
- Ensure the Hoco QS2 is sufficiently charged (at least 75% battery recommended).
- אויסלעשן די איגנישאַן פונעם אויטאָ און אַלע עלעקטרישע אַקסעסאָריעס.
- פאַרבינדן די רויט (+) קלamp of the jump start cable to the positive (+) terminal of the vehicle's battery.
- פאַרבינדן די שוואַרץ (-) קלamp to the negative (-) terminal of the vehicle's battery or a solid, unpainted metal part of the engine block (ground point).
- Insert the blue connector of the jump start cable into the jump start port on the Hoco QS2.
- Once connected, the Hoco QS2 will automatically enter jump start mode.
- Start the vehicle's engine. If it doesn't start immediately, wait 30 seconds before trying again. Do not crank for more than 3 seconds per attempt.
- Once the vehicle starts, immediately disconnect the jump start cable from the Hoco QS2, then remove the black (-) clamp, נאכגעפאלגט דורך די רויטע (+) קלamp פון דער אויטאָ באַטאַרייע.
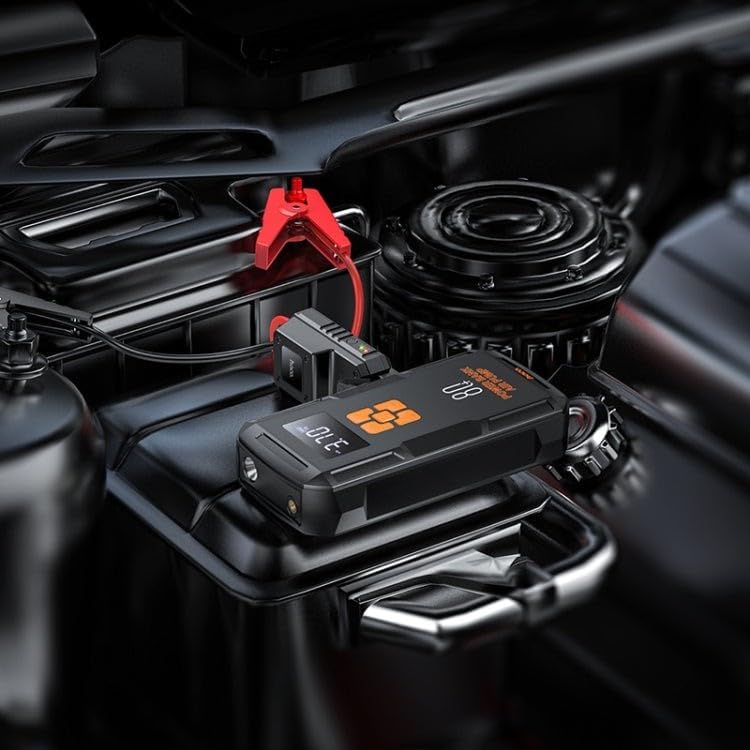
Figure 4: Using the Hoco QS2 for jump-starting a vehicle.
6.2 Tire Inflation Function (Air Pump)
The Hoco QS2 can inflate tires up to 10.3 bar (150 PSI) and features multiple inflation modes.
- Connect the air hose to the air hose port on the Hoco QS2.
- Attach the other end of the air hose to the tire valve. Ensure a secure connection to prevent air leakage. Use appropriate nozzle adapters for other inflatables (e.g., bicycle tires, sports balls).
- Press the Power button to turn on the device. The display will show the current tire pressure.
- Press the 'M' (Mode) button to cycle through the inflation modes: Car, Motorcycle, Bicycle, Basketball. Each mode has a default pressure setting, which can be adjusted.
- ניצט די '+' און '-' קנעפלעך צו שטעלן אייער געוואונטשענעם ציל דרוק.
- Press the Power button again to start inflation. The pump will automatically stop once the target pressure is reached.
- Disconnect the air hose from the tire valve and the device.

Figure 5: Inflating a car tire with the Hoco QS2.
6.3 פּאַוער באַנק פונקציע
The Hoco QS2 can charge your electronic devices via its dual USB output ports.
- Connect your device's USB charging cable to one of the USB output ports on the Hoco QS2.
- Connect the other end of the cable to your electronic device (e.g., smartphone, tablet).
- The Hoco QS2 will automatically begin charging your device.
- The digital display will show the remaining battery level of the power bank.
6.4 LED Flashlight Function
The integrated LED flashlight provides illumination for various situations.
- To turn on the flashlight, press and hold the 'Light' button (usually indicated by a light bulb icon).
- Press the 'Light' button again to cycle through different light modes (e.g., steady on, SOS signal, strobe).
- Press and hold the 'Light' button again to turn off the flashlight.
7. וישאַלט און סטאָרידזש
- רייניקט דעם אַפּאַראַט מיט אַ ווייכן, טרוקענעם שטאָף. ניצט נישט קיין שאַרפע כעמיקאַלן אָדער אַברייסיוו רייניגער.
- Store the Hoco QS2 in a cool, dry place, away from direct sunlight and moisture.
- For long-term storage, charge the device every 3-6 months to maintain battery health.
- Ensure all ports are covered when not in use to prevent dust and debris from entering.
8. טראָובלעשאָאָטינג
| פּראָבלעם | מעגלעך סיבה | לייזונג |
|---|---|---|
| די מיטל איז נישט קער אויף. | נידעריק באַטאַרייע. | טשאַרדזש די מיטל גאָר. |
| דאָס אויטאָ הייבט נישט אָן צו שפּרינגען. | Incorrect cable connection; Device battery too low; Vehicle battery severely discharged. | Ensure correct polarity (+ to +, - to -). Charge the Hoco QS2. Allow more time for the vehicle battery to receive a charge, or seek professional assistance if the battery is completely dead. |
| Air pump not inflating or inflating slowly. | Air hose not securely connected; Nozzle adapter not suitable; Device battery low. | Check all connections for leaks. Use the correct adapter. Charge the device. |
| USB טשאַרדזשינג אַרבעט נישט. | Device battery low; Cable faulty; Device not compatible. | Charge the Hoco QS2. Try a different USB cable. Ensure your device is compatible with 5V/2.4A charging. |
9. טעכניש ספּעסאַפאַקיישאַנז
| שטריך | באַשרייַבונג |
|---|---|
| מאָדעל נומער | קסקסנומקס |
| באַטאַרייע קאַפּאַציטעט | 8000 מאַה (29.6 ווה) |
| טיפּ-C אַרייַנשרייַב | 5V / 2.4A |
| USB Output 1/2 | 5V / 2.4A |
| גאַנץ וסב רעזולטאַט | 5V / 2.4A |
| שפרינג אָנהייב רעזולטאַט | 12V (for vehicle emergency start) |
| מאַקסימום לופט דרוק | 10.3 באַר / 150 PSI |
| דימענשאַנז | בעערעך 12 רענטגענ 10 רענטגענ 8 סענטימעטער |
| וואָג | בעערעך. 800 גראַמז |
| אַפּערייטינג טעמפּעראַטור | Refer to product packaging for specific range. |
10. וואָראַנטי און שטיצן
HOCO products are designed and manufactured to the highest quality standards. For warranty information and customer support, please refer to the warranty card included with your purchase or visit the official HOCO webזייטל. האַלט אייער קויף קוויטל ווי אַ באַווייַז פון קויפן פֿאַר קיין וואָראַנטי קליימז.


