הקדמה
Thank you for choosing the Mastech MS8233D Digital Multimeter. This manual provides essential information for the safe and effective operation, maintenance, and troubleshooting of your device. Please read this manual thoroughly before use and keep it for future reference.
זיכערקייַט אינפֿאָרמאַציע
ווארענונג: כדי צו פארמיידן עלעקטרישע שאק אדער פערזענליכע שאדן, ליינט און פארשטייט אלע זיכערהייט אינפארמאציע איידער איר ניצט דעם פראדוקט.
- שטענדיק זיכער מאַכן אַז דער מולטימעטער איז אין דער ריכטיקער פונקציע און קייט איידער איר מאַכט מעסטונגען.
- דו זאלסט נישט צולייגן מער ווי די רייטאַד וואָלtage, as marked on the meter, between terminals or between any terminal and earth ground. The MS8233D has a Safety Rating of CATII 600V.
- ניצן וואָרענען ווען ארבעטן מיט וואָלtagהעכער 30V AC RMS, 42V שפּיץ, אדער 60V DC. אזעלכע וואָלומעןtagדאָס איז אַ ריזיקירן פון קלאַפּ.
- האַלט אייערע פינגער הינטער די פּראָבע באַריערן בעת מעסטונגען.
- Do not use the meter if it is damaged or if the case is open. Inspect the meter and test leads before use.
- טוישט די באַטעריע גלייך ווען דער נידעריק באַטעריע אינדיקאַטאָר דערשיינט צו ענשור גענויע מעסטונגען.
- ניצט נישט דעם מעטער אין עקספּלאָזיווע גאַז, פארע, אדער שטויב סביבות.
שליסל פֿעיִקייטן
The Mastech MS8233D Digital Multimeter offers a range of functionalities for various electrical measurements:
- ווייַז: 2000 counts for precise readings.
- ראַנג: Auto and Manual Ranging capabilities.
- דיאָוד טעסט: Features a Diode Open VoltagE פון 1.5V.
- קאָנטינויטי טעסט: Audible buzzer for resistance less than 60Ω.
- דאַטן האַלטן: איינפֿרירט די אָנגעגעבענע לייענונג פֿאַר באַקוועמלעכקייט.
- אַוטאָ מאַכט אַוועק: שפּאָרט באַטאַריע לעבן.
- ניט-קאָנטאַקט VoltagE דיטעקשאַן (NCV): For identifying live wires without direct contact.
- מאַקסימום מעזשערמאַנט: Records the highest value measured.
- ווייַז באַקלייט: פֿאַר וויזאַביליטי אין נידעריק-ליכט טנאָים.
- נידעריק באַטעריע אַרויסווייַזונג: ווײַזט אָן ווען מען דאַרף אויסטוישן אַ באַטעריע.
- מאַכט צושטעלן: Operates on 1x 9V 6F22 Battery.
- סערטיפיקאַטיאָנס: RoHS געהאָרכיק.
- זיכערהייט רייטינג: CATII 600V.
פיגורע 1: פראָנט view of the Mastech MS8233D Digital Multimeter, highlighting the display, rotary function switch, and input terminals.
פּראָדוקט איבערview און קאַמפּאָונאַנץ
The MS8233D multimeter is designed for ease of use and durability. Familiarize yourself with its main parts:

פיגורע 2: איבערview of the MS8233D Digital Multimeter, illustrating its physical dimensions, power supply, and typical applications in domestic, industrial, and electronics settings.
- LCD ווייַז: ווײַזט מעסטונג לייענונגען, איינסן און פונקציע אינדיקאַטאָרן.
- פונקציע ראָטאַרי סוויטש: Used to select the desired measurement function (e.g., ACV, DCV, Resistance, Diode, Continuity, Temperature, NCV).
- אַרייַנשרייַב דזשאַקס: Terminals for connecting test leads.
- קאַם דזשאַק: Common (negative) input terminal for all measurements.
- VΩmA דזשעק: Positive אַרייַנשרייַב וואָקזאַל פֿאַר וואָלtage, resistance, diode, continuity, and small current measurements.
- 10A דזשעק: Positive input terminal for high current (up to 10A) measurements.
- פונקציע קנעפּלעך: For features like Data Hold, Backlight, and Range selection.
סעטאַפּ
ייַנמאָנטירונג פון באַטאַרייע
The MS8233D requires one 9V 6F22 battery for operation. To install or replace the battery:
- Ensure the multimeter is turned off and disconnect all test leads from the input terminals.
- געפינט דעם דעקל פונעם באַטעריע־אָפּטייל אויף דער הינטערשטער זייט פונעם מעטער.
- Use a screwdriver to loosen the screw(s) on the battery cover and remove the cover.
- Connect the new 9V battery to the battery clips, observing the correct polarity.
- לייגט אריין די באַטעריע אין דעם קאָמפּאַרטמענט און לייגט צוריק דעם דעקל, באַזיגנדיק עס מיט די שרויף(ן).
באַמערקונג: The meter includes a low battery indicator. Replace the battery promptly when this indicator appears to maintain measurement accuracy.
אַפּערייטינג ינסטראַקשאַנז
Before making any measurement, ensure the test leads are properly connected and the function switch is set to the desired range.
מעאַסורינג דק וואָלtagE (DCV)
- שטעקט אריין דעם רויטן טעסט דראָט אין דעם VΩmA דזשעק און דעם שוואַרצן טעסט דראָט אין דעם COM דזשעק.
- Set the rotary switch to the desired DCV range (e.g., 200mV, 2V, 20V, 200V, 600V). If unsure, start with the highest range or use auto-ranging if available.
- פֿאַרבינדט די טעסט פּראָובס אַריבער דעם קאָמפּאָנענט אָדער קרייַז וואָס דאַרף געמעסטן ווערן, באַאָבאַכטנדיק די פּאָלאַריטעט.
- לייענען דעם חלקtagE ווערט אויף די לקד אַרויסווייַזן.
מעאַסורינג אַק וואָלtage (ACV)
- שטעקט אריין דעם רויטן טעסט דראָט אין דעם VΩmA דזשעק און דעם שוואַרצן טעסט דראָט אין דעם COM דזשעק.
- Set the rotary switch to the desired ACV range (e.g., 2V, 20V, 200V, 600V).
- פֿאַרבינדט די טעסט פּראָובס אַריבער דעם קאָמפּאָנענט אָדער קרייַז וואָס דאַרף געמעסטן ווערן.
- לייענען דעם חלקtagE ווערט אויף די לקד אַרויסווייַזן.
Measuring DC/AC Current (DCA/ACA)
CAUTION: Never connect the meter in parallel to a voltagדי מקור ביים מעסטן שטראָם. דאָס קען שאַטן דעם מעטער און דעם קרייַז.
- For currents up to 200mA, insert the red test lead into the VΩmA jack. For currents up to 10A, insert the red test lead into the 10A jack. Insert the black test lead into the COM jack.
- Set the rotary switch to the desired DC or AC current range (e.g., 200µA, 2000µA, 20mA, 200mA, 10A).
- עפֿנט דעם קרייז וואו מען וויל מעסטן דעם קראַנט און פֿאַרבינדט דעם מעטער אין סעריע מיטן לאַסט.
- לייענען די קראַנט ווערט אויף די לקד אַרויסווייַזן.
Measuring Resistance (Ω)
- שטעקט אריין דעם רויטן טעסט דראָט אין דעם VΩmA דזשעק און דעם שוואַרצן טעסט דראָט אין דעם COM דזשעק.
- Set the rotary switch to the desired Resistance range (e.g., 200Ω, 2kΩ, 20kΩ, 200kΩ, 2MΩ, 20MΩ).
- זיכער מאַכן אַז די קרייַז אָדער קאָמפּאָנענט איז דעענערדזשייזד איידער איר מעסט די קעגנשטעל.
- פֿאַרבינדט די טעסט פּראָובז אַריבער דעם קאָמפּאָנענט.
- לייענט דעם ווערט פון דעם קעגנשטעל אויפן LCD דיספּלעי.
דייאָוד טעסט
- שטעקט אריין דעם רויטן טעסט דראָט אין דעם VΩmA דזשעק און דעם שוואַרצן טעסט דראָט אין דעם COM דזשעק.
- Set the rotary switch to the Diode symbol (usually shared with Continuity).
- פֿאַרבינדט די רויטע פּראָבע צו דער אַנאָדע און די שוואַרצע פּראָבע צו דער קאַטאָדע פֿון דער דיאָד.
- דער דיספּלעי וועט ווײַזן דעם פֿאָרווערטס באַנדtagע טראָפּן. דרייט איבער די פּראָבעס; דער דיספּליי זאָל ווייַזן 'OL' (אָפֿן שלייף) פֿאַר אַ גוטע דיאָד.
קאָנטינויטי טעסט
- שטעקט אריין דעם רויטן טעסט דראָט אין דעם VΩmA דזשעק און דעם שוואַרצן טעסט דראָט אין דעם COM דזשעק.
- Set the rotary switch to the Continuity symbol (usually shared with Diode).
- פֿאַרבינדט די טעסט פּראָובז אַריבער דעם קרייַז אָדער קאָמפּאָנענט.
- If the resistance is below approximately 60Ω, the buzzer will sound, indicating continuity. The display will also show the resistance value.
נאַן-קאָנטאַקט חלקtagE (NCV) דעטעקשאַן
- Set the rotary switch to the NCV function.
- Move the top part of the meter (NCV sensor area) close to the conductor suspected of having AC voltage.
- דער מעטער וועט ארויסגעבן אן הערבארן ביפּ און דער NCV אינדיקאַטאָר וועט זיך אָנצינדן אויב AC באַנדtage איז דיטעקטאַד.
דאַטאַ האָלד פונקטיאָן
Press the 'HOLD' button to freeze the current reading on the display. Press it again to release the hold and resume live measurements.
באַקלייט פונקציע
Press the 'LIGHT' button to turn on the display backlight. Press it again to turn it off. The backlight may automatically turn off after a short period to conserve battery.
וישאַלט
רייניקונג
ווישט אויס דעם מעטער'ס קעסטל מיט אדווערטייזמענטamp א טוך און א מילדן דיטערדזשענט. ניצט נישט קיין שווארצע אדער סאָלווענטן. זיכערט זיך אז דער מעטער איז אינגאנצן טרוקן פארן ניצן.
באַטערי פאַרבייַט
Refer to the 'Battery Installation' section under 'Setup' for instructions on replacing the 9V battery. Always replace the battery when the low battery indicator is displayed to ensure accurate readings and proper operation.
Fuse Replacement
The MS8233D is equipped with internal fuses to protect against overcurrent. If the current measurement function stops working, the fuse may need replacement. Fuse replacement should only be performed by qualified personnel. Use only fuses of the specified type and rating (e.g., F200mA/250V for mA range, F10A/250V for 10A range).
טראָובלעשאָאָטינג
| פּראָבלעם | מעגלעך סיבה | לייזונג |
|---|---|---|
| קיין דיספּלעי אָדער טונקעל דיספּלעי | טויט אָדער נידעריק באַטאַרייע | פאַרבייַטן די 9 וו באַטאַרייע. |
| פאַלש רידינגז | Incorrect function/range selected; poor test lead connection; low battery | Verify function and range; check test lead connections; replace battery. |
| קראַנט מעסטונג אַרבעט נישט | בלאָון קאָריק | Replace the appropriate fuse (refer to Maintenance section). |
| 'OL' (Overload) displayed | Measurement exceeds selected range; open circuit (for continuity/resistance) | Select a higher range; check for open circuit. |
| קיין קאנטינעויטעט ביפּ | Resistance too high; open circuit | Check for continuity; ensure resistance is below 60Ω. |
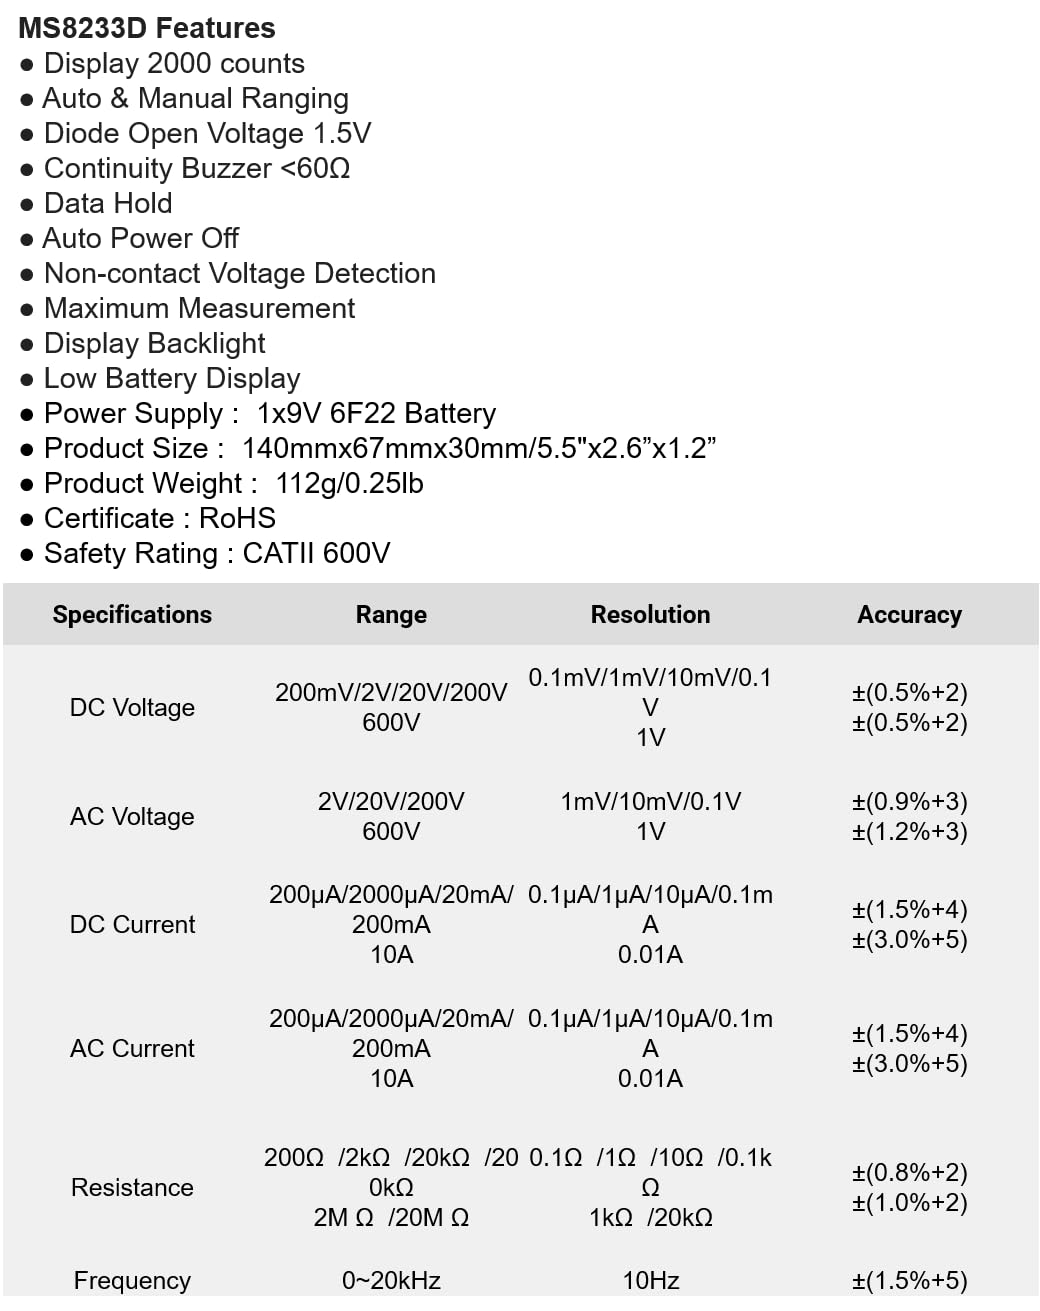
ספּעסאַפאַקיישאַנז
The following table details the measurement ranges, resolutions, and accuracies for the Mastech MS8233D Digital Multimeter:

Figure 3: Comprehensive specifications for the MS8233D, outlining measurement capabilities and precision.
| שטריך | באַשרייַבונג |
|---|---|
| ווייַז | 2000 קאַונץ |
| DC Voltage | 200 וו / 2 וו / 20 וו / 200 וו / 600 וו |
| AC Voltage | 2 וו / 20 וו / 200 וו / 600 וו |
| DC Current | 200µA / 2000µA / 20mA / 200mA / 10A |
| AC קראַנט | 200µA / 2000µA / 20mA / 200mA / 10A |
| קעגנשטעל | 200Ω / 2קΩ / 20kΩ / 200kΩ / 2MΩ / 20mΩ |
| אָפטקייַט | 0-20כז |
| Diode Open Voltage | 1.5V |
| העמשעכדיקייט באַזער | <60Ω |
| מאַכט צושטעלן | 1x 9V 6F22 Battery |
| פּראָדוקט דימענשאַנז | 140 מם רענטגענ 67 מם רענטגענ 30 מם (5.5 "רענטגענ 2.6" רענטגענ 1.2") |
| פּראָדוקט וואָג | 112 ג (0.25 לב) |
| זיכערקייַט רייטינג | CATII 600V |
| סערטיפיקאַטיאָנס | CE, RoHS |
וואָראַנטי און שטיצן
For warranty information and technical support, please refer to the documentation provided with your purchase or contact the seller/manufacturer directly. Keep your purchase receipt as proof of purchase for any warranty claims.


