1. הקדמה
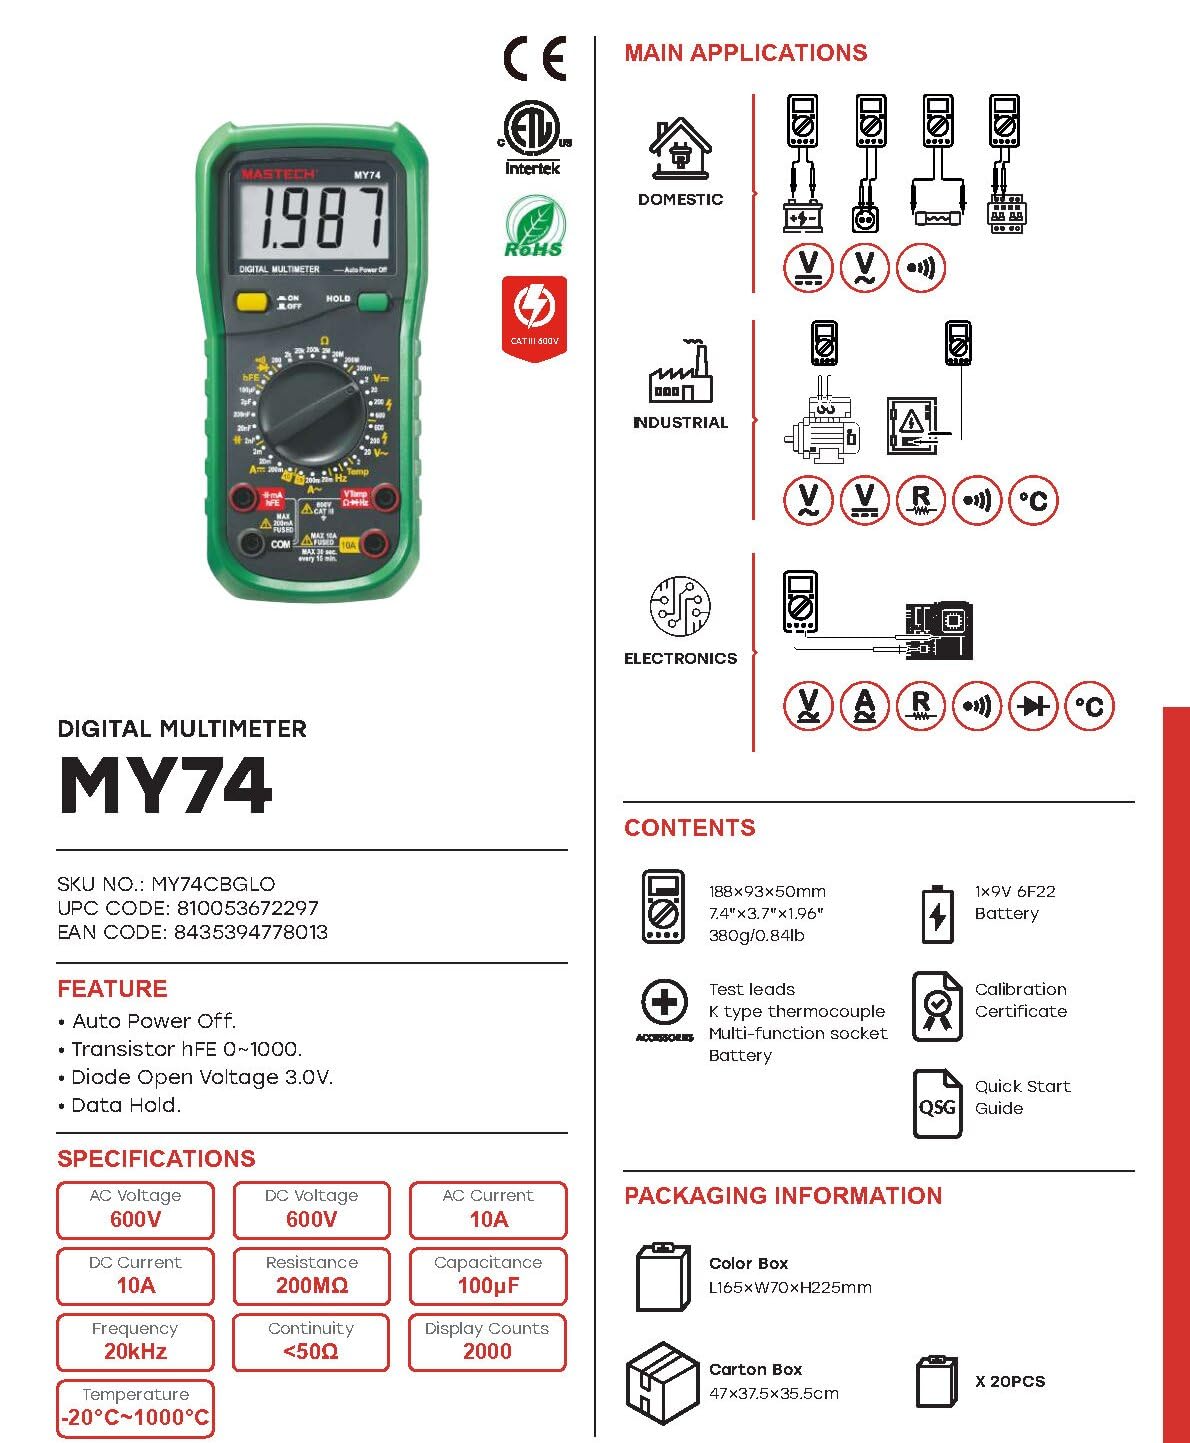
This manual provides detailed instructions for the safe and effective operation of your MASTECH MY74 Digital Multimeter. Please read this manual thoroughly before using the device and retain it for future reference. The MY74 is a compact, handheld digital multimeter designed for measuring AC/DC voltage, AC/DC current, resistance, capacitance, frequency, temperature, diode, continuity, and transistor hFE.
2. זיכערקייַט אינפֿאָרמאַציע
ווארענונג: כדי צו פארמיידן עלעקטרישע שאק אדער פערזענליכע שאדן, ליינט און פארשטייט אלע זיכערהייט אינפארמאציע איידער איר ניצט דעם מולטימעטער.
- Always ensure the multimeter is in good working condition and free from damage.
- דו זאלסט נישט צולייגן מער ווי די רייטאַד וואָלtagE, ווי אנגעצייכנט אויף די מעטער, צווישן די טערמינאַלס אָדער צווישן קיין וואָקזאַל און ערד ערד.
- ניצן וואָרענען ווען ארבעטן מיט וואָלtagהעכער 30V AC RMS, 42V שפּיץ, אדער 60V DC. די וואַליומעןtagדאָס איז אַ ריזיקירן פון קלאַפּ.
- שטענדיק אָפּשטעקן די טעסט דראָטן פֿון דער קרייַז איידער איר ענדערן פֿונקציעס.
- ניצט נישט דעם מעטער אויב די באַטעריע דעקל איז נישט ריכטיק פֿאַרמאַכט.
- פאַרבייַטן די באַטאַרייע ווי באַלד ווי די נידעריק באַטאַרייע גראדן אויס.
- Adhere to the measurement category (CAT III 600V) for safe operation.
3. פּראָדוקט איבערview
The MASTECH MY74 Digital Multimeter features a clear display, a rotary function switch, and input jacks for test leads. Familiarize yourself with the components shown below.

די הויפּט קאַמפּאָונאַנץ אַרייַננעמען:
- LCD ווייַז: ווײַזט מעסטונג לייענונגען, איינסן און פונקציע אינדיקאַטאָרן.
- ראָטאַרי פונקציע סוויטש: אויסקלייבט די געוואונטשענע מעסטונג פונקציע.
- ON/OFF קנעפּל: מאַכט אָן אָדער אויס דעם אַפּאַראַט.
- האַלטן קנעפּל: איינפֿרירט די איצטיקע אַרויסווײַזונג.
- אַרייַנשרייַב דזשאַקס:
- COM: פּראָסט וואָקזאַל פֿאַר אַלע מעזשערמאַנץ.
- VΩHz: אַרייַנשרייַב פֿאַר וואָלtagע, קעגנשטעל, פרעקווענץ, קאַפּאַסיטאַנס, דיאָד, און קאָנטינויִטעט מעסטונגען.
- mAµA: אינפוט פאר מיליampערע און מיקראָampערע קראַנט מעסטונגען.
- 10א: Input for 10 Ampערע קראַנט מעסטונגען.
4. פֿעיִקייטן
The MASTECH MY74 Digital Multimeter offers the following key features:
- ווייַז: 2000 קאַונץ
- אַוטאָ פּאָווער אויסגעלאשן פֿונקציע
- Transistor hFE measurement (0~1000)
- Diode Open Voltage: 3.0 וו
- Continuity Buzzer: Activates below 50Ω
- דאַטאַ האָלד פֿונקציע
- Low Battery Display indicator
5. סעטאַפּ
5.1 באַטאַרייע ייַנמאָנטירונג
The MASTECH MY74 requires 2 LR44 batteries (included). To install or replace batteries:
- זיכער מאַכן אַז דער מולטימעטער איז אויסגעלאָשן און אָפּשטעקן אַלע טעסט דראָטן.
- געפינט די באַטעריע אָפּטייל אויף דער צוריקזייט פון דעם מעטער.
- ונסקרעוו די דעקן פון די באַטאַרייע אָפּטייל.
- Insert the batteries, observing correct polarity (+ and -).
- פאַרבייַטן די דעקן פון די באַטאַרייע אָפּטייל און באַוואָרענען עס מיט די שרויף.
5.2 פֿאַרבינדן טעסט דראָטן
Always connect the black test lead to the COM jack. Connect the red test lead to the appropriate input jack based on the measurement function:
- VΩHz: פֿאַר וואָלtage, resistance, frequency, capacitance, diode, and continuity.
- mAµA: פֿאַר קראַנט מעסטונגען ביז 200mA.
- 10א: פֿאַר קראַנט מעסטונגען ביז 10A.
6. אַפּערייטינג ינסטרוקטיאָנס
Before taking any measurement, ensure the test leads are correctly connected and the rotary switch is set to the desired function.
6.1 דק חלקtage Measurement (V–)
- Connect the red test lead to the VΩHz jack and the black test lead to the COM jack.
- שטעלט דעם ראָטאַרי סוויטש צו דער געוואונטשער DC וואָלומעןtage range (e.g., 200mV, 2V, 20V, 200V, 600V).
- פֿאַרבינדט די טעסט־לידער פּאַראַלעל צום קרייז אָדער קאָמפּאָנענט וואָס ווערט געטעסט.
- לייענען דעם חלקtagE ווערט אויף די אַרויסווייַזן.
6.2 אַק בtage Measurement (V∼)
- Connect the red test lead to the VΩHz jack and the black test lead to the COM jack.
- שטעלט דעם ראָטאַרי סוויטש צו דער געוואונטשער AC וואָלומעןtage range (e.g., 2V, 20V, 200V, 750V).
- Connect the test leads in parallel to the AC circuit or component.
- לייענען דעם חלקtagE ווערט אויף די אַרויסווייַזן.
6.3 DC Current Measurement (A–)
CAUTION: Never connect the multimeter in parallel to a voltagדי מקור ביים מעסט שטראָם. דאָס קען אויפרייסן די פיוז אָדער באַשעדיגן דעם מעטער.
- פאַרבינדן די שוואַרץ פּרובירן פירן צו די קאַם דזשאַק.
- For currents up to 200mA, connect the red test lead to the mAµA jack. For currents up to 10A, connect the red test lead to the 10A jack.
- Set the rotary switch to the appropriate DC Current range (e.g., 2mA, 20mA, 200mA, 10A).
- Open the circuit and connect the multimeter in series with the load.
- לייענט דעם איצטיקן ווערט אויפן דיספלעי.
6.4 AC Current Measurement (A∼)
CAUTION: Never connect the multimeter in parallel to a voltagדי מקור ביים מעסט שטראָם. דאָס קען אויפרייסן די פיוז אָדער באַשעדיגן דעם מעטער.
- פאַרבינדן די שוואַרץ פּרובירן פירן צו די קאַם דזשאַק.
- For currents up to 200mA, connect the red test lead to the mAµA jack. For currents up to 10A, connect the red test lead to the 10A jack.
- Set the rotary switch to the appropriate AC Current range (e.g., 2mA, 20mA, 200mA, 10A).
- Open the circuit and connect the multimeter in series with the load.
- לייענט דעם איצטיקן ווערט אויפן דיספלעי.
6.5 קעגנשטעל מעסטונג (Ω)
CAUTION: Ensure the circuit is de-energized and all capacitors are discharged before measuring resistance.
- Connect the red test lead to the VΩHz jack and the black test lead to the COM jack.
- Set the rotary switch to the desired Resistance range (e.g., 200Ω, 2kΩ, 20kΩ, 200kΩ, 2MΩ, 200MΩ).
- פֿאַרבינדט די טעסט־לידער אַריבער דעם קאָמפּאָנענט וואָס מע דאַרף מעסטן.
- לייענען די קעגנשטעל ווערט אויף די אַרויסווייַזן.
6.6 דיאָד טעסט (→|–)
- Connect the red test lead to the VΩHz jack and the black test lead to the COM jack.
- Set the rotary switch to the Diode Test position.
- פֿאַרבינדט דעם רויטן טעסט־דראָט צו דער אַנאָדע און דעם שוואַרצן טעסט־דראָט צו דער קאַטאָדע פֿון דער דיאָד.
- דער דיספּלעי וועט ווײַזן דעם פֿאָרווערטס באַנדtage drop. Reverse the leads; the display should show "OL" (Open Loop) for a good diode.
6.7 Continuity Test (♫)
- Connect the red test lead to the VΩHz jack and the black test lead to the COM jack.
- Set the rotary switch to the Continuity Test position.
- פֿאַרבינדט די טעסט־לידער אַריבער דעם קרייַז אָדער קאָמפּאָנענט.
- If the resistance is less than approximately 50Ω, the buzzer will sound, indicating continuity.
6.8 טראַנזיסטאָר hFE טעסט
- שטעלן די דריי - באַשטימען צו די hFE שטעלע.
- Insert the transistor's Emitter, Base, and Collector leads into the corresponding holes in the multi-function socket (NPN or PNP).
- לייענט דעם hFE ווערט אויפן דיספלעי.
6.9 Capacitance Measurement (F)
CAUTION: Ensure the capacitor is fully discharged before measuring capacitance to avoid damage to the meter.
- Connect the red test lead to the VΩHz jack and the black test lead to the COM jack.
- Set the rotary switch to the Capacitance range (e.g., 2nF, 20nF, 200nF, 2µF, 20µF, 100µF).
- פֿאַרבינדט די טעסט־לידער אַריבער דעם קאַפּאַסיטאָר.
- לייענען די קאַפּאַסאַטאַנס ווערט אויף די אַרויסווייַזן.
6.10 פרעקווענץ מעסטונג (הרץ)
- Connect the red test lead to the VΩHz jack and the black test lead to the COM jack.
- Set the rotary switch to the Frequency range (20kHz).
- פֿאַרבינדט די טעסט־לידער פּאַראַלעל צום סיגנאַל־מקור.
- לייענט די פרעקווענץ ווערט אויפן דיספלעי.
6.11 Temperature Measurement (°C/°F)
- Connect the K-type thermocouple to the VΩHz and COM jacks, observing polarity.
- Set the rotary switch to the Temperature range.
- Place the thermocouple probe at the point where temperature is to be measured.
- לייענט די טעמפּעראַטור ווערט אויף דעם עקראַן.
7. וישאַלט
7.1 רייניקונג
ווישן די פאַל מיט אַדamp שטאָף און מילדן וואַשפּולווער. ניצט נישט קיין שוואַרצע מאַטעריאַלן אָדער סאָלווענטן. מאַכט זיכער אַז דער מעטער איז גאָר טרוקן איידער נוצן.
7.2 באַטערי פאַרבייַט
Refer to section 5.1 for battery replacement instructions. Replace batteries promptly when the low battery indicator appears to ensure accurate readings.
7.3 קאָריק פאַרבייַט
אויב די קראַנט מעסטונג פונקציע פיילז, קען די פיוז דאַרפֿן צו זיין ריפּלייסט. זעט די ספּעסיפיקאַציעס פֿאַר די ריכטיקע פיוז טיפּ און שאַץ. פיוז ריפּלייסמאַנט זאָל נאָר דורכגעפירט ווערן דורך קוואַליפֿיצירטע פּערסאָנעל.
8. טראָובלעשאָאָטינג
| פּראָבלעם | מעגלעך סיבה | לייזונג |
|---|---|---|
| דער מעטער גייט נישט אן. | טויטע אדער נישט ריכטיק אינסטאלירטע באַטעריעס. | קאָנטראָלירט די פּאָלאַריטעט פון די באַטעריע אָדער פאַרבייט די באַטעריעס. |
| "OL" (איבערלאָד) ווערט געוויזן. | Measurement exceeds selected range or open circuit. | Select a higher range or check for open circuit. |
| Incorrect current reading. | Blown fuse or incorrect input jack. | Check fuse and ensure test lead is in the correct current input jack (mAµA or 10A). |
| קיין קאנטינעויטעט ביפּ. | Resistance is too high or circuit is open. | Check the circuit for breaks. Ensure resistance is below 50Ω. |
9. ספּעסאַפאַקיישאַנז
The following table details the technical specifications for the MASTECH MY74 Digital Multimeter.

| פֿונקציע | קייט | האַכלאָטע | אַקיעראַסי |
|---|---|---|---|
| DC Voltage | 200mV/2V/20V/200V | 0.1מוו/1מוו/10מוו/0.1וו | ±(0.5%+2) |
| 600V | 1V | ±(0.8%+2) | |
| AC Voltage | 2V/20V/200V | 1mV/10mV/100mV | ±(0.8%+3) |
| 750V | 1V | ±(1.2%+3) | |
| DC Current | 2מאַ | 1 µA | ±(0.8%+1) |
| 20מאַ | 10 µA | ±(1.5%+1) | |
| 200מאַ | 0.1מאַ | ±(1.5%+1) | |
| 10 א | 10מאַ | ±(2.0%+5) | |
| AC קראַנט | 20מאַ | 10 µA | ±(1.0%+5) |
| 200מאַ | 0.1מאַ | ±(1.8%+5) | |
| 10 א | 0.01 א | ±(3.0%+7) | |
| קעגנשטעל | 200Ω | 0.1Ω | ±(0.8%+3) |
| 2kΩ/20kΩ/200kΩ/2MΩ | 1Ω/10Ω/100Ω/1kΩ | ±(0.8%+2) | |
| 20MΩ | 10kΩ | ±(1.0%+2) | |
| 200MΩ | 0.1MΩ | ±(6.0%+10) | |
| Diode Open Voltage | 3.0V | N/A | N/A |
| קאַפּאַסיטאַנס | 2nF/20nF/200nF/2µF | 1pF/10pF/0.1nF/1nF | ±(4.0%+3) |
| 20 µF | קסנומקסנף | ±(5.0%+3) | |
| 100 µF | 0.1 µF | ±(6.0%+10) | |
| אָפטקייַט | 20KHz | 0.01KHz | ±(2.0%+5) |
| טעמפּעראַטור | -20°C~0°C | 1°C | ±(5.0%+4) |
| 1°C~400°C | 1°C | ±(2.0%+3) | |
| 401°C~1000°C | 1°C | ±(2.0%+5) | |
| טראַנסיסטאָר הפע | 0~1000 | N/A | N/A |
| ווייַז | 2000 קאַונץ | ||
| אַוטאָ מאַכט אויסגעלאשן | יא | ||
| העמשעכדיקייט באַזער | <50Ω | ||
| Data Hold | יא | ||
| נידעריק באַטערי ווייַז | יא | ||
| מאַכט מקור | 2 LR44 באַטעריז (אַרייַנגערעכנט) | ||
| פּראָדוקט דימענשאַנז | 16 X 9 X 5 סענטימעטער | ||
| פּונקט וואָג | 0.5 קילאָגראַמס | ||
| זיכערקייַט רייטינג | CAT III 600V, CE, RoHS | ||
Note: Accuracy specifications are given for one year after calibration, at 18°C to 28°C (64°F to 82°F), with relative humidity up to 75%.
10. וואָראַנטי און שטיצן
MASTECH products are designed for reliability and performance. For warranty information and technical support, please refer to the documentation included with your purchase or visit the official MASTECH website. The EU Spare Part Availability Duration is 1 year.