1. הקדמה
This manual provides instructions for the safe operation, maintenance, and troubleshooting of your FLEX 24V Brushless Cordless 1/2-Inch Hammer Drill Turbo Mode Kit, model FX1271T-2B. Please read this manual thoroughly before using the tool to ensure proper and safe operation.
The FLEX FX1271T-2B is a powerful 24V brushless cordless hammer drill designed for demanding drilling and driving applications. It features a 1/2-inch full-metal ratcheting chuck, two-speed settings, a Turbo Mode for increased speed, and an anti-kickback safety feature. This kit includes the drill, a 2.5Ah Lithium-Ion Battery, a 5.0Ah Lithium-Ion Battery, and a 160W Fast Charger.
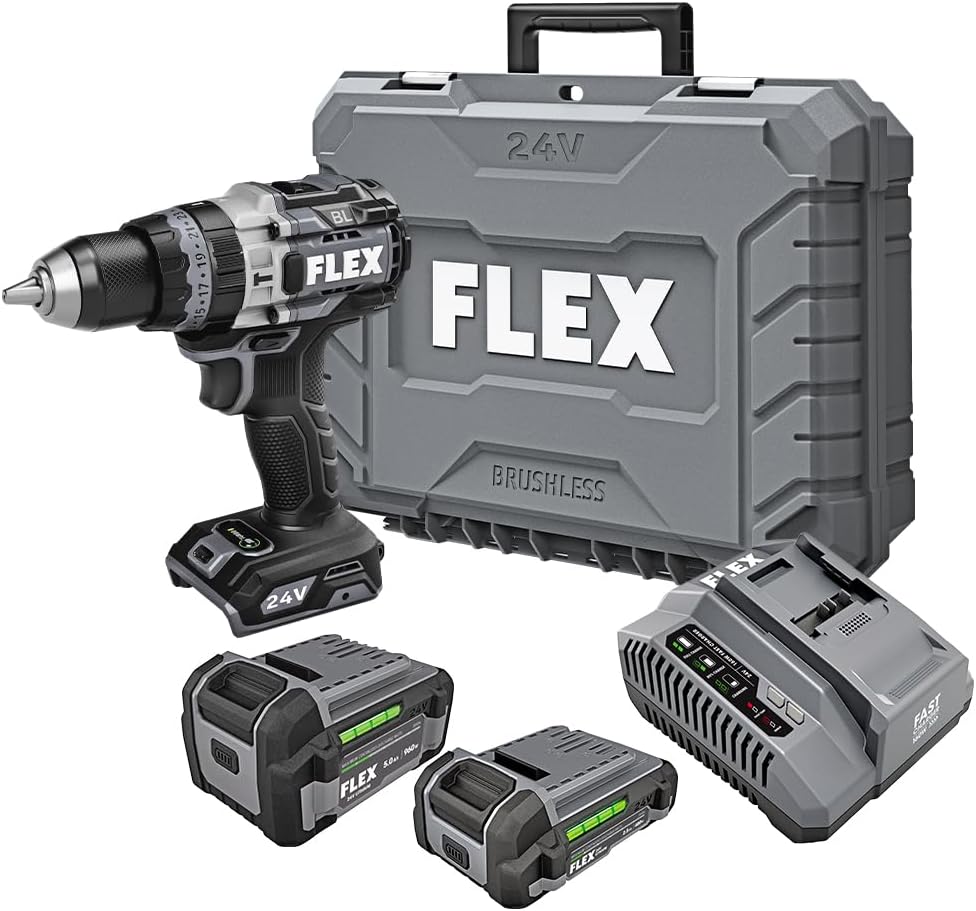
Figure 1: FLEX 24V Brushless Cordless 1/2-Inch Hammer Drill Kit (FX1271T-2B) including drill, two batteries, charger, and carrying case.
2. אַלגעמיינע זיכערקייַט אינסטרוקציעס
ווארענונג: לייענען אַלע זיכערקייַט וואָרנינגז, ינסטראַקשאַנז, אילוסטראציעס און ספּעסאַפאַקיישאַנז צוגעשטעלט מיט דעם מאַכט געצייַג. דורכפאַל צו נאָכפאָלגן אַלע אינסטרוקציעס ליסטעד אונטן קען רעזולטאַט אין עלעקטריש קלאַפּ, פייַער און / אָדער ערנסט שאָדן.
2.1 אַרבעט שטח זיכערקייַט
- האַלטן די אַרבעט געגנט ריין און געזונט ליט. קלאַטערד אָדער טונקל געביטן פאַרבעטן אַקסאַדאַנץ.
- דו זאלסט נישט אַרבעטן מאַכט מכשירים אין יקספּלאָוסיוו אַטמאָספערעס, אַזאַ ווי אין דעם בייַזייַן פון ברענעוודיק ליקווידס, גאַסאַז אָדער שטויב. מאַכט מכשירים מאַכן ספּאַרקס וואָס קען אָנצינדן די שטויב אָדער פיומז.
- האַלטן קינדער און בייסטאַנדערז אַוועק בשעת אַפּערייטינג אַ מאַכט געצייַג. דיסטראַקשאַנז קענען אָנמאַכן איר צו פאַרלירן קאָנטראָל.
2.2 עלעקטריקאַל זיכערקייַט
- מאַכט געצייַג פּלאַגז מוזן גלייַכן די ווענטיל. קיינמאָל מאָדיפיצירן די צאַפּן אין קיין וועג. דו זאלסט נישט נוצן קיין אַדאַפּטער פּלאַגז מיט ערד (גראָונדעד) מאַכט מכשירים. ונמאָדיפיעד פּלאַגז און וואָס ריכטן אַוטלעץ וועט רעדוצירן די ריזיקירן פון עלעקטריש קלאַפּ.
- ויסמיידן גוף קאָנטאַקט מיט ערד אָדער גראָונדעד סערפאַסיז, אַזאַ ווי פּייפּס, ראַדיאַטאָרס, ריינדזשאַז און ריפרידזשערייטערז. עס איז אַ געוואקסן ריזיקירן פון עלעקטריק קלאַפּ אויב דיין גוף איז ערד אָדער גראָונדעד.
- דו זאלסט נישט ויסשטעלן מאַכט מכשירים צו רעגן אָדער נאַס טנאָים. וואַסער קומט אין אַ מאַכט געצייַג וועט פאַרגרעסערן די ריזיקירן פון עלעקטריש קלאַפּ.
2.3 פערזענלעכע זיכערקייַט
- טראָגט שטענדיק אויג שוץ. ניצט זיכערהייט ברילן, ברילן, אדער אַ פּנים שילד.
- Wear hearing protection when operating the tool for extended periods.
- אָנטאָן רעכט. דו זאלסט נישט טראָגן פרייַ קליידער אָדער צירונג. האַלטן דיין האָר און קליידער אַוועק פון מאָווינג טיילן.
- בלייבן פלינק, היטן וואָס איר טאָן און נוצן סייכל ווען אַפּערייטינג אַ מאַכט געצייַג.
2.4 מכשירים נוצן און זאָרגן
- צי ניט צווינגען די מאַכט געצייַג. ניצן די ריכטיק מאַכט געצייַג פֿאַר דיין אַפּלאַקיישאַן.
- דיסקאַנעקט די באַטאַרייע פּאַק פון די מאַכט געצייַג איידער איר מאַכן קיין אַדזשאַסטמאַנץ, טשאַנגינג אַקסעסעריז אָדער סטאָרינג מאַכט מכשירים.
- קראָם ליידיק מאַכט מכשירים אויס פון די דערגרייכן פון קינדער און טאָן ניט לאָזן מענטשן וואָס זענען נישט באַקאַנט מיט די מאַכט געצייַג אָדער די ינסטראַקשאַנז צו אַרבעטן די מאַכט געצייַג.
- האַלטן מאַכט מכשירים און אַקסעסעריז. קוק פֿאַר מיסאַליינמאַנט אָדער ביינדינג פון מאָווינג טיילן, ברייקידזש פון פּאַרץ און קיין אנדערע צושטאַנד וואָס קען ווירקן די אָפּעראַציע פון די מאַכט געצייַג.
2.5 באַטערי טול נוצן און זאָרגן
- ריטשאַרדזש בלויז מיט די טשאַרדזשער ספּעסיפיעד דורך דער פאַבריקאַנט. א טשאַרדזשער וואָס איז פּאַסיק פֿאַר איין טיפּ פון באַטאַרייע פּאַק קען מאַכן אַ ריזיקירן פון פייַער ווען געוויינט מיט אן אנדער באַטאַרייע פּאַק.
- ניצן מאַכט מכשירים בלויז מיט ספּאַסיפיקלי דעזיגנייטיד באַטאַרייע פּאַקס. ניצן קיין אנדערע באַטאַרייע פּאַקס קען מאַכן אַ ריזיקירן פון שאָדן און פייַער.
- ווען די באַטאַרייע פּאַק איז נישט אין נוצן, האַלטן עס אַוועק פון אנדערע מעטאַל אַבדזשעקץ, ווי פּאַפּיר קליפּס, קאָינס, שליסלען, ניילז, סקרוז אָדער אנדערע קליין מעטאַל אַבדזשעקץ וואָס קענען מאַכן אַ קשר פון איין וואָקזאַל צו אנדערן. שאָרטינג די באַטאַרייע טערמינאַלס צוזאַמען קען פאַרשאַפן ברענט אָדער אַ פייַער.
- אונטער אַביוזינג טנאָים, פליסיק קען זיין עדזשעקטעד פון די באַטאַרייע; ויסמיידן קאָנטאַקט. אויב קאָנטאַקט אַקסאַדענאַלי אַקערז, שווענקען מיט וואַסער. אויב פליסיק קאָנטאַקט אויגן, אַדישנאַלי זוכן מעדיציניש הילף. פליסיק עדזשעקטעד פון די באַטאַרייע קען פאַרשאַפן יריטיישאַן אָדער ברענט.
3. קאַמפּאָונאַנץ ינקלודעד
Your FLEX 24V Brushless Cordless 1/2-Inch Hammer Drill Kit (FX1271T-2B) includes the following items:
- FLEX 24V Brushless Cordless 1/2-Inch Hammer Drill
- (1) FLEX 24V 2.5Ah Lithium-Ion Battery (FX0111-1)
- (1) FLEX 24V 5.0Ah Lithium-Ion Battery (FX0121-1)
- FLEX 160W Fast Charger
- אַגזיליערי שעפּן
- קעריינג קאַסע

Figure 2: The FLEX Advantage highlights the included 2.5Ah and 5.0Ah Lithium-Ion batteries, emphasizing their power, runtime, and fast charging capabilities.
4. אויפשטעלן און ערשטע באנוץ
4.1 טשאַרדזשינג די באַטאַרייע
- Connect the 160W Fast Charger to a standard power outlet.
- שטופּ די באַטעריע פּאַק אויף דעם טשאַרדזשער ביז עס קליקט אין פּלאַץ.
- The charger's indicator lights will show the charging status. A fully charged battery will be indicated by a solid green light.
- אַמאָל גאָר באפוילן, אַראָפּנעמען די באַטאַרייע פון די טשאַרדזשער.
4.2 ינסטאָלינג די באַטאַרייע
- Align the battery pack with the battery port on the base of the drill handle.
- Slide the battery into the port until it locks securely into place. Ensure it is fully seated to prevent accidental dislodgement during operation.
- כדי ארויסצונעמען די באַטעריע, דריק די ארויסלאָז קנעפּל(ן) אויף די זייטן פון די באַטעריע פּאַק און שלעפּ עס ארויס.
4.3 אנשטעלן דעם הילפס-הענטל
For improved control and safety, especially during high-torque applications or hammer drilling, attach the auxiliary handle.
- לאָזט אָפּ דעם הילפס-הענטל קל.amp דורך עס דרייען קעגן דעם זייגער.
- Slide the handle over the front of the drill body, positioning it to your preferred angle.
- פאַרשטייַפן די קלamp דורך עס דרייען זייגערווייז ביז דער הענטל איז זיכער באפעסטיקט.

Figure 3: The drill with the auxiliary handle attached, providing enhanced control and stability, particularly when the anti-kickback feature engages.
4.4 Installing Drill Bits or Accessories
- Ensure the drill is off and the battery is removed for safety.
- Grip the rear collar of the 1/2-inch full-metal ratcheting chuck and rotate the front collar counter-clockwise to open the chuck jaws.
- Insert the drill bit or accessory fully into the chuck jaws.
- Rotate the front collar clockwise to tighten the chuck jaws firmly around the bit. The ratcheting mechanism will provide an audible click when securely tightened.
- Gently pull on the bit to ensure it is properly secured.

Figure 4: Detail of the 1/2-inch full-metal ratcheting chuck, designed for secure bit retention and durability.
5. אַפּערייטינג ינסטרוקטיאָנס
5.1 אײַנשטעלן/אויסלעשן און גיכקייט קאָנטראָל
- טריגער סוויטש: Squeeze the trigger switch to turn the drill on. Release it to turn the drill off.
- וועריאַבלע גיכקייַט: The trigger switch is pressure-sensitive, allowing for variable speed control. Pressing the trigger further increases the speed.
- פאָרווערטס/צוריק סעלעקטאָר: Located above the trigger, push the selector left for forward rotation (drilling/driving) and right for reverse rotation (removing screws). Center position locks the trigger for safety.
5.2 Gear Selection (2-Speed)
The drill features a 2-speed gearbox for optimal performance across various applications.
- גאַנג 1 (נידעריקע גיכקייט, הויך טאָרק): Slide the gear selector switch to position '1'. Ideal for driving screws, drilling large holes, or applications requiring maximum torque.
- גאַנג 2 (הויך גיכקייט, נידעריקער דריימאָמענט): Slide the gear selector switch to position '2'. Suitable for fast drilling of smaller holes in wood or metal.
NOTE: Always ensure the drill is stopped before changing gear settings to prevent damage to the gearbox.
5.3 Mode Selection (Drill, Drive, Hammer Drill)
Rotate the collar behind the chuck to select the desired operating mode:
- דריל מאָדע (דריל אייקאָן): For drilling holes in wood, metal, and plastics.
- Drive Mode (Screw Icon): For driving screws. The clutch settings (numbered ring) allow you to adjust the torque to prevent over-driving screws or damaging materials.
- Hammer Drill Mode (Hammer Icon): For drilling into masonry, brick, and concrete. This mode combines rotary action with a hammering motion.
5.4 טורבאָ מאָדע
The Turbo Mode button, located on top of the drill, provides an immediate increase in speed for faster results when needed.
- דרוק די TURBO button during operation to engage maximum speed.
- Release the button to return to the previously selected speed setting.

Figure 5: The Turbo Mode button, when pressed, provides increased speed for rapid task completion.
5.5 Anti-Kickback Feature
The drill is equipped with an advanced anti-kickback braking technology. If the drill bit binds during operation, the system will detect the sudden rotational force and rapidly stop the motor to reduce the risk of kickback and potential injury.
5.6 אינטעגרירטע LED ליכט
An LED light is integrated into the drill to illuminate the work area, improving visibility in dimly lit conditions. The light activates when the trigger is pressed.

Figure 6: The integrated LED light provides illumination for improved visibility in dark work environments.
5.7 Drilling into Masonry (Hammer Drill Mode)
When drilling into masonry, brick, or concrete:
- Select Hammer Drill Mode.
- Ensure the auxiliary handle is securely attached and held firmly with both hands.
- Use appropriate masonry drill bits.
- Apply steady, firm pressure to the drill, allowing the hammering action to break up the material.

Figure 7: The FLEX hammer drill in action, demonstrating its capability to drill into tough materials with 1,400 in-lbs of torque.
6. וישאַלט
6.1 רייניקונג
- שטענדיק אָפּשטעקן די באַטאַרייע פּאַק איידער איר דורכפירן קיין רייניקונג אָדער וישאַלט.
- ניצט אַ ווייכע באַרשט אָדער קאָמפּרעסירטע לופט צו רייניקן שטויב און שמוץ פון די ווענטילאַציע עפענונגען.
- ווישט אָפּ דאָס געצייַג־געhäuse מיט אַדamp שטאָף. דו זאלסט נישט נוצן האַרב קעמיקאַלז אָדער אַברייסיוו קלינערז.
- האַלט די טשאַק קיעפער ריין און פריי פון דעבריס צו ענשור געהעריק ביט גריפּ.
6.2 סטאָרידזש
- Store the tool, batteries, and charger in a cool, dry place, away from direct sunlight and moisture.
- Ensure batteries are partially charged (not fully depleted or fully charged for long-term storage) before storing.
- Store the tool in its carrying case to protect it from damage.
7. טראָובלעשאָאָטינג
| פּראָבלעם | מעגלעך סיבה | לייזונג |
|---|---|---|
| די דריל הייבט זיך נישט אן. | באַטעריע נישט אויפגעלאָדן אָדער נישט ריכטיק אינסטאַלירט. Forward/Reverse selector in center (locked) position. | Charge battery and ensure it is securely installed. Move selector to forward or reverse position. |
| פארלוסט פון מאַכט בעת אָפּעראַציע. | באַטאַרייע אָפּצאָל איז נידעריק. אָווערלאָאַד שוץ אַקטיווייטיד. | ריטשאַרדזש די באַטאַרייע. Reduce pressure on the tool; allow it to cool down. |
| ביט גליטשט אין טשאַק. | טשאַק נישט גענוג צוגעצויגן. Chuck jaws are dirty or worn. | ציען צוריק דעם טשאַק פעסט אָן. Clean chuck jaws. If problem persists, chuck may need replacement. |
| יבעריק ווייבריישאַן אָדער ראַש. | Damaged or bent drill bit. פרייַ קאַמפּאָונאַנץ. | Replace drill bit. Check for loose screws or parts. If problem persists, discontinue use and contact service. |
8. ספּעסאַפאַקיישאַנז
| שטריך | דעטאַל |
|---|---|
| מאָדעל נומער | FX1271T-2B |
| Voltage | 24 וואלטס |
| טשאַק גרייס | 1/2-אינטש |
| טשאַק טיפּ | Full-Metal Ratcheting |
| מאַקסימום טאָרק | 1400 אינטשעס פונט |
| מאַקסימום ראָוטיישאַנאַל גיכקייַט | 2500 רפּם |
| נומער פון ספּידז | 2 |
| באַטעריע קאַפּאַציטעט (אַרייַנגערעכנט) | 2.5 Ah, 5.0 Ah Lithium-Ion |
| Charger Type (Included) | 160 וו שנעל טשאַרדזשער |
| ספּעציעלע פֿעיִקייטן | Turbo Mode, Anti-Kickback, LED Light, Brushless Motor |
| פּונקט וואָג | 15.37 פונט (קיט) |
| פּראָדוקט דימענשאַנז | 7.2"L x 4"W x 10"H (Tool) |
| דרילינג קאַפּאַציטעט (האָלץ) | 2 אינטשעס |
| דרילינג קאַפּאַציטעט (מעטאַל) | 2 אינטשעס |
9. וואָראַנטי און שטיצן
9.1 FLEX Limited Lifetime Warranty
This FLEX tool is protected by the FLEX Limited Lifetime Warranty. To qualify for this warranty, you must register your new FLEX tool, battery, or charger within 30 days of purchase through December 31, 2025. Registration can be completed at registermyFLEX.com.
Please refer to the official FLEX website or your product packaging for full terms and conditions of the warranty.
9.2 קונה שטיצן
For technical assistance, replacement parts, or warranty claims, please contact FLEX customer support. Contact information can typically be found on the FLEX official webוועבזייטל אדער אויף אייער פּראָדוקט פּאַקאַדזשינג.
When contacting support, please have your model number (FX1271T-2B) and purchase date available.


