1. הקדמה
This manual provides detailed instructions for the installation, operation, and maintenance of your Kolink Unity Solar ARGB Mesh Midi Tower Case. Please read this manual thoroughly before beginning installation to ensure proper setup and safe usage. This case is designed to house standard PC components, offering efficient cooling and customizable ARGB lighting.
2. זיכערקייַט אינפֿאָרמאַציע
- שטענדיק אָפּשטעקן די מאַכט צושטעל פון די וואַנט אַוטלעט איידער איר ינסטאַלירן אָדער אַראָפּנעמען קיין קאָמפּאָנענטן.
- Handle all components with care to prevent damage from electrostatic discharge (ESD). Consider using an anti-static wrist strap.
- Avoid placing the case in direct sunlight, near heat sources, or in environments with excessive dust or humidity.
- פרובירט נישט צו מאדיפיצירן דעם קעיס אדער זיינע קאמפאנענטן. נישט-ערלויבטע מאדיפיקאציעס קענען בטל מאכן אייער גאראנטיע און שאפן זיכערהייט ריזיקעס.
- Keep small parts, such as screws, away from children.
3. פּעקל אינהאַלט
באַשטעטיקן אַז אַלע זאכן זענען פאַראַן אין פּעקל:
- Kolink Unity Solar ARGB Mesh Midi Tower Case
- Accessory Box (containing screws, cable ties, and standoffs)
- באַניצער מאַנואַל (דעם דאָקומענט)
4. פּראָדוקט איבערview
The Kolink Unity Solar ARGB Mesh Midi Tower Case features a mesh front panel for optimal airflow, pre-installed ARGB fans, and a tempered glass side panel to showcase your build.
4.1 פונדרויסנדיק Views

פיגורע 4.1.1: פראָנט-זייַט view of the Kolink Unity Solar ARGB Mesh Midi Tower Case, highlighting the mesh front panel and three illuminated ARGB fans.
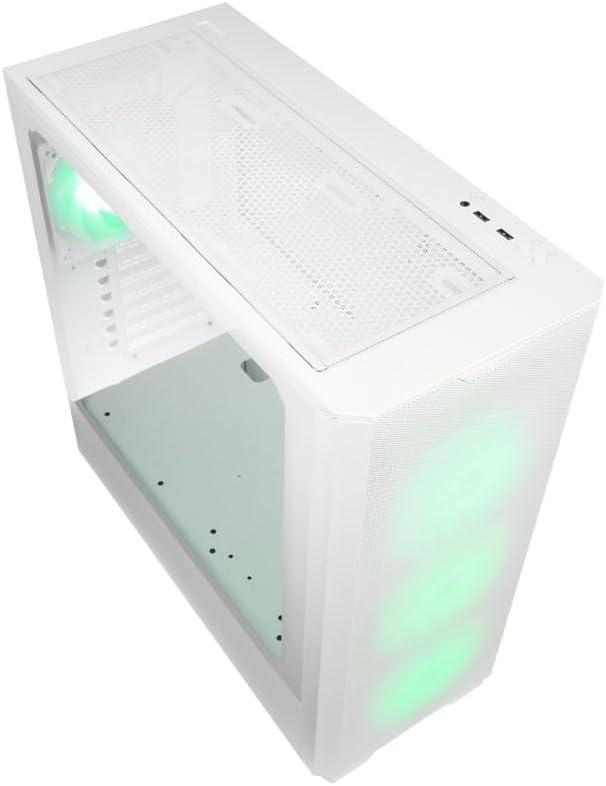
פיגורע 4.1.2: Top view of the case, showing the top mesh panel and front I/O ports.
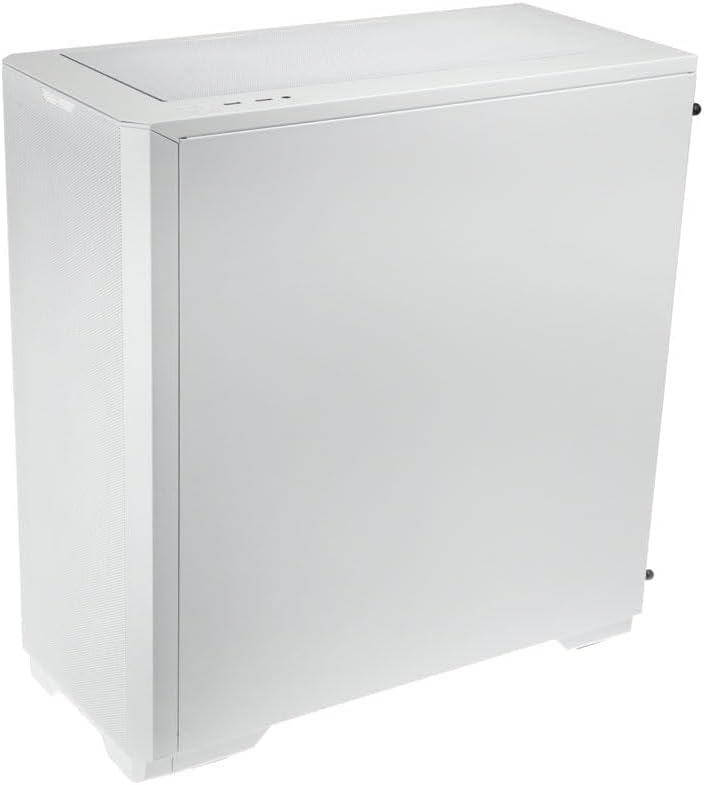
פיגורע 4.1.3: הינטערשטע זייט view of the case, illustrating the solid right side panel.

פיגורע 4.1.4: Composite image showing the front, rear, and tempered glass side panel of the case.
4.2 פראָנט I/O פּאָרץ

פיגורע 4.2.1: Close-up of the top-mounted front I/O panel, featuring audio jacks, USB ports, and control buttons.
The front I/O panel typically includes:
- מאַכט קנעפּל
- באַשטעטיק קנעפּל
- וסב 3.0 פּאָרץ (קס 1)
- וסב 2.0 פּאָרץ (קס 2)
- HD Audio Jacks (Headphone/Microphone)
- ARGB Control Button (for pre-installed fans)
4.3 Internal Layout

פיגורע 4.3.1: ינלענדיש view of the case, showing the motherboard tray, front fan mounts, and PSU shroud.

פיגורע 4.3.2: נאך אן אינעווייניק view, highlighting the rear fan mount and the spacious main chamber.

פיגורע 4.3.3: Close-up of the pre-installed ARGB fans at the front of the case.

פיגורע 4.3.4: View behind the motherboard tray, showing space for cable management and drive mounts.
5. סעטאַפּ און ינסטאַלירונג גייד
Follow these steps to install your PC components into the Kolink Unity Solar case.
5.1 צוגרייטן דעם פאַל
- Place the case on a flat, stable surface.
- Remove the tempered glass side panel by unscrewing the thumbscrews at the rear and carefully pulling it away. Set it aside on a soft, non-abrasive surface.
- Remove the solid right side panel by unscrewing its thumbscrews and sliding it off.
5.2 מאָטהערבאָאַרד ינסטאַללאַטיאָן
- Install the I/O shield (if applicable) into the rear opening of the case.
- Ensure the correct standoffs are installed for your motherboard form factor (ATX, Micro-ATX, Mini-ITX). Adjust or add standoffs as needed using the provided tools.
- Carefully align your motherboard with the standoffs and I/O shield.
- Secure the motherboard with the provided screws. Do not overtighten.
5.3 מאַכט סופּפּלי יוניט (פּסו) ינסטאַלירונג
- Locate the PSU mounting area at the bottom rear of the case.
- Slide your PSU into the designated bay from the rear of the case.
- Align the PSU with the screw holes and secure it with the provided screws.
5.4 Storage Drive Installation (HDDs/SSDs)
דער קעסטל שטיצט קייפל סטאָרידזש דרייווס. זעט די אַקסעסאָרי קעסטל פֿאַר ספּעציפֿישע מאָנטירונג האַרדווער.
- 2.5" SSDs: Mount directly onto the SSD trays located behind the motherboard tray or on the PSU shroud. Secure with screws.
- 3.5" האַרט דיסקס: Install into the drive cage located under the PSU shroud. Slide the drive into the tray and secure it.
5.5 Graphics Card (GPU) and Expansion Card Installation
- אַראָפּנעמען די נייטיקע PCIe סלאָט דעקל פון די הינטערשטע טייל פון די קעסטל.
- אַרײַנשטעלן אײַער גראַפיקס קאַרטל אָדער אַנדערע יקספּאַנשאַן קאַרדס אין די פּאַסיק PCIe סלאָץ אויף אײַער מוטערבאָרד.
- Secure the cards with the provided screws or retention clips.
5.6 Cable Management and Connections
- Connect all necessary power cables from the PSU to your motherboard, CPU, GPU, and storage drives.
- Connect the front I/O cables (USB, Audio, Power/Reset switches, ARGB control) to their respective headers on the motherboard. Refer to your motherboard manual for header locations.
- Route cables through the cutouts and tie-down points behind the motherboard tray to maintain a clean interior and optimize airflow. Use the included cable ties.
- Ensure the pre-installed ARGB fans are connected to the integrated ARGB controller or directly to an ARGB header on your motherboard (if supported).
6. Operating the ARGB Lighting
The Kolink Unity Solar case comes with pre-installed ARGB fans. You can control their lighting effects in two ways:
- Case ARGB Button: Use the dedicated ARGB control button on the front I/O panel to cycle through various lighting modes and colors.
- Motherboard Software: If your motherboard has a 3-pin 5V ARGB header and compatible software (e.g., ASUS Aura Sync, MSI Mystic Light, Gigabyte RGB Fusion), you can connect the case's ARGB controller to the motherboard and synchronize lighting effects with other components. Refer to your motherboard manual for instructions on ARGB header connection and software usage.
7. וישאַלט
רעגולערע אויפהאלטונג העלפט זיכער מאכן די בעסטע פאָרשטעלונג און לאַנגלעבעדיקייט פון אייערע פּיסי קאָמפּאָנענטן.
- שטויב פילטערס: The case features removable dust filters on the front, top, and bottom. Periodically remove and clean these filters with compressed air or by rinsing them with water (ensure they are completely dry before reinstallation).
- ינלענדיש רייניקונג: Use compressed air to remove dust from inside the case, especially from fan blades, heatsinks, and other components. Perform this cleaning in a well-ventilated area.
- עקסטעריאָר רייניקונג: ווישן די יקסטיריער סערפאַסיז מיט אַ ווייך, דamp שטאָף. פֿאַרמײַדט שאַרפֿע כעמיקאַלן אָדער אַברייסיוו רייניגער.
8. טראָובלעשאָאָטינג
אויב איר טרעפט פּראָבלעמען, זעט די פאלגענדע געוויינטלעכע טראָובלעשווטינג טריט:
- PC not powering on: Double-check all power connections from the PSU to the motherboard, CPU, and GPU. Ensure the front panel power switch cable is correctly connected to the motherboard header. Verify the PSU switch is in the 'ON' position.
- Fans not spinning/ARGB not lighting up: Check fan power connections and ARGB connections. Ensure ARGB cables are connected to the correct 3-pin 5V ARGB headers (not 4-pin 12V RGB headers). If using the case controller, ensure it is powered.
- קיין אַרויסווייַזונג רעזולטאַט: Ensure your graphics card is properly seated in its PCIe slot and all necessary power cables are connected. Verify your monitor cable is connected to the graphics card, not the motherboard's integrated graphics port (unless you are using integrated graphics).
9. ספּעסאַפאַקיישאַנז
Key specifications for the Kolink Unity Solar ARGB Mesh Midi Tower Case:
| שטריך | באַשרייַבונג |
|---|---|
| סאָרט | קאָלי |
| מאָדעל נאָמען | Unity Solar |
| נומער מאָדעל נומער | UNITYSOLARWHT |
| טיפּ פון קאַסטן | מיד טאַוער |
| קאָליר | ווייַס |
| מאָטהערבאָאַרד קאַמפּאַטאַבילאַטי | אַטקס, מיקראָ-אַטקס, מיני-יטקס |
| קאָאָלינג אופֿן | לופט |
| מאַכט צושטעלן מאַונטינג טיפּ | דנאָ בארג |
| נומער פון וסב 2.0 פּאָרץ | 2 |
| גאַנץ וסב פּאָרץ | 2 (Note: Product description indicates 1x USB 3.0, 2x USB 2.0. Please verify with product packaging.) |
| Total Internal Bays | 4 (Mixed 2.5"/3.5" support) |
| פּונקט וואָג | 2.2 פונט |
10. וואָראַנטי און שטיצן
For warranty information and technical support, please refer to the official KOLINK webזייטל אדער קאָנטאַקט אייער הענדלער. האַלט אייער קויפן באַווייַז פֿאַר וואָראַנטי קליימז.


