1. הקדמה
This manual provides comprehensive instructions for the installation, operation, and maintenance of your Vivotek ND9426P Network Video Recorder (NVR). The ND9426P is a 16-channel, 2-bay embedded NVR with Power over Ethernet (PoE) capabilities and integrated Artificial Intelligence (AI) features, designed for robust surveillance applications. Please read this manual thoroughly before using the device to ensure proper setup and functionality.
2. זיכערקייַט אינפֿאָרמאַציע
- Ensure the NVR is installed in a well-ventilated area to prevent overheating.
- ניצן בלויז די מאַכט אַדאַפּטער סאַפּלייד מיט די מיטל.
- Do not expose the NVR to water, moisture, or extreme temperatures.
- Avoid placing heavy objects on top of the NVR.
- אָפּשטעקן די מאַכט איידער איר דורכפירן קיין וישאַלט אָדער ינסטאַלירונג פּראָצעדורן.
- אָפּשיקן אַלע סערוויסעס צו קוואַלאַפייד פּערסאַנעל.
3. פּעקל אינהאַלט
באַשטעטיקט אַז אַלע זאכן וואָס זענען אויסגערעכנט אונטן זענען אַרייַנגערעכנט אין אייער פּעקל. אויב עפּעס פעלנדיק אָדער צעבראָכן, קאָנטאַקטירט אייער פאַרקויפער גלייך.
- Vivotek ND9426P NVR Unit
- מאַכט אַדאַפּטער
- וסב מאַוס
- שנעל ינסטאַללאַטיאָן גייד
- HDD מאָנטירונג שרויפן
4. פיזישע איבערview
Familiarize yourself with the front and rear panels of the Vivotek ND9426P NVR.
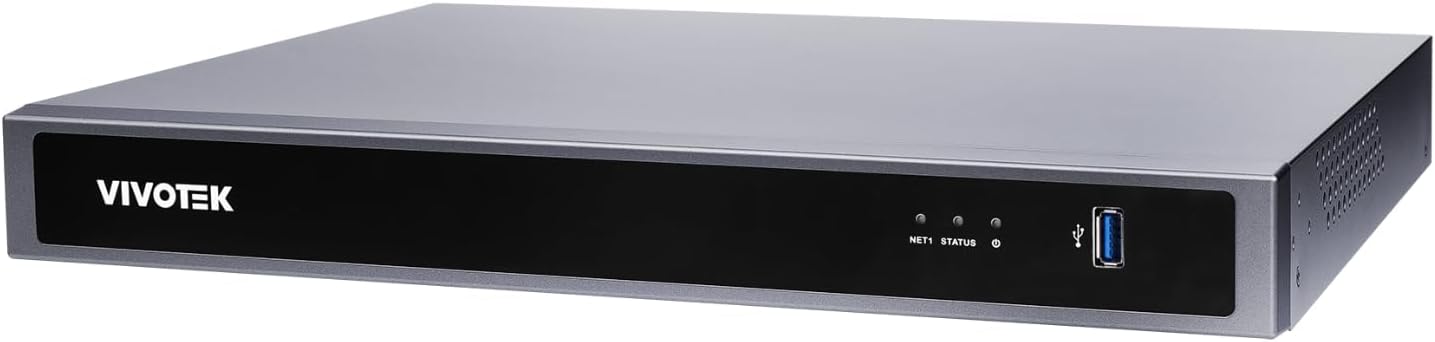
Figure 1: Front Panel of Vivotek ND9426P NVR. This image displays the front of the NVR unit, featuring the VIVOTEK brand logo on the left, two small indicator LEDs labeled "NET1" and "STATUS" in the center, and a blue USB 3.0 port on the right. The overall casing is a dark gray metallic finish.
4.1 פראָנט פּאַנעל
- VIVOTEK Logo: ווײַזט אָן די בראַנד.
- NET1 LED: Network activity indicator for LAN port 1.
- סטאַטוס געפירט: סיסטעם סטאַטוס גראדן.
- וסב 3.0 פּאָרט: For connecting a USB mouse, keyboard, or external storage devices.
4.2 הינטערשטע פּאַנעל (טיפּישע קאָנפיגוראַציע)
While not pictured, the rear panel typically includes the following ports:
- PoE Ports (x16): RJ-45 ports for connecting IP cameras and providing power.
- לאַן פּאָרט: RJ-45 port for connecting the NVR to your local network.
- HDMI רעזולטאַט: For connecting to a monitor or display.
- VGA רעזולטאַט: For connecting to a monitor or display.
- אַודיאָ אין/אויס: פֿאַר קאַנעקטינג פונדרויסנדיק אַודיאָ דעוויסעס.
- וסב 2.0 פּאָרץ: נאָך USB פּאָרץ פֿאַר פּעריפעריאַלס.
- מאַכט אַרייַנשרייַב: פֿאַר קאַנעקטינג די מאַכט אַדאַפּטער.
- גראַונדינג טערמינאַל: פֿאַר זיכערהייט גראַונדינג.
5. סעטאַפּ
5.1 ייַזנוואַרג ינסטאַלירונג
- ייַנמאָנטירונג פון שווער פאָר:
אַראָפּשרויפן די NVR casing to access the internal bays. Mount up to two 3.5-inch SATA hard drives using the provided screws. Reattach the casinג זיכער.
- פֿאַרבינדן IP קאַמעראַס:
Connect your PoE-enabled IP cameras to the NVR's PoE ports using Ethernet cables. The NVR will provide power and data connectivity.
- Connect Display and Mouse:
Connect a monitor to the NVR's HDMI or VGA output port. Connect the USB mouse to one of the NVR's USB ports.
- נעץ קאַנעקשאַן:
פֿאַרבינדט דעם NVR'ס LAN פּאָרט צו אייער נעץ ראַוטער אָדער סוויטש ניצנדיק אַן עטהערנעט קאַבל.
- מאַכט אויף:
פֿאַרבינדט דעם מאַכט אַדאַפּטער צום NVR'ס מאַכט אַרייַנגאַנג און דאַן שטעקט עס אַרײַן אין אַ מאַכט אַוטלעט. דער NVR וועט זיך אויטאָמאַטיש אָנצינדן.
5.2 ערשט קאַנפיגיעריישאַן
- Upon first boot, the NVR will guide you through a setup wizard. Follow the on-screen instructions.
- Set a strong password for the administrator account. This is crucial for security.
- קאָנפיגורירן נעץ סעטטינגס (DHCP אדער סטאַטיש IP).
- Scan for and add connected IP cameras.
- שטעלן דאַטע, צייט און צייט זאָנע.
6. אפערירן די NVR
6.1 באַניצער צובינד נאַוויגאַציע
- לעבן View: Access real-time video feeds from all connected cameras. Use the mouse to select camera viewס און אויסלייגן.
- פּלייבאַק: Review רעקאָרדעד פוtage. Navigate through timelines, search by date/time, and export video clips.
- רעקאָרדינג סעטטינגס: Configure recording schedules (continuous, motion-triggered, event-based) and video quality for each camera.
- געשעעניש פאַרוואַלטונג: Set up alerts for motion detection, tampering, or AI-triggered events. Configure notification methods (e.g., email, push notifications).
- סיסטעם סעטטינגס: Manage user accounts, network configurations, storage, and system logs.
6.2 קינסטלעכע אינטעליגענץ פֿעיִטשערס
The Vivotek ND9426P integrates advanced AI capabilities to enhance surveillance efficiency. These features may include:
- סמאַרט באַוועגונג דעטעקשאַן: Differentiates between human/vehicle movement and environmental factors to reduce false alarms.
- ינטרוזשאַן דעטעקשאַן: Defines specific areas for monitoring and triggers alerts upon unauthorized entry.
- ליניע קראָסינג דעטעקציע: Detects when an object crosses a predefined virtual line.
- Refer to the NVR's on-screen interface or the detailed software manual for specific AI feature configuration.
7. וישאַלט
- Firmware דערהייַנטיקונגען: Regularly check the VIVOTEK webזייטל פֿאַר פירמווער דערהייַנטיקונגען צו ענשור אָפּטימאַל פאָרשטעלונג און זיכערהייט. נאָכפאָלגן די צוגעשטעלטע אינסטרוקציעס קערפֿול פֿאַר דערהייַנטיקונג.
- דאַטאַ באַקקופּ: מאַכן אַ באַקאַפּ פון וויכטיקע רעקאָרדירטע פֿילמען פּעריִאָדישtage צו עקסטערנע סטאָרידזש דעוויסעס (למשל, USB דרייוו, נעץ סטאָרידזש) צו פאַרמייַדן דאַטן אָנווער.
- סיסטעם לאָגס: Review system logs regularly for any error messages or unusual activity that may indicate a problem.
- רייניקונג: Keep the NVR unit clean and free from dust. Use a soft, dry cloth. Do not use liquid cleaners or aerosols. Ensure ventilation openings are not obstructed.
8. טראָובלעשאָאָטינג
| פּראָבלעם | מעגלעך סיבה | לייזונג |
|---|---|---|
| קיין ווידעא ארויסגאַנג אויף מאָניטאָר | לויזער קאַבל פֿאַרבינדונג, אומרעכטע אינפוט מקור אויף מאָניטאָר, NVR נישט אנגעצונדן. | Check HDMI/VGA cable connections. Ensure monitor is set to correct input. Verify NVR power. |
| קאַמעראַס ווייַזן נישט | Camera not powered, network issue, incorrect camera settings. | Check camera power and Ethernet cables. Verify network connectivity. Ensure cameras are added and configured correctly in NVR settings. |
| Cannot access NVR over network | Network cable disconnected, incorrect IP address, firewall blocking access. | Check LAN cable. Verify NVR's IP address and network settings. Adjust firewall rules if necessary. |
| רעקאָרדירונג אַרבעט נישט | Hard drive not installed/initialized, recording schedule not set, insufficient storage. | Ensure HDD is installed and formatted. Check recording schedules. Verify available storage space. |
9. ספּעסאַפאַקיישאַנז
| מאָדעל | ND9426P |
| סאָרט | VIVOTEK |
| נומער פון טשאַנאַלז | 16 |
| הדד בייס | 2 (3.5" SATA) |
| PoE פּאָרץ | 16 |
| קאַנעקטיוויטי טעכנאָלאָגיע | עטהערנעט, וסב |
| פּונקט וואָג | 1 קילאָגראַמס (2.2 פונט) |
| פּעקל דימענשאַנז | 0.39 X 0.39 X 0.39 אינטשעס (L X W X H) |
Note: Specifications are subject to change without notice. For the most current information, please refer to the official VIVOTEK product page.
10. וואָראַנטי און שטיצן
VIVOTEK products are covered by a limited warranty. For detailed warranty terms and conditions, please refer to the warranty card included with your product or visit the official VIVOTEK webפּלאַץ.
For technical support, product inquiries, or service requests, please contact your local VIVOTEK dealer or visit the VIVOTEK support portal online. Have your product model and serial number ready when contacting support.
- VIVOTEK Official Webפּלאַץ: www.vivotek.com
- שטיצן טויער: אָפּשיקן צו די website for regional support contacts.


