1. הקדמה
This manual provides instructions for the proper setup, operation, and maintenance of your Tera Pro 2D QR Barcode Scanner Model 9600. Please read this manual thoroughly before using the device to ensure optimal performance and longevity.

Image 1.1: Tera Pro 2D QR Barcode Scanner Model 9600. This image shows the scanner from a front-side view, highlighting its compact, omnidirectional design.
2. שליסל פֿעיִקייטן
- ווירעלעסס טשאַרדזשינג פּאַד: Integrated wireless charging for continuous operation without USB cables.
- Superior Global CMOS Imaging Scanning: Fast and accurate reading of standard and high-density 1D/2D barcodes, including challenging formats like PDF417, on various surfaces.
- דאַטע און צייט פּרעפיקס/סופֿיקס: Capability to record barcode scans with an appended date and time for enhanced tracking.
- 3-אין-1 קאָנעקטיוויטי: Supports Bluetooth, 2.4G wireless (via USB dongle), and USB wired connections for broad compatibility.
- ברייט קאַמפּאַטאַבילאַטי: Works with Windows (11/10/8/7/XP), Mac OS, iOS, Android, and Linux operating systems.
- ווערסאַטאַל באַרקאָד שטיצע: Decodes a wide range of 1D (Codabar, Code 11, Code93, MSI, Code 128, UCC/EAN-128, Code 39, EAN-8, EAN-13, UPC-A, ISBN, Industrial 25, Interleaved 25, Standard 25, 2/5 Matrix) and 2D (QR, PDF417, Data Matrix, Aztec code, Hanxin) barcodes.
3. סעטאַפּ
3.1. אויפלאָדן דעם סקאַנער
The Tera 9600 scanner features a wireless charging capability. Simply place the scanner onto the included wireless charging pad. Ensure the charging pad is connected to a power source via its USB cable. The scanner will begin charging automatically.

Image 3.1: Wireless Charging Feature. This image illustrates the scanner placed on its wireless charging pad, with lightning bolt icons indicating power transfer. It also shows a smartphone and earphones, suggesting the pad's versatility.
3.2. פֿאַרבינדן דעם סקאַנער
The Tera 9600 offers three connection modes: USB Wired, 2.4G Wireless, and Bluetooth.
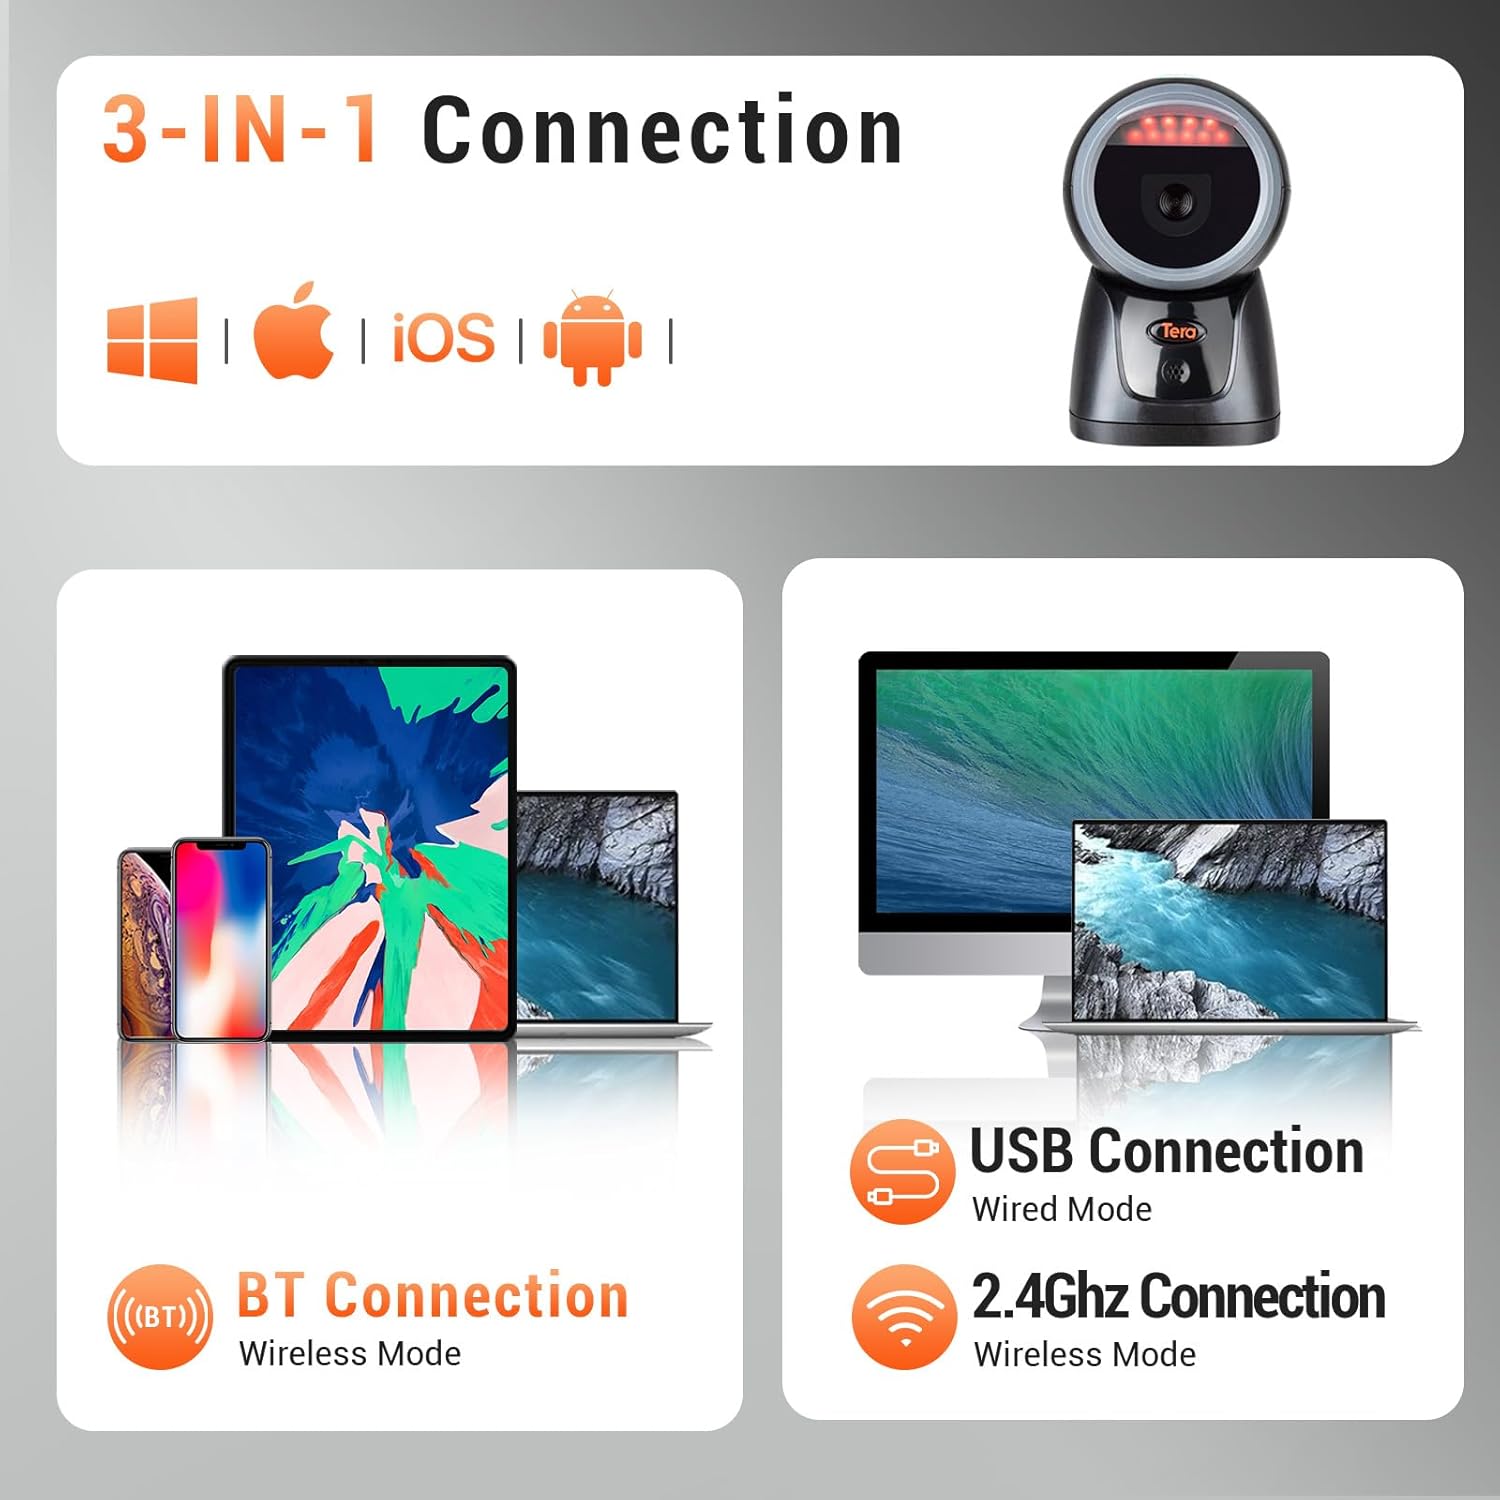
Image 3.2: 3-in-1 Connection. This image displays the three connection methods: Bluetooth (BT Connection), USB Wired (USB Connection), and 2.4G Wireless (2.4Ghz Connection), along with compatible operating systems (Windows, iOS, Android).
3.2.1. USB דראָט פֿאַרבינדונג
- Insert the USB cable into the scanner's port.
- Connect the other end of the USB cable to your computer's USB port.
- The scanner will be recognized as a keyboard device, and no additional drivers are typically required.
3.2.2. 2.4ג ווירעלעסס קאַנעקשאַן
- Plug the 2.4G USB dongle (receiver) into an available USB port on your computer.
- The scanner should automatically pair with the dongle. If not, refer to the specific pairing instructions in the full user manual (usually involving scanning a pairing barcode).
- The transmission distance can reach up to 328ft (100m) in barrier-free environments and 114ft (35m) in environments with obstacles.
3.2.3. בלועטאָאָטה קאַנעקשאַן
- Ensure the USB cable is removed from the scanner.
- Scan the "Bluetooth HID" barcode (found in the comprehensive manual) to switch the scanner to Bluetooth mode.
- Scan the "Pairing" barcode (also in the comprehensive manual). The LED indicator on the scanner will start blinking.
- On your device (smartphone, tablet, computer), go to Bluetooth settings and search for "BT Scanner HID" or a similar device name.
- Select the scanner to pair. Once paired, the LED indicator will stop blinking and remain solid.
3.3. Installing and Removing the USB Cable
The USB cable for wired connection or initial charging is designed to be securely installed and removed.
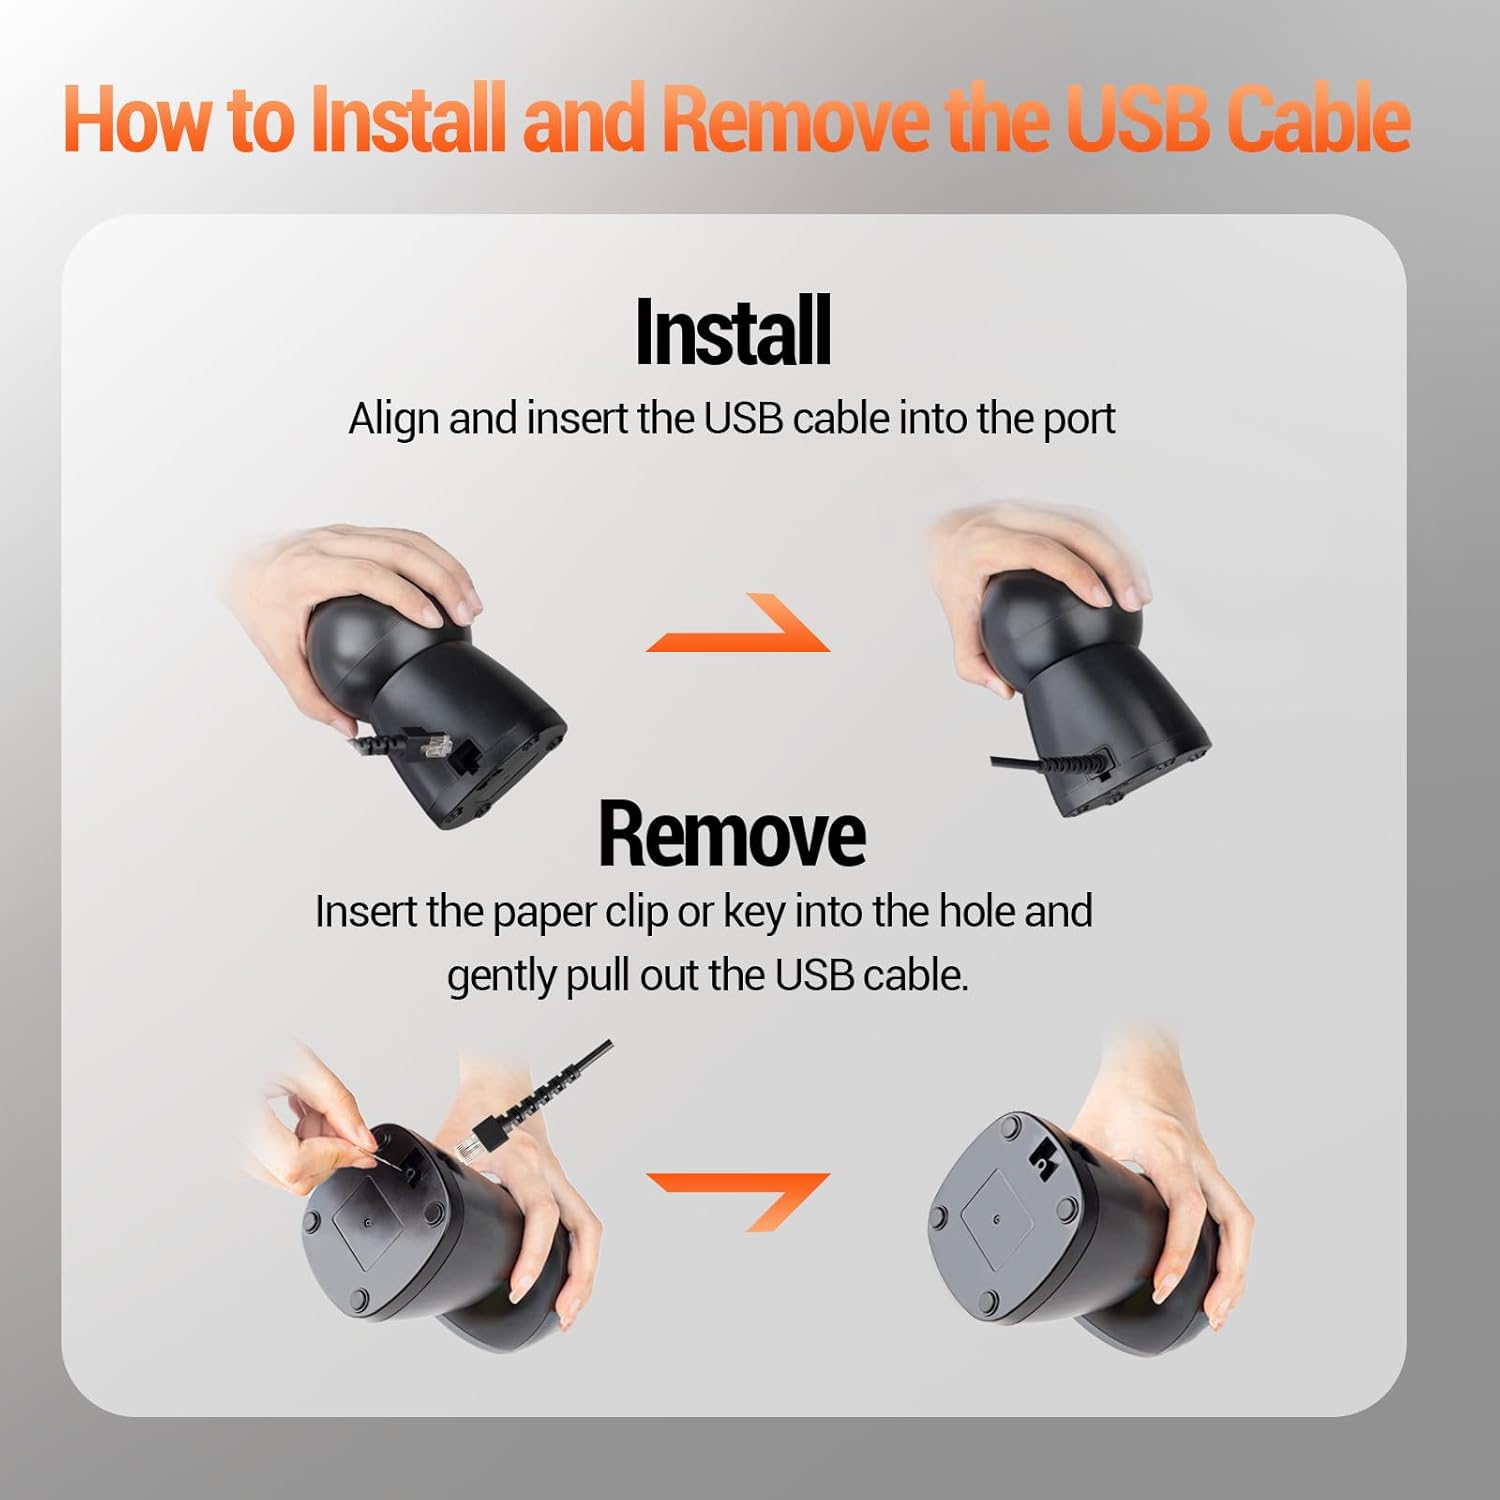
Image 3.3: USB Cable Installation and Removal. This image provides a visual guide for inserting the USB cable into the scanner's port and for safely removing it using a paper clip or key in the designated pinhole.
ייַנמאָנטירונג:
Align the USB cable connector with the port on the scanner and insert it firmly until it clicks into place.
באַזייַטיקונג:
To remove the USB cable, locate the small pinhole near the USB port. Insert a paper clip or a small key into this hole and gently pull out the USB cable. This mechanism ensures a secure connection during use.
4. אָפּעראַציע
4.1. גרונטלעכע סקענירן
To scan a barcode, position the scanner over the barcode, ensuring the entire barcode is within the scanning area. The scanner will emit a light beam. A successful scan is typically indicated by an audible beep and/or a visual indicator (e.g., LED flash).

Image 4.1: Scanner in Operation. This image shows the Tera 9600 scanner being used to scan a QR code on a package in a warehouse setting, demonstrating its hands-free capability.
4.2. Date & Time Prefix/Suffix Function
The Tera 9600 allows you to add the current date and time as a prefix or suffix to scanned barcode data. This feature is useful for timestamping inventory or tracking items.
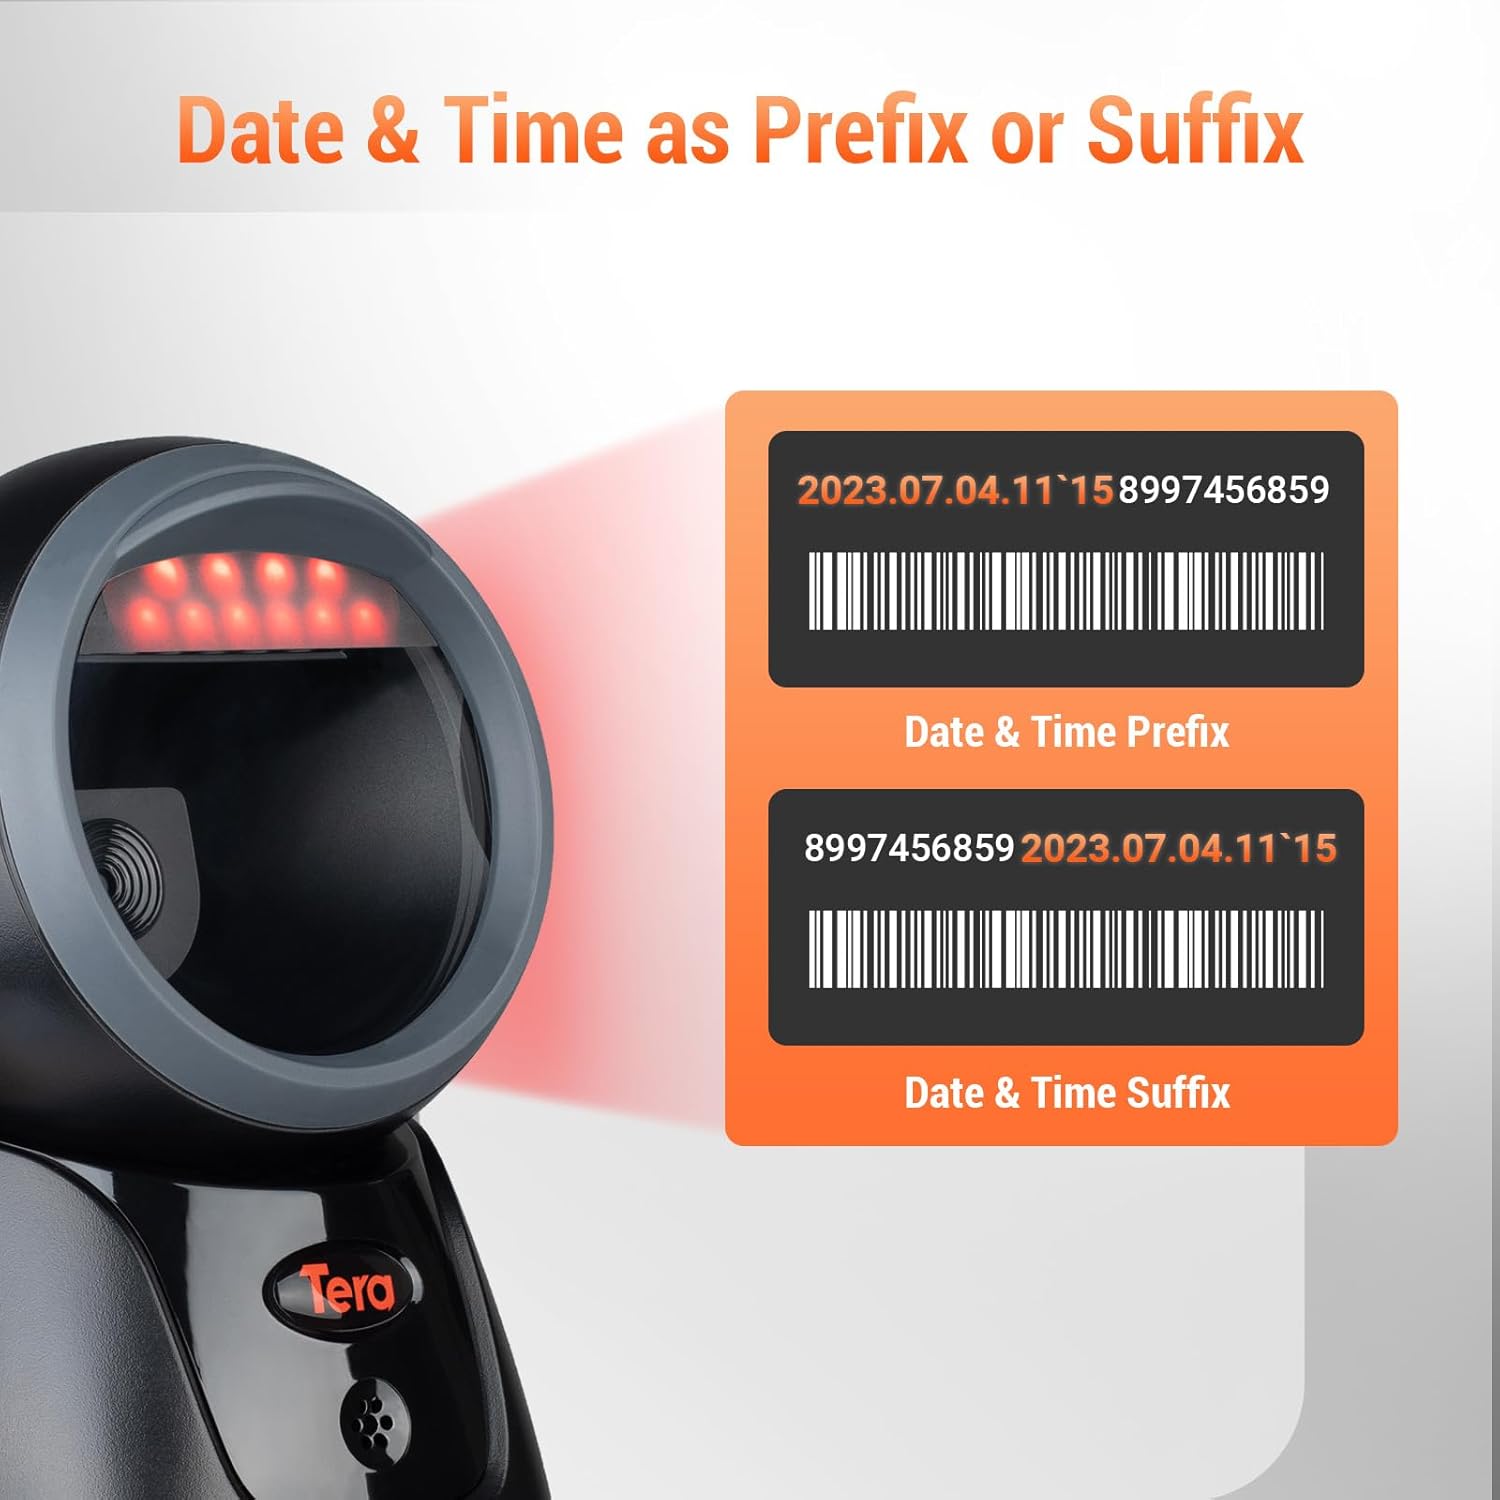
Image 4.2: Date & Time Prefix/Suffix. This image illustrates how date and time information can be appended before (prefix) or after (suffix) the scanned barcode data.
To enable or configure this function, refer to the specific programming barcodes in the full user manual. These barcodes allow you to select prefix or suffix mode and format the date/time output.
4.3. Advanced Scanning Capabilities
The scanner utilizes a Superior Global CMOS Imaging Scanning Engine for fast and accurate data capture.

Image 4.3: Global Shutter Scanning Engine. This image shows a stylized representation of the "Global Shutter" chip, emphasizing its role in fast and accurate scanning.
It can read barcodes from various challenging surfaces, including:
- Damaged or poorly printed barcodes.
- Barcodes on reflective materials.
- Barcodes on screens (e.g., mobile phones, monitors).
- High-density barcodes.
5. וישאַלט
- רייניקונג: ניצט אַ ווייכע, טרוקענע שטאָף צו רייניקן די אויסערלעכע זייט פון דעם סקאַנער. פֿאַר דעם סקאַנינג פֿענצטער, ניצט אַ לינט-פֿרייע שטאָף לייכט ווישן.ampגעוואַשן מיט אַ מילדן, נישט-שרייַבנדיקן רייניגער. ניצט נישט שטרענגע כעמיקאַלן אָדער שרייַבנדיקע מאַטעריאַלן.
- סטאָרידזש: האַלט דעם סקאַנער אין אַ קיל, טרוקן אָרט אַוועק פון דירעקט זונשייַן און עקסטרעמע טעמפּעראַטורן.
- באַטערי זאָרגן: For optimal battery life, avoid fully discharging the scanner frequently. Charge it regularly, especially if it will be stored for an extended period.
6. טראָובלעשאָאָטינג
- Scanner not connecting or recognized by computer:
- זיכער מאַכן אַז דער USB קאַבל איז זיכער פארבונדן צו ביידע דעם סקאַנער און דעם קאָמפּיוטער.
- If using 2.4G wireless, ensure the USB dongle is properly inserted and the scanner is in 2.4G mode.
- If using Bluetooth, ensure the scanner is in Bluetooth pairing mode, the USB cable is removed, and your device's Bluetooth is enabled and searching for devices. Try re-pairing.
- Test with a different USB port or computer if possible.
- Refer to the full user manual for specific pairing barcodes if automatic connection fails.
- סקאַנער לייענט נישט באַרקאָודז:
- זיכער מאַכן אַז דער באַרקאָד איז ריין, נישט געשעדיגט, און גוט באַלויכטן.
- אַדזשאַסטירן די דיסטאַנץ און ווינקל צווישן דעם סקאַנער און דעם באַרקאָד.
- Check if the barcode type is supported by the scanner (refer to specifications).
- רייניקט דעם סקענער'ס לייענפֿענצטער.
- Scanner beeps but no data is transmitted:
- Verify that the scanner is properly connected to your host device (computer, POS system).
- Ensure the application you are using is ready to receive input (e.g., a text editor, spreadsheet, or POS software).
- Check the connection mode (USB, 2.4G, Bluetooth) and ensure it matches your setup.
7. ספּעסאַפאַקיישאַנז
| שטריך | דעטאַל |
|---|---|
| מאָדעל נומער | 9600 |
| Scanning Engine | Global CMOS Imaging |
| קאַנעקטיוויטי | USB Cable, 2.4G Wireless, Bluetooth |
| דראָטלאָזע ראַנגע (2.4G) | Up to 328ft (100m) in open space, 114ft (35m) indoors |
| קאַמפּאַטאַבאַל אַס | ווינדאָוס 11/10/8/7/XP, מעק אָ.עס., יאָס, אַנדרויד, לינוקס |
| 1D דעקאָדירן קייפּאַביליטי | קאָדאַבאַר, קאָד 11, קאָד 93, MSI, קאָד 128, UCC/EAN-128, קאָד 39, EAN-8, EAN-13, UPC-A, ISBN, אינדוסטריעל 25, אינטערליווד 25, סטאַנדאַרד 25, 2/5 מאַטריץ |
| 2D דעקאָדירן קייפּאַביליטי | QR, PDF417, Data Matrix, Aztec code, Hanxin |
| מאַכט מקור | Battery Powered (with Wireless Charging) |
| דימענשאַנז | זעט די פּראָדוקט פּאַקאַדזשינג |
| וואָג | זעט די פּראָדוקט פּאַקאַדזשינג |
8. וואָראַנטי און שטיצן
The Tera Pro 2D QR Barcode Scanner Model 9600 comes with a standard manufacturer's warranty. Please refer to the warranty card included in your product packaging for specific terms and conditions.
For technical support, troubleshooting assistance, or warranty claims, please contact Tera customer service through the retailer where you purchased the product or visit the official Tera webפּלאַץ פֿאַר קאָנטאַקט אינפֿאָרמאַציע.


