הקדמה
This instruction manual provides detailed guidance for the safe and efficient installation, operation, and maintenance of your Amico 30-inch Low Profile Ceiling Fan with Light and Remote Control. Please read all instructions carefully before beginning installation and retain this manual for future reference.

Amico ceiling fan installed in a living room, demonstrating its aesthetic appeal and air circulation.
זיכערקייַט אינפֿאָרמאַציע
- שטענדיק אויסשליסן די עלעקטריע ביים קרייז ברעיקער איידער אינסטאַלאַציע אדער סערוויסינג.
- Ensure the mounting structure is securely attached to the building structure and can support the fan's weight.
- Do not connect to dimmer switches or fan speed switches to prevent operational malfunctions.
- Ensure fan blades are at least 7 feet above the floor.
- Avoid direct exposure to rain for outdoor installations.
פּעקל אינהאַלט
באַשטעטיקן אַז אַלע זאכן זענען אַרייַנגערעכנט אין דיין פּעקל:
- פאָכער מאָטאָר אַסעמבלי
- געפירט ליכט באָרד
- Lampשאָטן
- פאָכער בלאַדעס (3)
- Remote Control with Wall Cradle
- Remote Control Receiver Module
- מאָונטינג קלאַמער
- Hardware Kit (screws, wire nuts, etc.)
- ינסטראַקשאַנז מאַנואַל

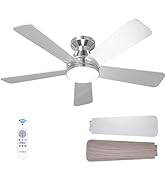
Components of the Amico ceiling fan, including LED light board, lampshade, fan blade, controller, and remote.
מכשירים פארלאנגט
- פיליפּס קאָפּ שרויפנ - ציער
- פלאַטהעאַד שרויפנ - ציער
- דראָט סטריפּערז
- צוואַנג
- עלעקטריקאַל טייפּ
- לייטער
- זיכערקייַט גאָגגלעס
סעטאַפּ / ינסטאַלירונג
1. Assemble Fan Blades
- Carefully attach each fan blade to the motor assembly using the provided screws. Ensure they are securely fastened.
2. Install LED Light Board
- Connect the wiring from the LED light board to the motor assembly.
- Secure the LED light board to the motor assembly with the small bolts.
3. Connect Remote Control Receiver
- Plug the wiring from the motor body into the designated ports on the remote control receiver module.
- Carefully place the receiver module into the motor assembly housing.
4. Mount the Fan to the Ceiling
- איידער איר הייבט אן, זיכערט זיך אז די מאכט איז אויסגעלאשן ביים קרייז ברעיקער.
- Attach the mounting bracket to a standard ceiling junction box using the provided screws. Ensure it is tightly secured.
- Hang the fan assembly onto the hook provided on the mounting bracket. This allows hands-free wiring.
- Connect the fan's wiring to the household wiring: white (neutral) to white, black (hot) to black, and green/bare copper (ground) to green/bare copper. Use wire nuts to secure connections.
- קערפאַלי טאַק אַלע ווירעס אין די קנופּ קעסטל.
- Align the fan assembly with the mounting bracket and twist to secure it. Fasten any remaining screws to firmly install the fan.

Easy installation: Fits standard ceiling junction box. Do not connect to dimmer or fan gear switch.
5. Attach Lampשאָטן
- דריי די לampshade clockwise onto the fan assembly to cover the LED light board.
אַפּערייטינג ינסטראַקשאַנז
Your Amico ceiling fan is controlled by the included remote. Ensure 2 AAA batteries (included) are installed in the remote.

Remote control features for the Amico 30-inch ceiling fan.
רימאָוט קאָנטראָל פאַנגקשאַנז:
- ווענטילאַטאָר אויף/אויס: דריק דעם ווענטילאַטאָר אייקאָן קנעפּל צו דרייען דעם ווענטילאַטאָר אָן אָדער אויס.
- ליכט אויף / אַוועק: דריק דעם גלאָביר-בילב איקאָן קנעפּל צו אנצינדן אדער אויסלעשן די ליכט.
- פאַן גיכקייַט: Select from 6 fan speeds (1-6) using the numbered buttons.
- ליכט דימינג: Use the '+' and '-' buttons to adjust light brightness (10%-100%).
- קאָליר טעמפּעראַטור: Choose from 3000K (warm), 4000K (natural), or 6000K (cool) using the dedicated buttons.
- ריווערסאַבאַל דק מאָטאָר: Press the reversible arrow button to change fan direction for summer (downward airflow) or winter (upward airflow).
- טיימער באַשטעטיקן: Set the fan to turn off automatically after 1, 2, or 4 hours using the timer buttons.
- זכּרון פֿונקציע: The fan and light will retain the last brightness, color temperature, and fan speed settings when turned off and on via the wall switch or remote.

Reversible DC motor function for summer and winter use.

Customizable light with 3 color temperatures and dimming.
וישאַלט
- רייניקונג: To clean the fan, use a soft brush or lint-free cloth to avoid scratching the finish. Do not use abrasive cleaners.
- בלייד קער: Hand wash blades if necessary.
- טייטנינג סקרוז: Periodically check all screws for tightness.
טראָובלעשאָאָטינג
| פּראָבלעם | מעגלעך סיבה | לייזונג |
|---|---|---|
| פאָכער טוט נישט אָנהייבן | קיין שטראָם צום ווענטילאַטאָר; לויזע דראָט פֿאַרבינדונגען; ווײַטקאָנטראָל נישט געפּאָרט אָדער באַטעריעס טויט. | Check circuit breaker; ensure all wire connections are secure; replace remote batteries; pair remote with receiver. |
| פאַן איז טומלדיק | Loose screws; unbalanced blades; motor noise. | Tighten all screws; ensure blades are balanced; motor noise up to 35dB is normal. |
| ליכט טוט נישט אַרבעטן | Loose wire connection; faulty LED light board. | Check light wire connections; contact support for LED light board replacement. |
| ווייַט קאָנטראָל נישט ארבעטן | Dead batteries; remote not paired; interference. | Replace batteries; re-pair remote with receiver; ensure no strong interference sources nearby. |
ספּעסאַפאַקיישאַנז
- סאָרט: אַמיקאָ
- מאָדעל נאָמען: KFM30PLY03R1
- קאָליר: ווייַס
- גרייס: 30 אינטשעס
- פּראָדוקט דימענשאַנז: 30"ד רענטגענ 30"וו רענטגענ 8.66"ה
- עלעקטריק פאַן פּלאַן: Ceiling Fan
- מאַכט מקור: 120V AC אַרייַנגאַנג, DC מאָטאָר
- וואָסtage: 35 וואטס
- Voltage: 120 וואלטס (AC)
- נומער פון בלאַדעס: 3
- נומער פון מאַכט לעוועלס: 6
- ראַש מדרגה: 35 דעציבעלן
- ספּעציעלע פֿעיִקייטן: 2/4/8H Timer, 3CCT (3000K/4000K/6000K), 6 Speeds, Dimmable, Reversible
- קאָנטראָל אופֿן: ווייַט
- ינסטאַלירונג טיפּ: גלייַך בארג
- דרינענדיק / דרויסנדיק באַניץ: Indoor, Outdoor (Not to be exposed directly to rain)
- נומער וואָג: 8.51 פונט
וואָראַנטי און שטיצן
Amico provides a 10-year warranty for the motor and a 2-year warranty for other parts of the ceiling fan. For technical support or any issues during use or installation, please contact Amico customer service. We offer 24-hour technical support.
Warranty details: 10 years for motor, 2 years for other parts.


