1. הקדמה
This manual provides detailed instructions for the installation, operation, and maintenance of your darkFlash Aquarius Mesh Computer Case. Please read this manual thoroughly before beginning installation to ensure proper setup and safe use of your new computer chassis.
2. זיכערקייַט אינפֿאָרמאַציע
שטענדיק אָבסערווירן די פאלגענדע זיכערקייַט פּריקאָשאַנז:
- Disconnect all power sources before installing or removing any components.
- טראָגט אַן אַנטי-סטאַטיש האַנטגעלענק-רימען צו פאַרמייַדן עלעקטראָסטאַטישער אָפּזאָגן (ESD) שאָדן צו קאָמפּאָנענטן.
- האַנדלט מיט קאָמפּאָנענטן פֿאָרזיכטיק צו פֿאַרמייַדן פֿיזישע שעדיקן.
- האַלטן קליין טיילן און מכשירים אַוועק פון קינדער.
- Ensure proper ventilation around the computer case.
3. פּעקל אינהאַלט
באַשטעטיקן אַז אַלע זאכן זענען פאַראַן אין דיין פּעקל:
- darkFlash Aquarius Mesh Computer Case
- Accessory Box (screws, standoffs, cable ties, etc.)
- באַניצער מאַנואַל (דעם דאָקומענט)
4. סעטאַפּ און ייַנמאָנטירונג
Follow these steps for proper component installation.
4.1. צוגרייטן דעם פאַל
Before installing components, remove the side panels. The Aquarius Mesh case typically features a tempered glass side panel and a solid metal panel.
- Locate the thumbscrews on the rear of the case securing the side panels.
- Unscrew the thumbscrews and carefully slide the panels backward, then lift them off.

פיגורע 1: פראָנט און זייַט view of the darkFlash Aquarius Mesh case. Note the mesh front panel and tempered glass side panel.

פיגורע 2: דערציען view of the darkFlash Aquarius Mesh case, showing expansion slots and rear fan mount.
4.2. מאָטהערבאָאַרד ינסטאַללאַטיאָן
The Aquarius Mesh supports ATX, Micro-ATX, and Mini-ITX motherboards.
- אינסטאלירט דעם I/O שילד אין דעם אויסשניט אויף דער הינטערשטער זייט פון דעם קעיס.
- Align your motherboard with the pre-installed standoffs. Ensure the I/O ports align with the I/O shield.
- Secure the motherboard with the appropriate screws from the accessory box.
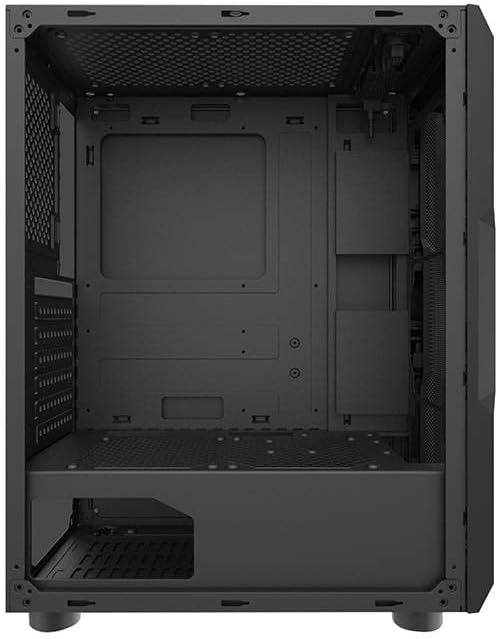
פיגורע 3: ינלענדיש view of the darkFlash Aquarius Mesh case, highlighting the motherboard tray and cable routing options.
4.3. מאַכט צושטעלן אַפּאַראַט (PSU) ינסטאַלירונג
The PSU mounts at the bottom rear of the case.
- Slide the PSU into its designated compartment from the rear of the case.
- Align the screw holes and secure the PSU with screws.
4.4. סטאָרידזש דרייוו אינסטאַלאַציע
The case provides mounting options for 3.5-inch HDDs and 2.5-inch SSDs.
- 3.5" האַרט דיסקס: Locate the drive cage usually beneath the PSU shroud or behind the motherboard tray. Slide the HDD into the bay and secure it with screws.
- 2.5" SSDs: Mount SSDs to dedicated brackets behind the motherboard tray or on the PSU shroud. Secure with screws.

Figure 4: Rear interior view of the darkFlash Aquarius Mesh case, showing the motherboard cutout and potential SSD mounting points.
4.5. Expansion Card Installation (e.g., GPU)
- אַראָפּנעמען די נייטיקע יקספּאַנשאַן סלאָט דעקל פון די הינטערשטע טייל פון די קעסטל.
- Insert the expansion card into the appropriate PCIe slot on the motherboard.
- Secure the card with the provided screws or retention clips.
4.6. קאַבלע מאַנאַגעמענט
Utilize the cable routing cutouts and tie-down points behind the motherboard tray to organize cables. This improves airflow and aesthetics.
4.7. Reassembling the Case
Once all components are installed and cables are managed:
- Carefully reattach the side panels, ensuring they slide into place correctly.
- Secure the side panels with the thumbscrews.
5. אַפּערייטינג ינסטרוקטיאָנס
After assembly, connect your peripherals and power cable.
- Connect your monitor, keyboard, mouse, and other peripherals to the motherboard's I/O ports.
- Connect the power cable to the PSU and a wall outlet.
- Press the power button located on the top panel of the case to start your computer.

פיגורע 5: שפּיץ view of the darkFlash Aquarius Mesh case, showing the front I/O panel with power button, reset button, USB ports, and audio jacks.
6. וישאַלט
רעגולערע אויפהאלטונג העלפט זיכער מאכן די אפטימאלע פאָרשטעלונג און לענג פון לעבן פון אייערע קאמפיוטער קאמפאנענטן.
- שטויב פילטערס: The Aquarius Mesh case features removable dust filters (e.g., on the front, top, and bottom). Regularly remove and clean these filters with water and mild soap, or by vacuuming, to maintain good airflow. Ensure they are completely dry before reinstallation.
- ינלענדיש רייניקונג: Periodically open the case and use compressed air to remove dust buildup from fans, heatsinks, and other components.
- עקסטעריאָר רייניקונג: ווישן די יקסטיריער סערפאַסיז מיט אַ ווייך, דamp שטאָף. ויסמייַדן האַרב קעמיקאַלז.
7. טראָובלעשאָאָטינג
אויב איר טרעפט פּראָבלעמען, באַטראַכט די פאלגענדע געוויינטלעכע לייזונגען:
- קיין מאַכט:
- Ensure the PSU switch is in the 'ON' position.
- Check all power connections to the motherboard and components.
- Verify the power cable is securely plugged into the wall outlet and PSU.
- פעןס דרייען זיך נישט:
- Check fan connections to the motherboard or fan controller.
- Ensure fans are not obstructed by cables or dust.
- Front Panel I/O Not Working:
- Verify that the front panel connectors (USB, audio, power/reset switches) are correctly connected to the motherboard headers. Refer to your motherboard manual for header locations.
8. ספּעסאַפאַקיישאַנז
| שטריך | דעטאַל |
|---|---|
| סאָרט | טונקלפלאַש |
| מאָדעל נומער | Aquarius Mesh |
| טיפּ פון קאַסטן | מיטן טורעם |
| מאַטעריאַל | אַללוי סטיל |
| קאָליר | שוואַרץ |
| קאָאָלינג אופֿן | לופט |
| רעקאַמענדיד נוצן | קאָמפּיוטער |
| Hard Drive Form Factor | 3.5 אינטשעס |
9. וואָראַנטי און שטיצן
For warranty information or technical support, please refer to the official darkFlash webזייטל אדער קאנטאקט זייער קאסטומער סערוויס. האלט אייער באווייז פון קויפן פאר גאראנטיע טענות.
פֿאַר ווייטערדיקע הילף, קענט איר באַזוכן די darkFlash official webפּלאַץ.


