הקדמה
The Vikeri 1520P 20MP Trail Camera is designed for wildlife monitoring, hunting, and property surveillance. It features high-resolution video and photo capabilities, a fast trigger speed, and a durable, waterproof design. This manual provides detailed instructions for setting up, operating, and maintaining your trail camera to ensure optimal performance.

Figure 1: Vikeri 1520P 20MP Trail Camera package contents.
סעטאַפּ
1. אויספּאַקן און קאָמפּאָנענטן
איידער איר הייבט אן די סעטאַפּ, זיכערט זיך אז אלע קאמפאנענטן זענען פאראן:
- Vikeri 1520P 20MP Trail Camera (2 units)
- מאַונטינג רימען
- 32GB Micro SD Card (2 units)
- AA Batteries (8 units)
- וסב קאַבלע
- באַניצער מאַנואַל (דעם דאָקומענט)
2. באַטאַרייע ייַנמאָנטירונג
- געפינט די באַטעריע אָפּטייל אויף דער הינטערשטער זייט פון דער קאַמעראַ.
- Open the two latches on the side of the camera to access the interior.
- אַרײַנשטעלן 4 AA באַטעריעס אין די באַשטימטע סלאָץ, און זיכער מאַכן אַז די פּאָלאַריטעט איז ריכטיק (+/-).
- פאַרמאַכן די באַטאַרייע אָפּטייל סיקיורלי.
3. SD קאַרטל אַריינשטעלן
- Locate the micro SD card slot inside the camera, typically near the battery compartment.
- Insert the provided 32GB micro SD card into the slot until it clicks into place. Ensure the card is inserted in the correct orientation.
- It is recommended to format the SD card through the camera's menu before first use.
4. מאָונטינג די קאַמעראַ
The camera can be mounted to a tree or post using the included strap:
- Thread the mounting strap through the slots on the back of the camera.
- Secure the camera to a tree or post at a height of 1-2 meters (approximately 3-6 feet).
- Ensure the camera is aligned parallel to the ground in the desired direction for optimal detection.
- Tighten the strap firmly to prevent movement.

Figure 2: Camera mounted on a tree, demonstrating its IP66 waterproof rating.
אַפּערייטינג די אַפּאַראַט
1. פּאָווערינג אויף / אויסגעלאשן
- To power on the camera, slide the mode switch to the 'ON' position.
- To power off, slide the switch to the 'OFF' position.
2. נאַוויגאַציע די מעניו
The camera features a built-in 2.4-inch LCD color screen and control buttons for easy navigation and settings adjustment.
- ניצן די דירעקטיאָנאַל קנעפּלעך (אַרויף, אַראָפּ, לינקס, רעכט) צו נאַוויגירן דורך מעניו אָפּציעס.
- Press the 'OK' button to confirm selections.
- Press the 'MENU' button to access the main settings menu.
3. Photo and Video Settings
Adjust the camera settings to suit your monitoring needs:
- רעזאלוציע: The camera supports up to 1520P video and 20MP photos, providing clear and vibrant images.
- טריגער גיכקייַט: With a lightning-fast 0.2-second trigger speed, the camera captures movements quickly, minimizing missed events.
- דעטעקשאַן ווינקל: The 120° wide-angle PIR (Passive Infrared) detection provides a broad field of view, capturing more activity.
- נאַכט זעאונג: Equipped with 48pcs 940nm no-glow infrared LEDs, the camera provides clear night vision up to 65 feet without disturbing wildlife.
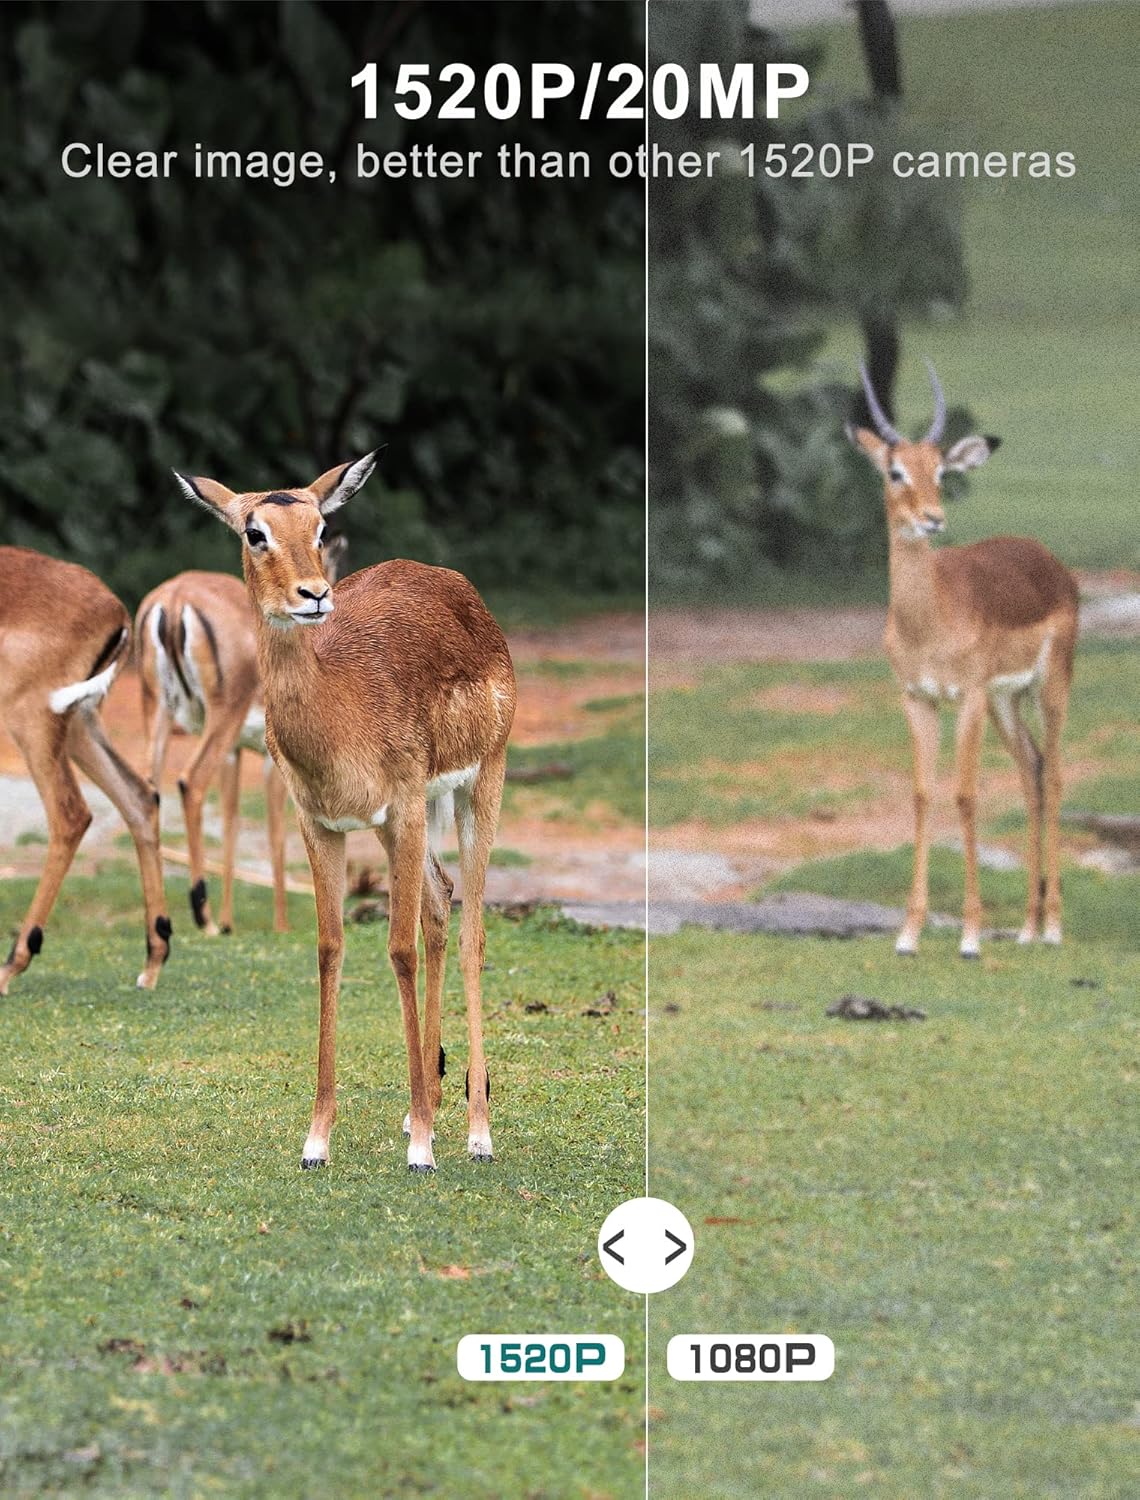
Figure 3: Image quality comparison between 1520P and 1080P resolutions.

Figure 4: Demonstration of the 0.2s trigger speed capturing fast-moving subjects.

Figure 5: The 120° wide-angle detection captures a broader area.

Figure 6: Night vision capability with 940nm no-glow IR LEDs.
4. Viewקאַפּטשערד מעדיע
איר קענען view photos and videos directly on the camera's LCD screen:
- Switch the camera to 'PLAYBACK' mode using the mode switch.
- Use the directional buttons to browse through captured images and videos.
- Press 'OK' to view אַן אויסגעקליבענער file.
- צו אַריבערפירן files to a computer, remove the micro SD card and insert it into a card reader, or connect the camera directly via the USB cable.
וישאַלט
- רייניקונג: Regularly clean the camera lens and PIR sensors with a soft, dry cloth to ensure clear images and accurate detection. Avoid abrasive materials.
- באַטערי טשעק: Monitor battery levels through the LCD screen. Replace all batteries when low to prevent interruption of recording.
- סד קאַרד מאַנאַגעמענט: Periodically format the SD card to maintain optimal performance and prevent data corruption. Back up important files איידער פאָרמאַטטינג.
- וואָטערפּרוף פּלאָמבע: Ensure the latches are securely closed and the rubber seal around the camera housing is free from debris to maintain its IP66 waterproof rating.
- סטאָרידזש: ווען נישט אין באַנוץ פֿאַר לענגערע פּעריאָדן, אַרויסנעמען די באַטעריעס און האַלטן די קאַמעראַ אין אַ קיל, טרוקן אָרט.
טראָובלעשאָאָטינג
| פּראָבלעם | מעגלעך סיבה | לייזונג |
|---|---|---|
| קאַמעראַ גייט נישט אָן | Low or dead batteries; Incorrect battery insertion | Replace all batteries with new ones; Ensure correct polarity (+/-) |
| שלעכטע בילד/ווידעא קוואַליטעט | Dirty lens; Incorrect resolution settings; Insufficient lighting | Clean the lens; Adjust resolution settings in the menu; Ensure adequate light for non-night vision modes |
| באַוועגונג סענסאָר טריגערט נישט | PIR sensor obstructed; Sensitivity set too low; Subject out of range | Clear any obstructions from the sensor; Increase PIR sensitivity in settings; Ensure subject is within detection range (up to 65-80ft) |
| SD card error message | SD card not formatted; Corrupted SD card; Incompatible SD card | Format the SD card via the camera menu; Try a different, high-quality micro SD card (up to 32GB) |
| קורץ באַטאַרייע לעבן | Frequent triggers; Extreme temperatures; Low-quality batteries | Reduce trigger frequency if possible; Use high-quality alkaline or lithium batteries; Avoid extreme temperature exposure |
טעכניש ספּעסאַפאַקיישאַנז
| שטריך | באַשרייַבונג |
|---|---|
| ווידעא קאַפּטורע רעסאָלוטיאָן | 1520 פּ |
| עפעקטיוו נאָך האַכלאָטע | 20 מפּ |
| צינגל ספּיד | 0.2 סעקונדעס |
| Viewינג אַנגלע | 120 דיגריז |
| נאַכט וויזשאַן ראַנגע | 65 פֿיס |
| נומער פון יר לעדס | 48 (940nm No Glow) |
| אינטערנאַציאָנאַלע פּראַטעקשאַן שאַץ | IP66 (וואָטערפּרוף) |
| מאַכט מקור | באַטאַרייע פּאַוערד (4 אַאַ באַטעריז פארלאנגט) |
| קאַנעקטיוויטי טעכנאָלאָגיע | Wireless (USB for data transfer) |
| ווייַז | 2.4" LCD Color Screen |
| מאַטעריאַל | אַקרילאָניטרילע בוטאַדיענע סטירענע (אַבס) |
| פּראָדוקט דימענשאַנז | 5.39 X 3.42 X 2.36 אינטשעס |
| פּונקט וואָג | 2.79 pounds (for 2 cameras) |
וואָראַנטי און שטיצן
For information regarding product warranty, returns, or technical support, please refer to the official Vikeri brand store or contact Vikeri customer service directly.
Official Vikeri Brand Store: Visit the Vikeri Store on Amazon
ביטע באַהאַלטן אייער קויף קוויטל פֿאַר יעדע וואָראַנטי פאָדערונג.


