1. הקדמה
Thank you for choosing the Xigmatek Lux M Micro-ATX Mini Tower PC Case. This manual provides detailed instructions for the installation, operation, and maintenance of your new PC chassis. Please read this manual carefully before beginning the assembly process to ensure proper installation and to maximize the performance and longevity of your system.
The Lux M case is designed to offer a robust and aesthetically pleasing housing for your computer components, featuring a tempered glass side panel, a metallic front panel with a unique cut-out pattern, and pre-installed fixed RGB fans for optimal cooling and visual appeal. It supports Micro-ATX and Mini-ITX motherboards and is compatible with various cooling solutions, including water cooling.
2. זיכערקייַט אינפֿאָרמאַציע
ביטע אָבסערווירן די פאלגענדע זיכערהייט מיטלען בעת ינסטאַלירונג און אָפּעראַציע:
- שטענדיק אָפּשטעקן די מאַכט צושטעל פון די וואַנט אַוטלעט איידער איר ינסטאַלירן אָדער אַראָפּנעמען קיין קאָמפּאָנענטן צו פאַרמייַדן עלעקטרישע קלאַפּ.
- Handle all components with care. Avoid touching circuit boards directly; hold them by their edges.
- Wear an anti-static wrist strap when handling sensitive electronic components to prevent electrostatic discharge (ESD) damage.
- Keep the case and components away from liquids, excessive heat, and direct sunlight.
- זאָרגט פֿאַר געהעריקע ווענטילאַציע אַרום דעם פּיסי קעסטל כּדי צו פֿאַרמייַדן איבערהיצונג.
- האַלט קליינע טיילן און שרויפן אַוועק פון קינדער.
3. פּעקל אינהאַלט
באַשטעטיקט אַז אַלע זאכן זענען פאַראַן אין אייער פּעקל. אויב עפּעס פעלן אָדער זענען געשעדיגט, ביטע קאָנטאַקט אייער הענדלער.
- Xigmatek Lux M Micro-ATX Mini Tower PC Case
- Accessory box (containing screws, standoffs, cable ties, etc.)
- באַניצער מאַנואַל (דעם דאָקומענט)
4. פּראָדוקט איבערview
Familiarize yourself with the various parts of your Xigmatek Lux M PC case.
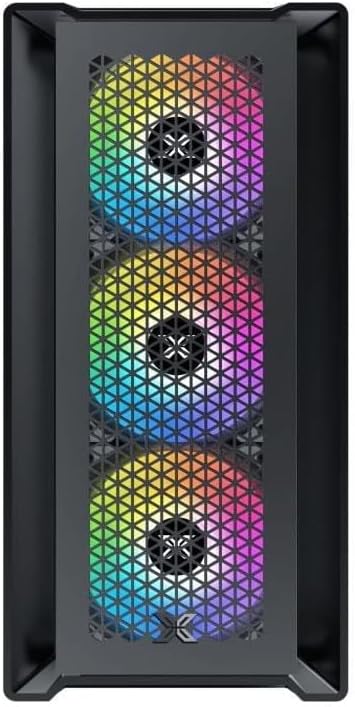
פיגורע 4.1: פראָנט View. This image displays the front of the Xigmatek Lux M case, highlighting the metallic mesh panel with a triangular design and the three pre-installed 120mm fixed RGB fans.

Figure 4.2: Angled Top-Front View. This perspective shows the tempered glass side panel, offering a clear view of the interior, and the top panel with its I/O ports (USB, audio) and power button.
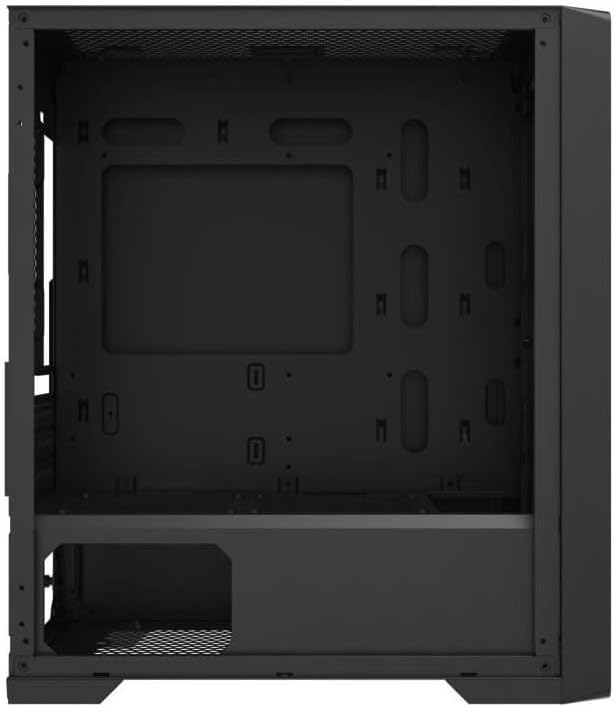
פיגור 4.3: אינעווייניקסטע אויסלייג. The internal structure of the case, featuring the motherboard mounting tray, cutouts for cable management, and the power supply shroud at the bottom.
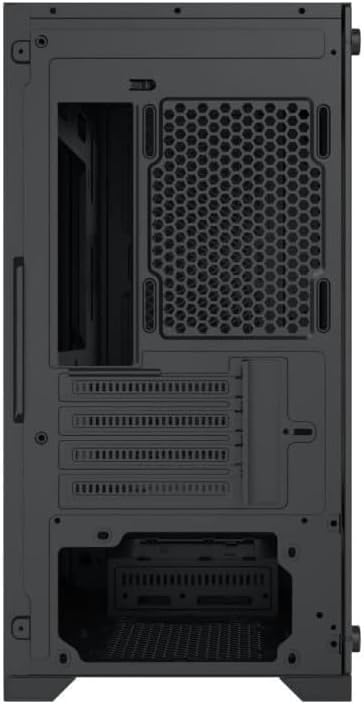
פיגורע 4.4: דערציען View. This image illustrates the rear of the case, including the expansion slots for graphics cards and other add-in cards, the rear fan mounting area, and the power supply mounting bracket.
5. סעטאַפּ און ייַנמאָנטירונג
Follow these steps to install your computer components into the Xigmatek Lux M case.
5.1. צוגרייטן דעם פאַל
- שטעלט דעם קעסטל אויף א פלאַכער, סטאַבילער ייבערפלאַך.
- Remove the tempered glass side panel by unscrewing the thumb screws and carefully lifting it off. Set it aside on a soft, non-abrasive surface.
- Remove the opposite steel side panel by unscrewing the thumb screws and sliding it backward.
5.2. מאָטהערבאָאַרד ינסטאַללאַטיאָן
The Lux M supports Micro-ATX and Mini-ITX motherboards.
- אינסטאלירט דעם I/O שילד (אויב נישט פאר-אינסטאלירט אויף אייער מוטערבאָרד) אין דער הינטערשטער עפענונג פון דעם קעיס.
- Align the motherboard with the pre-installed standoffs. Ensure all screw holes on the motherboard match the standoffs.
- Secure the motherboard using the provided motherboard screws. Do not overtighten.
5.3. מאַכט צושטעלן אַפּאַראַט (PSU) ינסטאַלירונג
The PSU mounts at the rear bottom of the case.
- שטופּ אַרײַן די PSU אין זײַן באַשטימטן אָפּטייל פֿון דער הינטערשטער זײַט פֿונעם קעיס.
- Align the PSU's screw holes with the holes on the case's rear panel.
- Secure the PSU with the provided screws.
5.4. Storage Drive Installation (2.5"/3.5" Drives)
The case supports 2x 2.5"/3.5" storage drives.
- Locate the drive cage beneath the PSU shroud or dedicated 2.5" mounting points behind the motherboard tray.
- For 3.5" HDDs, slide the drive into a drive tray (if applicable) and secure it with screws.
- For 2.5" SSDs, secure them directly to the mounting points using the provided screws.
5.5. Graphics Card (VGA) and Expansion Card Installation
דער קעיס שטיצט גראַפיקס קאַרדס ביז 320 מם אין לענג.
- אַראָפּנעמען די נייטיקע יקספּאַנשאַן סלאָט דעקל פון די הינטערשטע טייל פון די קעסטל.
- Insert your graphics card or other expansion card into the appropriate PCIe slot on your motherboard.
- Secure the card to the case using the expansion slot screws.
5.6. Cooling System Installation (Optional)
The Lux M comes with 4x 120mm X24F fixed RGB fans. It supports additional cooling options.
- CPU Cooler: Max height of 160mm. Install your CPU cooler according to its manufacturer's instructions.
- ראַדיאַטאָר שטיצן: The case supports radiators of 360mm, 240mm, or 120mm. Refer to your radiator's manual for installation. Common mounting locations include the front and top panels.
5.7. קאַבלע מאַנאַגעמענט
ניצט די קאַבל רוטינג אויסשניטן און בינדפּונקטן הינטערן מאַדערבאָרד טאַץ צו אָרגאַניזירן קאַבלען. דאָס פֿאַרבעסערט לופֿטפֿלוס און עסטעטיק.
5.8. לעצט אַסעמבלי
- Once all components are installed and cables are managed, reattach the steel side panel and secure it with thumb screws.
- Carefully reattach the tempered glass side panel and secure it with thumb screws.
6. אַפּערייטינג ינסטרוקטיאָנס
After completing the installation, connect your peripherals (monitor, keyboard, mouse) and power cable to the PC. Press the power button located on the top panel of the case to start your system.
The pre-installed X24F RGB fans feature fixed RGB lighting, which will illuminate automatically upon system power-on. No additional software or controller is required for their basic operation.
Ensure that the case's ventilation is not obstructed to maintain optimal airflow and cooling performance.
7. וישאַלט
רעגולערע אויפהאלטונג העלפט זיכער מאכן די לאנגעוויטי און אפטימאלע פערפארמאנס פון אייערע קאמפיוטער קאמפאנענטן.
- שטויב רייניקונג: Periodically clean dust filters (if present) and the interior of the case using compressed air or a soft brush. Dust accumulation can hinder airflow and lead to overheating.
- עקסטעריאָר רייניקונג: ווישן די יקסטיריער סערפאַסיז מיט אַ ווייך, דamp cloth. Avoid harsh chemicals that may damage the finish or tempered glass.
- טעמפּערד גלאז: Clean the tempered glass panel with a glass cleaner and a microfiber cloth to avoid scratches and streaks.
8. טראָובלעשאָאָטינג
אויב איר טרעפט פּראָבלעמען בעת אָדער נאָך דער אינסטאַלאַציע, באַטראַכט די פאלגענדע געוויינטלעכע טראָובלעשווטינג טריט:
- קיין מאַכט:
- זיכער מאַכן אַז דער מאַכט קאַבל איז זיכער פארבונדן צו ביידע די PSU און די וואַנט אָוטלעט.
- Check that the PSU switch is in the 'ON' position.
- Verify that the front panel power switch cable is correctly connected to the motherboard's front panel header.
- Fans Not Spinning / RGB Not Lighting:
- Ensure all fan power cables are securely connected to the motherboard or a fan controller.
- For RGB, confirm that any necessary RGB headers are connected to the motherboard (though the included fans are fixed RGB and should light up with power).
- קיין אַרויסווייַז רעזולטאַט:
- Verify that your monitor cable is connected to the graphics card (if installed) and not the motherboard's integrated graphics port.
- לייג צוריק די גראַפיקס קאַרטל אין איר PCIe סלאָט.
- איבערהייצונג:
- Ensure all case fans are spinning and oriented correctly for optimal airflow (intake/exhaust).
- Clean any dust filters and internal components.
- Verify that the CPU cooler is properly seated and making good contact with the CPU.
For more complex issues, consult your component manuals or seek assistance from Xigmatek support or a qualified technician.
9. ספּעסאַפאַקיישאַנז
| שטריך | באַשרייַבונג |
|---|---|
| סאָרט | קסיגמאַטעק |
| מאָדעל נאָמען | Lux M |
| מאָדעל נומער | EN48540 |
| טיפּ פון קאַסטן | מיני טאַוער |
| מאָטהערבאָאַרד קאַמפּאַטאַבילאַטי | מיקראָ-אַטקס, מיני-יטקס |
| מאַטעריאַל | Tempered Glass (side panel), Metal (front panel) |
| קאָליר | שוואַרץ |
| פאַר-אינסטאַלירן פאַנס | 4 x 120mm X24F Fixed RGB Fans |
| ראַדיאַטאָר שטיצן | 360 מם, 240 מם, 120 מם |
| מאַקסימום קפּו קולער הייך | 160 מם |
| מאַקס VGA לענג | 320 מם |
| מאַקסימום פּסו לענג | 165 מם |
| סטאָרידזש בייס | 2x 2.5"/3.5" |
| ספּעציעלע פֿעיִקייטן | RGB Lighting, Triangular Mesh Front Design |
10. וואָראַנטי און שטיצן
Xigmatek products are manufactured to the highest quality standards. For warranty information and technical support, please refer to the warranty card included with your product or visit the official Xigmatek webזייטל. ביטע באַהאַלטן אייער קויפן באַווייַז פֿאַר וואָראַנטי קליימז.
For further assistance, you may contact Xigmatek customer support through their official channels.


