1. הקדמה
This manual provides detailed instructions for the installation, operation, and maintenance of the Vivotek ND9425P 16-Channel 4K UHD Network Video Recorder (NVR). This NVR is designed to manage and record video streams from up to 16 IP cameras, offering 4K UHD resolution support for high-quality surveillance. It is an integral component of a comprehensive security system, suitable for various applications requiring reliable video monitoring and recording.
Key features of the Vivotek ND9425P NVR include:
- Multimedia SoC CPU for efficient processing.
- Support for H.265, H.264, and MJPEG video codecs for flexible compression.
- Seamless recording capabilities.
- Smart Stream III optimization for bandwidth efficiency.
- Integrated PoE technology for simplified camera connectivity (when used with compatible PoE cameras).
2. זיכערקייַט אינפֿאָרמאַציע
Please read all safety instructions carefully before operating the device. Failure to follow these instructions may result in injury or damage to the product.
- מאַכט מקור: Use only the power adapter supplied with the NVR. Ensure the power outlet provides the correct voltage.
- ווענטילאַטיאָן: Do not block any ventilation openings. Install the NVR in a well-ventilated area to prevent overheating.
- סוויווע: Avoid exposing the NVR to water, moisture, extreme temperatures, or direct sunlight.
- רייניקונג: אָפּשטעקן די מאַכט איידער רייניקונג. ניצט אַ טרוקענעם, ווייכן שטאָף. ניצט נישט פליסיקע אָדער אַעראָזאָל רייניגער.
- סערוויס: דו זאלסט נישט פּרווון צו דינען דעם פּראָדוקט זיך. קאָנטאַקט אַלע קוואַלאַפייד סערוויס פּערסאַנעל.
- קאַבלעס: Ensure all cables are properly connected and secured to prevent tripping hazards or accidental disconnections.
3. פּעקל אינהאַלט
באַשטעטיקן אַז אַלע זאכן זענען פאַראַן אין דעם פּעקל איידער איר גייט ווייטער מיט דער אינסטאַלאַציע:
- Vivotek ND9425P 16-Channel 4K UHD NVR Unit
- מאַכט אַדאַפּטער
- וסב מאַוס
- שנעל ינסטאַללאַטיאָן גייד
- Resource CD (containing full manual and software)
- שרויפן פֿאַר HDD אינסטאַלאַציע (אויב אָנווענדלעך)
- עטהערנעט קאַבלע
Note: The package contents may vary slightly depending on the specific kit purchased. For example, some kits may include 8 x 2 MP Night Vision Dome Cameras and 8 x Ethernet Patch Cables.
4. פּראָדוקט איבערview
דער אָפּטיילונג גיט אַן איבערבליקview of the Vivotek ND9425P NVR's physical components and interfaces.
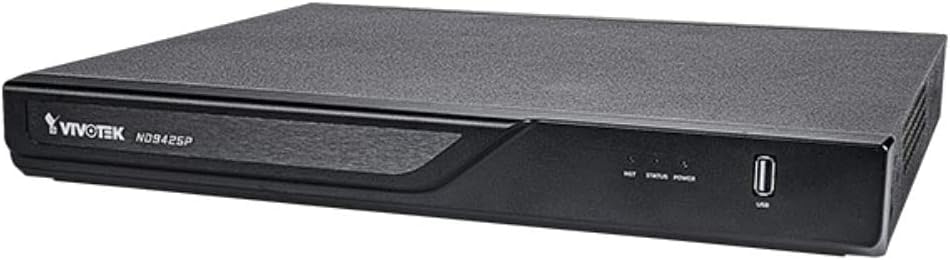
פיגורע 4.1: Vivotek ND9425P NVR Front Panel
The image displays the Vivotek ND9425P NVR unit, a compact black rectangular device. The front panel features the "VIVOTEK ND9425P" logo on the left, followed by three small indicator lights labeled "NET", "STATUS", and "POWER". On the far right of the front panel, there is a USB port, labeled "USB" below it. The top surface of the NVR has a textured finish.
4.1 Front Panel Indicators and Ports
- נעץ געפירט: ינדיקייץ נעץ טעטיקייט.
- סטאַטוס געפירט: Indicates system status (e.g., recording, error).
- מאַכט געפֿירט: ינדיקייץ מאַכט סטאַטוס.
- וסב פּאָרט: For connecting a USB mouse, keyboard, or external storage devices for backup.
4.2 הינטערשטע פּאַנעל פּאָרטן
The rear panel typically includes ports for power input, Ethernet (LAN), HDMI/VGA video output, audio input/output, and additional USB ports for peripheral connections.
5. סעטאַפּ
5.1 ייַזנוואַרג ינסטאַלירונג
- האַרט דרייוו אינסטאַלאַציע (אויב נישט פאַר-אינסטאַלירט):
Unscrew the NVR cover. Carefully slide the hard drive into the bay and secure it with the provided screws. Reattach the cover.
- פֿאַרבינדן קאַמעראַס:
Connect your IP cameras to the NVR's PoE ports (if available) or to your network switch. Ensure all cameras are powered on and accessible on the network.
- פאַרבינדן צו די נעץ:
פֿאַרבינדט אַן עטהערנעט קאַבל פֿון די NVR'ס LAN פּאָרט צו דיין ראַוטער אָדער נעץ סוויטש.
- פֿאַרבינדן דיספּליי:
פֿאַרבינדט אַ מאָניטאָר צום NVR'ס HDMI אָדער VGA אַרויסגאַנג פּאָרט.
- פאַרבינדן פּעריפעראַלס:
פֿאַרבינדט די USB מויז צו אַ USB פּאָרט אויף די NVR.
- מאַכט אויף:
פֿאַרבינדט דעם מאַכט אַדאַפּטער צום NVR'ס מאַכט אַרייַנגאַנג און דאַן שטעקט עס אַרײַן אין אַ מאַכט אַוטלעט. דער NVR וועט זיך אויטאָמאַטיש אָנצינדן.
5.2 Initial Configuration Wizard
Upon the first boot, the NVR will typically launch an initial configuration wizard. Follow the on-screen prompts to:
- שטעלט אויף דעם אדמיניסטראטאר פּאַראָל.
- קאָנפיגורירן נעץ סעטטינגס (DHCP אדער סטאַטיק IP).
- זוכן פֿאַר און צולייגן פארבונדענע IP קאַמעראַס.
- שטעלן דאַטע און צייט.
- איניציאליזירן די האַרט דרייוו פֿאַר רעקאָרדינג.
6. אפערירן די NVR
6.1 לעבן View
נאך דער ערשטער סעטאַפּ, וועט די NVR ווייַזן די לעבעדיגע view פון פארבונדענע קאַמעראַס. איר קענט באַשטימען צווישן איין-קאַמעראַ view און מולטי-קאַמעראַ גריד views.
6.2 רעקאָרדינג קאָנפיגוראַטיאָן
Access the recording settings through the main menu to configure recording schedules and modes:
- קעסיידערדיק רעקאָרדינג: רעקאָרדס 24/7.
- רעקאָרדינג פון באַוועגונג דעטעקטיאָן: Records only when motion is detected by the camera.
- סקעדזשולד רעקאָרדינג: רעקאָרדס בעת ספּעציפֿישע צייטן פון טאָג אָדער וואָך.
- געשעעניש רעקאָרדינג: רעקאָרדס באַזירט אויף ספּעציפֿישע געשעענישן (למשל, אַלאַרם אַרייַנשרייַב).
6.3 ווידערשפּיל און באַקאַפּ
צו שייַעךview רעקאָרדעד פוtage:
- Navigate to the "Playback" section from the main menu.
- אויסקלייבן די געוואונטשענע קאַמערא(ס) און דאַטע/צייט קייט.
- ניצט די צייט-ליניע צו נאַוויגירן דורך רעקאָרדירונגען.
- To back up footage, insert a USB drive into the NVR's USB port and follow the on-screen instructions for export.
6.4 רימאָוט אַקסעס
The Vivotek ND9425P NVR supports remote access via a web browser or dedicated mobile applications (e.g., VIVOCloud). Refer to the full user manual on the Resource CD for detailed instructions on setting up remote access, including port forwarding or P2P cloud services.
7. וישאַלט
7.1 פירמוואַרע דערהייַנטיקונגען
קאָנטראָלירט און אינסטאַלירט רעגולער פירמווער דערהייַנטיקונגען צו ענשור אָפּטימאַלע פאָרשטעלונג, זיכערהייט און צוטריט צו נייַע פֿעיִקייטן. פירמווער דערהייַנטיקונגען קענען טיפּיש דורכגעפירט ווערן דורך די NVR'ס. web interface or through a USB drive.
7.2 האַרט דרייוו פאַרוואַלטונג
The NVR will automatically overwrite the oldest recordings when the hard drive is full. You can configure storage settings, check HDD health, and format the drive through the system settings.
7.3 רייניקונג
Keep the NVR unit clean by gently wiping its exterior with a dry, soft cloth. Ensure ventilation openings are free from dust and obstructions.
8. טראָובלעשאָאָטינג
| פּראָבלעם | מעגלעך סיבה | לייזונג |
|---|---|---|
| קיין מאַכט | Power cable disconnected; faulty power adapter; power outlet issue. | Check power cable connection; try a different power outlet; contact support if adapter is faulty. |
| קיין ווידעא רעזולטאַט | HDMI/VGA cable loose; incorrect display input selected; NVR not booted. | Ensure display cable is secure; select correct input on monitor; wait for NVR to boot up. |
| Cameras Not Displaying | Network issue; camera not powered; incorrect camera IP address; camera not added to NVR. | Check network cables; ensure cameras are powered; verify camera IP settings; add cameras via NVR interface. |
| קיין רעקאָרדינג | Hard drive not initialized; recording schedule not set; HDD full. | Initialize HDD in settings; configure recording schedule; check HDD status. |
| Remote Access Fails | נעץ קאָנפיגוראַציע פּראָבלעם; פּאָרט פאָרווערדינג נישט אײַנגעשטעלט; פיירוואַל בלאָקירן. | באַשטעטיקן נעץ סעטטינגס; קאָנפיגורירן פּאָרט פאָרווערדינג אויף ראַוטער; קאָנטראָלירן פיירוואַל כּללים. |
For more detailed troubleshooting, refer to the comprehensive user manual provided on the Resource CD or visit the VIVOTEK support webפּלאַץ.
9. ספּעסאַפאַקיישאַנז
| שטריך | דעטאַל |
|---|---|
| מאָדעל נומער | ND9425P |
| פאַבריקאַנט | Vivotek USA |
| פּראָדוקט דימענשאַנז | 19.69 X 19.69 X 11.02 אינטשעס |
| פּונקט וואָג | 8.62 פונט |
| קאַנעקטיוויטי טעכנאָלאָגיע | עטהערנעט |
| קאַמפּאַטאַבאַל דעוויסעס | אַפּאַראַט |
| זכּרון סטאָרידזש קאַפּאַסיטי | 64 GB (referring to internal flash/RAM, not HDD capacity) |
| נומער פון טשאַנאַלז | 16 |
| ווידעא קאָדעקס | ה .265, ה .264, מדזשפּעג |
| מאַקסימום רעזאָלוציע שטיצע | 4K UHD (as per product title) |
10. וואָראַנטי און שטיצן
For warranty information, please refer to the warranty card included with your product or visit the official VIVOTEK website. VIVOTEK provides technical support for its products. If you encounter issues that cannot be resolved using this manual or the troubleshooting section, please contact VIVOTEK customer support through their official webזייטל אדער באשטימטע שטיצע קאנאלן.
Official VIVOTEK Webפּלאַץ: www.vivotek.com


