1. הקדמה
This manual provides comprehensive instructions for the installation, operation, and maintenance of your AZZA CSAZ-340F CELESTA ATX Mid Tower Gaming Case. Please read this manual thoroughly before beginning installation to ensure proper setup and to maximize the performance and longevity of your system components.

פיגורע 1: The AZZA CSAZ-340F CELESTA Mid Tower ATX Case, showcasing its design and form factor.
2. זיכערקייַט אינפֿאָרמאַציע
- Always disconnect the power supply from the wall outlet before installing or removing any components inside the case.
- Handle all components with care to prevent damage from electrostatic discharge (ESD). Consider using an anti-static wrist strap.
- Keep the case and components away from liquids and excessive moisture.
- זאָרגט פֿאַר געהעריקע ווענטילאַציע אַרום דעם קעסטל צו פֿאַרמייַדן איבערהיצונג.
- Do not attempt to modify the case structure or components, as this may void your warranty and pose safety risks.
- האַלט קליינע טיילן און פּאַקאַדזשינג מאַטעריאַלן אַוועק פון קינדער.
3. פּעקל אינהאַלט
באַשטעטיקט אַז אַלע זאכן וואָס זענען אויסגערעכנט אונטן זענען פאַראַן אין אייער פּעקל:
- AZZA CSAZ-340F CELESTA ATX Mid Tower Gaming Case
- אַקסעסאָרי קעסטל (מיט שרויפן, סטאַנדאָפס, קאַבל טייז, אאז"וו)
- באַניצער מאַנואַל (דעם דאָקומענט)
4. ספּעסאַפאַקיישאַנז
The following table details the technical specifications of the AZZA CSAZ-340F CELESTA case:
| שטריך | באַשרייַבונג |
|---|---|
| סאָרט | AZZA |
| מאָדעל נאָמען | CSAZ-340F CELESTA |
| טיפּ פון קאַסטן | מיד טאַוער |
| מאָטהערבאָאַרד קאַמפּאַטאַבילאַטי | אַטקס, מיקראָ-אַטקס, מיני-יטקס |
| קאָליר | שוואַרץ |
| מאַטעריאַל | מעטאַל |
| מאַכט צושטעלן מאַונטינג טיפּ | דנאָ בארג |
| קאָאָלינג אופֿן | לופט |
| Fan Size (Included/Supported) | 120mm (Rear included), Supports 120mm/140mm |
| מאַקסימום גפּו לענג | 320 מם |
| מאַקסימום קפּו קולער הייך | 165 מם |
| מאַקסימום פּסו לענג | 160 מם |
| 3.5" HDD Support | 2 |
| 2.5" SSD Support | 4/6 (depending on configuration) |
| סופּפּאָרט פראָנט פאַן | 3 X 120 מם אָדער 3 X 140 מם |
| Top Fan Support | 2 X 120 מם אָדער 2 X 140 מם |
| Rear Fan Support | 1 X 120 מם |
| פראָנט ראַדיאַטאָר שטיצן | Up to 280mm/360mm |
| שפּיץ ראַדיאַטאָר שטיצן | 2 x 120mm (from image) |
| דערציען ראַדיאַטאָר שטיצן | 1 x 120mm (from image) |
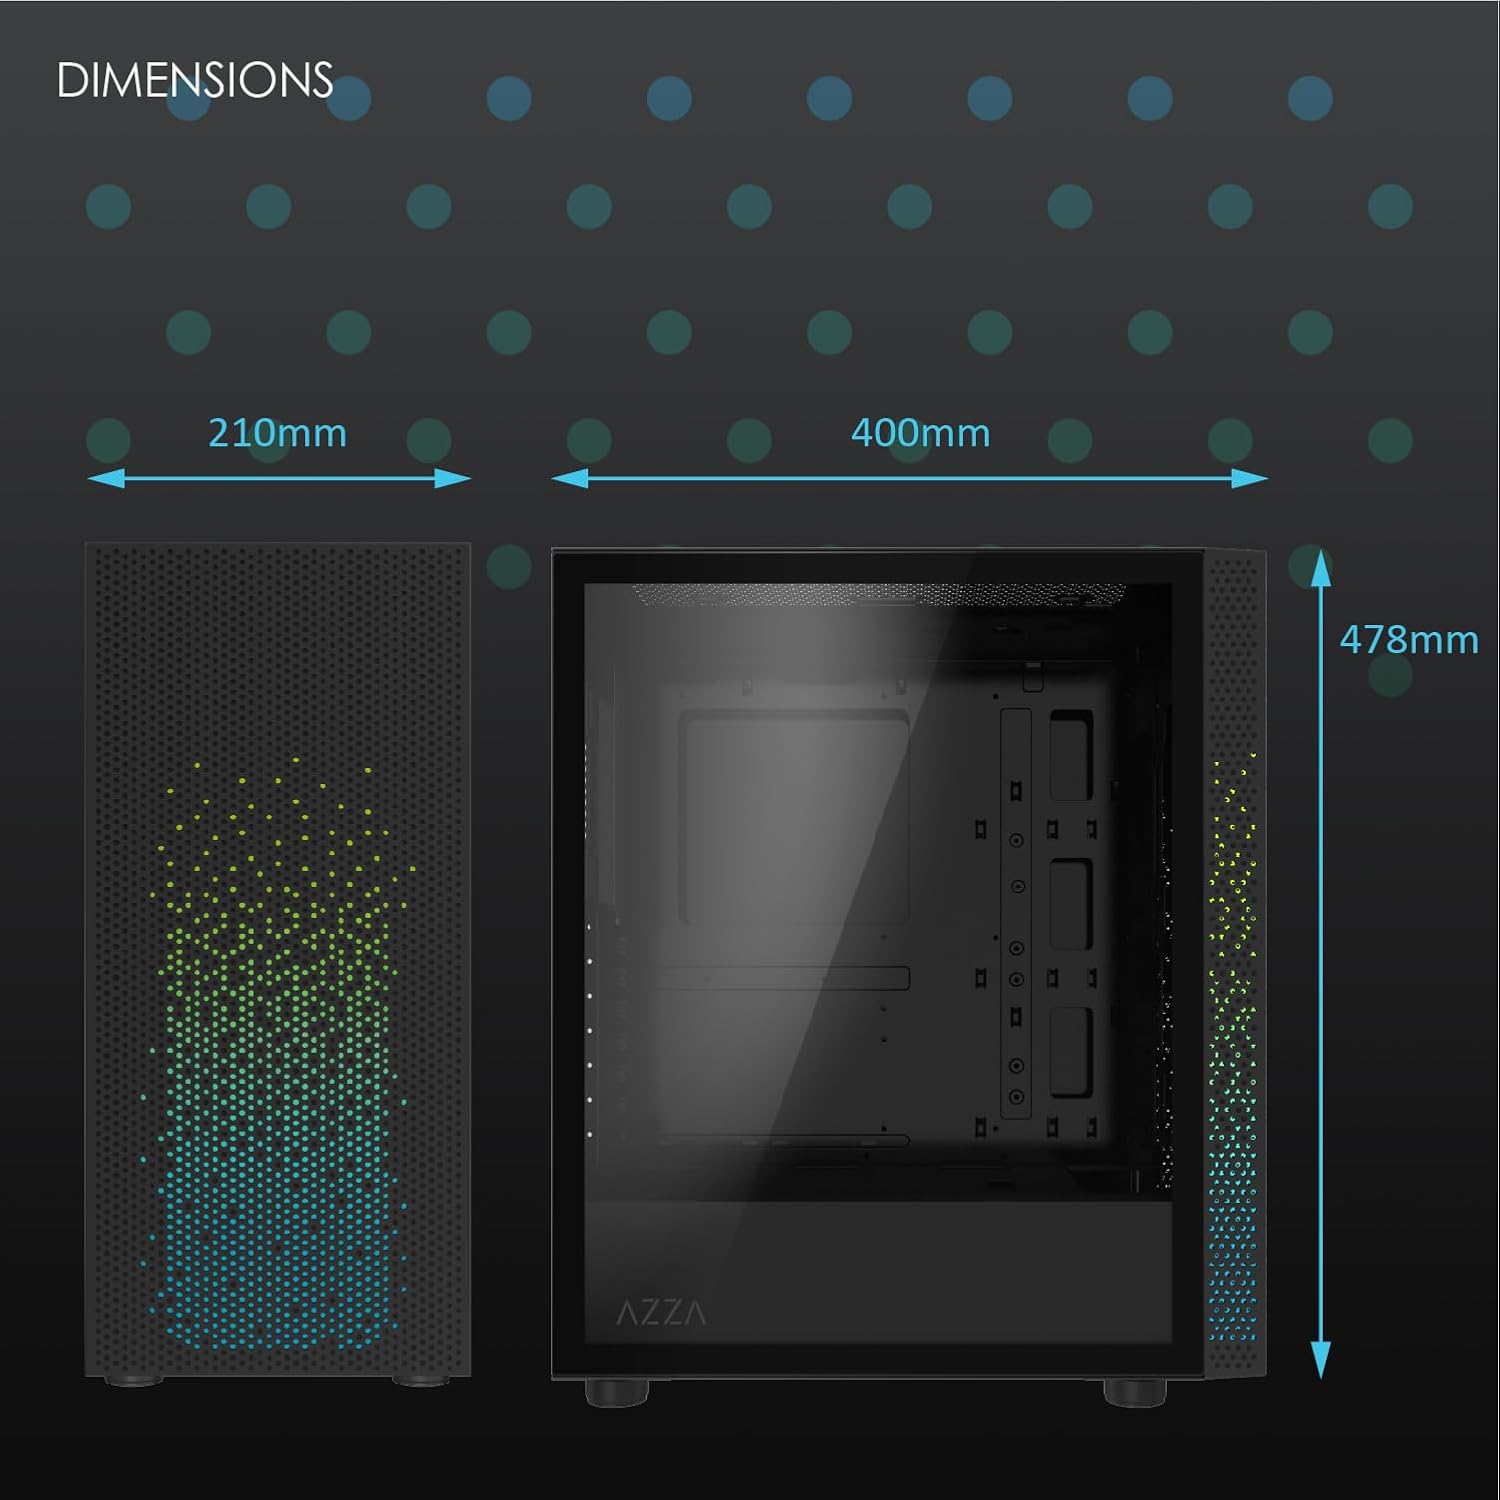
פיגורע 2: Physical dimensions of the AZZA CSAZ-340F CELESTA case: 210mm (width), 400mm (depth), 478mm (height).

פיגורע 3: Diagram illustrating fan and radiator mounting options for the AZZA CSAZ-340F CELESTA case, including front, top, and rear configurations.

פיגורע 4: Internal component support diagram for the AZZA CSAZ-340F CELESTA, showing maximum dimensions for CPU cooler, GPU, and PSU, along with drive bay locations.
5. סעטאַפּ און ייַנמאָנטירונג
Follow these steps to install your components into the AZZA CSAZ-340F CELESTA case.
5.1 צוגרייטן דעם פאַל
- שטעלט דעם קעסטל אויף א פלאַכער, סטאַבילער ייבערפלאַך.
- Remove the side panels. Typically, these are secured with thumbscrews at the rear of the case.
5.2 מאָטהערבאָאַרד ינסטאַללאַטיאָן
- Install the I/O shield (if not pre-installed) into the rear opening of the case.
- Ensure the correct standoffs are installed for your ATX, Micro-ATX, or Mini-ITX motherboard. Adjust or add standoffs as needed using the provided tools.
- לייגט פֿאָרזיכטיק אייער מאַדערבאָרד אויף די סטאַנדאָפס, און גלייכט אויס די שרויף לעכער.
- Secure the motherboard with the appropriate screws from the accessory box. Do not overtighten.
5.3 מאַכט סופּפּלי יוניט (פּסו) ינסטאַלירונג
- Position the PSU in the bottom rear compartment of the case, ensuring the fan faces downwards (if there's a filtered vent) or upwards.
- Secure the PSU to the case with the provided screws from the rear.
- פירט די נויטיקע מאַכט קייבאַלז דורך די קאַבל פאַרוואַלטונג אויסשניטן.
5.4 סטאָרידזש דרייוו אינסטאַלאַציע (HDD/SSD)
- 3.5" האַרט דיסקס: Locate the drive cage. Slide the 3.5" HDDs into the drive trays and secure them, often tool-less or with screws.
- 2.5" SSDs: Mount 2.5" SSDs to the dedicated mounting points on the motherboard tray or drive cage using screws.
- Connect SATA data and power cables to the installed drives.
5.5 גראַפיקס קאַרטל (GPU) ינסטאַלירונג
- אַראָפּנעמען די נייטיקע PCIe סלאָט דעקל פון די הינטערשטע טייל פון די קעסטל.
- Carefully insert your graphics card into the appropriate PCIe slot on the motherboard until it clicks into place.
- באַפֿעסטיקן די גראַפיקס קאַרטל צום קעיס מיט שרויפֿן.
- Connect any required PCIe power cables from the PSU to the graphics card.
5.6 אינסטאַלאַציע פון CPU קילער
Install your CPU cooler according to its specific manufacturer instructions. Ensure it does not exceed the maximum height of 165mm.
5.7 אינסטאַלאַציע פון ווענטילאַטאָר און ראַדיאַטאָר
דער קעיס שטיצט פארשידענע פען און ראַדיאַטאָר קאָנפיגוראַציעס:
- פראָנט: Up to 3 x 120mm or 3 x 140mm fans, or radiators up to 280mm/360mm.
- אויבן: Up to 2 x 120mm or 2 x 140mm fans, or 2 x 120mm radiators.
- הינטן: 1 x 120mm fan (pre-installed) or 1 x 120mm radiator.
Mount fans and radiators using the appropriate screws and ensure proper airflow direction.
5.8 קאַבלע מאַנאַגעמענט
ניצט די קאַבל פאַרוואַלטונג אויסשניטן און בינדונג פונקטן הינטער די מאַדערבאָרד טאַץ צו פירן און באַזאָרגן קאַבלען. דאָס פֿאַרבעסערט לופט לויפן און עסטעטיק.
5.9 לעצט אַסעמבלי
- Double-check all connections and ensure no cables are obstructing fans.
- Reattach the side panels.
- Connect external peripherals (monitor, keyboard, mouse, etc.) and the power cable.
6. אפערירן אייער סיסטעם
Once all components are installed and connected, you can power on your system. The front panel features power and reset buttons, along with USB and audio ports for convenient access.

פיגורע 5: Close-up of the AZZA CSAZ-340F CELESTA's front panel, highlighting the integrated lighting effects.
7. וישאַלט
- שטויב פילטערס: Regularly clean the dust filters (if present) to maintain optimal airflow and cooling performance.
- ינלענדיש רייניקונג: Periodically open the case and use compressed air to remove dust from components and fans. Ensure the system is powered off and unplugged before cleaning.
- עקסטעריאָר רייניקונג: ווישן די יקסטיריער סערפאַסיז מיט אַ ווייך, דamp שטאָף. ויסמייַדן האַרב קעמיקאַלז.
8. טראָובלעשאָאָטינג
אויב איר טרעפט פּראָבלעמען, באַטראַכט די פאלגענדע געוויינטלעכע טראָובלעשווטינג טריט:
- סיסטעם גייט נישט אן:
- זיכער מאַכן אַז דער מאַכט קאַבל איז זיכער פארבונדן צו ביידע די PSU און די וואַנט אָוטלעט.
- Check that the PSU switch is in the "ON" position.
- Verify all internal power connections (24-pin ATX, 8-pin CPU, PCIe power) are seated correctly.
- באַשטעטיקן אַז די פראָנט פּאַנעל מאַכט קנעפּל קייבאַלז זענען ריכטיק פארבונדן צו די מאָטהערבאָאַרד.
- קיין אַרויסווייַז רעזולטאַט:
- Ensure your monitor is connected to the graphics card (not the motherboard's integrated graphics ports, unless you are using integrated graphics).
- לייג צוריק די גראַפיקס קאַרטל אין איר PCIe סלאָט.
- Check monitor input selection.
- איבערהייצונג:
- Verify all case fans are spinning and oriented correctly for airflow.
- Clean any dust filters and internal components.
- Ensure CPU cooler is properly seated and making good contact with the CPU.
9. וואָראַנטי און שטיצן
For warranty information and technical support, please refer to the official AZZA website or contact AZZA customer service directly. Keep your proof of purchase for warranty claims.
AZZA Official Webפּלאַץ: www.azza.com


