1. הקדמה
This manual provides essential instructions for the safe and effective operation of your AOPUTTRIVER AP-770D Digital Multimeter. Please read this manual thoroughly before use and retain it for future reference. This device is designed for accurate measurement of various electrical parameters in a wide range of applications.
זיכערקייַט אינפֿאָרמאַציע
- שטענדיק אַדכיר צו היגע און נאציאנאלע זיכערקייַט קאָודז.
- ניצט נישט דעם מעטער אויב ער קוקט אויס געשעדיגט אדער אויב די איזאלאציע אויף די טעסט דראטן איז קאמפראמיטירט.
- זיכער מאַכן אַז די ריכטיקע פונקציע און קייט זענען אויסגעקליבן איידער איר מאַכט מעסטונגען.
- Avoid making measurements on circuits with voltages exceeding the meter's rated limits.
- Replace batteries and fuses only with the specified type and rating.
2. פּעקל אינהאַלט
באַשטעטיקט אַז אַלע זאכן וואָס זענען אויסגערעכנט אונטן זענען פאַראַן אין אייער פּעקל:
- AOPUTTRIVER AP-770D Digital Multimeter
- טעסט דראָטן (רויט און שוואַרץ)
- K-Type Thermocouple (Temperature Probe)
- 9 וו באַטאַרייע
- באַניצער מאַנואַל
- קעריינג טאַש
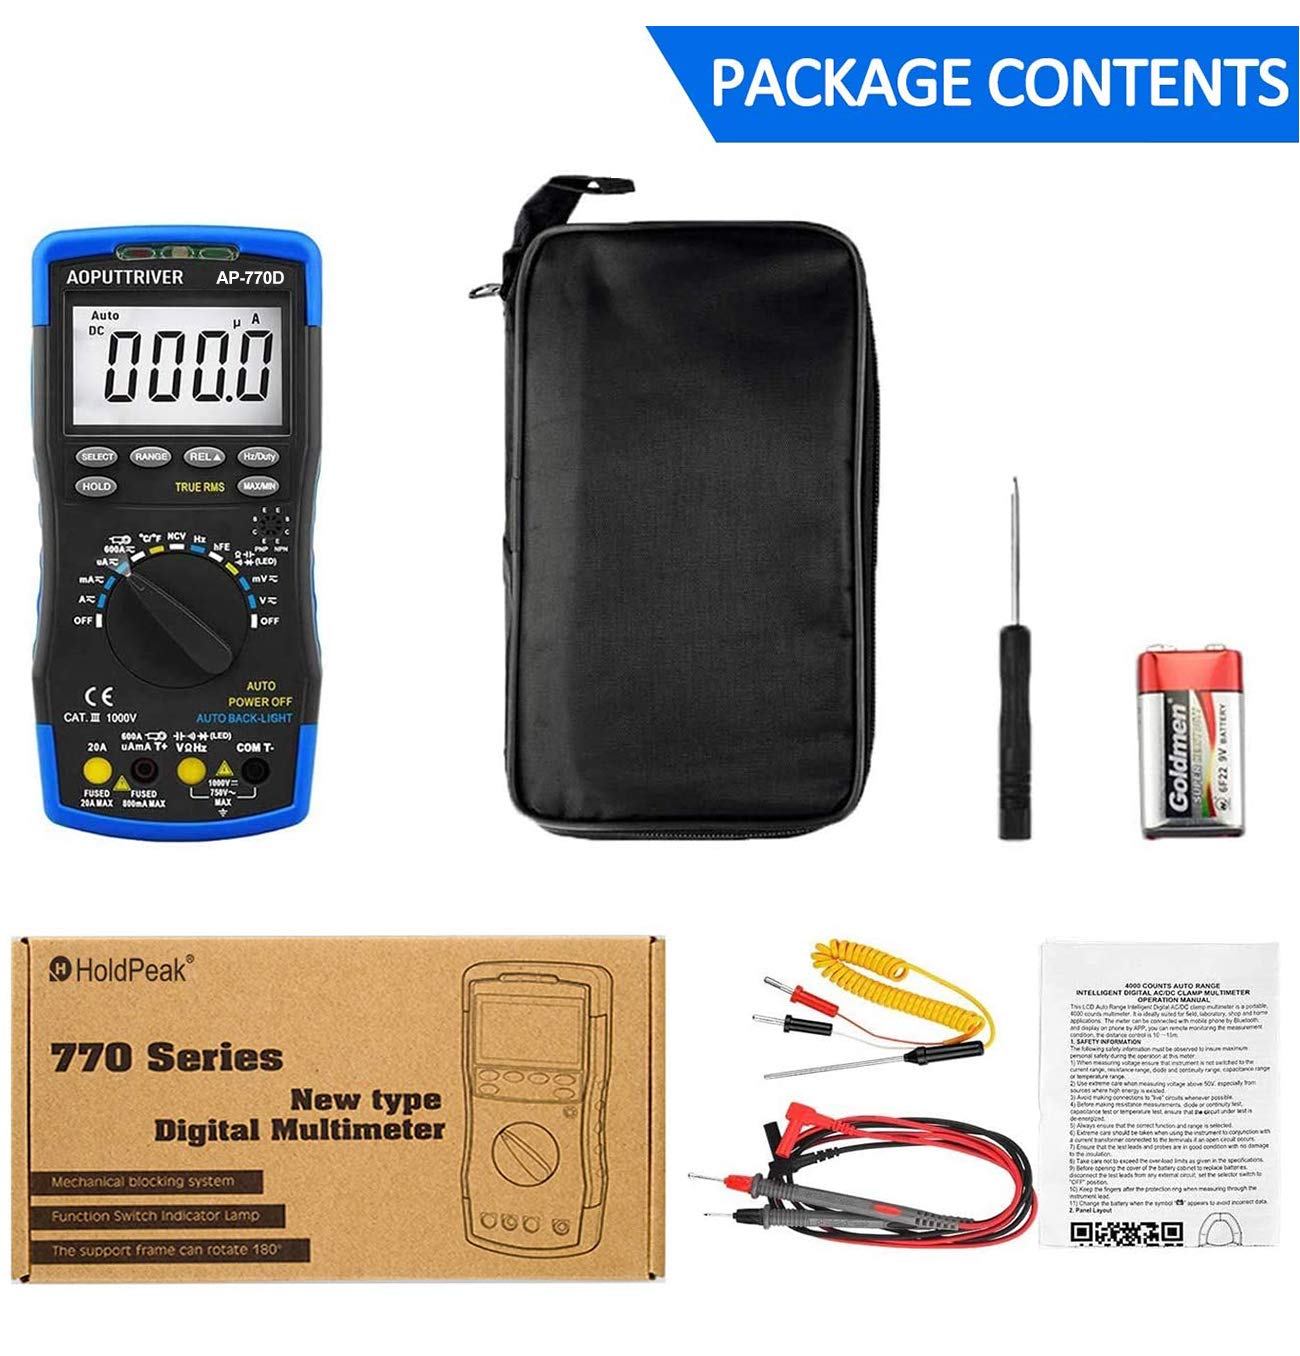
Figure 2.1: Contents of the AP-770D package, including the multimeter, test leads, temperature probe, battery, manual, and carrying pouch.
3. פּראָדוקט איבערview
Familiarize yourself with the components of your AP-770D Digital Multimeter:

פיגורע 3.1: פראָנט view of the AP-770D with key functions labeled.
- NCV Red Light: Indicates non-contact voltagE דיטעקשאַן.
- CDS Sensor: Light sensor for auto backlight.
- NCV Green Light: Indicates non-contact voltagE דיטעקשאַן.
- NCV Detection Area: Point for non-contact voltage סענסינג.
- ווייַז: Large LCD for reading measurements.
- סעלעקט שליסל: Toggles between functions within a rotary switch position.
- האַלטן קנעפּל: איינפֿרירט די איצטיקע אַרויסווײַזונג.
- RANGE Key: Switches between auto-ranging and manual ranging.
- REL ▲ Key: אַקטיוויזירט רעלאַטיווע מעסטונג מאָדע.
- Hz/פליכט שליסל: Selects frequency or duty cycle measurement.
- מאַקס/מין קנעפּל: רעקאָרדירט מאַקסימום און מינימום רידינגז.
- Transistor hFE Test Input Jack: For testing transistor gain.
- ראָטאַרי סוויטש: אויסקלייבט די געוואונטשענע מעסטונג פונקציע.
- VΩHz אריינגאנג: אַרייַנשרייַב וואָקזאַל פֿאַר וואָלtagע, קעגנשטעל, פרעקווענץ, קאַפּאַסיטאַנס, דיאָד, און קאָנטינויִטעט מעסטונגען.
- COM איינגאַבע: געמיינזאמע (נעגאַטיווע) טערמינאַל פֿאַר אַלע מעסטונגען.
- 20A אַרייַנגאַנג דזשעק: Input terminal for high AC/DC current measurements (up to 20A).
- µA mA T+ Input: Input terminal for microampערע/מיליampere current and temperature measurements.

Figure 3.2: Dimensions of the AP-770D and its 180° swivel stand.
4. סעטאַפּ
4.1 באַטאַרייע ייַנמאָנטירונג
The AP-770D requires one 9V battery for operation. To install or replace the battery:
- זייט זיכער אז דער מולטימעטער איז אויסגעלאשן און די טעסט דראטן זענען אפגעטיילט.
- געפינט דעם דעקל פונעם באַטעריע־אָפּטייל אויף דער הינטערשטער זייט פונעם אַפּאַראַט.
- ניצט אַ שרויפנציהער צו לייזן די שרויף וואָס באַזיכערט די באַטאַרייע דעקל.
- Remove the cover and insert the 9V battery, observing correct polarity.
- פאַרבייַטן די באַטאַרייע דעקן און פאַרשטייַפן די שרויף.
4.2 ערשט מאַכט-אויף
Turn the rotary switch from the 'OFF' position to any desired measurement function. The display will illuminate. The meter features an auto backlight that activates in low-light conditions.
5. אַפּערייטינג מאָדעס
The AP-770D offers a variety of measurement functions. Always ensure the correct function is selected and test leads are connected to the appropriate input jacks.
5.1 חלקtagמעסטונג (AC/DC)
צו מעסטן וואָלtage:
- Set the rotary switch to the 'V~' (AC Voltage) or 'V∓' (DC Voltagה) שטעלע.
- Connect the red test lead to the 'VΩHz' input jack and the black test lead to the 'COM' input jack.
- פֿאַרבינדט די טעסט פּראָובס אַריבער דעם קרייַז אָדער קאָמפּאָנענט וואָס דאַרף געמעסטן ווערן.
- לייענען דעם חלקtagE ווערט אויף די אַרויסווייַזן.
5.2 קראַנט מעסטונג (AC/DC)
צו מעסטן קראַנט:
- Set the rotary switch to the appropriate current range (µA, mA, or A). Use the 'SELECT' button to toggle between AC and DC current if applicable.
- Connect the red test lead to the 'µA mA T+' or '20A' input jack (depending on expected current) and the black test lead to the 'COM' input jack.
- פֿאַרבינדט די טעסט פּראָובז אין סעריע מיטן קרייַז וואָס מע וויל מעסטן.
- לייענט דעם איצטיקן ווערט אויפן דיספלעי.
5.3 קעגנשטעל מעזשערמאַנט
צו מעסטן קעגנשטעל:
- Set the rotary switch to the 'Ω' (Resistance) position.
- Connect the red test lead to the 'VΩHz' input jack and the black test lead to the 'COM' input jack.
- פֿאַרבינדט די טעסט פּראָבעס אַריבער דעם קאָמפּאָנענט וואָס מע דאַרף מעסטן. מאַכט זיכער אַז די קרייז איז דעענערדזשייזד.
- לייענען די קעגנשטעל ווערט אויף די אַרויסווייַזן.
5.4 מעאַסורעמענט קאַפּאַציטעט
צו מעסטן קאַפּאַסאַטאַנס:
- Set the rotary switch to the '––||––' (Capacitance) position.
- Connect the red test lead to the 'VΩHz' input jack and the black test lead to the 'COM' input jack.
- פֿאַרבינדט די טעסט פּראָבעס אַריבער דעם קאַפּאַסיטאָר. מאַכט זיכער אַז דער קאַפּאַסיטאָר איז אויסגעלאָדן איידער איר טעסט.
- לייענען די קאַפּאַסאַטאַנס ווערט אויף די אַרויסווייַזן.
5.5 אָפטקייט און דוטי ציקל מעסטונג
צו מעסטן אָפטקייט אָדער דוטי ציקל:
- Set the rotary switch to the 'Hz' position.
- Connect the red test lead to the 'VΩHz' input jack and the black test lead to the 'COM' input jack.
- פֿאַרבינדט די טעסט פּראָובז אַריבער די סיגנאַל מקור.
- Press the 'Hz/Duty' button to toggle between frequency and duty cycle readings.
5.6 דייאָוד טעסט
צו דורכפירן א דיאד טעסט:
- Set the rotary switch to the '→|–' (Diode) position.
- Connect the red test lead to the 'VΩHz' input jack and the black test lead to the 'COM' input jack.
- פֿאַרבינדט די רויטע פּראָבע צו דער אַנאָדע און די שוואַרצע פּראָבע צו דער קאַטאָדע פֿון דער דיאָד.
- A forward voltage drop will be displayed for a good diode. Reverse the probes; the display should show 'OL' (Open Loop).
5.7 קאָנטינויטי טעסט
צו דורכפירן אַ קעסיידערדיק פּראָבע:
- Set the rotary switch to the '▪))' (Continuity) position.
- Connect the red test lead to the 'VΩHz' input jack and the black test lead to the 'COM' input jack.
- פֿאַרבינדט די טעסט פּראָובז אַריבער דעם קרייַז אָדער קאָמפּאָנענט.
- If continuity exists (resistance below a certain threshold), the buzzer will sound.
5.8 טעמפּעראַטור מעזשערמאַנט
צו מעסטן טעמפּעראַטור:
- Set the rotary switch to the '°C/°F' (Temperature) position.
- Connect the K-type thermocouple to the 'µA mA T+' and 'COM' input jacks, observing polarity.
- Place the thermocouple tip on or in the object whose temperature is to be measured.
- Read the temperature value on the display. Use the 'SELECT' button to switch between Celsius and Fahrenheit.

Figure 5.1: Measuring temperature of a liquid using the AP-770D's temperature probe.
5.9 ניט-קאָנטאַקט VoltagE (NCV) דעטעקשאַן
צו דעטעקטירן AC וואָלומעןtagאָן קאָנטאַקט:
- שטעלט דעם ראָטאַרי סוויטש צו דער 'NCV' פּאָזיציע.
- Move the NCV detection area (top of the meter) close to the conductor being tested.
- The NCV red and green lights will flash, and the buzzer will sound, indicating the presence of AC voltage. The intensity of the indication increases with stronger voltage.

Figure 5.2: Using the NCV function to detect live wires without direct contact.
5.10 hFE Test (Transistor Gain)
To test transistor hFE:
- Set the rotary switch to the 'hFE' position.
- Insert the transistor leads (Emitter, Base, Collector) into the corresponding holes in the 'Transistor hFE Test Input Jack'.
- לייענט דעם hFE ווערט אויפן דיספלעי.
6. ספּעסאַפאַקיישאַנז
| שטריך | ווערט |
|---|---|
| ווייַז גראף | 40,000 קאַונץ |
| אמת RMS | יא |
| אַוטאָ ראַנגע | יא |
| NCV | יא |
| אַק/דק חלקtage | אַרויף צו 1000 וו |
| אַק / דק קראַנט | אַרויף צו 20 אַ |
| קעגנשטעל | ביז 60MΩ |
| קאַפּאַסיטאַנס | ביז 60mF |
| אָפטקייַט | אַרויף צו 10MHz |
| טעמפּעראַטור | Yes (with K-type thermocouple) |
| דייאָוד טעסט | יא |
| קאָנטינויטי טעסט | יא (מיט א בוזער) |
| hFE טעסט | יא |
| אַוטאָ באַקלייט | יא |
| אַוטאָ מאַכט אויסגעלאשן | יא |
| זיכערקייַט סטאַנדאַרד | IEC-1010, CAT III 1000V |
| מאַכט מקור | 9 וו באַטאַרייע |
| דימענשאַנז | 20cm X 9cm X 4cm (בעערעך) |
| וואָג | 350 גראַמז |
7. וישאַלט
7.1 רייניקונג
ווישט אויס דעם מעטער'ס קasinג מיט אַדamp שטאָף און מילדן וואַשפּולווער. ניצט נישט קיין שוואַרצע מאַטעריאַלן אָדער סאָלווענטן. מאַכט זיכער אַז דער מעטער איז גאָר טרוקן איידער נוצן.
7.2 באַטערי פאַרבייַט
When the battery symbol appears on the display, replace the 9V battery as described in Section 4.1.
7.3 קאָריק פאַרבייַט
If the current measurement function fails, the fuse may need replacement. Refer to the full user manual for detailed instructions on fuse replacement. Always use fuses with the specified ratings (e.g., Fused 20A MAX, Fused 500mA MAX).

Figure 7.1: The mechanical blocking system helps prevent incorrect lead insertion, enhancing safety during use.
8. טראָובלעשאָאָטינג
- קיין ווייַז: קאָנטראָלירט די אינסטאַלאַציע פון די באַטעריע און די לאָדונג־לעוועל. טוישט די באַטעריע אויב נייטיק.
- 'OL' אויף דיספּליי: Indicates an over-range condition or open circuit. Select a higher range or check connections.
- פאַלש רידינגז: Ensure correct function and range are selected. Verify test lead connections and integrity.
- קראַנט מעסטונג דורכפאַל: Check the fuse. Replace if blown (refer to Section 7.3).
9. וואָראַנטי און שטיצן
For warranty information or technical support, please refer to the contact details provided in your product packaging or visit the AOPUTTRIVER official website. Do not attempt to repair the device yourself, as this may void the warranty and pose a safety risk.


