1. הקדמה
This manual provides detailed instructions for the installation, operation, and maintenance of your Anlapus 1080p HD-TVI Surveillance Camera. Please read this manual thoroughly before using the product to ensure proper function and safety.
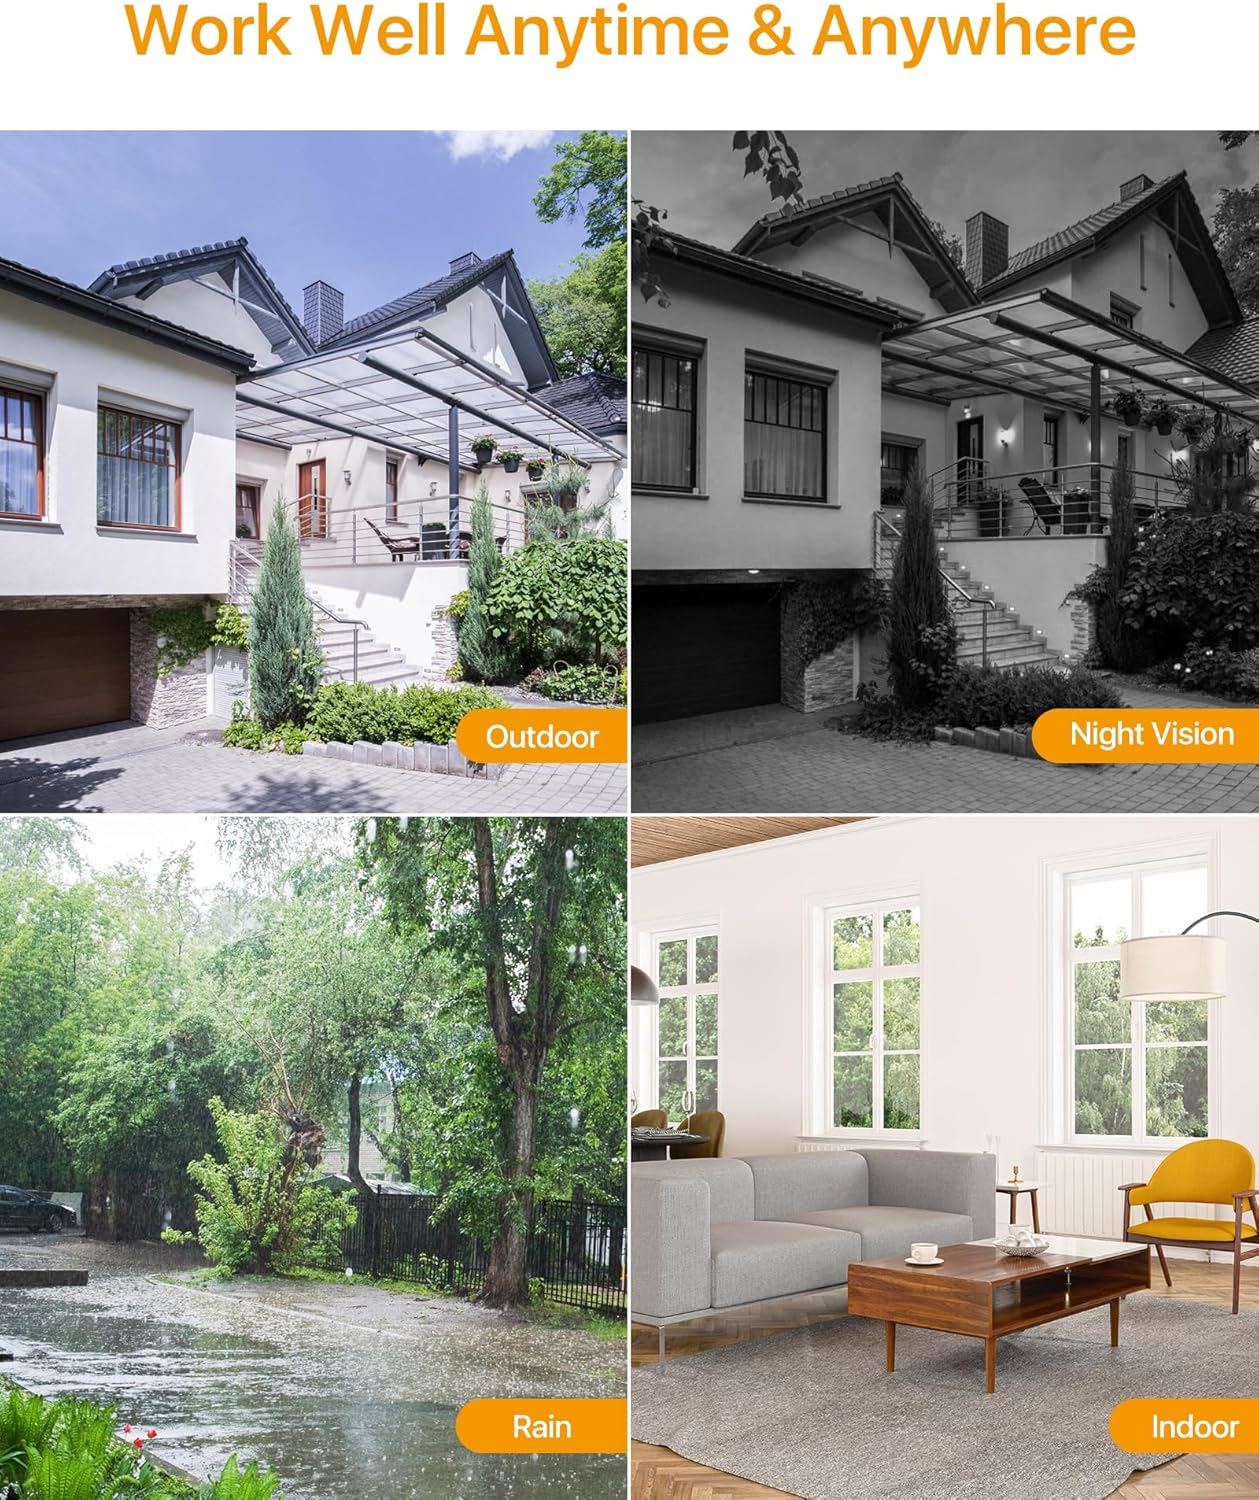
The Anlapus HD-TVI camera is designed for both indoor and outdoor surveillance, offering high-definition video quality and robust performance in various environmental conditions.
2. פּעקל אינהאַלט
באַשטעטיקט אַז אַלע זאכן וואָס זענען אויסגערעכנט אונטן זענען אַרייַנגערעכנט אין אייער פּעקל. אויב עפּעס פעלנדיק אָדער צעבראָכן, ביטע קאָנטאַקטירט קונה שטיצע.
- 4 x Anlapus 1080p HD-TVI Cameras
- 4 x BNC ווידעא קאַבלען
- קסנומקס רענטגענ מאַכט סופּפּלי
- 1 x 1-to-4 Power Splitter Cable
- 4 x ווארענונג סטיקערס
- 4 x Mounting Screw Bags (including screws and wall plugs)
- 4 x Mounting Hole Templates
- 1 x שנעל אָנהייב גייד
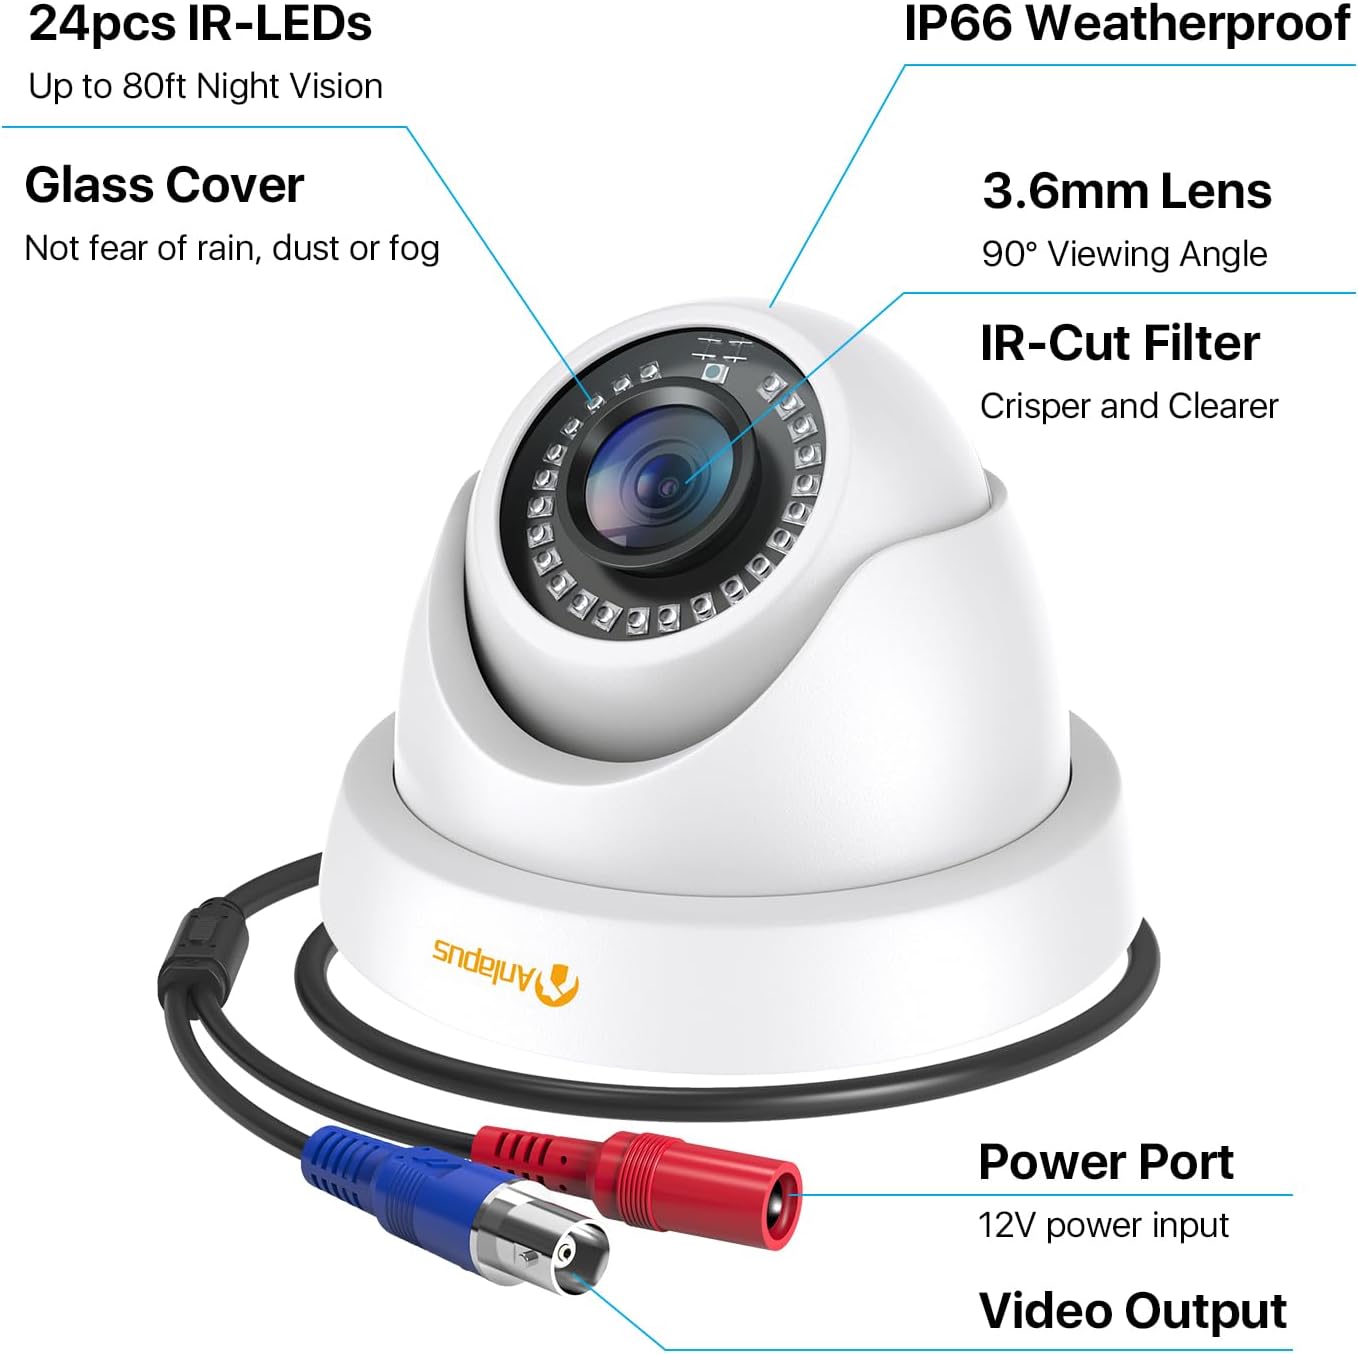
3. פּראָדוקט פֿעיִקייטן
- 1080 פּ הד האַכלאָטע: גיט קלאָר און דיטיילד ווידעא פאָאָtage (1920x1080 pixels).
- ברייט Viewאין ווינקל: Equipped with a 3.6mm lens, offering a 90-degree field of view.
- HD-TVI Compatibility: Designed to work with HD-TVI DVRs. Ensure your DVR supports HD-TVI technology.
- אַוואַנסירטע נאַכט זעאונג: Features 24 IR-Cut LEDs for up to 24 meters (80 feet) of clear black and white night vision.
- IP66 וועטערפּרוף שאַץ: Robust metal housing ensures protection against dust and water, suitable for both indoor and outdoor use in various weather conditions.
- פלעקסאַבאַל מאַונטינג: Features a 3-axis adjustable bracket for ceiling or wall mounting, allowing 360-degree horizontal and 180-degree vertical adjustment.


4. סעטאַפּ און ייַנמאָנטירונג
4.1 פאַר-ינסטאַללאַטיאָן טשעקליסט
- Ensure your DVR is compatible with HD-TVI cameras.
- Plan the camera placement to cover desired surveillance areas.
- Ensure power outlets are accessible for the camera power supply.
- Gather necessary tools: drill, screwdriver, ladder (if mounting high).
4.2 מאָונטינג די אַפּאַראַט
- Select a suitable mounting location (wall or ceiling) that provides the desired viewing angle and is within reach of the BNC cable and power supply.
- Use the provided mounting hole template to mark the drill points on the surface.
- בויער פּילאָט האָלעס אין די אנגעצייכנט שטעלעס.
- Insert the wall plugs into the drilled holes (if mounting on masonry or drywall).
- באַפֿעסטיקן די קאַמעראַ באַזע צו דער ייבערפֿלאַך מיט די צוגעשטעלטע שרויפֿן.
- Adjust the camera angle using the 3-axis bracket. The bracket allows for 360-degree horizontal rotation and 180-degree vertical tilt. Tighten the adjustment screws once the desired angle is achieved.
4.3 קאַנעקטינג די אַפּאַראַט
Refer to the connection diagram below for proper wiring.
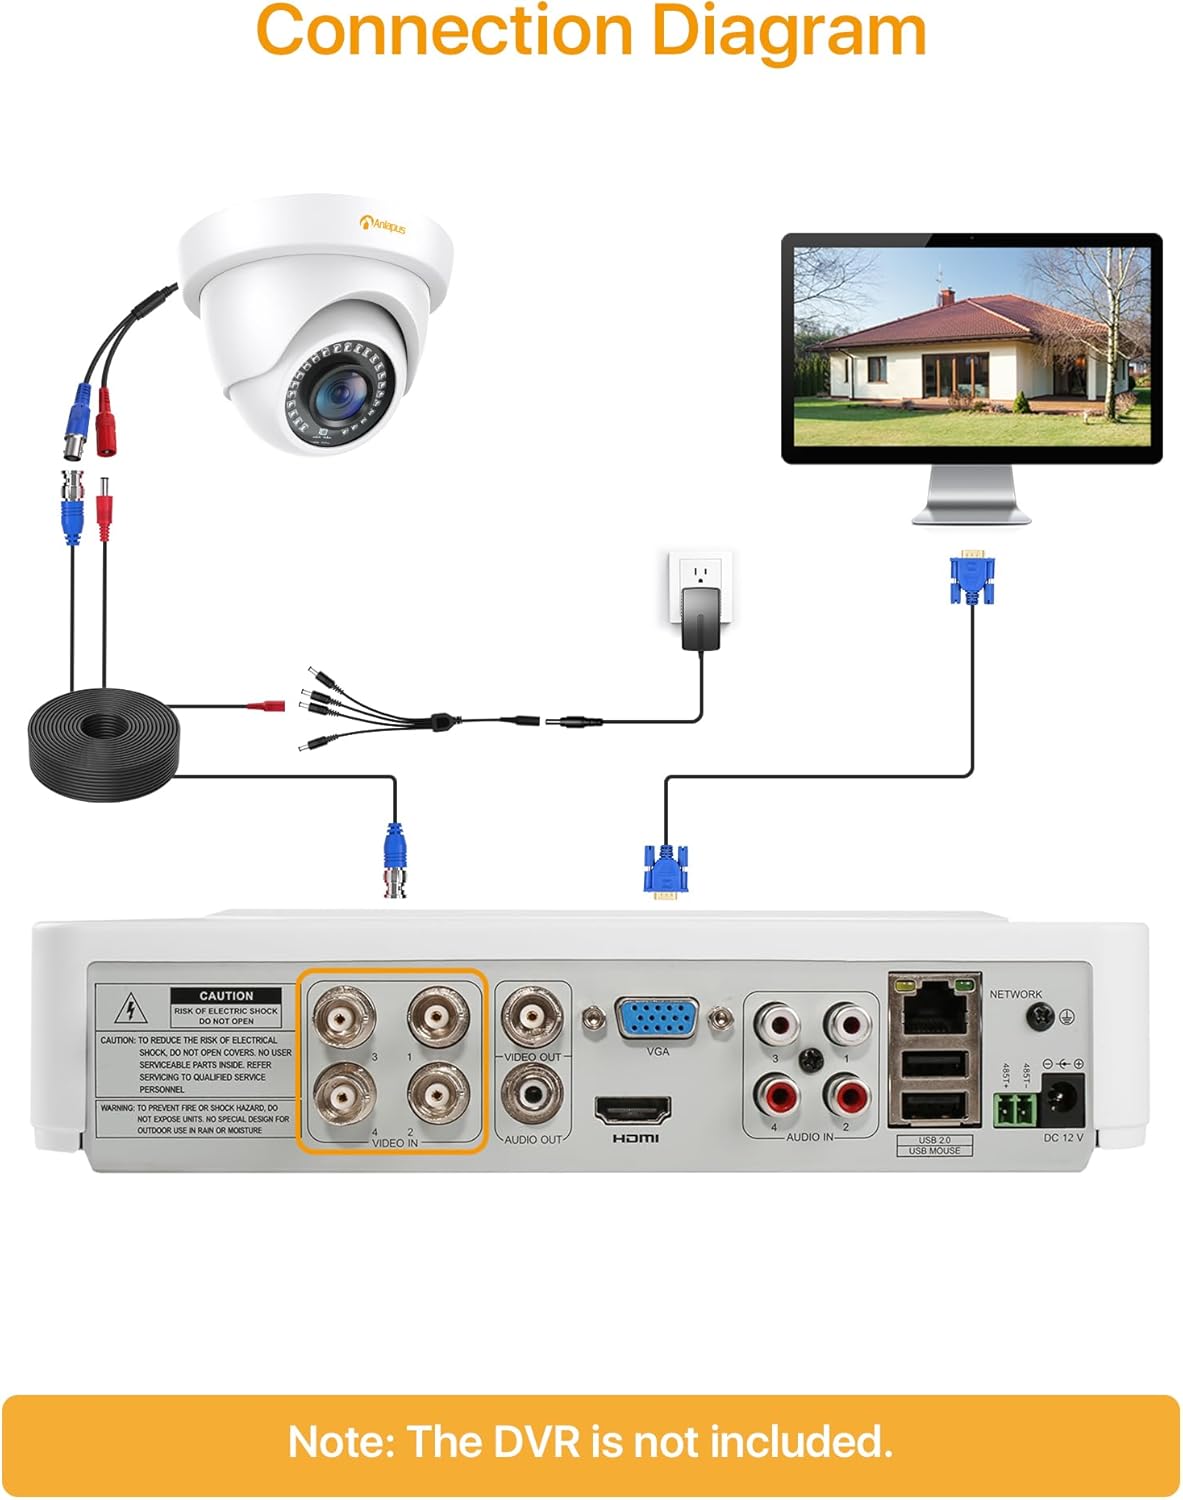
- Connect one end of the BNC video cable to the video output port of the camera.
- Connect the other end of the BNC video cable to a "VIDEO IN" port on your HD-TVI DVR.
- Connect the camera's power input to one of the outputs on the 1-to-4 power splitter cable.
- Connect the power supply to the 1-to-4 power splitter cable.
- שטעקט אריין די מאַכט צושטעל אין אַ נאָרמאַל עלעקטרישע ווענטיל.
- Repeat these steps for all cameras.
וויכטיק: פאַרזיכערן אַלע קאַנעקשאַנז זענען זיכער איידער מאַכט אויף די סיסטעם.
5. אַפּערייטינג ינסטרוקטיאָנס
Once the cameras are properly installed and connected to your HD-TVI DVR, refer to your DVR's instruction manual for specific operating procedures, including:
- Viewאין לעבןtagE פון די קאַמעראַס.
- Recording and playback of video.
- Configuring motion detection and alerts.
- Accessing the system remotely via mobile app or web צובינד.
- Adjusting camera settings (if supported by your DVR).
The Anlapus camera provides a continuous video feed to the DVR. Its night vision capabilities activate automatically in low-light conditions.
6. וישאַלט
- רייניקונג: רייניקן פּעריִאָדיש די קאַמעראַ אָביעקטיוו און די קעסטל מיט אַ ווייכן, דamp שטאָף. פֿאַרמײַדט אַברייסיוו רייניגער אָדער סאָלווענטן.
- קאַבלע דורכקוק: Regularly check all cables for signs of wear, damage, or loose connections.
- Firmware דערהייַנטיקונגען: While the camera itself does not typically require firmware updates, ensure your DVR's firmware is up-to-date for optimal performance and compatibility.
- ענוויראָנמענטאַל שוץ: Although the camera is IP66 weatherproof, extreme weather conditions (e.g., heavy snow, ice) may temporarily affect performance. Ensure the camera is securely mounted to withstand strong winds.
7. טראָובלעשאָאָטינג
| פּראָבלעם | מעגלעך סיבה | לייזונג |
|---|---|---|
| No image on DVR screen |
|
|
| Poor image quality / blurry video |
|
|
| נאַכט זעאונג טוט נישט אַרבעטן |
|
|
If you encounter issues not covered here, please contact Anlapus customer support.
8. ספּעסאַפאַקיישאַנז
| מאָדעל נומער | AJ-A4K-202T4-WPES |
| ווידעא האַכלאָטע | 1080p (1920 x 1080 Pixels) |
| לענס | 3.6 מם |
| Viewינג אַנגלע | 90 דיגריז |
| נאַכט וויזשאַן ראַנגע | ביז 24 מעטער (80 פֿיס) |
| יר לעדס | 24 pcs IR-Cut LEDs |
| וועטערפּראָאָף שאַץ | IP66 |
| מאַטעריאַל | מעטאַל |
| קאַנעקטיוויטי טעכנאָלאָגיע | Wired (BNC) |
| מאַכט אַרייַנשרייַב | 12 וואלטס |
| מאַכט קאַנסאַמשאַן | 12 וואטס |
| דימענסיעס (L X W X H) | 42.9 X 27 X 8.71 סענטימעטער |
| וואָג | 2.61 kilograms (for the package) |
| רעקאַמענדיד נוצן | סערוויילאַנס |
| קאַמפּאַטאַבאַל דעוויסעס | דיגיטאַל ווידעא רעקאָרדער (דוור) |
9. וואָראַנטי און שטיצן
Anlapus products are designed for reliability and performance. For warranty information and technical support, please refer to the warranty card included in your package or visit the official Anlapus webפּלאַץ.
If you require assistance with installation, troubleshooting, or have any questions regarding your Anlapus surveillance camera, please contact our customer support team. Contact details can typically be found on the Anlapus brand store page or in the quick start guide.