הקדמה
Thank you for choosing the KBS 17-in-1 Bread Maker. This appliance is designed to simplify your bread-making process with its advanced features and versatile programs. Please read this manual thoroughly before first use to ensure safe and optimal operation.

Image: The KBS 17-in-1 Bread Maker in stainless steel finish, shown with a freshly baked loaf of bread, a jar of jam, and fresh strawberries, highlighting its versatility.
וויכטיק סאַפעטי אינסטרוקציעס
שטענדיק פֿאָלגן די גרונטלעכע זיכערהייט מיטלען ווען איר ניצט עלעקטרישע אַפּאַראַטן צו רעדוצירן דעם ריזיקאָ פֿון פֿײַער, עלעקטרישן קלאַפּ, און/אָדער שאָדן צו מענטשן, אַרײַנגערעכנט די פֿאָלגנדיקע:
- לייענען אַלע ינסטראַקשאַנז.
- דו זאלסט נישט פאַרבינדן הייס סערפאַסיז. ניצן כאַנדאַלז אָדער נאַבז.
- כדי צו באַשיצן קעגן עלעקטרישע קלאַפּן, טונקט נישט איין דעם שנור, פּלאַגז, אדער ברויט מאַשין אין וואַסער אדער אַנדערע פליסיקייט.
- נאָענט השגחה איז נייטיק ווען קיין אַפּפּליאַנסע איז געניצט דורך אָדער לעבן קינדער.
- אָפּשטעקן די ווענטיל ווען ניט אין נוצן און איידער רייניקונג. לאָזן צו קילן איידער איר שטעלן אויף אָדער נעמען אַוועק טיילן.
- דו זאלסט נישט אַרבעטן קיין אַפּפּליאַנסע מיט אַ דאַמידזשד שנור אָדער צאַפּן אָדער נאָך די אַפּפּליאַנסע פון די אַפּפּליאַנסע, אָדער איז געפֿאַלן אָדער דאַמידזשד אין קיין וועג.
- די נוצן פון אַקסעסערי אַטאַטשמאַנץ וואָס זענען נישט רעקאַמענדיד דורך דער פאַבריקאַנט קען פאַרשאַפן ינדזשעריז.
- דו זאלסט נישט נוצן ינ דרויסן.
- דו זאלסט נישט לאָזן די שנור הענגען איבער די ברעג פון טיש אָדער טאָמבאַנק אָדער פאַרבינדן הייס סערפאַסיז.
- צי ניט שטעלן אויף אָדער לעבן אַ הייס גאַז אָדער עלעקטריש בורנער, אָדער אין אַ העאַטעד ויוון.
- עקסטרעם וואָרענען מוזן זיין געוויינט ווען מאָווינג אַ אַפּפּליאַנסע מיט הייס ייל אָדער אנדערע הייס ליקווידס.
- צו אָפּשטעקן, דריי יעדן קאָנטראָל צו "אויס", און דערנאָך אַרויסנעמען דעם שטעקער פֿון דער וואַנט־אַויטלעט.
- דו זאלסט נישט נוצן די מיטל פֿאַר אנדערע ווי בדעה נוצן.
פּראָדוקט קאַמפּאָונאַנץ און אַקסעסעריז
The KBS 17-in-1 Bread Maker comes with essential components and accessories to facilitate your baking experience.
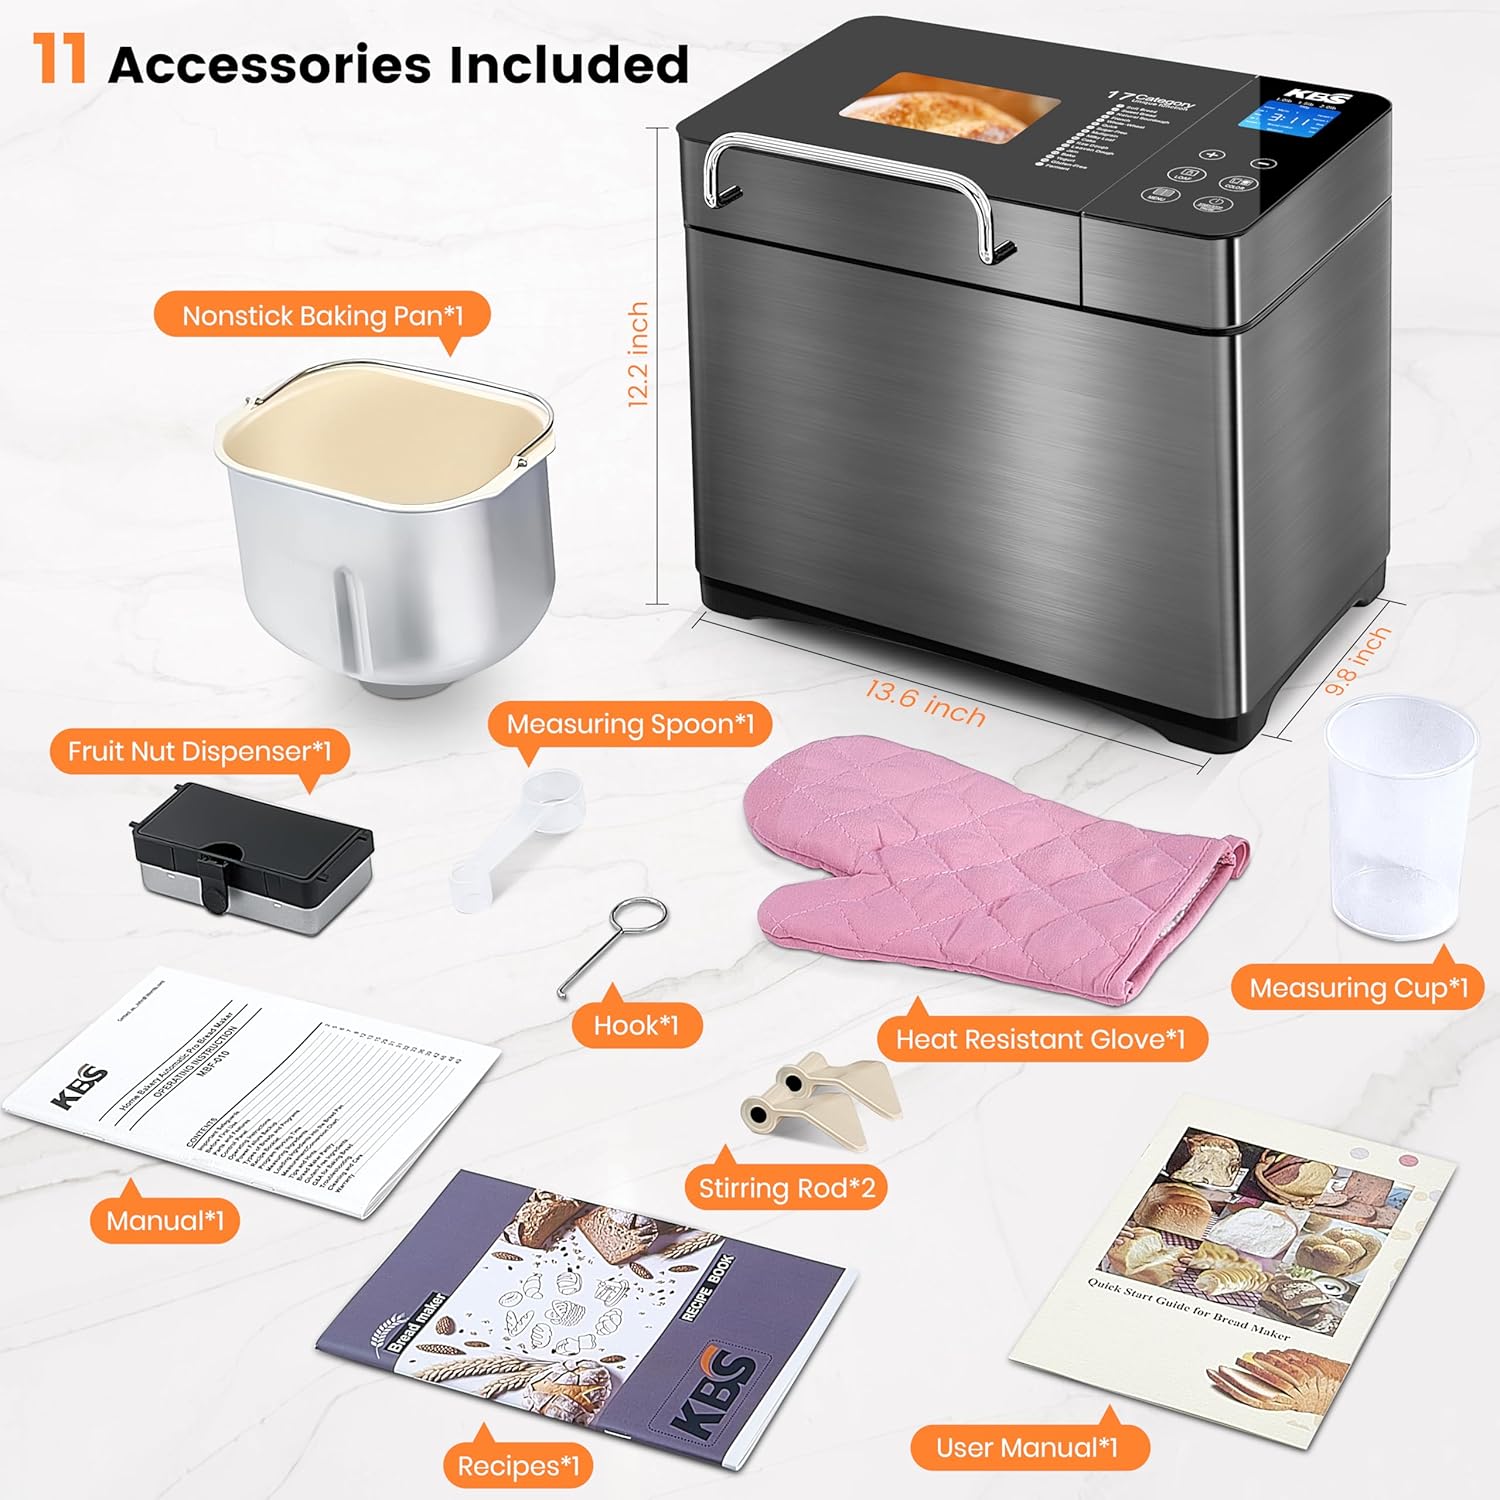
בילד: אן עקספלאדירטע view of the KBS Bread Maker and its included accessories, such as the nonstick baking pan, automatic fruit and nut dispenser, measuring spoon, hook for paddle removal, heat-resistant glove, and two stirring rods.
אַרייַנגערעכנט אַקסעסעריז:
- Nonstick Baking Pan (1)
- Fruit Nut Dispenser (1)
- Measuring Spoon (1)
- Hook (1) - For removing the kneading paddle from baked bread.
- Heat Resistant Glove (1)
- Stirring Rods (2)
- מעסט־בעכער (1)
אויפשטעלן און ערשטע באנוץ
- אויספּאַקן: נעמט פֿאָרזיכטיק אַרויס דעם ברויט־מאַשין און אַלע אַקסעסאָריעס פֿון דער פֿאַרפּאַקונג.
- רייניקונג: Before first use, wash the bread pan, kneading paddles, measuring cup, and measuring spoon with warm, soapy water. Rinse thoroughly and dry all parts. Wipe the exterior of the bread maker with a damp שטאָף.
- אָרט: שטעלט דעם ברויט מאַשין אויף אַ סטאַבילן, פלאַכן, היץ-קעגנשטעליקן ייבערפלאַך, אַוועק פון דירעקטן זונשייַן און היץ-קוואַלן. זאָרגט פֿאַר גענוג ווענטילאַציע אַרום דעם אַפּאַראַט.
- Install Kneading Paddle: Insert the kneading paddle onto the shaft inside the bread pan. Ensure it clicks into place securely.
- אַרײַנשטעלן ברויט פּאַן: Place the bread pan into the bread maker, pressing down firmly until it locks into position.
- מאַכט קשר: Plug the power cord into a grounded electrical outlet. The display will light up, indicating the bread maker is ready for use.

Image: A visual guide demonstrating the three easy steps to operate the bread maker: adding ingredients, selecting settings on the touch panel, and the final baked bread.
אַפּערייטינג ינסטראַקשאַנז
קאָנטראָל פּאַנעל איבערview:
Video: An official demonstration of the KBS Bread Maker's control panel and its various functions, including program selection, loaf size, and crust color settings.
The bread maker features an intuitive touch panel for easy operation. Key buttons include:
- מעניו: Press to cycle through the 17 automatic programs.
- LOAF: Select 1.0 lb, 1.5 lb, or 2.0 lb loaf size.
- קאָליר: Choose light, medium, or dark crust color.
- +/-: Adjust the delay timer.
- אָנהייב / האַלטן / פּויזע: Start, pause, or stop the baking cycle.
באַקינג פּראָצעס:
- לייג ינגרידיאַנץ: Add ingredients to the bread pan in the order specified by your recipe (typically liquids first, then dry ingredients, with yeast last). Ensure the kneading paddle is correctly installed.
- אויסקלייַבן פּראָגראַם: Press the MENU button to select the desired program (e.g., Basic, French, Whole Wheat, Gluten-Free). The bread maker offers 17 programs, including options for dough, jam, and yogurt.
- Choose Loaf Size and Crust Color: Use the LOAF and COLOR buttons to set your preferences.
- Automatic Nut Dispenser: If your recipe includes nuts or fruits, place them in the automatic nut dispenser. The dispenser will release them into the dough at the optimal time during the kneading cycle.
- אָנהייבן באַקן: Press the START/STOP/PAUSE button to begin the cycle. The bread maker will automatically knead, rise, and bake.
- פאַרהאַלטונג טייַמער (אָפּציאָנאַל): To delay the start of the baking process, use the +/- buttons to set the desired delay time (up to 15 hours).
- האַלטן וואַרעם פֿונקציע: After baking, the bread maker will automatically switch to a 1-hour keep warm function to maintain freshness.
- אַראָפּנעמען ברויט: Once the cycle is complete, unplug the bread maker. Using the heat-resistant glove, carefully remove the bread pan. Invert the pan to release the bread onto a wire rack to cool. Use the hook to remove the kneading paddle if it remains embedded in the bread.

Image: A visual representation of the bread maker's automated process, from adding ingredients and selecting a program to the machine kneading the dough and producing a finished loaf.

Image: This graphic illustrates the 15-hour delay timer and 1-hour keep warm functions, enabling users to schedule baking for fresh bread at their convenience, such as in the morning.
זאָרגן און וישאַלט
Proper care and maintenance will extend the life of your KBS Bread Maker.
- Cleaning the Bread Pan and Kneading Paddle: After each use, remove the bread pan and kneading paddle. Wash them with warm, soapy water. The ceramic nonstick coating is designed for easy cleaning. Avoid abrasive cleaners or scouring pads that could damage the nonstick surface. These parts can be machine washed.
- רייניקונג די יקסטיריער: ווישט אָפּ די אויסערלעכע זייט פון דער ברויט מאַשין מיט אַ ווייכן, טרוקענעם שטאָף.amp שטאָף. ניצט נישט קיין שאַרפע כעמיקאַלן אדער אַברייסיוו רייניגער. טונקט קיינמאָל נישט דעם הויפּט אַפּאַראַט אין וואַסער אדער קיין אַנדערע פליסיקייט.
- Cleaning the Lid and Viewאין פֿענצטער: Wipe the inside of the lid and the viewינג פֿענצטער מיט אַדamp טוך. פֿאַר שווערע פֿלעקן, ניצט אַ מילדן וואַשפּולווער.
- סטאָרידזש: Ensure the bread maker is clean and completely dry before storing. Store it in a cool, dry place.

בילד: א קוועער-שניט view highlighting the five layers of the healthy ceramic bread pan, designed for superior nonstick performance and durability, processed at 3,000°F.
טראָובלעשאָאָטינג גייד
אויב איר טרעפט פּראָבלעמען מיט אייער ברויט מאַשין, זעט די פאלגענדע געוויינטלעכע פּראָבלעמען און לייזונגען:
| פּראָבלעם | מעגלעך סיבה | לייזונג |
|---|---|---|
| ברויט גייט נישט ארויף | Expired yeast, incorrect water temperature, too much salt/sugar, wrong flour type. | Check yeast expiration date. Use water between 105-115°F (40-46°C). Ensure correct ingredient measurements. Use bread flour for best results. |
| ברויט איז צו געדיכט/שווער | Too much flour, not enough liquid, low room temperature. | Measure ingredients precisely. Increase liquid slightly if dough appears too dry. Ensure room temperature is not too cold. |
| ברויט פאלט צוזאם בעתן באקן | צו פיל פליסיקייט, צו פיל הייוון, הויכע הומידיטי. | Reduce liquid slightly. Reduce yeast amount. Avoid opening the lid during baking. |
| קנעטן פּאַדעל שטעקן אין ברויט | געוויינטלעכע געשעעניש. | Use the provided hook to carefully remove the paddle after the bread has cooled slightly. |
| מאַשין איז נישט סטאַרטינג | נישט איינגעשטאכן, מאַכט אויסtage, incorrect program selection. | Ensure power cord is securely plugged in. Check household circuit breaker. Re-select program and press START. |
פּראָדוקט ספּעסאַפאַקיישאַנז
| שטריך | דעטאַל |
|---|---|
| סאָרט | KBS |
| מאָדעל נומער | MBF-011 |
| קאָליר | ומבאַפלעקט שטאָל |
| פּראָדוקט דימענשאַנז | 9.8"ד רענטגענ 13.6"וו רענטגענ 12.2"ה |
| פּונקט וואָג | 14.7 פונט |
| וואָסtage | 710 watts (Dual Heaters) |
| נומער פון מגילה | 17 (including Gluten-Free, French, Whole Wheat, Sourdough, Pizza Dough, Jam, Yogurt, Cake) |
| ברויט גרייסן | 1 פונט, 1.5 פונט, 2 פונט |
| Crust Colors | ליכט, מיטל, טונקל |
| ברויט מאַטעריאַל | Ceramic Nonstick (PTFE/PFOA/lead-free) |
| טייַמער פֿונקציע | 15-שעה פאַרהאַלטן טייַמער |
| האַלטן וואַרעם פֿונקציע | 1-hour automatic keep warm |
| Power Failure Backup | קסנומקס מינוט |
| סערטיפיקאַטיאָנס | עטל, פקק |
| לאַנד פון אָריגין | כינע |

Image: The control panel displaying the 17 automatic programs, including options for various bread types, dough, jam, and yogurt.

Image: This graphic illustrates the three available loaf sizes (1lb, 1.5lb, 2lb) and three crust color options (light, medium, dark) that can be selected on the bread maker.
וואָראַנטי און קונה שטיצן
KBS stands behind the quality of its products. The KBS Bread Maker comes with a 3-year after-sales support and free lifetime technical assistance.
The product is certified by ETL and FCC, ensuring high safety and quality standards.
For any inquiries, technical support, or warranty claims, please contact our customer service team. We aim to respond to all inquiries within 12 hours.
For further assistance, please visit the official KBS Store: KBS Official Store


