הקדמה
א דאנק פארן קויפןasing the Trexonic Retro Record Player. This versatile audio system combines vintage aesthetics with modern functionality, allowing you to enjoy your favorite music from various sources including vinyl records, CDs, Bluetooth devices, AM/FM radio, and USB/SD cards. This manual provides detailed instructions for setup, operation, and maintenance to ensure optimal performance and longevity of your device.

Image: The Trexonic Retro Record Player, showcasing its classic design with the turntable lid open and a vinyl record in place.
וויכטיק סאַפעטי אינפֿאָרמאַציע
Please read these safety instructions carefully before operating the unit. Keep this manual for future reference.
- דו זאלסט נישט ויסשטעלן דעם אַפּפּליאַנסע צו רעגן אָדער נעץ.
- בלאָקירט נישט קיין ווענטילאַציע עפענונגען. אינסטאַלירט לויט די אינסטרוקציעס פונעם פאַבריקאַנט.
- דו זאלסט נישט ינסטאַלירן לעבן קיין היץ קוואלן אַזאַ ווי ראַדיאַטאָרס, היץ רעדזשיסטערז, סטאָוווז אָדער אנדערע אַפּאַראַט (אַרייַנגערעכנט ampליפיערס) וואָס פּראָדוצירן היץ.
- באַשיצן די מאַכט שנור פון גיין אויף אָדער פּינטשט, ספּעציעל אין די פּלאַגז, קאַנוויניאַנס רעסאַפּיז און די פונט ווו זיי אַרויסגיין פון די אַפּאַראַט.
- נאָר נוצן אַטאַטשמאַנץ / אַקסעסעריז ספּעסיפיעד דורך דער פאַבריקאַנט.
- אָפּשטויסן דעם אַפּאַראַט בעשאַס בליץ סטאָרמז אָדער ווען אַניוזד פֿאַר לאַנג פּיריאַדז.
- אָפּשיקן אַלע סערוויסעס צו קוואַלאַפייד סערוויס פּערסאַנעל. סערוויס איז פארלאנגט ווען דער אַפּאַראַט איז דאַמידזשד אין קיין וועג, אַזאַ ווי מאַכט צושטעלן שנור אָדער צאַפּן איז דאַמידזשד, פליסיק איז ספּילד אָדער אַבדזשעקץ זענען געפאלן אין די אַפּאַראַט, דער אַפּאַראַט איז יקספּאָוזד צו רעגן אָדער נעץ, אַרבעט נישט נאָרמאַלי , אָדער האט שוין דראַפּט.
פּראָדוקט פֿעיִקייטן
The Trexonic Retro Record Player is equipped with a variety of features for a comprehensive audio experience:
- 3-Speed Belt-Driven Turntable: Plays 33 1/3, 45, and 78 RPM vinyl records.
- געבויט-אין בלועטאָאָטה: Wirelessly stream music from compatible devices.
- קאָמפּאַקטדיסק שפּילער: Supports standard audio CDs.
- AM/FM ראַדיאָ: Integrated tuner with backlit display.
- USB/SD Input: For MP3 playback and recording vinyl to MP3.
- הילפס-איינגאנג (3.5 מ"מ): פאַרבינדן פונדרויסנדיק אַודיאָ דעוויסעס.
- כעדפאָון דזשאַק: פֿאַר פּריוואַט צוגעהערט.
- RCA Line-Out: Connect to external speakers or audio systems.
- Alarm Clock with Timer: Programmable alarm and sleep timer functions.
- געבויט-אין סטערעאָ ספּיקערז: For immediate audio playback.
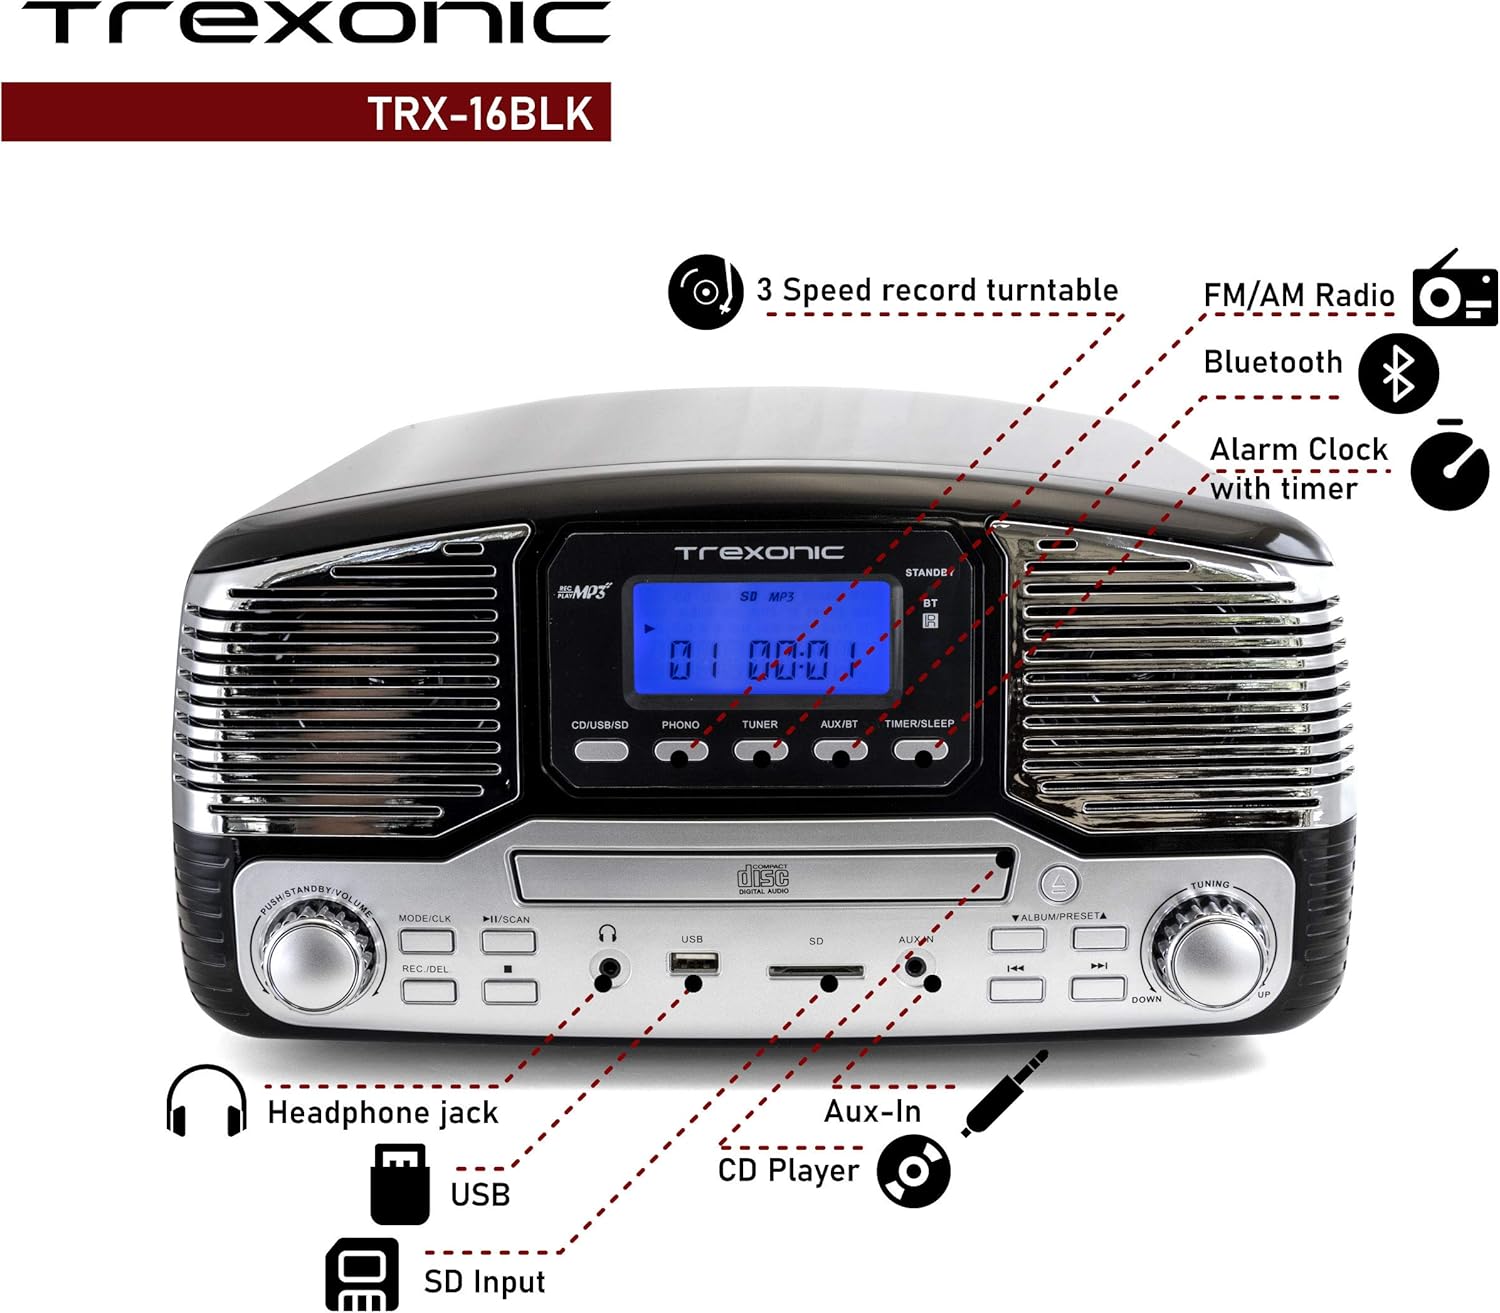
Image: A detailed diagram highlighting the key features and control locations on the Trexonic Retro Record Player.
קאָנטראָלס און פאַנגקשאַנז
Familiarize yourself with the various controls and ports on your Trexonic Retro Record Player:

בילד: נאָענט-אַרויף view of the digital display and mode selection buttons (CD/USB/SD, PHONO, TUNER, AUX/BT, TIMER/SLEEP).
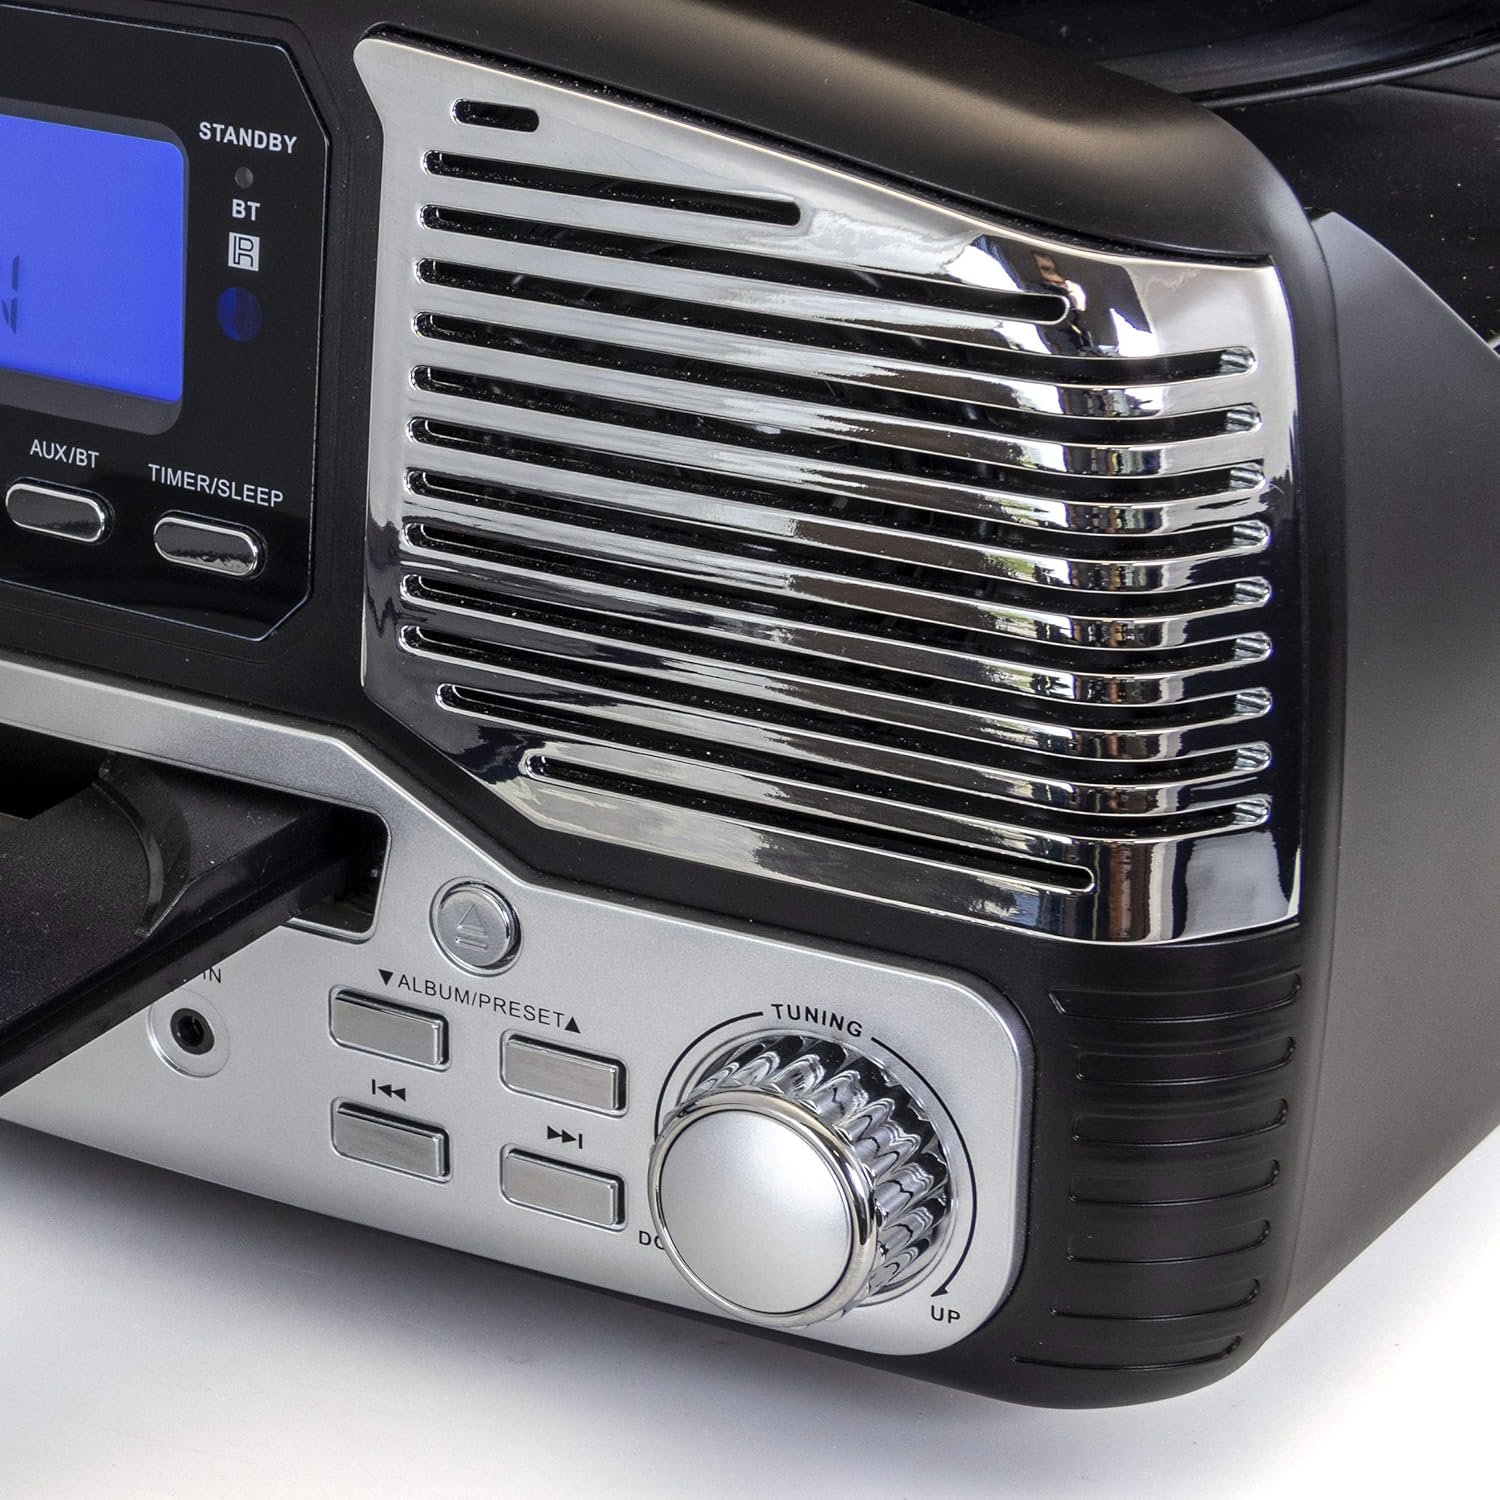
בילד: נאָענט-אַרויף view of the tuning knob and track navigation buttons (SCAN, ALBUM/PRESET, UP, DOWN).
שליסל קאָנטראָלס אַרייַננעמען:
- מאַכט / וואָלום קנופּ: טוט אָן/אויס דעם אַפּאַראַט און אַדזשאַסטירט די וואָלומען.
- Mode/CLK Button: Selects audio source (CD/USB/SD, PHONO, TUNER, AUX/BT) and sets clock.
- REC/DEL Button: Initiates recording to USB/SD or deletes files.
- Play/Pause, Stop, Skip Buttons: Standard playback controls for CD/USB/SD.
- טונינג קנעפּל: For manual radio station selection.
- Timer/Sleep Button: Activates sleep timer or alarm settings.
- כעדפאָון דזשאַק: 3.5 מ״מ אַרויסגאַנג פֿאַר כעדפאָונז.
- וסב פּאָרט: פֿאַר USB פלאַש דרייווס.
- SD Card Slot: פֿאַר SD זכּרון קאַרטלעך.
- AUX IN דזשאַק: 3.5 מ״מ אַרײַנגאַנג פֿאַר עקסטערנע אַודיאָ דעוויסעס.
- RCA Line Out (Rear): פֿאַרבינדט זיך צו עקסטערנעם ampליפערז אָדער פּאַוערד ספּיקערז.
- FM Antenna (Rear): פֿאַר FM ראַדיאָ אָפּנאַם.
ערשט סעטאַפּ
Follow these steps to set up your Trexonic Retro Record Player:
- אויספּאַקן: נעמט פֿאָרזיכטיק אַרויס דעם אַפּאַראַט פֿון זײַן פּאַקאַדזשינג. האַלט די פּאַקאַדזשינג מאַטעריאַלן פֿאַר צוקונפֿטיקן טראַנספּאָרט אָדער סטאָרידזש.
- אָרט: Place the unit on a flat, stable surface away from direct sunlight, heat sources, and excessive dust or moisture.
- מאַכט קשר: Connect the AC power adapter to the DC 12V IN (1000mA) jack on the rear of the unit, then plug the adapter into a standard wall outlet.
- FM אַנטענע: Extend the FM wire antenna located at the back of the unit for optimal radio reception.
- עקסטערנע קאַנעקשאַנז (אפציאָנעל): If connecting to external speakers or an amplifier, use RCA cables to connect the LINE OUT jacks on the rear of the unit to the corresponding input jacks on your external audio equipment.

Image: The rear panel of the Trexonic Retro Record Player, illustrating the connection points for power, FM antenna, and RCA line-out.
אַפּערייטינג ינסטראַקשאַנז
פּלייַינג וויניל רעקאָרדס
This unit supports 33 1/3, 45, and 78 RPM records.
- הייבן די שטויב דעקן.
- Place a record on the turntable platter. If playing a 45 RPM single, place the included 45 RPM adapter on the center spindle.
- Set the speed selector switch to the appropriate speed (33, 45, or 78 RPM) for your record.
- דרוק די מאָדע / קלק button repeatedly until "PHONO" is displayed.
- Gently lift the tone arm from its rest and move it over the record. The platter will begin to rotate.
- Carefully lower the tone arm onto the desired track of the record.
- סטרויערן די באַנד ניצן די מאַכט / באנד קנופּ.
- When the record finishes, the tone arm will automatically return to its rest (for most records). Lift the tone arm and return it to its rest manually if needed.

בילד: א נאָענטע בילד view of the turntable in operation, showing the stylus tracking a vinyl record.
Playing Compact Discs (CD)
- דרוק די מאָדע / קלק button repeatedly until "CD" is displayed.
- דרוק די עפענען / נאָענט קנעפּל צו עפענען די CD טאַץ.
- לייגט אַ סי-די מיט דער עטיקעט זײַט אַרויף אין דעם טאַץ.
- דרוק די עפענען / נאָענט button again to close the tray. The unit will read the CD and begin playback automatically.
- ניצן די שפּיל / פּויזע, האַלטן, און SKIP קנעפּלעך צו קאָנטראָלירן פּלייבאַק.

Image: The Trexonic Retro Record Player with its CD tray extended, ready for disc insertion or removal.
קאַנעקטינג דורך בלועטאָאָטה
- דרוק די מאָדע / קלק button repeatedly until "BT" (Bluetooth) is displayed. The unit will enter pairing mode, indicated by a flashing Bluetooth icon on the display.
- אַקטיווירן בלועטוט אויף אייער עקסטערנעם מיטל (סמאַרטפאָן, טאַבלעט, אאז"וו) און זוכן פֿאַר פֿאַראַן דעוויסעס.
- Select "Trexonic" or "TRX-16BLK" from the list of devices.
- Once paired, the Bluetooth icon will stop flashing and remain solid. You can now stream audio wirelessly to the unit.
ניצן די AM / FM ראַדיאָ
- דרוק די מאָדע / קלק button repeatedly until "TUNER" is displayed.
- דרייען די טונינג knob to manually select your desired AM or FM radio station.
- For better FM reception, adjust the position of the FM wire antenna on the rear of the unit.
USB/SD Card Functions (Playback & Recording)
The unit supports MP3 playback from USB flash drives and SD cards, and can record audio from vinyl to MP3 format.
- פּלייבאַק: Insert a USB flash drive into the USB port or an SD card into the SD card slot. Press the מאָדע / קלק button until "USB" or "SD" is displayed. The unit will automatically detect and play MP3 files. Use playback controls to navigate.
- Recording (Vinyl to MP3):
- זיכער מאַכן אַז אַ USB דרייוו אָדער SD קאַרטל איז אַרײַנגעשטעלט.
- Select "PHONO" mode.
- Start playing your vinyl record.
- דרוק די REC/DEL button to begin recording. The display will indicate recording status.
- דרוק REC/DEL again to stop recording. The recorded MP3 file וועט ווערן געראַטעוועט אויף די USB דרייוו אדער SD קאַרטל.
Connecting External Devices (AUX-In)
- פֿאַרבינדט איין עק פֿון אַ 3.5 מ״מ אַודיאָ קאַבל (נישט אַרייַנגערעכנט) צום AUX IN דזשעק אויף דער פֿראָנט פֿון דער אַפּאַראַט.
- Connect the other end of the cable to the headphone jack or audio output of your external device (e.g., MP3 player, smartphone).
- דרוק די מאָדע / קלק button repeatedly until "AUX" is displayed.
- Play audio from your external device. The sound will be routed through the Trexonic Retro Record Player's speakers.
Setting the Alarm and Sleep Timer
Detailed instructions for setting the alarm and sleep timer are typically found in the full product manual. Generally, these functions are accessed via the טיימער / שלאָף button and navigation controls.
- באַשטעטיקן זייגער: דריקן און האַלטן מאָדע / קלק to enter clock setting mode, then use navigation buttons to adjust time.
- באַשטעטיקן שרעק: דרוק טיימער / שלאָף to cycle through alarm settings (e.g., alarm time, source).
- שלאָפן טימער: דרוק טיימער / שלאָף repeatedly to set a countdown timer for the unit to automatically turn off.
וישאַלט
Proper care will ensure the longevity of your Trexonic Retro Record Player.
- רייניקונג די אַפּאַראַט: ווישט אָפּ די אויסערלעכע זייט מיט אַ ווייכן, טרוקענעם שטאָף. ניצט נישט קיין שרײַבנדיקע רייניגער אָדער סאָלווענטן.
- רייניקן דעם סטיילוס: Use a soft brush (not included) to gently brush the stylus from back to front to remove dust. Do not touch the stylus with your fingers.
- שטויב דעקל: האַלט דעם שטויב דעקל פֿאַרמאַכט ווען עס איז נישט אין באַנוץ צו באַשיצן דעם דריי-טיש פֿון שטויב און שמוץ.
- רעקאָרד זאָרג: Keep your vinyl records clean and stored vertically in their sleeves to prevent warping and dust accumulation.
טראָובלעשאָאָטינג גייד
If you encounter any issues, please refer to the following table before seeking professional service.
| פּראָבלעם | מעגלעך סיבה | לייזונג |
|---|---|---|
| קיין מאַכט | עלעקטרישע שנור נישט זיכער פארבונדן. | זיכער מאַכן אַז די מאַכט שנור איז פעסט אַרייַנגעשטעקט אין דעם אַפּאַראַט און אין דער וואַנט ווענטיל. |
| קיין געזונט פון ספּיקערז | די קול איז צו נידעריג אדער שטיל. אומרעכטע מאָדע אויסגעקליבן. | פֿאַרגרעסערן די באַנד. דריקן מאָדע / קלק to select the correct audio source. |
| Turntable not spinning or sound distorted | Speed setting incorrect. Stylus dirty or damaged. Tone arm not properly lowered. | Check the speed selector. Clean or replace stylus. Ensure tone arm is fully lowered onto the record. |
| סי-די שפּילט נישט | CD inserted incorrectly or disc is scratched/dirty. Incorrect mode. | Ensure CD is inserted label-side up. Clean or try another CD. Select "CD" mode. |
| בלועטאָאָטה פּערינג ישוז | Device too far. Bluetooth not enabled on external device. | Move devices closer. Ensure Bluetooth is enabled and "Trexonic" is selected. |
| נעבעך ראַדיאָ אָפּטראָג | די FM אַנטענע נישט אויסגעצויגן אָדער ריכטיק פּאַזיציאָנירט. | Fully extend and adjust the FM wire antenna. Try repositioning the unit. |
טעכניש ספּעסאַפאַקיישאַנז
| שטריך | באַשרייַבונג |
|---|---|
| מאָדעל נומער | TRX-16BLK |
| מאַכט אַרייַנשרייַב | DC 12V, 1000mA (via AC adapter) |
| טערנטייבאַל ספּידז | 33 1/3, 45, 78 רפּם |
| קאַנעקטיוויטי | Bluetooth, Wired (AUX-In, RCA Line-Out) |
| מעדיע סופּפּאָרט | Vinyl Records, Audio CDs, USB (MP3), SD Card (MP3) |
| ראַדיאָ פרעקווענסיעס | AM/FM |
| דימענסיעס (בעערעך) | 13 רענטגענ 12 X 6 אינטשעס (פּאַקע דימענשאַנז) |
| וואָג (בעערעך) | 8 פונט |
| מאַטעריאַל | פּלאַסטיק |
וואָראַנטי אינפֿאָרמאַציע און קונה שטיצע
Trexonic products are designed and manufactured to the highest quality standards. For specific warranty details, please refer to the warranty card included with your purchase or visit the official Trexonic website. If you require technical assistance or have questions regarding your product, please contact Trexonic customer support through their official channels.
ביטע האַלטן דיין דערווייַז פון קויפן פֿאַר וואָראַנטי קליימז.


