1. הקדמה
The MASTECH MS8260E is a versatile 2000-count digital multimeter designed for a wide range of electrical and electronic measurements. It features a large LCD display, non-contact voltage (NCV) detection, and capabilities for measuring AC/DC voltage, AC/DC current, resistance, capacitance, and inductance. This manual provides essential information for the safe and effective operation, maintenance, and troubleshooting of your device.
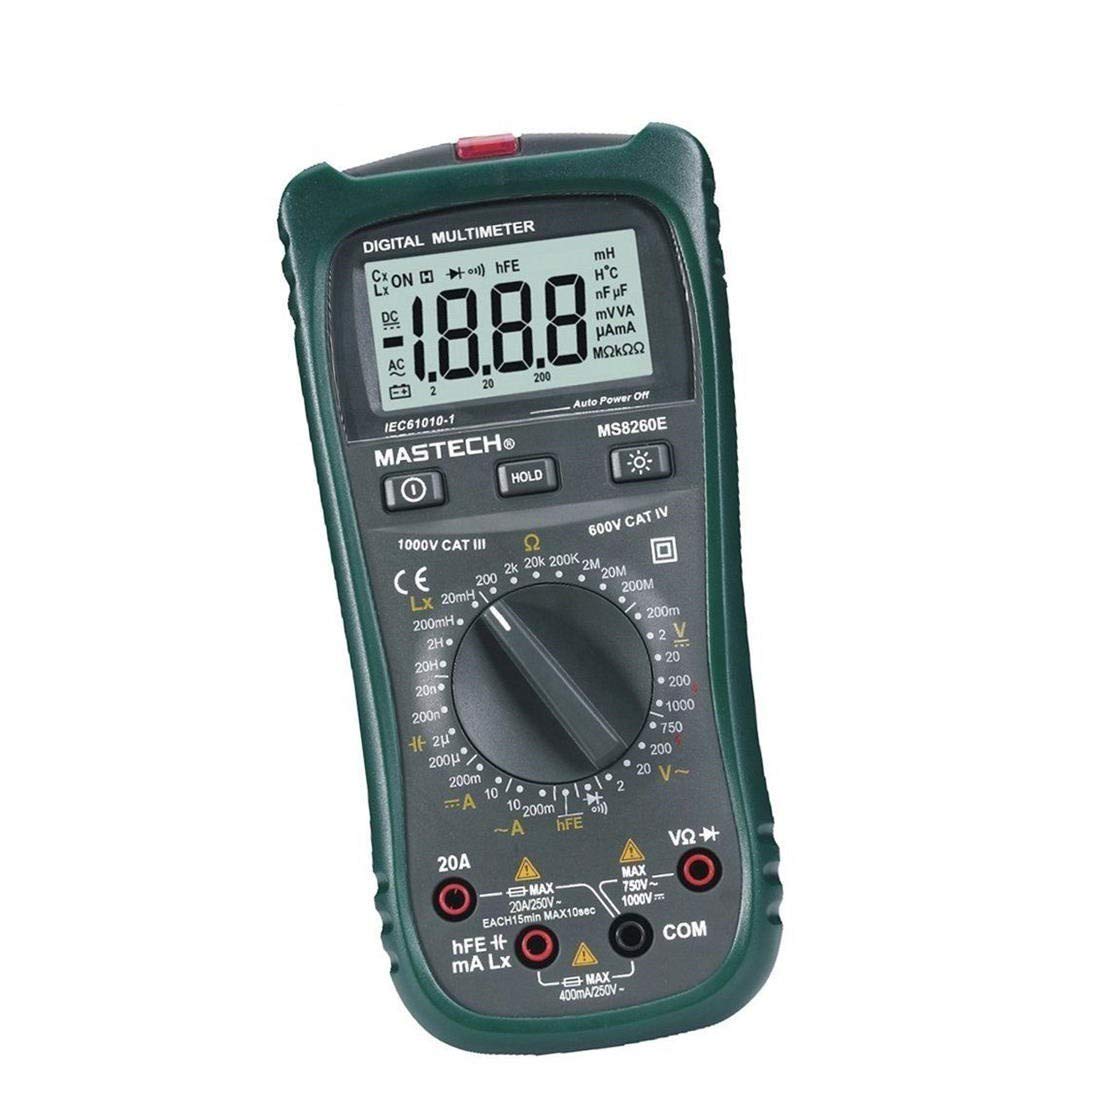
פיגורע 1: פראָנט view of the MASTECH MS8260E Digital Multimeter, showing the LCD display, function rotary switch, and input jacks.
2. זיכערקייַט אינפֿאָרמאַציע
To ensure safe operation and service of the meter, follow these safety guidelines:
- Read and understand all instructions in this manual before using the meter.
- שטענדיק אַדכיר צו היגע און נאציאנאלע זיכערקייַט קאָודז.
- ניצט נישט דעם מעטער אויב ער קוקט אויס געשעדיגט אדער אויב די איזאלאציע אויף די טעסט דראטן איז קאמפראמיטירט.
- Observe the input limits for each measurement range to prevent electrical shock or damage to the meter. This meter is rated for CAT.IV 600V.
- ניצן וואָרענען ווען ארבעטן מיט וואָלtagהעכער 30V AC RMS, 42V שפּיץ, אדער 60V DC. די וואַליומעןtagדאָס איז אַ ריזיקירן פון קלאַפּ.
- שטענדיק אָפּשטעקן די מאַכט פֿון דער קרייז און אָפּלאָדן אַלע הויך-וואָלוומעtage capacitors before making resistance, continuity, diode, or capacitance measurements.
- טוישט די באַטעריע גלייך ווען דער נידעריק באַטעריע אינדיקאַטאָר דערשיינט צו ענשור גענויע מעסטונגען.
- ניצט נישט דעם מעטער אין עקספּלאָזיווע גאַז, פארע, אדער שטויב סביבות.
3. פּראָדוקט איבערview
The MS8260E multimeter is equipped with several features to facilitate accurate and convenient measurements:
- Large 2000 Counts LCD Display: Provides clear digital readings.
- געבויט-אין ניט-קאָנטאַקט Voltage (NCV) Detector: דעטעקץ AC voltage greater than 110V without physical contact, indicated by a flash warning.
- דאַטאַ האַלטן פֿונקציע: איינפֿרירט די אָנגעגעבענע לייענונג פֿאַר גרינגע רעקאָרדינג.
- ווייַז באַקלייט: Improves visibility in dimly lit conditions.
- אַוטאָ מאַכט אַוועק: Conserves battery life by automatically turning off the meter after a period of inactivity.
- נידעריק באַטערי ינדיקאַטיאָן: וואָרנט דעם באַניצער ווען די באַטאַרייע דאַרף ווערן געטוישט.
- פּאָלעראַטי אָנווייַז: Automatically displays negative polarity.
- 30-Range Rotary Switch: Selects various measurement functions including AC/DC voltage, AC/DC current, resistance, capacitance, inductance, diode check, continuity test, and transistor (hFE) check.
4. סעטאַפּ
4.1 באַטאַרייע ייַנמאָנטירונג
The MS8260E requires one 9V battery (NEDA 1604/6F22). To install or replace the battery:
- Ensure the meter is turned off and disconnect all test leads from the input terminals.
- געפינט דעם דעקל פונעם באַטעריע־אָפּטייל אויף דער הינטערשטער זייט פונעם מעטער.
- שרויפט ארויס די שרויף(ן) און נעמט אראפ דעם דעקל.
- אַרײַנשטעלן די 9V באַטעריע, אָבסערווירנדיק די ריכטיקע פּאָלאַריטעט.
- לייג צוריק דעם דעקל פונעם באַטעריע־אָפּטייל און פֿאַרזיכער עס מיט די שרויף(ן).
4.2 פֿאַרבינדן טעסט דראָטן
Always connect the black test lead to the "COM" (common) input jack. Connect the red test lead to the appropriate input jack based on the desired measurement:
- פֿאַר וואָלtage, Resistance, Capacitance, Inductance, Diode, Continuity, and hFE measurements: Connect the red lead to the "VΩCAPHz" jack.
- For Current measurements up to 200mA: Connect the red lead to the "mA" jack.
- For Current measurements up to 10A: Connect the red lead to the "10A" jack.
Ensure test leads are fully inserted into the jacks before taking measurements.
5. אַפּערייטינג ינסטרוקטיאָנס
Turn the rotary switch to the desired function. The meter will display "OL" (Overload) if no input is present or if the input exceeds the range.
5.1 דק חלקtagE מעזשערמאַנט (DCV)
- Set the rotary switch to the desired DCV range (200mV, 2V, 20V, 200V, 1000V).
- Connect the black test lead to the "COM" jack and the red test lead to the "VΩCAPHz" jack.
- פֿאַרבינדט די טעסט־לידער אַריבער דעם קאָמפּאָנענט אָדער קרייז וואָס מע דאַרף מעסטן, און באַאָבאַכט די פּאָלאַריטעט.
- לייענען דעם חלקtagE ווערט אויף די לקד אַרויסווייַזן.
5.2 אַק בtagE מעאַסורעמענט (ACV)
- Set the rotary switch to the desired ACV range (2V, 20V, 200V, 750V).
- Connect the black test lead to the "COM" jack and the red test lead to the "VΩCAPHz" jack.
- פֿאַרבינדט די טעסט דראָטן אַריבער די AC וואָלומעןtagE מקור.
- לייענען דעם חלקtagE ווערט אויף די לקד אַרויסווייַזן.
5.3 גלייכשטראָם מעסטונג (DCA)
- Set the rotary switch to the desired DCA range (200mA, 10A).
- For measurements up to 200mA, connect the red lead to the "mA" jack. For measurements up to 10A, connect the red lead to the "10A" jack. The black lead connects to "COM".
- עפֿנט דעם קרייז וואו מען וויל מעסטן דעם קראַנט און פֿאַרבינדט דעם מעטער אין סעריע מיטן לאַסט.
- לייענען די קראַנט ווערט אויף די לקד אַרויסווייַזן.
5.4 AC Current Measurement (ACA)
- Set the rotary switch to the desired ACA range (200mA, 10A).
- For measurements up to 200mA, connect the red lead to the "mA" jack. For measurements up to 10A, connect the red lead to the "10A" jack. The black lead connects to "COM".
- עפֿנט דעם קרייז וואו מען וויל מעסטן דעם קראַנט און פֿאַרבינדט דעם מעטער אין סעריע מיטן לאַסט.
- לייענען די קראַנט ווערט אויף די לקד אַרויסווייַזן.
5.5 קעגנשטעל מעסטונג (Ω)
- Set the rotary switch to the desired Ω range (200Ω, 2kΩ, 20kΩ, 200kΩ, 2MΩ, 20MΩ, 200MΩ).
- Connect the black test lead to "COM" and the red test lead to "VΩCAPHz".
- Ensure the circuit is de-energized and all capacitors are discharged.
- Connect the test leads across the resistor or component.
- לייענט דעם ווערט פון דעם קעגנשטעל אויפן LCD דיספּלעי.
5.6 Capacitance Measurement (CAP)
- Set the rotary switch to the desired CAP range (20nF, 200nF, 2uF, 200uF).
- Connect the black test lead to "COM" and the red test lead to "VΩCAPHz".
- זיכער מאַכן אַז דער קאַפּאַסיטאָר איז גאָר אויסגעלאָדן איידער איר פֿאַרבינדט די טעסט דראָטן.
- פֿאַרבינדט די טעסט־לידער אַריבער דעם קאַפּאַסיטאָר.
- לייענען די קאַפּאַסאַטאַנס ווערט אויף די לקד אַרויסווייַזן.
5.7 Inductance Measurement (L)
- Set the rotary switch to the desired Inductance range (20mH, 200mH, 2H, 20H).
- Connect the black test lead to "COM" and the red test lead to "VΩCAPHz".
- Connect the test leads across the inductor.
- Read the inductance value on the LCD display.
5.8 דייאָוד טעסט
- Set the rotary switch to the Diode symbol.
- Connect the black test lead to "COM" and the red test lead to "VΩCAPHz".
- פֿאַרבינדט דעם רויטן דראָט צום אַנאָד און דעם שוואַרצן דראָט צום קאַטאָד פֿון דער דיאָד. אַ פֿאָרווערטס וואָלומעןtagא טראָפּן (געווענליך 0.5V ביז 0.8V פֿאַר סיליקאָן דיאָדן) וועט ווערן געוויזן.
- Reverse the leads. The display should show "OL" for a good diode.
5.9 קאָנטינויטי טעסט
- Set the rotary switch to the Continuity symbol.
- Connect the black test lead to "COM" and the red test lead to "VΩCAPHz".
- פֿאַרבינדט די טעסט־לידער אַריבער דעם קרייַז אָדער קאָמפּאָנענט.
- אויב דער קעגנשטאנד איז אונטער בערך 30Ω, וועט דער בוזער קלינגען, וואס ווײַזט אויף קאנטינעויטעט.
5.10 Transistor (hFE) Test
- שטעלן די דריי - באַשטימען צו די hFE שטעלע.
- Identify the type (NPN or PNP) and pinout (Emitter, Base, Collector) of the transistor.
- Insert the transistor leads into the corresponding sockets in the hFE test socket on the meter.
- ליינט דעם hFE (DC קראַנט געווינס) ווערט אויף דעם LCD דיספּלעי.
5.11 ניט-קאָנטאַקט VoltagE (NCV) דעטעקשאַן
- Set the rotary switch to the NCV position.
- Hold the top front part of the meter near the AC voltagע מקור (למשל, אַן עלעקטרישע ווענטיל אָדער איזאָלירטער דראָט).
- אויב AC voltage greater than 110V is detected, the NCV indicator light will flash, and the buzzer may sound.
6. וישאַלט
6.1 רייניקונג
ווישט אויס דעם מעטער מיט אדווערטייזמענטamp cloth and a mild detergent. Do not use abrasives or solvents. Ensure the meter is dry before use.
6.2 באַטערי פאַרבייַט
When the "BAT" symbol appears on the display, the battery needs to be replaced. Refer to Section 4.1 for battery installation instructions.
6.3 קאָריק פאַרבייַט
If the current measurement function fails, the fuse may need replacement. This operation should only be performed by qualified personnel. Refer to the service manual or contact customer support for fuse specifications and replacement procedures.
6.4 סטאָרידזש
If the meter is not to be used for an extended period, remove the battery to prevent leakage and damage to the meter. Store the meter in a cool, dry place away from direct sunlight.
7. טראָובלעשאָאָטינג
| פּראָבלעם | מעגלעך סיבה | לייזונג |
|---|---|---|
| קיין דיספּלעי אָדער שוואַך דיספּלעי | Low battery; Meter off | Replace battery; Turn on meter |
| "OL" געוויזן | Input exceeds range; Open circuit (for resistance/continuity) | Select higher range; Check circuit connection |
| פאַלש רידינגז | Low battery; Incorrect range selected; Poor test lead contact | Replace battery; Select appropriate range; Ensure good contact |
| קראַנט מעסטונג אַרבעט נישט | בלאָון קאָריק | Replace fuse (by qualified personnel) |
8. ספּעסאַפאַקיישאַנז
| מעאַסורעמענט פונקציע | קייט | אַקיעראַסי |
|---|---|---|
| DC VoltagE (DCV) | 200 וו, 2 וו, 20 וו, 200 וו, 1000 וו | ±0.5% (200mV-200V), ±0.8% (1000V) |
| AC Voltage (ACV) | 2 וו, 20 וו, 200 וו, 750 וו | ±0.8% (2V-200V), ±1.2% (750V) |
| DC Current (DCA) | 200מאַ, 10אַ | ±1.5% (200mA), ±2.0% (10A) |
| AC Current (ACA) | 200מאַ, 10אַ | ±1.8% (200mA), ±3.0% (10A) |
| קעגנשטעל (Ω) | 200Ω, 2kΩ, 20kΩ, 200kΩ, 2MΩ, 20MΩ, 200MΩ | ±0.8% (200Ω-2MΩ), ±1.0% (20MΩ), ±5.0% (200MΩ) |
| קאַפּאַסיטאַנס (CAP) | 20nF, 200nF, 2uF, 200uF | ±4.0% (20nF-2uF), ±5.0% (200uF) |
| ינדוקטאַנסע (ל) | 20mH, 200mH, 2H, 20H | ± 3.0% |
| אַודיבלע קאָנטינויטי | Buzzer sounds at <30Ω | N/A |
| דייאָוד טעסט | 1 מאַ, 2.8 וו | N/A |
| Transistor (hFE) | 0 - 1,000 | N/A |
אַלגעמיינע ספּעסאַפאַקיישאַנז:
- ווייַז: 2000 קאַונץ לקד
- זיכערהייט רייטינג: CAT.IV 600V
- מאַכט: 9V battery (NEDA 1604/6F22)
- וואָג: Approximately 1 kg (including battery)
9. וואָראַנטי און שטיצן
For warranty information, technical support, or service inquiries, please refer to the warranty card included with your product or visit the official Mastech website. Do not attempt to repair the meter yourself, as this may void the warranty and pose safety risks.