1. הקדמה
This user manual provides detailed instructions for the operation and maintenance of your LOTUS Mini Portable Projector YG-300. Please read this manual thoroughly before using the projector to ensure proper functionality and to prevent damage.
The YG-300 is a compact and versatile video projection system designed for various applications, including presentations, conferences, training, and home theater setups. It projects light beams to display images and videos from compatible sources.
2. פּעקל אינהאַלט
ביים אויספּאַקן דעם פּעקל, ביטע באַשטעטיקן אַז אַלע די זאַכן וואָס זענען אויסגערעכנט אונטן זענען אַרייַנגערעכנט אין אייער פּעקל:
- YG-300 Projector Unit
- Power Adapter (AC/DC 12V, 1.5A)
- ווייַט קאָנטראָל
- Three-in-one AV Cable
- ענגליש באַניצער מאַנואַל

Figure 2.1: Included accessories with the YG-300 Mini Portable Projector.
3. פּראָדוקט איבערview
3.1. Projector Front and Side View

פיגורע 3.1: פראָנט view of the YG-300 projector, highlighting the projection lens and side ventilation.
3.2. Projector Top Panel Controls
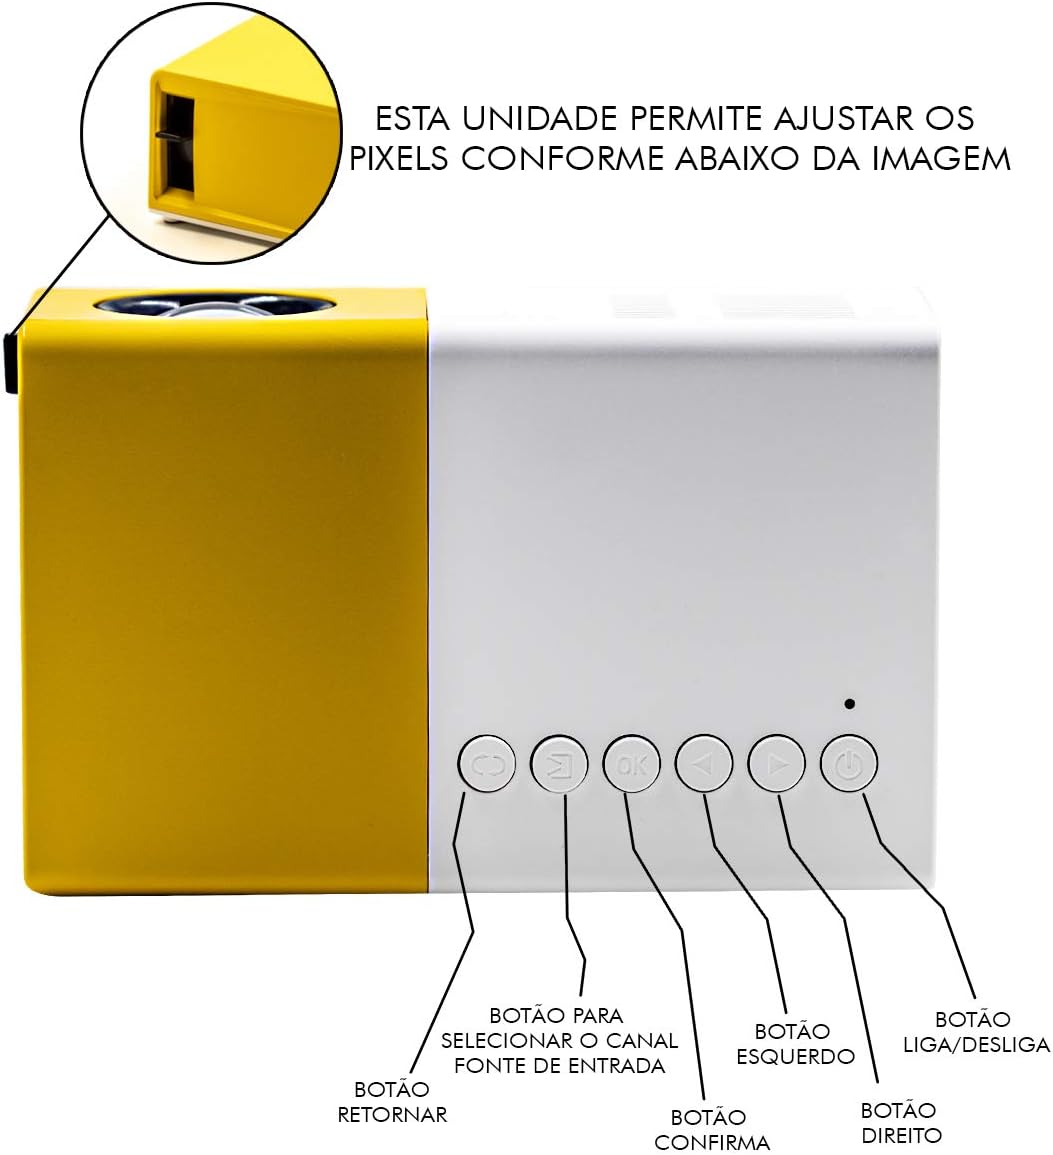
Figure 3.2: Top panel controls of the YG-300 projector. From left to right: Return button, Input Source selection button, OK (Confirm) button, Left navigation button, Right navigation button, and Power On/Off button.
3.3. Projector Rear Panel Ports
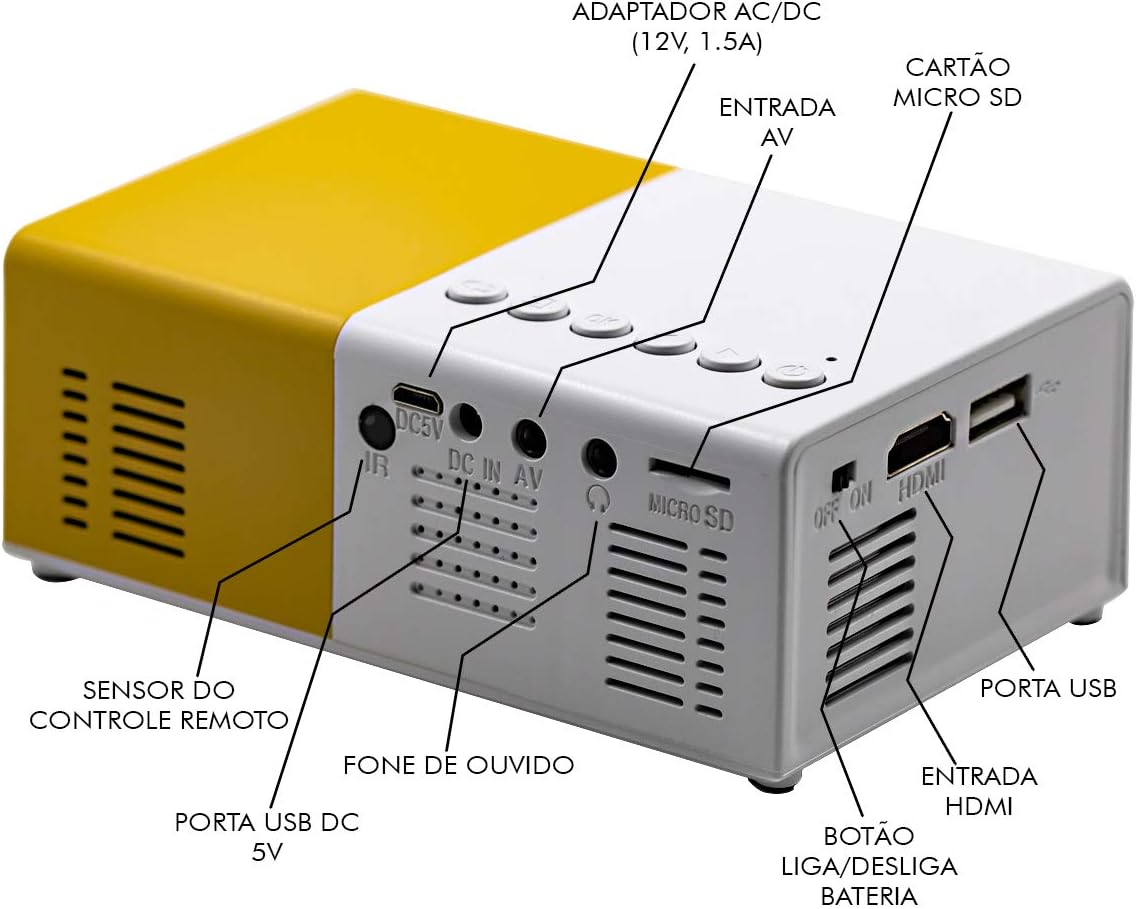
Figure 3.3: Rear panel of the YG-300 projector, detailing the connectivity options including USB, AV, Micro SD, HDMI, and audio output.
3.4. רימאָוט קאָנטראָל פאַנגקשאַנז

Figure 3.4: Remote control for the YG-300 projector, showing buttons for power, menu access, source selection, directional navigation, OK, play/pause, volume control, and exit.
4. סעטאַפּ
4.1. מאַכט קאַנעקשאַן
- Connect the provided power adapter to the "DC IN AV" port on the rear of the projector.
- צאַפּן די מאַכט אַדאַפּטער אין אַ נאָרמאַל עלעקטריקאַל ווענטיל.
- Ensure the power switch (if present, often near the DC IN port) is in the "ON" position.
4.2. Positioning the Projector
Place the projector on a stable, flat surface. For optimal image quality, position the projector between 1.2 to 3 meters (approximately 4 to 10 feet) from the projection surface. This distance will yield an image size between 20 to 80 inches.

פיגורע 4.1: עקסample setup of the YG-300 projector for home use.
4.3. פֿאַרבינדן אַרייַנשרייַב דעוויסעס
The YG-300 supports multiple input sources:
- הדמי: Connect an HDMI cable from your device (e.g., laptop, game console, streaming stick) to the HDMI port on the projector.
- וסב: אַרײַנשטעלן אַ USB פֿלעש דרייוו אין דעם USB פּאָרט צו שפּילן מעדיע files גלייַך.
- מיקראָ סד: Insert a Micro SD card into the Micro SD slot to play media files.
- פון: Use the provided three-in-one AV cable to connect to devices with AV output (e.g., older DVD players, set-top boxes).
5. אַפּערייטינג ינסטרוקטיאָנס
5.1. פּאָווערינג אויף / אויסגעלאשן
- צו מאַכט אויף, דריקן די מאַכט אויף / אַוועק button on the projector's top panel or the remote control.
- צו מאַכט אַוועק, דריקן די מאַכט אויף / אַוועק קנעפּל ווידער.
5.2. אויסקלייבן די איינגאבע מקור
After powering on, use the מקור קנעפּל אויף די ווייַט קאָנטראָל אָדער אַרייַנשרייַב מקור סעלעקציע button on the projector's top panel to cycle through available input sources (HDMI, USB, Micro SD, AV).
5.3. Adjusting Image Focus
The projector features a manual focus adjustment. Rotate the focus ring located around the lens until the projected image appears clear and sharp.
5.4. Navigating Menus and Media
Use the directional buttons (לינקס, רעכט, Up, אַראָפּ) און די OK button on the remote control or projector to navigate through menus and select media fileס. די צוריקקומען דער קנעפּל וועט אייך צוריקברענגען צום פריערדיקן עקראַן.
5.5. באַנד קאָנטראָל
סטרויערן די באַנד ניצן די באַנד אַרויף און באַנד אַראָפּ buttons on the remote control. You can also connect external speakers or headphones to the 3.5mm audio jack for enhanced sound.
6. וישאַלט
6.1. רייניקונג פון די לינז
ווישט אָפּ די פּראָיעקטאָר לינז מיט אַ ווייכן, לינט-פֿרײַעם שטאָף ספּעציעל דיזיינד פֿאַר אָפּטישע פֿלאַכן. ניצט נישט קיין שרײַבנדיקע רייניגער אָדער סאָלווענטן.
6.2. רייניקן דעם פּראָיעקטאָר קערפּער
ווישט אָפּ די אויסערלעכע זייט פון פּראָיעקטאָר מיט אַ ווייכן, טרוקענעם שטאָף. פֿאַרמייַדט צו נוצן פֿליסיקע רייניקונגסמיטלען גלייך אויף דעם אַפּאַראַט.
6.3. ווענטילאַטיאָן
Ensure that the ventilation grilles on the projector are not blocked to prevent overheating. Adequate airflow is crucial for the projector's longevity.
7. טראָובלעשאָאָטינג
| פּראָבלעם | מעגלעך סיבה | לייזונג |
|---|---|---|
| קיין בילד נישט פּראָיעקטירט |
|
|
| די בילד איז בלערי |
|
|
| קיין געזונט |
|
|
| פּראָיעקטאָר איבערהייצט זיך און שליסט זיך אויס |
|
|
8. ספּעסאַפאַקיישאַנז
| שטריך | דעטאַל |
|---|---|
| סאָרט | לאָטוס |
| מאָדעל | YG-300 |
| פאַבריקאַנט | LEJIADA |
| ברייטנאַס | 600 לומענס |
| געבוירן האַכלאָטע | 800 X 480 בילדצעלן |
| פּרויעקציע דיסטאַנסע | 1.2 - 3 meters (approx. 4 - 10 feet) |
| בילד גרייס | 20 - 80 אינטשעס |
| Screen Ratio | 4:3 |
| קאַנעקטיוויטי | HDMI, USB, 3.5mm Audio, Micro SD Card Slot |
| פּראָדוקט דימענשאַנז | 12.5 X 8 X 5 סענטימעטער (4.9 X 3.1 X 2 אינטשעס) |
| פּראָדוקט וואָג | 480 ג (1.06 לבס) |

Figure 8.1: Dimensions of the YG-300 projector and its remote control.
9. וואָראַנטי און שטיצן
For warranty information and technical support, please refer to the contact details provided by your retailer or the manufacturer, LEJIADA. Keep your purchase receipt as proof of purchase for any warranty claims.
This product is designed for durability and performance. For any issues not covered in the troubleshooting section, please contact customer support.


