1. הקדמה
This manual provides essential information and instructions for the safe and efficient use of your Nokia 8 Sirocco TA-1005 smartphone. Please read this guide thoroughly before operating your device to ensure optimal performance and longevity. This device is designed for use with GSM, 3G, and 4G LTE networks. Compatibility with CDMA networks, including Verizon, Sprint, and US Cellular, is not supported. Verify network compatibility with your service provider prior to use.
2. וואָס איז אין דער קעסטל
Upon unboxing your Nokia 8 Sirocco TA-1005, verify that all components are present:
- Nokia 8 Sirocco TA-1005 Device
- וסב טיפּע- C קאַבלע
- מאַכט אַדאַפּטער
- העאַדסעט
- סים עדזשעקטאָר טול
- שנעל אָנהייב גייד
- זיכערקייַט און וואָראַנטי אינפֿאָרמאַציע
3. מיטל אויסלייג
Familiarize yourself with the physical components of your Nokia 8 Sirocco TA-1005.
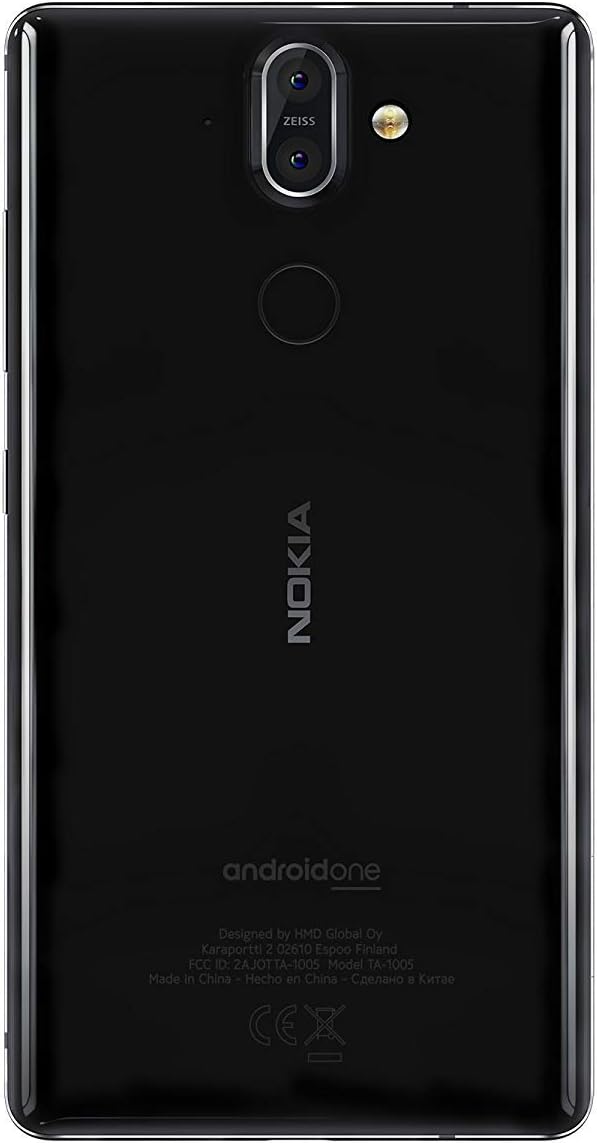
פיגורע 3.1: דערציען view of the Nokia 8 Sirocco TA-1005. This image displays the dual camera setup with ZEISS optics, the circular fingerprint sensor below the camera, and the Nokia logo centrally placed. The 'androidone' branding is visible towards the bottom.
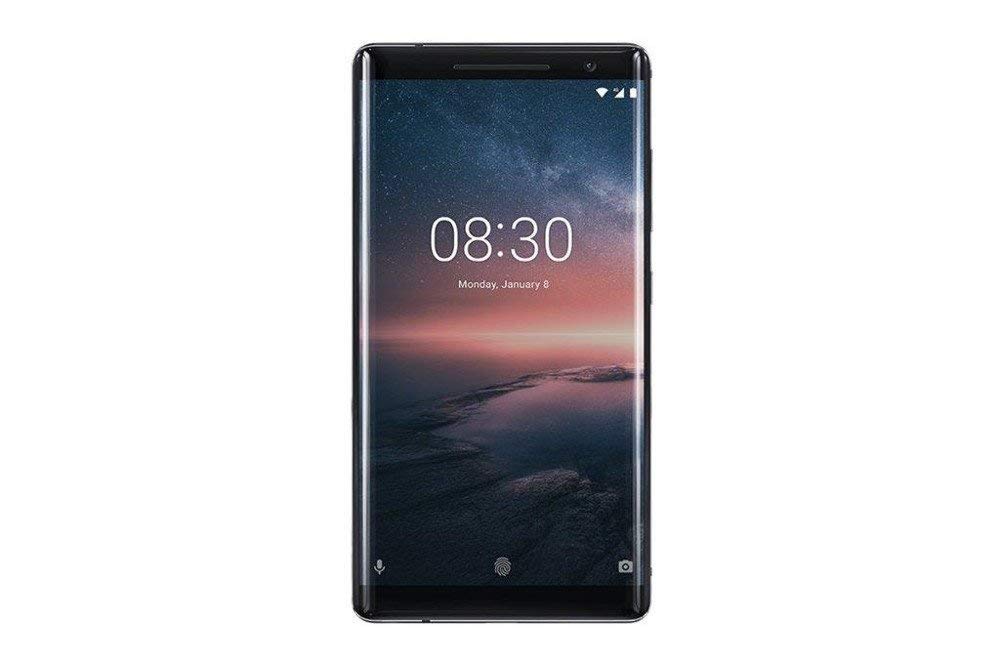
פיגורע 3.2: פראָנט view of the Nokia 8 Sirocco TA-1005. The image highlights the 5.5-inch P-OLED curved display, the front-facing camera at the top, and the on-screen navigation buttons. The device features minimal bezels.

פיגורע 3.3: זייַט view of the Nokia 8 Sirocco TA-1005. This image illustrates the slim profile of the device, with the power button and volume rocker located on the right side for easy access.
שליסל קאַמפּאָונאַנץ:
- פראָנט אַפּאַראַט: געפינען זיך ביים שפּיץ פונעם עקראַן.
- עאַרפּיעסע: For calls, located above the display.
- ווייַז: 5.5-inch P-OLED capacitive touchscreen.
- באַנד קנעפּלעך: On the right side, to adjust audio levels.
- מאַכט / שלאָס קנעפּל: On the right side, to power on/off or lock/unlock the screen.
- וסב טיפּ-C פּאָרט: אין אונטן, פֿאַר טשאַרדזשינג און דאַטן אַריבערפירן.
- מיקראָפאָן: Located at the bottom and top.
- רעדנער: ליגן אין די דנאָ.
- סים/מעמאָריע קאַרטל טאַץ: On the side, for inserting SIM cards.
- דערציען קאַמעראַס: Dual cameras with ZEISS optics on the back.
- פלאַש: Dual-tone flash next to the rear cameras.
- פינגערפּרינט סענסאָר: On the back, below the rear cameras.
4. סעטאַפּ
4.1. ינסערטינג די סים קאַרד
- געפינט די סים קארטל טאַץ אויף דער זייט פון אייער דעווייס.
- שטעקט אריין דעם סים קארטל ארויסווארף געצייג אין דעם קליינעם לאך אויפן טאַץ צו עס עפענען.
- Place your Nano-SIM card(s) into the designated slot(s) on the tray, ensuring the gold contacts face downwards.
- קערפאַלי שטופּן די טאַץ צוריק אין די מיטל ביז עס קליקס אין פּלאַץ.
באַמערקונג: This device does not support external memory cards.
4.2. פּאַוערינג אויף און אויסגעלאשן
- צו מאַכט אויף: Press and hold the Power/Lock button until the Nokia logo appears.
- צו מאַכט אַוועק: Press and hold the Power/Lock button until the power options menu appears, then select "Power off".
4.3. ערשט סעטאַפּ
Upon first power-on, the device will guide you through the initial setup process. This includes selecting your language, connecting to a Wi-Fi network, setting up your Google account, and configuring security features like fingerprint unlock or a PIN/pattern.
5. אַפּערייטינג ינסטרוקטיאָנס
5.1. מאכן קאַללס
- Open the "Phone" application.
- אַרייַן די טעלעפאָן נומער ניצן די דייאַל טאַפליע אָדער סעלעקטירן אַ קאָנטאַקט פון דיין אַדרעס בוך.
- צאַפּן דעם רוף בילדל צו אָנהייבן דעם רוף.
5.2. שיקט אַרטיקלען
- Open the "Messages" application.
- דריקט אויף דעם "אָנהייבן שמועס" אדער "נייַע מעסעדזש" בילדל.
- אַרייַן די נומער פון דעם באַקומער אָדער סעלעקטירן פון קאָנטאַקטן.
- טיפּ דיין אָנזאָג אין די טעקסט פעלד.
- צאַפּן אויף דעם שיקן בילדל.
5.3. ניצן די קאַמעראַ
- Open the "Camera" application.
- ראַם דיין ונטערטעניק אויף דעם עקראַן.
- צאַפּן דעם שאַטער קנעפּל צו נעמען אַ פאָטאָ.
- Switch between photo and video modes, or access advanced settings like portrait mode or panorama, as desired.
5.4. אינטערנעט קאַנעקטיוויטי
- ווי-פי: גיין צו סעטטינגס > נעץ און אינטערנעט > Wi-Fi. Turn Wi-Fi on and select an available network. Enter the password if required.
- מאָביל דאַטן: גיין צו סעטטינגס> נעץ & אינטערנעט> מאָביל נעץ. Ensure "Mobile data" is enabled.
5.5. זיכערהייַט פֿעיִקייטן
Your Nokia 8 Sirocco TA-1005 offers various security options:
- ופשליסן פינגערפּרינט: רעגיסטרירט אייערע פינגער-אפדרוקן דורך Settings > Security & Location > Fingerprint.
- פאַרשטעלן לאַק: Set a PIN, pattern, or password via Settings > Security & Location > Screen lock.
6. וישאַלט
6.1. רייניקונג די מיטל
Use a soft, lint-free cloth to clean your device. Avoid using harsh chemicals or abrasive materials, which can damage the screen or finish.
6.2. באַטערי קער
- Charge your device using only Nokia-approved chargers and cables.
- ויסמיידן יקספּאָוזינג די מיטל צו עקסטרעם טעמפּעראַטורעס.
- לאָזט נישט די באַטאַרייע זיך אָפט גאָר אויסלאָדן.
6.3. ווייכווארג דערהייַנטיקונגען
קאָנטראָלירט און אינסטאַלירט רעגולער ווייכווארג דערהייַנטיקונגען צו זיכער מאַכן אַז אייער מיטל האט די לעצטע פֿעיִקייטן, זיכערהייט פּאַטשאַז און פאָרשטעלונג פֿאַרבעסערונגען. גייט צו סעטטינגס > סיסטעם > סיסטעם דערהייַנטיקונג.
7. טראָובלעשאָאָטינג
אויב איר טרעפט פּראָבלעמען מיט אייער מיטל, באַזירט זיך אויף די פאלגענדע געוויינטלעכע לייזונגען:
| פּראָבלעם | לייזונג |
|---|---|
| די מיטל איז נישט קער אויף | Ensure the battery is charged. Connect to a charger for at least 30 minutes. If unresponsive, perform a force restart by holding the Power button for 10-15 seconds. |
| נעבעך נעץ סיגנאַל | Check SIM card insertion. Move to an area with better network coverage. Restart the device. Verify network settings in סעטטינגס> נעץ & אינטערנעט> מאָביל נעץ. |
| Applications are crashing | אויסמעקן די אַפּ'ס קאַש (סעטטינגס > אַפּפּס און נאָוטאַפאַקיישאַנז > [אַפּפּ נאָמען] > סטאָרידזש און קאַש > ויסמעקן קאַש). דערהייַנטיקט די אַפּ פֿון גוגל פּליי סטאָר. אויב די פּראָבלעם בלייבט, דעינסטאַלירט און ריינסטאַלירט די אַפּ. |
| באַטאַרייע דריינז געשווינד | Reduce screen brightness. Close unused background apps. Disable Wi-Fi, Bluetooth, and GPS when not in use. Check battery usage in סעטטינגס> באַטערי צו אידענטיפיצירן מאַכט-פאַרנוצנדיקע אַפּפּס. |
| דער מיטל איז נישט ריספּאַנדינג | Perform a force restart by holding the Power button for 10-15 seconds. If the issue continues, consider a factory reset (סעטטינגס> סיסטעם> באַשטעטיק אָפּציעס> מעקן אַלע דאַטן (פאַבריק באַשטעטיק)). ווארענונג: A factory reset will erase all data on your device. Back up important data before proceeding. |
8. ספּעסאַפאַקיישאַנז
Detailed technical specifications for the Nokia 8 Sirocco TA-1005:
| שטריך | דעטאַל |
|---|---|
| מאָדעל נאָמען | 8 Sirocco |
| מאָדעל נומער | טאַ-קסנומקס |
| אָפּערייטינג סיסטעם | אַנדרויד 8.0 (אָרעאָ) |
| פּראַסעסער | Qualcomm MSM8998 Snapdragon 835, Octa-core (4x2.5 GHz Kryo & 4x1.8 GHz Kryo) |
| גפּו | אַדרענאָ 540 |
| באַראַן | 6 גיגאבייט |
| אינערלעכער סטאָרידזש | 128 גיגאבייט |
| ווייַז | 5.5 inches, P-OLED capacitive touchscreen, 1440 x 2560 pixels, Corning Gorilla Glass 5 |
| דערציען אַפּאַראַט | 12MP Wide (f/1.7) + 13 MP Tele (f/2.6), dual-tone flash |
| פראָנט אַפּאַראַט | 5MP |
| באַטאַרייע קאַפּאַציטעט | 3250 מאַה |
| טשאַרדזשינג | שנעל טשאַרדזשינג שטיצן |
| קאַנעקטיוויטי | Wi-Fi 802.11a/b/g/n, Bluetooth, USB Type-C |
| דימענשאַנז | 43.36 X 43.17 X 0.75 סענטימעטער |
| וואָג | 181 ג |
| SIM טיפּ | נאַנאָ סים |
| נעץ שטיצן | 2G GSM, 3G, 4G LTE (Note: Not compatible with CDMA networks) |
9. Safety and Warranty Information
9.1. זיכערקייַט גיידליינז
- Do not use the device in prohibited areas, such as aircraft or hospitals.
- פֿאַרמײַדט אויסשטעלן דעם אַפּאַראַט צו וואַסער אָדער איבעריקע פֿײַכטקייט.
- ניצט נאָר אָריגינעלע אָדער באַשטעטיקטע אַקסעסאָריעס.
- דו זאלסט נישט פּרווון צו דיסאַסעמבאַל אָדער פאַרריכטן די מיטל זיך.
- אַוועקוואַרפן דאָס אַפּאַראַט און זײַן באַטאַרייע פֿאַראַנטוואָרטלעך לויט די לאָקאַלע רעגולאַציעס.
9.2. וואָראַנטי אינפֿאָרמאַציע
Your Nokia 8 Sirocco TA-1005 is covered by a limited manufacturer's warranty. Please refer to the separate warranty document included in your product packaging or visit the official Nokia support webזייטל פֿאַר דעטאַלירטע תּנאים און באַדינגונגען. האַלט דיין קויף באַווייַז פֿאַר וואָראַנטי קליימז.


