1. הקדמה
This manual provides comprehensive instructions for the installation, operation, and programming of your Salus RT510 Programmable Digital Thermostat. The RT510 is designed to control your heating system efficiently, allowing you to set specific temperatures at different times throughout the day and week.
2. זיכערקייַט אינפֿאָרמאַציע
- Installation should only be carried out by a qualified electrician or competent person in accordance with national wiring regulations.
- Always disconnect the mains power supply before installing or performing any maintenance on the thermostat.
- Ensure the thermostat is kept away from water and excessive moisture.
- Use only the specified battery type (Alkaline) and dispose of used batteries responsibly.
- פרובירט נישט צו פאררעכטן אדער מאדיפיצירן דעם איינהייט אליין. קאנטאקטירט קוואַליפֿיצירטע סערוויס פּערסאָנעל.
3. פּעקל אינהאַלט
ביטע קאָנטראָלירט אַז אייער פּעקל כּולל די פאלגענדע זאכן:
- Salus RT510 Digital Thermostat Unit
- Wall Mounting Backplate
- מאָנטירונג שרויפן און וואַנט פּלאַגז
- אַלקאַליין באַטעריז
- באַניצער מאַנואַל (דעם דאָקומענט)
4. פּראָדוקט איבערview
The Salus RT510 thermostat features a clear digital display and intuitive controls for managing your heating system.
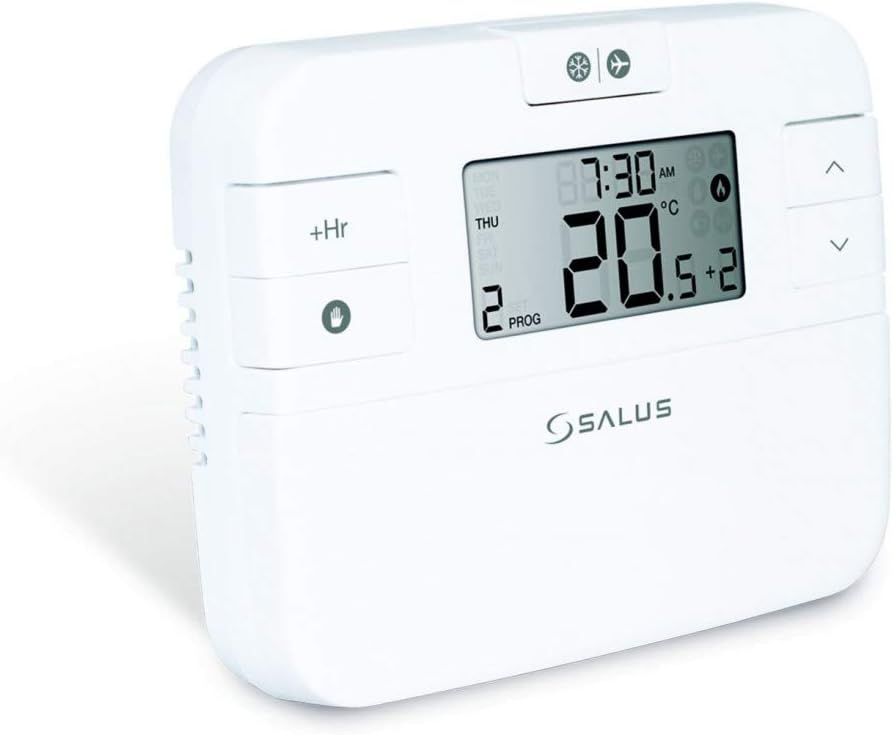
Figure 1: Salus RT510 Thermostat Front View
The image displays the Salus RT510 digital thermostat, a white rectangular unit with a large LCD screen. The screen shows the current time (8:30 AM), day (THU), current temperature (20.5°C), and program number (2 PROG). To the left of the screen are '+Hr' and a hand icon button for manual override. To the right are up and down arrow buttons. Above the screen are small icons for snowflake (cooling) and fan (ventilation), and an airplane (holiday mode). The Salus logo is visible below the screen.
ווייַז עלעמענטן:
- Time and Day: ווייזט קראַנט צייט און טאָג פון די וואָך.
- קראַנט טעמפּעראַטור: Displays the ambient room temperature.
- שטעלן טעמפּעראַטור: Indicates the desired temperature.
- פּראָגראַם נומער: Shows the active program period.
- Flame Icon: צינדט זיך אָן ווען די הייצונג סיסטעם איז אַקטיוו.
- באַטערי ינדיקאַטאָר: Alerts when batteries are low.
קאָנטראָל קנעפּלעך:
- אַרויף / אַראָפּ אַראָוז: Adjust temperature settings, navigate menus.
- +Hr Button: Used for temporary manual override or extending current settings.
- Hand Icon Button: Activates manual mode or confirms selections.
- Mode Button (if present): Switches between heating, cooling (if supported), and off modes.
5. ינסטאַלירונג
The Salus RT510 is a hard-wired thermostat. Proper installation is crucial for safe and effective operation.
- מאַכט דיסקאַנעקשאַן: Before beginning, ensure the mains power supply to your heating system is completely disconnected at the consumer unit.
- מאַונטינג אָרט: Choose an internal wall, approximately 1.5 meters from the floor, away from direct sunlight, drafts, or heat sources (e.g., radiators, lampס).
- ייַנמאָנטירונג פון באַקפּלאַץ:
- Separate the backplate from the thermostat unit.
- Secure the backplate to the wall using the provided screws and wall plugs. Ensure it is level.
- וויירינג: Connect the electrical wiring from your heating system to the terminals on the backplate as per the wiring diagram provided with the product packaging. If you are unsure, consult a qualified electrician. The thermostat operates on 230 Volts.
- צובינדן דעם טערמאָסטאַט: Once wiring is complete and secure, carefully attach the main thermostat unit to the backplate, ensuring it hooks over the top and is secured by two small screws at the bottom.
- מאַכט ווידער קאַנעקשאַן: Restore mains power to your heating system.
באַמערקונג: Incorrect wiring can damage the thermostat or your heating system. If you are not confident with electrical installations, please seek professional assistance.
6. ערשט סעטאַפּ
After installation and power-up, perform the following steps for initial configuration:
- אַרייַנלייגן באַטעריז: Open the battery compartment (usually on the back or side) and insert the supplied Alkaline batteries, observing correct polarity. The thermostat display should illuminate.
- שטעלן צייט און טאָג:
- Press the appropriate button (refer to your unit's specific button, often a 'SET' or 'MENU' button, or hold the hand icon button) to enter time/day setting mode.
- Use the Up/Down arrows to adjust the hour, minute, and day of the week.
- Confirm each setting by pressing the appropriate button (e.g., hand icon or 'SET').
- טעמפּעראַטור אַפּאַראַט: If applicable, select between Celsius (°C) and Fahrenheit (°F) in the settings menu.
7. אַפּערייטינג ינסטרוקטיאָנס
7.1. מאַנועלע טעמפּעראַטור אַדזשאַסטמענט
To temporarily adjust the temperature without changing the program:
- In normal operating mode, press the Up or Down arrow buttons. The set temperature will flash.
- Adjust to your desired temperature. The new setting will be active until the next programmed time period begins.
7.2. Manual Override (+Hr Function)
The '+Hr' button allows for a temporary override of the current program for a set number of hours.
- Press the '+Hr' button. The display will show the override duration (e.g., 1 hour).
- Use the Up/Down arrows to adjust the desired temperature for this override period.
- The thermostat will maintain this temperature for the set duration, then revert to the programmed schedule.
7.3. Holiday Mode (Airplane Icon)
If your unit features a holiday mode (indicated by an airplane icon), this allows you to set a constant, lower temperature for an extended period, saving energy while you are away.
- Activate holiday mode via the menu or a dedicated button.
- Set the desired temperature and duration (number of days).
- The thermostat will maintain this temperature until the holiday mode expires, then resume the normal program.
8. Programming the Thermostat
The Salus RT510 offers flexible programming options to suit your lifestyle. You can typically choose between 5/2 day programming (weekdays and weekends) or individual 7-day programming.
8.1. אריינגיין אין פּראָגראַמירן מאָדע
Press and hold the 'PROG' or 'MENU' button (or similar, refer to your unit's specific button layout) until the display changes to show programming options.
8.2. Setting Program Periods
The thermostat allows for up to 6 temperature periods per day. Each period is defined by a start time and a target temperature. The period automatically ends when the next period begins.
- Select Day(s): Choose whether to program for 5 weekdays + 2 weekend days, or each day individually (Mon, Tue, Wed, etc.).
- Set Period 1 (P1):
- Adjust the start time for the first period using the Up/Down arrows.
- Adjust the desired temperature for this period.
- Confirm and move to the next setting.
- Repeat for P2-P6: Follow the same steps to set the start time and temperature for the remaining program periods (P2, P3, P4, P5, P6).
- היט און אַרויסגאַנג: Once all periods are set for the selected day(s), save your settings and exit programming mode (often by pressing the 'PROG' or 'MENU' button again, or waiting for an automatic exit).
טיפּ: Even if you only need a few changes, you may need to set all 6 periods. For example, if you want a consistent temperature for several hours, set multiple consecutive periods to the same temperature.
9. וישאַלט
9.1. באַטערי פאַרבייַט
When the low battery indicator appears on the display, replace the batteries promptly to ensure continuous operation and prevent data loss.
- עפענען די באַטאַרייע אָפּטייל.
- אַראָפּנעמען די אַלט באַטעריז.
- Insert new Alkaline batteries, ensuring correct polarity.
- Close the battery compartment. The time and program settings should be retained.
9.2. רייניקונג
רייניקן דעם טערמאָסטאַט גasing with a soft, dry cloth. Do not use abrasive cleaners, solvents, or spray directly onto the unit.
10. טראָובלעשאָאָטינג
| פּראָבלעם | מעגלעך סיבה | לייזונג |
|---|---|---|
| דער עקראַן איז ליידיק אָדער טונקל. | נידעריק אָדער טויט באַטעריז. | Replace batteries with new Alkaline batteries. |
| Heating not turning on. |
|
|
| Incorrect time/day displayed. | Time/day not set correctly or power interruption. | Re-set the current time and day as per Section 6. |
| טערמאָסטאַט רעאַגירט נישט אויף קנעפּל דריקונגען. | Temporary software glitch or very low batteries. | Remove and re-insert batteries. If issue persists, contact support. |
11. ספּעסאַפאַקיישאַנז
| שטריך | דעטאַל |
|---|---|
| מאָדעל | RT510 |
| סאָרט | סאַלוס |
| טיפּ | פּראָוגראַמאַבאַל דיגיטאַל טערמאַסטאַט |
| מאַכט מקור | Corded Electric (230V) for heating system, Battery for unit operation |
| Voltage | 230 וואלטס |
| באַטעריז | אַלקאַליין (אַרייַנגערעכנט) |
| דימענשאַנז (די רענטגענ וו x ה) | 10 x 3 x 10 ס״מ (אומגעפער) |
| וואָג | 300 ג |
| מאַטעריאַל | פּלאַסטיק |
| ווייַז טיפּ | דיגיטאַל |
| קאָנטראָל טיפּ | דרוק קנעפּל |
| מאַונטינג | וואנט בארג |
| ספּעציעלע פֿעיִקייטן | פּראָגראַממאַבלע |
| קאַנעקטיוויטי | Wi-Fi (Note: This feature is listed in product specifications. Please refer to your specific model's documentation for Wi-Fi setup if applicable.) |
12. וואָראַנטי און שטיצן
For warranty information and technical support, please refer to the documentation included with your product or visit the official Salus webזייטל. האַלט דיין קויפן באַווייַז פֿאַר וואָראַנטי קליימז.
If you encounter issues not covered in this manual, please contact Salus customer support for assistance.


