1. הקדמה
This manual provides essential information for the safe and efficient operation of your NEC NP-PA653U LCD Projector. Please read this manual thoroughly before using the projector and retain it for future reference. The NEC NP-PA653U is an advanced professional installation projector designed for higher education and corporate environments, offering high brightness and flexible installation options.
2. זיכערקייַט אינפֿאָרמאַציע
וויכטיק זיכערהייט אינסטרוקציעס:
- Always connect the projector to a grounded power outlet.
- בלאָקירט נישט די ווענטילאַציע עפענונגען. זאָרגט פֿאַר גענוג פּלאַץ אַרום דעם פּראָיעקטאָר פֿאַר געהעריקן לופֿטפֿלוס.
- קוק נישט גלייך אריין אין די פּראָיעקטאָר לינז ווען די לamp is on, as this can cause eye damage.
- Avoid placing the projector in direct sunlight, near heat sources, or in environments with excessive dust or humidity.
- איבערגעבן אלע סערוויסינג צו קוואַליפֿיצירטע סערוויס פּערסאָנעל. פּרוּווט נישט צו עפֿענען אָדער פאַרריכטן דעם פּראָיעקטאָר אַליין.
- ניצן בלויז אַטאַטשמאַנץ / אַקסעסעריז ספּעסיפיעד דורך דער פאַבריקאַנט.
3. פּעקל אינהאַלט
באַשטעטיקט אַז אַלע זאכן וואָס זענען אויסגערעכנט אונטן זענען אַרייַנגערעכנט אין אייער פּעקל:
- NEC NP-PA653U LCD Projector
- אָביעקטיוו לאָך דעקן
- ווירעלעסס ווייַט קאָנטראָל
- Lens lock screw
- מאַכט שנור
- באַניצער מאַנואַל (דעם דאָקומענט)
4. פּראָדוקט איבערview
The NEC NP-PA653U is a high-performance LCD projector designed for professional installations. It features 6500 lumens brightness, WUXGA (1920x1200) resolution, and advanced connectivity options including HDBaseT.
4.1 פראָנט View

פיגורע 4.1: פראָנט view of the NEC NP-PA653U LCD Projector. This image shows the main lens assembly and the overall white casing of the projector.
4.2 דערציען View (Input/Output Panel)
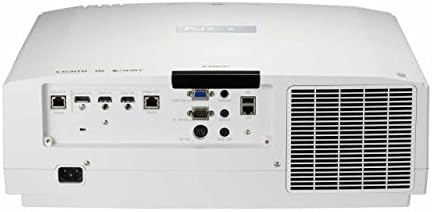
פיגורע 4.2: דערציען view of the NEC NP-PA653U LCD Projector. This panel includes various connectivity options such as HDMI, HDBaseT, VGA, audio inputs/outputs, and network ports.
4.3 זייַט View (קאָנטראָל פּאַנעל)
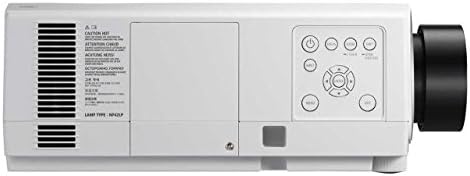
פיגורע 4.3: זייַט view of the NEC NP-PA653U LCD Projector. This image highlights the integrated control panel with buttons for power, menu navigation, and input selection.
5. סעטאַפּ
5.1 פיזישע פּלאַצירונג
The NP-PA653U offers flexible installation options, including tilt-free and portrait installation capabilities. Ensure the projector is placed on a stable, level surface or securely mounted. Maintain adequate ventilation space around the unit.
- Lens Installation: This projector uses optional powered lenses. Align the lens with the lens mount and secure it according to the lens-specific instructions. Use the provided lens lock screw.
- פּרויעקציע דיסטאַנסע: Adjust the distance from the screen to achieve the desired image size. The optional powered lenses allow for lens shift, focus, and zoom adjustments.
5.2 קאַנעקטינג דעוויסעס
Connect your source devices (e.g., computer, Blu-ray player) to the appropriate input ports on the projector's rear panel (refer to Figure 4.2).
- HDBaseT: For uncompressed Full HD digital video, audio, Ethernet, power, and control signals over a single cable. The HDBaseT input and separate HDBaseT loop out provide versatile connectivity.
- הדמי: Connect devices using HDMI cables for high-definition digital video and audio.
- ווגאַ: Connect computers using a VGA cable for analog video signals.
- נעץ (עטהערנעט): Connect to a network for control and monitoring.
5.3 מאַכט אויף / אַוועק
- Connect the power cord to the projector and a grounded electrical outlet.
- דרוק די מאַכט button on the projector's control panel or the remote control to turn on the projector. The power indicator light will change.
- דריקן די צו ויסמעקן מאַכט button again. Confirm shutdown if prompted. Allow the projector to cool down before unplugging.
6. אַפּערייטינג ינסטרוקטיאָנס
6.1 יקערדיק אָפּעראַציע
- אַרייַנשרייַב סעלעקציע: Use the "Input" button on the remote or control panel to cycle through available input sources (HDMI, HDBaseT, VGA, etc.).
- מעניו נאַוויגאַציע: Press the "Menu" button to access the on-screen display (OSD) menu. Use the arrow keys to navigate and "Enter" to select options.
- פאָקוס און זום: Adjust the focus and zoom using the controls on the optional powered lens or via the remote control/OSD menu.
- Lens Shift: Utilize the lens shift function (horizontal and vertical) to adjust the image position without moving the projector.
6.2 אַוואַנסירטע פֿעיִקייטן
- 4K Ready (HDR10, BT.2020): The projector supports HDR10 and BT.2020 signal formats, making it compatible with Ultra HD Blu-ray and 4K TV broadcasting content. Ensure your source device is configured for these formats.
- TileMatrix: This feature enables the creation of a large 4K x 2K resolution image by utilizing up to four projectors. Connect multiple projectors via the HDBaseT loop out and configure TileMatrix settings in the OSD menu.
- עדזש בלענדינג: For seamless multi-projector installations, use the built-in edge blending feature to smoothly combine images from adjacent projectors, eliminating visible seams.
- אָנלייגן: The projector supports stacking, allowing two or more projectors to be aligned to increase brightness or provide redundancy.
- High Performance Video Processing/Scaling: The projector incorporates advanced video processing to create life-like images from various input resolutions.
7. וישאַלט
7.1 רייניקונג
- פּראָיעקטאָר Casing: ווישן די קasinגיסט מיט אַ ווייכן, טרוקענעם שטאָף. פֿאַר שווערן שמוץ, ניצט אַ לייכט טרוקן שטאָף.amp cloth with a mild, non-abrasive cleaner.
- לענס: Gently clean the lens with a lens cleaning cloth or lens paper. Avoid using abrasive materials or harsh chemicals.
- לופט פילטערס: Regularly check and clean the air filters to prevent dust buildup, which can affect performance and lamp life. Refer to the OSD menu for filter usage time.
7.2 לamp פאַרבייַט
די פּראַדזשעקטער לamp האט א באגרענעצטע לעבנס-צייט. ווען די לamp life approaches its end, a warning message will appear. Replace the lamp with an authentic NEC replacement lamp (Lamp Type: NP42LP) to ensure optimal performance and safety.
- Turn off the projector and unplug the power cord. Allow it to cool completely (at least 60 minutes).
- געפינען די לamp cover (refer to Figure 4.3 for general location on the side panel).
- שרויף די לamp cover and carefully remove the old lamp מאָדולע.
- לייג אריין די נייע לamp מאָדול, זיכער מאַכן אַז עס איז ריכטיק אײַנגעשטעלט.
- פאַרבייַטן די לamp cover and secure it with screws.
- באַשטעטיק די לamp טייַמער אין דעם פּראָיעקטאָר'ס OSD מעניו.
8. טראָובלעשאָאָטינג
This section addresses common issues you might encounter. For more complex problems, contact NEC customer support.
| פּראָבלעם | מעגלעך סיבה | לייזונג |
|---|---|---|
| קיין בילד געוויזן |
|
|
| די בילד איז בלערי |
|
|
| פּראָיעקטאָר איבערהייצט זיך און שליסט זיך אויס |
|
|
9. ספּעסאַפאַקיישאַנז
| שטריך | דעטאַל |
|---|---|
| מאָדעל נומער | NP-PA653U |
| סאָרט | NEC |
| ברייטנאַס | 6500 לומענס |
| ווייַז האַכלאָטע | 1920 x 1080 (supports 4K signals) |
| קאַנעקטיוויטי טעכנאָלאָגיע | Ethernet, HDBaseT, HDMI, VGA |
| פּראָדוקט דימענשאַנז | 19.8 X 16.2 X 6.6 אינטשעס |
| פּונקט וואָג | 22.5 פונט |
| רעקאָממענדעד ניצט | Business, Education |
| ספּעציעלע שטריך | פּאָרטאַטיוו |
| פאַבריקאַנט | NEC Solutions (America), Inc. |
| ערשטער דאַטע בנימצא | 7 יאנואר 2017 |
10. וואָראַנטי און שטיצן
For warranty information, technical support, or service inquiries, please refer to the official NEC website or contact your authorized NEC dealer. Keep your purchase receipt as proof of purchase for warranty claims.
אָנליין רעסורסן: באַזוכט די אָפֿיציעלע NEC website for the latest drivers, firmware updates, and additional support documentation.


