1. הקדמה
The Neewer RF-550D Macro LED Ring Flash is designed for close-up photography, scientific research, medical applications, and personal photography. It provides continuous and stable illumination or flash light to enhance image quality in macro environments. This manual provides detailed instructions for the proper setup, operation, and maintenance of your device.
2. זיכערקייַט אינפֿאָרמאַציע
- דו זאלסט נישט ויסשטעלן די מיטל צו וואַסער אָדער נעץ.
- פֿאַרמײַדן דירעקטע אויגן אויסשטעל צו די LED ליכט.
- ניצט נאָר די ספּעציפֿיצירטע באַטעריע טיפּ (4 AA באַטעריעס).
- האַלטן אויס פון דערגרייכן פון קינדער.
- פּרוּווט נישט צו צענעמען אָדער פאַרריכטן דעם אַפּאַראַט אַליין. קאָנטאַקט קוואַליפֿיצירטע סערוויס פּערסאָנעל.
- Ensure the device is securely mounted to prevent accidental drops.
3. פּעקל אינהאַלט
באַשטעטיקן אַז אַלע זאכן זענען פאַראַן אין דיין פּעקל:
- Neewer RF-550D Macro LED Ring Flash (48 LEDs)
- Control Unit with LCD Display
- מאַכט אַדאַפּטער / טשאַרדזשער
- 8 x Adapter Rings (49mm, 52mm, 55mm, 58mm, 62mm, 67mm, 72mm, 77mm)
- 4 x Flash Diffusers (White, Transparent, Blue, Yellow)

Image: All components of the Neewer RF-550D Macro LED Ring Flash, including the ring light, control unit, power adapter, and various adapter rings and diffusers.

Image: A set of eight black adapter rings, clearly labeled with sizes 49mm, 52mm, 55mm, 58mm, 62mm, 67mm, 72mm, and 77mm, used to attach the ring flash to various camera lenses.
4. פּראָדוקט איבערview
The control unit features an LCD display and several buttons for managing the flash and light functions.

בילד: א נאָענטע בילד view of the control unit's LCD screen and buttons. Labels indicate: Mode Switch Button (MODE), LED Light Steady On Button (LIGHT), Test Button (PILOT), Power Switch (ON/OFF), Brightness - and Brightness + controls.
5. סעטאַפּ
5.1. ינסטאָלינג באַטעריז
The control unit requires 4 AA batteries (not included). Open the battery compartment cover on the back of the control unit and insert the batteries, ensuring correct polarity (+/-). Close the cover securely.

Image: A diagram showing the correct insertion of four AA batteries into the battery compartment of the control unit. A note indicates that batteries are not included.
5.2. Attaching to Camera Lens
- Select the appropriate adapter ring that matches your camera lens filter thread size (e.g., 49mm, 52mm, etc.).
- שרויפט דעם אויסגעקליבענעם אַדאַפּטער רינג אויף די פראָנט פון אייער קאַמעראַ לענס.
- Align the Macro LED Ring Flash with the adapter ring. Press the two release buttons on the ring flash and rotate it clockwise until it locks securely onto the adapter ring.

Image: A hand demonstrating how to attach the ring flash to a camera lens using an adapter ring. The ring flash is shown securely mounted on the lens.
5.3. מאָנטירן די קאָנטראָל אַפּאַראַט
Slide the control unit onto your camera's hot shoe mount until it clicks into place. Ensure it is firmly seated.
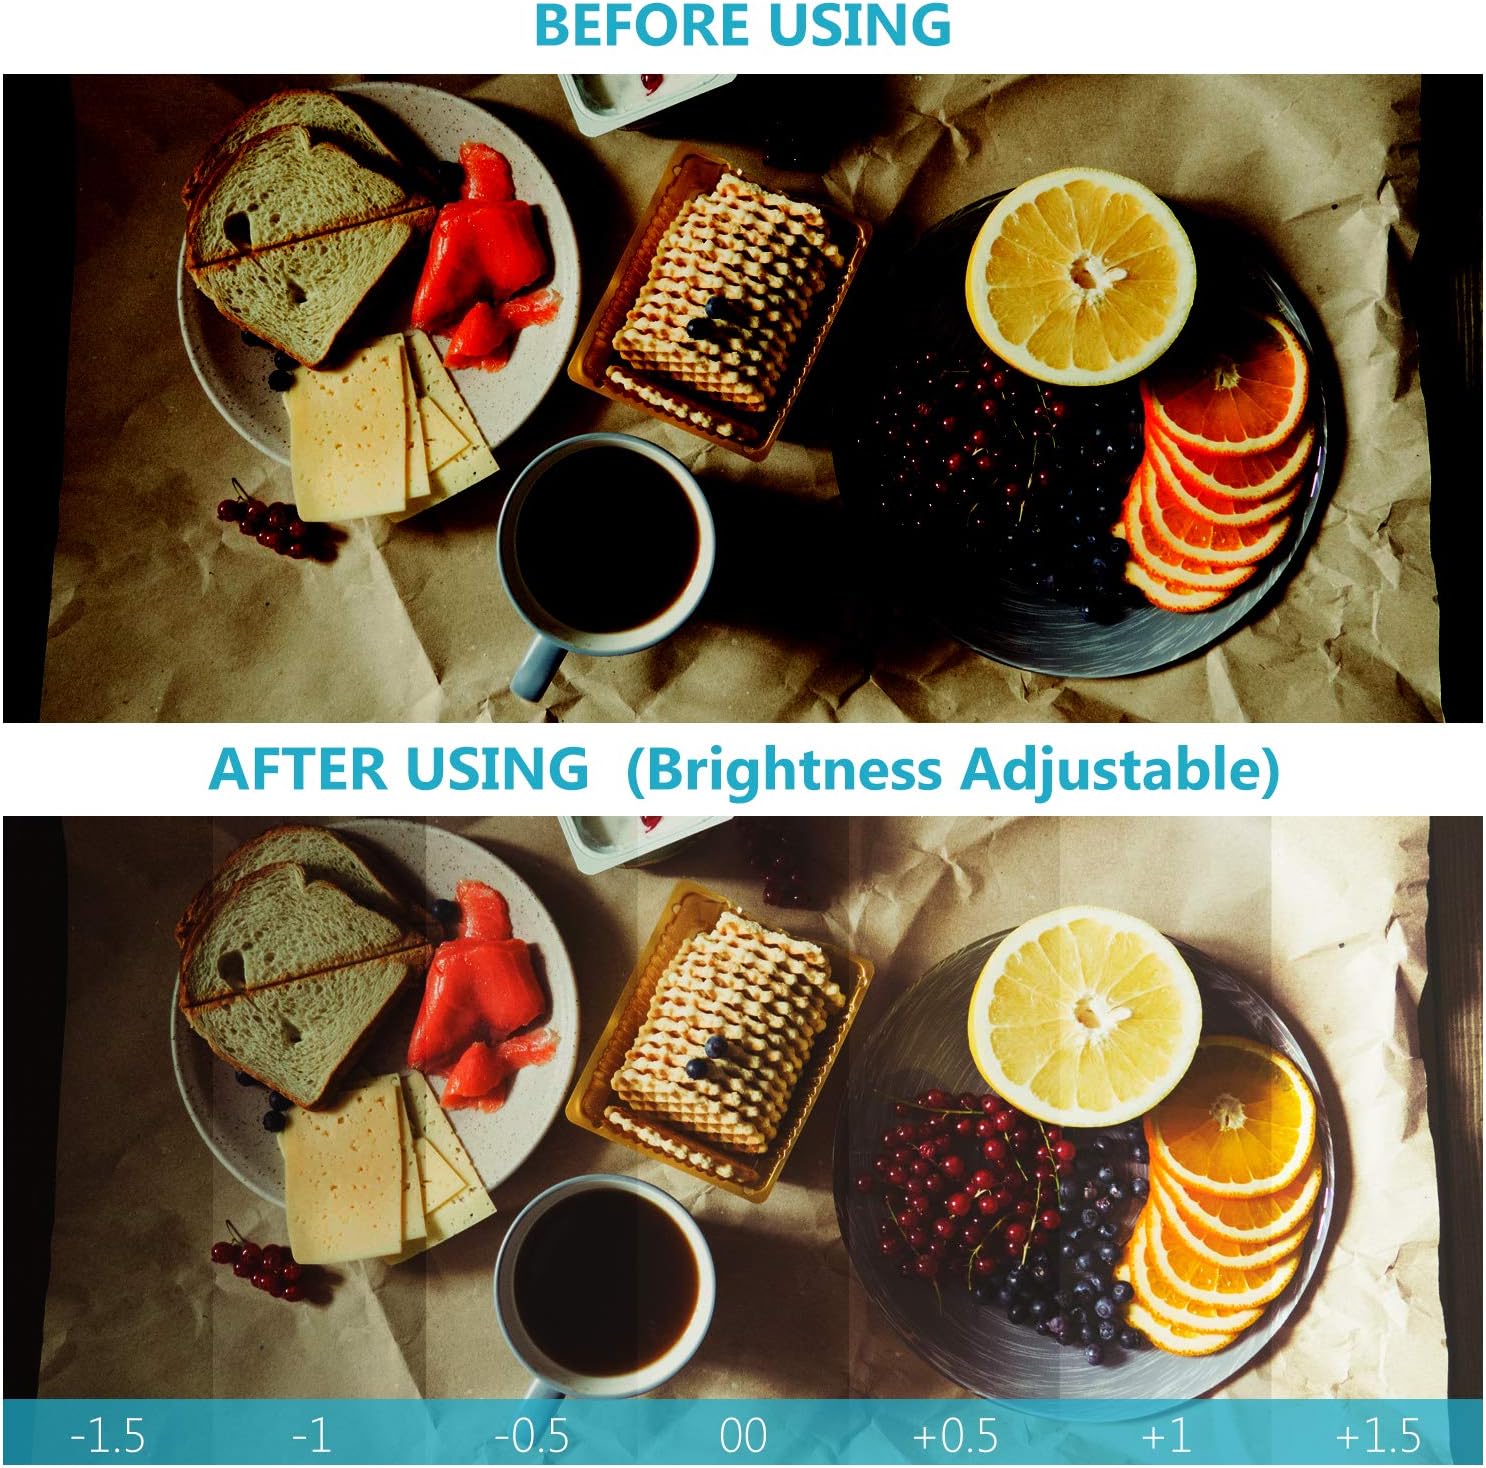
Image: The control unit of the ring flash is shown mounted on the hot shoe of a DSLR camera, connected to the ring light via a coiled cable.
6. אָפּעראַציע
6.1. פּאָווערינג אויף / אויסגעלאשן
דריקן און האַלטן די ON/OFF button on the control unit for a few seconds to power the device on or off.
6.2. סעלעקטינג מאָדעס
דרוק די מאָדע קנעפּל צו דורכגיין פאַרשידענע לייטינג מאָדעס:
- Full-Flash Mode: All 48 LEDs flash simultaneously.
- Left-Flash Mode: Only the left half of the LEDs flash.
- Right-Flash Mode: Only the right half of the LEDs flash.
- Full Light Steady-On Mode: All 48 LEDs provide continuous light.

Image: A collage showing example photographs taken with the four light modes: Left-Flash Mode, Right-Flash Mode, Full-Flash Mode, and Full Light Steady-On Mode, illustrating their effects on subjects.
6.3. אַדזשאַסטינג ברייטנאַס
ניצן די ברייטנאַס + און ליכטיקייט - buttons to adjust the intensity of the light or flash. The LCD display will show the current brightness level.

Image: A comparison showing a scene before and after using the ring flash with adjustable brightness. The 'After Using' section displays a gradient from -1.5 to +1.5, indicating the range of brightness adjustment.
6.4. Using Color Filters
The bundle includes four color diffusers (White, Transparent, Blue, Yellow) to modify the color temperature and lighting style of your photographs. Simply snap the desired filter onto the front of the LED ring flash.

Image: A display of four translucent color filters (Blue 9000K, Yellow 3000K, White 5000K, Transparent 5500K) and their corresponding effects on sample portraits, demonstrating different color temperatures and lighting styles.
7. וישאַלט
- רייניקונג: Use a soft, dry cloth to clean the exterior of the ring flash and control unit. Do not use abrasive cleaners or solvents.
- סטאָרידזש: When not in use, store the device in a cool, dry place, away from direct sunlight and extreme temperatures. Remove batteries if storing for extended periods.
- Lens Care: Keep adapter rings and diffusers clean to ensure optimal light transmission.
8. טראָובלעשאָאָטינג
| פּראָבלעם | מעגלעך סיבה | לייזונג |
|---|---|---|
| דער בליץ פליסט נישט. | Low or dead batteries; incorrect camera settings; loose connection. | Replace batteries; check camera flash settings; ensure control unit is securely mounted and cable is connected. |
| ליכט איז צו טונקל/העל. | די ליכטיקייט איינשטעלונג איז נישט ריכטיק. | Adjust brightness using the '+' and '-' buttons on the control unit. |
| רינג בליץ גייט נישט צו צום לענס. | אומרעכטע אַדאַפּטער רינג גרייס. | Ensure the correct adapter ring size is selected for your lens. |
9. ספּעסאַפאַקיישאַנז
| שטריך | דעטאַל |
|---|---|
| מאָדעל | RF-550D (10020025) |
| געפירט קוואַנטיטי | 48 ברעקלעך |
| קאַמפּאַטאַבאַל מאַונטינגז | Canon, Nikon (and other DSLR cameras with compatible lens thread sizes) |
| פלאַש סינק ספּיד | 1/200 or 1/250 seconds |
| קאַנעקטיוויטי טעכנאָלאָגיע | ווייערד |
| ווירעלעסס טעכנאָלאָגיע | Optical Pulse |
| בארג טיפּ | On-camera hot shoe |
| מאַכט מקור | 4 אַאַ באַטעריז (ניט אַרייַנגערעכנט) |
| אַדאַפּטער רינג סיזעס | 49 מם, 52 מם, 55 מם, 58 מם, 62 מם, 67 מם, 72 מם, 77 מם |
| פּונקט וואָג | 1.1 פונט (אומגעפער 0.5 ק"ג) |
10. וואָראַנטי און שטיצן
For warranty information and customer support, please refer to the documentation included with your purchase or visit the official Neewer webזייטל. האַלט דיין קויפן באַווייַז פֿאַר קיין וואָראַנטי קליימז.


