1. הקדמה
This manual provides comprehensive instructions for the installation, operation, and maintenance of the Supermicro X10SLM+-LN4F motherboard. Designed for server applications, this motherboard features an LGA1150 socket, Intel C224 PCH, DDR3 memory support, and multiple Gigabit Ethernet ports. Please read this manual thoroughly before proceeding with installation to ensure proper setup and optimal performance.
2. פּראָדוקט איבערview
The Supermicro X10SLM+-LN4F is a microATX server motherboard built for reliability and performance. Key features include:
- LGA1150 Socket for Intel Xeon E3-1200 v3/v4 and 4th Gen Core i3 processors.
- Intel C224 PCH chipset.
- Four DDR3 DIMM slots supporting up to 64GB ECC/non-ECC UDIMM.
- Multiple SATA3 (6Gbps) ports.
- Integrated quad Gigabit Ethernet ports.
- USB 3.0 and USB 2.0 support.
- VGA output for integrated graphics.
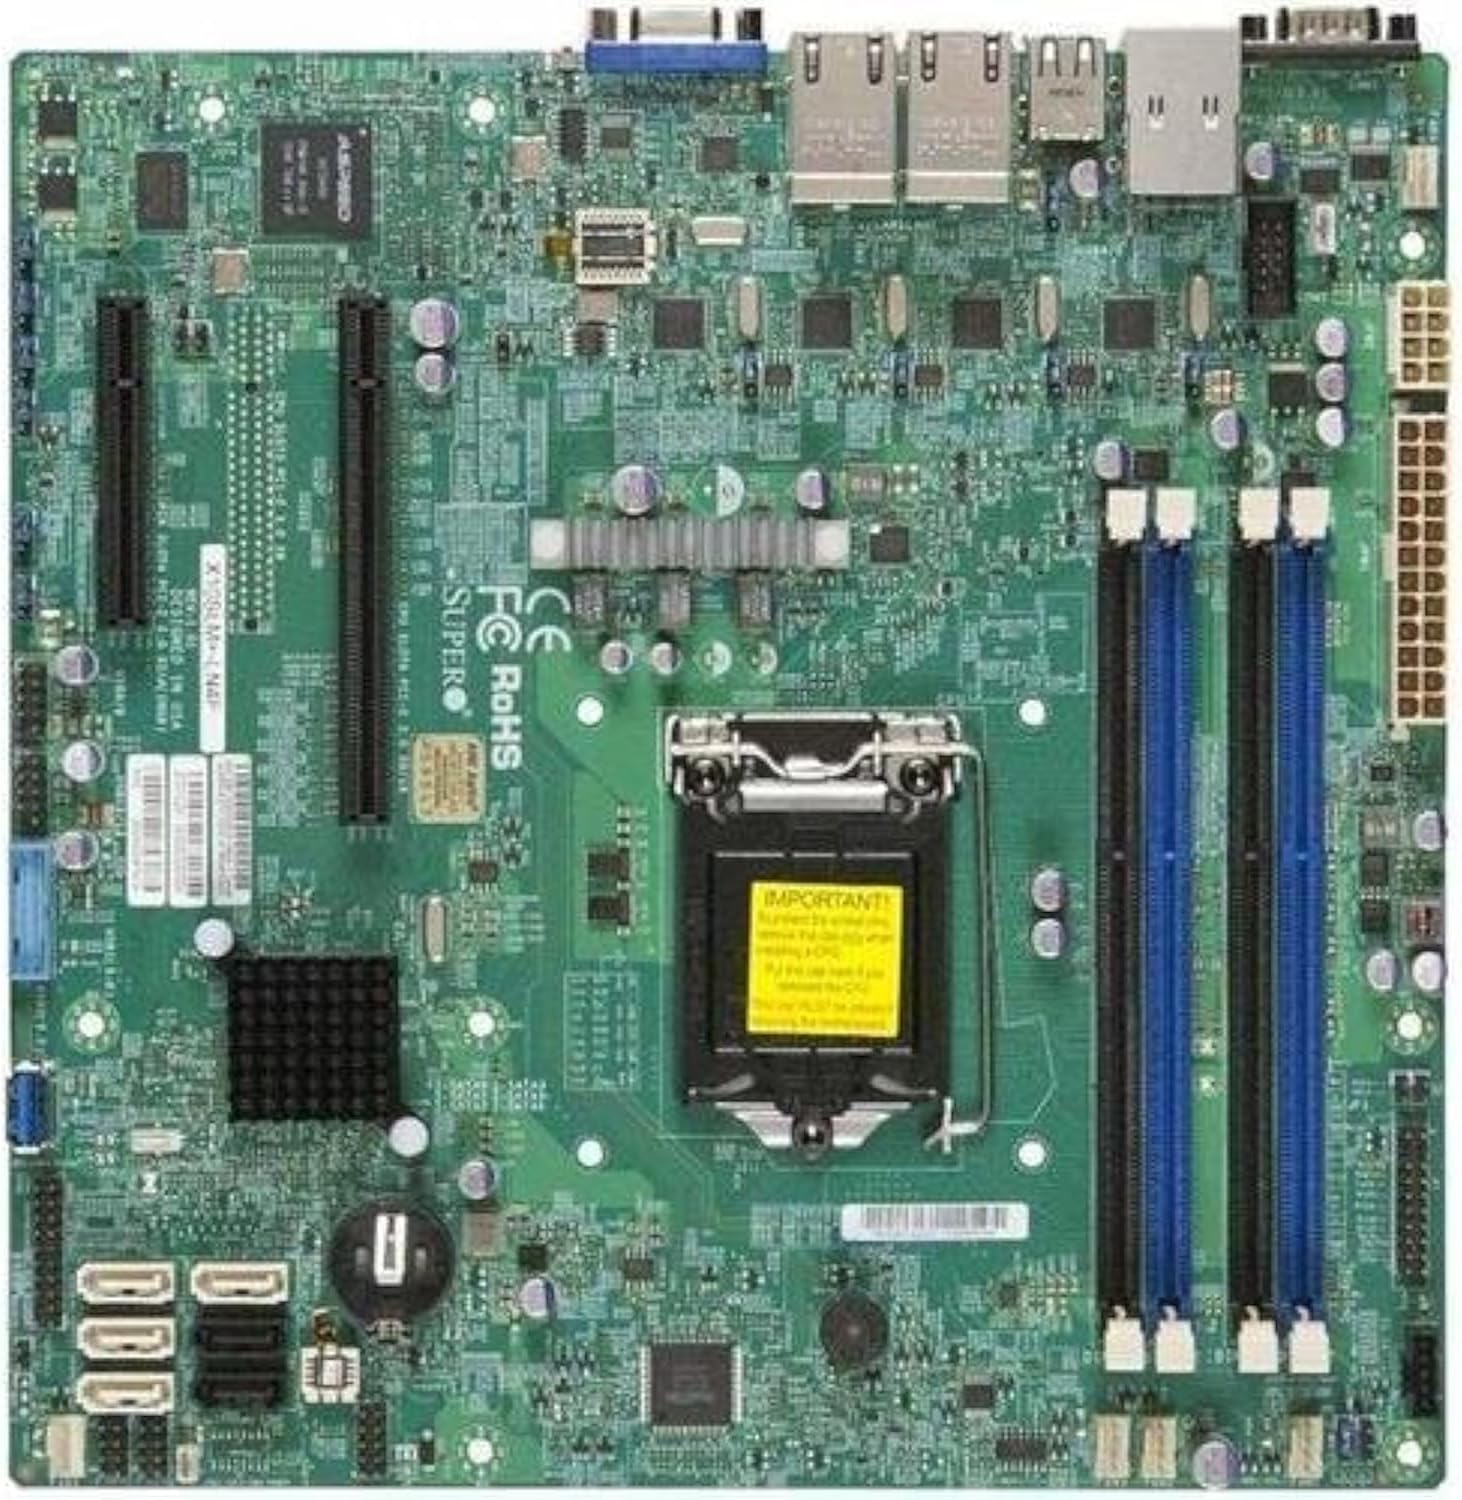
פיגורע 2.1: Top-down view of the Supermicro X10SLM+-LN4F motherboard, showing the CPU socket, DIMM slots, PCIe slots, and various connectors.

פיגורע 2.2: אַנגגאַלד view of the motherboard, highlighting the layout of components and expansion slots.
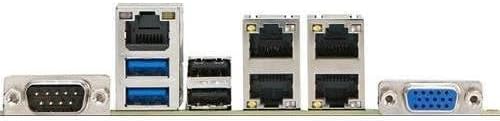
פיגורע 2.3: Rear I/O panel of the Supermicro X10SLM+-LN4F motherboard, featuring multiple LAN ports, USB ports, and serial ports.
3. סעטאַפּ און ייַנמאָנטירונג
איידער איר הייבט אן די אינסטאַלאַציע, זאָרגט אַז אייער סיסטעם איז אויסגעלאָשן און אָפּגעטיילט פֿון דער מאַכט מקור. טראָגט אַן אַנטיסטאַטיש האַנטגעלענק רימען צו פאַרמייַדן עלעקטראָסטאַטיש אָפּלאָד (ESD) שעדיקן צו קאָמפּאָנענטן.
3.1. סי-פי-יו אינסטאַלאַציע
- געפינט די LGA1150 CPU סאָקעט אויף די מאָטהערבאָאַרד.
- דריק אראפ דעם לאוד הייבער און ציה עס צו דער זייט צו עפענען דעם סי-פי-יו סאקעט ריטענשאַן ראם.
- פֿאָרזיכטיק גלייכט אויס דעם דרייעקיקן צייכן אויף דער CPU מיטן קאָרעספּאָנדירנדיקן צייכן אויף דער סאָקעט.
- לייג אריין די סי-פי-יו אין די סאקעט אן עס צווינגען.
- פֿאַרמאַכט דעם רעטענשאַן ראַם און באַפֿעסטיקן עס מיטן לאָד הייבער.
- טראָגט אויף אַ דין, גלייכן שיכט פון טערמישער פּאַסטע אויף די קפּו'ס אינטעגרירטע היץ פֿאַרשפּרייטער (IHS).
- אינסטאלירט דעם סי-פי-יו קולער לויט די אינסטרוקציעס פונעם פאבריקאנט.
3.2. זכּרון (RAM) אינסטאַלאַציע
- Locate the four DDR3 DIMM slots. For optimal performance, refer to the motherboard's specific memory population guidelines, typically starting with slots closest to the CPU or specific colored slots for dual-channel configurations.
- עפֿנט די ריטענשאַן קליפּס ביי ביידע ענדס פון די DIMM סלאָט.
- גלייכט אויס דעם קערב אויפן DDR3 זכּרון מאָדול מיטן שליסל אין דעם DIMM סלאָט.
- שטעקט אריין דעם זכּרון מאָדול פעסט אין דעם סלאָט ביז די ריטענשאַן קליפס קליקן אויף זייער אָרט.
- Ensure both clips are fully closed and the module is seated correctly.
3.3. סטאָרידזש מיטל ינסטאַלירונג
Connect SATA storage devices (HDDs/SSDs) to the SATA ports on the motherboard using SATA data cables. Connect the power cables from your power supply unit (PSU) to the storage devices.
3.4. אינסטאַלאַציע פון עקספּאַנסיע קאַרטל
This motherboard features PCI Express (PCIe) slots. To install an expansion card:
- Remove the corresponding slot cover from your chassis.
- Align the expansion card with the PCIe slot.
- Press down firmly until the card is fully seated in the slot.
- באַזײַטיקט די קאַרטל מיט אַ שרויף אָדער אַ ריטענשאַן קלעמערל פֿון אײַער שאַסי.
3.5. מאַכט קאַנעקשאַנז
- 24-פּין ATX מאַכט קאַנעקטער: Connect the main 24-pin power cable from your PSU to the ATX power connector on the motherboard.
- 8-pin EPS/CPU Power Connector: Connect the 8-pin (or 4+4 pin) CPU power cable from your PSU to the EPS connector near the CPU socket.
3.6. פראָנט פּאַנעל און הינטערשטע I/O קאַנעקשאַנז
- פראָנט פּאַנעל קאַנעקטערז: Connect the power switch, reset switch, power LED, and HDD activity LED cables from your chassis to the corresponding pins on the motherboard's front panel header. Refer to the motherboard's silkscreen labels for correct orientation.
- וסב כעדערז: Connect front panel USB ports to the onboard USB headers.
- Audio Headers: Connect front panel audio jacks to the onboard audio header.
- דערציען I/O פּאַנעל: Connect peripherals such as keyboard, mouse, monitor (via VGA), and network cables (to the Gigabit Ethernet ports) to the rear I/O panel.
4. אַפּערייטינג ינסטרוקטיאָנס
4.1. Initial Power On and BIOS/UEFI Setup
- After all components are installed and connected, connect the power cord to the PSU and turn on the power switch on the PSU.
- דריק דעם פּאַוער קנעפּל אויף אייער שאַסי.
- בעת דעם "Power-On Self-Test" (POST), דריקט איבער און איבער דעם קנעפּל DEL or F2 key (or as indicated on screen) to enter the BIOS/UEFI setup utility.
- In the BIOS/UEFI, configure essential settings such as date and time, boot order, and enable/disable specific features as required for your operating system and hardware.
- Save changes and exit the BIOS/UEFI. The system will restart.
4.2. אפערירן סיסטעם אינסטאַלאַציע
To install an operating system (e.g., Windows, Linux, VMware ESXi):
- Insert the operating system installation media (USB drive or DVD) into the system.
- Boot from the installation media (you may need to adjust the boot order in BIOS/UEFI).
- Follow the on-screen prompts to install the operating system on your chosen storage device.
- After installation, install all necessary drivers for the motherboard components (chipset, LAN, VGA, etc.) from the Supermicro webוועבזייטל אדער די צוגעשטעלטע דרייווער דיסק.
5. וישאַלט
רעגולערע אויפהאלטונג העלפט זיכער מאכן די לאנגעוויטי און סטאבילן אפעראציע פון אייער מאדערבאארד און סיסטעם.
5.1. רייניקונג
- רייניקן פּעריִאָדיש שטויב פֿון די מאַדערבאָרד און סיסטעם קאָמפּאָנענטן מיט קאָמפּרעסירטע לופֿט. זיכער מאַכן אַז די סיסטעם איז אויסגעלאָשן און נישט אַרויסגעשטעקט פֿון דער פּלאַטע איידער איר רייניקט.
- פֿאַרמײַדן צו ניצן פֿליסיגע רייניקונגס־מיטלען גלייך אויף קאָמפּאָנענטן.
- Ensure proper airflow within the chassis by keeping fan vents clear.
5.2. Firmware and Driver Updates
- קאָנטראָלירן די סופּערמיקראָ website periodically for updated BIOS/UEFI firmware and drivers for your motherboard model.
- Follow the provided instructions carefully when updating firmware to avoid system instability.
5.3. ינווייראַנמענאַל קאַנסידעריישאַנז
- Operate the motherboard within recommended temperature and humidity ranges to prevent damage.
- זיכער מאַכן אַז די סערווער שאַסי האט גענוג ווענטילאַציע.
6. טראָובלעשאָאָטינג
די סעקציע גיט לייזונגען צו געוויינטלעכע פראבלעמען וואָס איר קענט באַגעגענען.
6.1. קיין מאַכט / קיין POST (אויף-אויף זעלבסט-טעסט)
- Verify that the power supply unit (PSU) is connected correctly to the motherboard (24-pin ATX and 8-pin EPS connectors).
- Ensure the PSU is switched on and receiving power from the wall outlet.
- Check that the front panel power switch cable is correctly connected to the motherboard header.
- Reseat the CPU, RAM modules, and any expansion cards.
- Try booting with only essential components (CPU, one RAM stick, CPU cooler) to isolate the issue.
- Listen for beep codes from the system speaker, which can indicate specific hardware failures. Refer to the Supermicro website for beep code interpretations.
6.2. פּראָבלעמען מיטן אַרויסווייַזן
- Ensure the monitor is properly connected to the motherboard's VGA port.
- באַשטעטיקן אַז דער מאָניטאָר איז אנגעצונדן און איינגעשטעלט אויף דער ריכטיקער אינפוט מקור.
- If using a discrete graphics card, ensure it is properly seated and connected to power (if required).
6.3. Operating System Not Booting
- Check the boot order in the BIOS/UEFI to ensure the correct storage device is prioritized.
- Verify that the operating system is installed correctly on the storage device.
- Ensure SATA data and power cables are securely connected to the storage device and motherboard.
7. ספּעסאַפאַקיישאַנז
Below are the technical specifications for the Supermicro X10SLM+-LN4F motherboard:
| שטריך | דעטאַל |
|---|---|
| סאָרט | סופּערמיקראָ |
| מאָדעל נאָמען | X10SLM+-LN4F-B |
| קפּו סאָקקעט | LGA1150 |
| טשיפּסעט טיפּ | Intel C224 |
| ראַם זכּרון טעכנאָלאָגיע | DDR3 SDRAM |
| זכּרון ספּיד | 1600 מהז |
| זכּרון סטאָרידזש קאַפּאַסיטי | אַרויף צו 64 גיגאבייט |
| נומער פון וסב 2.0 פּאָרץ | 2 (הינטערשטע I/O) |
| graphics קאָרט צובינד | Integrated, PCI |
| קאַמפּאַטאַבאַל דעוויסעס | סערווירער |
| פּלאַטפאָרמע | Windows 10 |
| פּונקט וואָג | 5.8 פונט |
| פּראָדוקט דימענשאַנז (LxWxH) | 10 X 10 X 2 אינטשעס |
| ערשטער דאַטע בנימצא | 4 יוני 2013 |
Note: Specifications are subject to change without notice. For the most current information, please refer to the official Supermicro product page.
8. וואָראַנטי און שטיצן
For detailed warranty information, please refer to the warranty card included with your product or visit the official Supermicro website. Technical support is available through Supermicro's customer service channels, including their support portal, email, and phone. Please have your product model number (X10SLM+-LN4F) and serial number ready when contacting support.
For the latest drivers, BIOS updates, and additional documentation, please visit: www.supermicro.com


