1. הקדמה
This manual provides comprehensive instructions for the installation, operation, and maintenance of your Hertz HDP4 4-Channel 1000W Max D-Class Amplifier. Please read this manual thoroughly before attempting installation or operation to ensure proper function and safety.
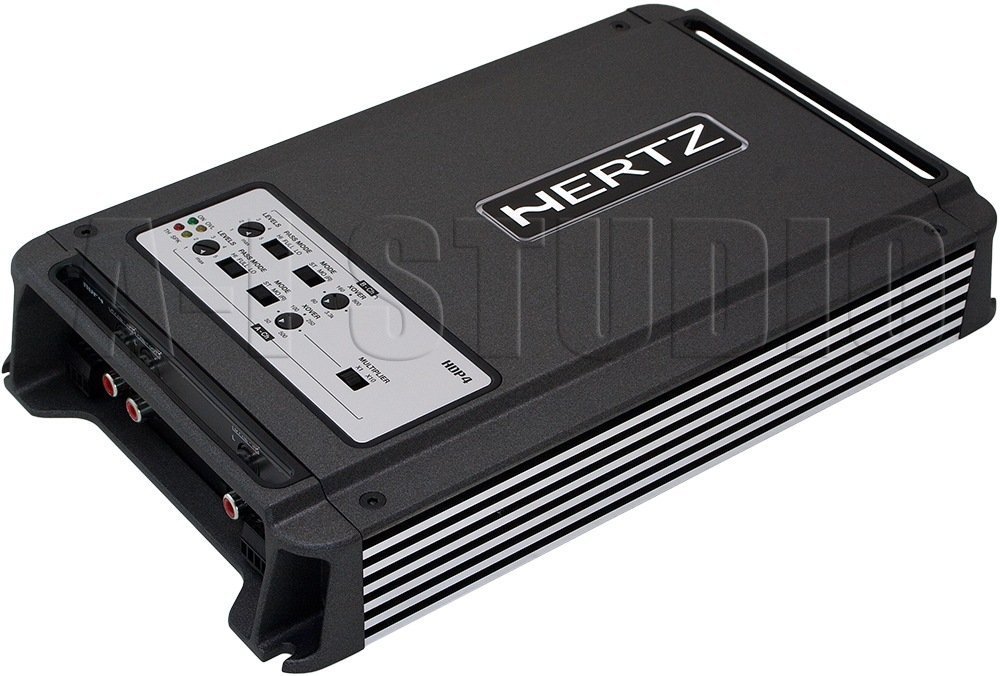
פיגור 1.1: אויבן-אראפ ווינקלעד view of the Hertz HDP4 ampלײַכטער, ווײַזןasinג זײַן קאָמפּאַקט שוואַרץ סיasing and control panel on the top surface. The Hertz logo is visible on the main body.
2. זיכערקייַט אינפֿאָרמאַציע
שטענדיק אָבסערווירן די פאלגענדע זיכערקייַט פּריקאָשאַנז:
- Disconnect the vehicle's battery before any installation or wiring.
- זיכער מאַכן אַז אַלע וויירינג איז ריכטיק איזאָלירט צו פאַרמייַדן קורץ קרייזן.
- בארג די amplifier securely in a well-ventilated area, away from moisture and direct heat.
- ניצט צוגעפאסטע וויירינג פאר מאַכט און ערד קאַנעקשאַנז ווי ספּעסיפיצירט אין דער ינסטאַלירונג אָפּטייל.
- באַראַטן זיך מיט אַ פאַכמאַן אינסטאַללער אויב איר זענט נישט זיכער וועגן קיין טייל פון די ינסטאַלירונג פּראָצעס.
3. פּעקל אינהאַלט
באַשטעטיקן אַז אַלע זאכן זענען פאַראַן אין פּעקל:
- Hertz HDP4 Ampליפיער אַפּאַראַט
- מאָנטירונג האַרדווער (שרויף, קלאַמערן)
- באַניצער מאַנואַל (דעם דאָקומענט)
4. סעטאַפּ און ייַנמאָנטירונג
4.1 מאָנטירן די Ampליפער
Choose a suitable location for mounting the amplifier. It should be a dry, well-ventilated area, protected from direct sunlight and excessive vibration. Ensure there is sufficient space around the ampליפיער פֿאַר לופט סערקיאַליישאַן.

פיגורע 4.1: שפּיץ view of the Hertz HDP4 amplifier, illustrating its compact design and potential mounting points. The amplifier features a textured black finish with the Hertz logo prominently displayed.
- שטעלן די amplifier in the desired mounting location and mark the screw holes.
- Drill pilot holes if necessary, ensuring not to damage any vehicle components.
- זיכער די ampליפיער ניצנדיק די צוגעשטעלטע מאַונטינג שרויפן.
4.2 וויירינג קאַנעקשאַנז
Proper wiring is critical for performance and safety. Refer to the diagram below for power, ground, remote, and speaker connections.

Figure 4.2: Rear panel of the Hertz HDP4 amplifier, detailing the power input (BATT), ground (GND), remote turn-on (REM) terminals, and speaker output terminals (L/R mono for channels A and B). Two 40A fuses are also visible.
- מאַכט (באַטערי): Connect a fused power cable (minimum 8 AWG recommended) directly from the vehicle's positive battery terminal to the BATT terminal on the ampליפער.
- ערד (GND): Connect a ground cable of the same gauge as the power cable from the GND terminal to a clean, unpainted metal point on the vehicle chassis.
- ווײַט (REM): Connect a remote turn-on wire from your head unit's remote output to the REM terminal.
- רעדנער אַוטפּוץ: Connect your speakers to the appropriate L (left) and R (right) terminals for each channel (A and B). Ensure correct polarity. The amplifier supports mono bridging for increased power output to a single speaker or subwoofer.
- פוסעס: די amplifier is equipped with two 40A fuses. Replace only with fuses of the same type and rating.
4.3 Input Connections and Controls
די amplifier offers both RCA (low-level) and High-Level inputs, along with various crossover and gain controls.

Figure 4.3: Input and control panel of the Hertz HDP4 amplifier. This panel includes RCA pre-inputs (A PRE-IN, B PRE-IN), high-level inputs (A HI-IN, B HI-IN), and various adjustment knobs for levels, pass mode, and crossover settings. A switch for HI-IN AUTO TURN-ON is also present.
- RCA Pre-Inputs (A PRE-IN, B PRE-IN): Connect your head unit's RCA outputs to these inputs for low-level signal.
- High-Level Inputs (A HI-IN, B HI-IN): If your head unit does not have RCA outputs, connect speaker-level signals directly to these inputs. The amplifier features an auto turn-on function for high-level inputs.
- לעוועלס: Adjust the input sensitivity (gain) to match the output of your head unit. Start with the gain at minimum and slowly increase until desired volume is achieved without distortion.
- פאָרן מאָדע: Select the desired crossover mode (e.g., Full, HPF, LPF) for each channel pair.
- Crossover Frequency (XOVER): Adjust the frequency point for the selected crossover mode.
- מולטיפּלייער: Use this switch to multiply the crossover frequency setting by 1 or 10, depending on your system requirements.
5. אַפּערייטינג ינסטרוקטיאָנס
5.1 ערשט מאַכט-אַרויף
- After all connections are made and verified, reconnect the vehicle's battery.
- צינד אן אייער הויפט איינהייט. די amplifier should power on automatically (if remote wire is connected or HI-IN AUTO TURN-ON is active).
- Start with the head unit volume low and gradually increase it, listening for clear audio.
5.2 אַדזשאַסטירן אַודיאָ סעטטינגס
פאַרגיכערן די amplifier's settings for optimal sound quality:
- געווינען צופּאַסונג: סטרויערן די amplifier's gain controls (LEVELS) to match the output voltage of your head unit. This is crucial to prevent distortion.
- קראָססאָווער סעטטינגס: Set the crossover frequencies (XOVER) and pass modes (PASS MODE) according to the specifications of your speakers. For full-range speakers, a high-pass filter (HPF) is often used to protect them from low bass frequencies. For subwoofers, a low-pass filter (LPF) is used.
6. וישאַלט
To ensure the longevity and optimal performance of your Hertz HDP4 ampליפיער, פאָלגט די וישאַלט גיידליינז:
- רייניקונג: פּיריאַדיקלי ריין די ampווישט אָפּ די אויסערלעכע זייט פון דעם לופטליפֿער מיט אַ ווייכן, טרוקענעם שטאָף. ניצט נישט קיין שטרענגע כעמיקאַלן אָדער אַברייסיוו רייניקונגסמיטלען.
- ווענטילאַטיאָן: פאַרזיכערן אַז די amplifier's cooling fins are free from dust and obstructions to maintain proper heat dissipation.
- פֿאַרבינדונגען: Regularly check all wiring connections for tightness and corrosion. Loose connections can lead to poor performance or damage.
- פוסעס: If a fuse blows, replace it only with a fuse of the exact same type and rating (2 x 40A). Using an incorrect fuse can cause severe damage to the amplifier or vehicle electrical system.

Figure 6.1: Bottom panel of the Hertz HDP4 amplifier, displaying the serial number label and important caution notes regarding insulated screws. This area should be kept clean and free from obstructions.
7. טראָובלעשאָאָטינג
אויב איר דערפאַרונג ישוז מיט דיין ampלייפיער, באַראַט זיך מיט דער פאלגענדער טאַבעלע איידער איר קאָנטאַקטירט שטיצע:
| פּראָבלעם | מעגלעך סיבה | לייזונג |
|---|---|---|
| קיין מאַכט / Ampליפיער טוט נישט קער אויף | Blown fuse, loose power/ground/remote wire, faulty head unit remote output. | Check and replace fuses. Verify all power, ground, and remote connections are secure. Test remote wire for 12V signal. |
| קיין געזונט | Loose RCA/speaker wires, incorrect input selection, amplifier in protection mode, faulty speakers. | Check all signal and speaker connections. Ensure correct input mode is selected. Check for protection light. Test speakers. |
| פאַרקרימט סאָונד | Gain set too high, incorrect crossover settings, poor quality audio source, damaged speakers. | Reduce gain. Adjust crossover settings. Test with a different audio source. Inspect speakers for damage. |
| Ampליפיער אָוווערכיץ | Insufficient ventilation, impedance mismatch, prolonged high-power operation. | זיכער מאַכן אַז די לופט־פֿלוס איז ריכטיק אַרום דעם ampליפיער. באַשטעטיקן אַז די רעדנער אימפּעדאַנס פּאַסט צו. amplifier's capabilities. Reduce volume or operating time. |
8. ספּעסאַפאַקיישאַנז
Technical specifications for the Hertz HDP4 4-Channel 1000W Max D-Class Ampלייבער:
- מאָדעל: הדפּקסנומקס
- סאָרט: הערץ
- טיפּ: 4-Channel D-Class Ampליפער
- מאַקסימום מאַכט: 1000W (as per product title, specific RMS not provided in data)
- פּראָדוקט דימענשאַנז (L x W x H): 11.18 X 6.73 X 1.83 אינטשעס
- וואָג: 6.35 פונט
- Voltage: 14.4 וואלטס (אין ארבעט)
- מאַונטינג טיפּ: ייבערפלאַך בארג
- פוסעס: 2 רענטגענ 40אַ
- ASIN: B00AWBU1FQ
9. וואָראַנטי אינפֿאָרמאַציע
Hertz products are designed and manufactured to the highest quality standards. For specific warranty terms and conditions, please refer to the warranty card included with your product or visit the official Hertz webזייטל. האַלט אייער קויף קוויטל ווי אַ באַווייַז פון קויפן פֿאַר וואָראַנטי קליימז.
10. שטיצן
For technical assistance, troubleshooting beyond this manual, or warranty inquiries, please contact Hertz customer support through their official website or authorized dealer. Ensure you have your product model (HDP4) and serial number ready when contacting support.
Official Hertz Webפּלאַץ: www.hertzaudiovideo.com


