1. הקדמה
Thank you for choosing the Coby SNAPP CAM3002 Mini Camcorder. This compact device is designed for easy video recording and photo capture, offering portability and user-friendly operation. This manual provides detailed instructions to help you set up, operate, and maintain your camcorder effectively.
2. פּעקל אינהאַלט
ביטע טשעק די פּאַקעט פֿאַר די פאלגענדע זאכן:
- Coby SNAPP CAM3002 Mini Camcorder
- 2 רענטגענ אַאַ אַלקאַלינע באַטעריז
- TV Connection Cable (RCA/Composite Video Cable)
- Muvee Software (on CD or via download link)
- באַניצער מאַנואַל (דעם דאָקומענט)
3. Camcorder Overview
Familiarize yourself with the main components of your Coby SNAPP CAM3002 Mini Camcorder:
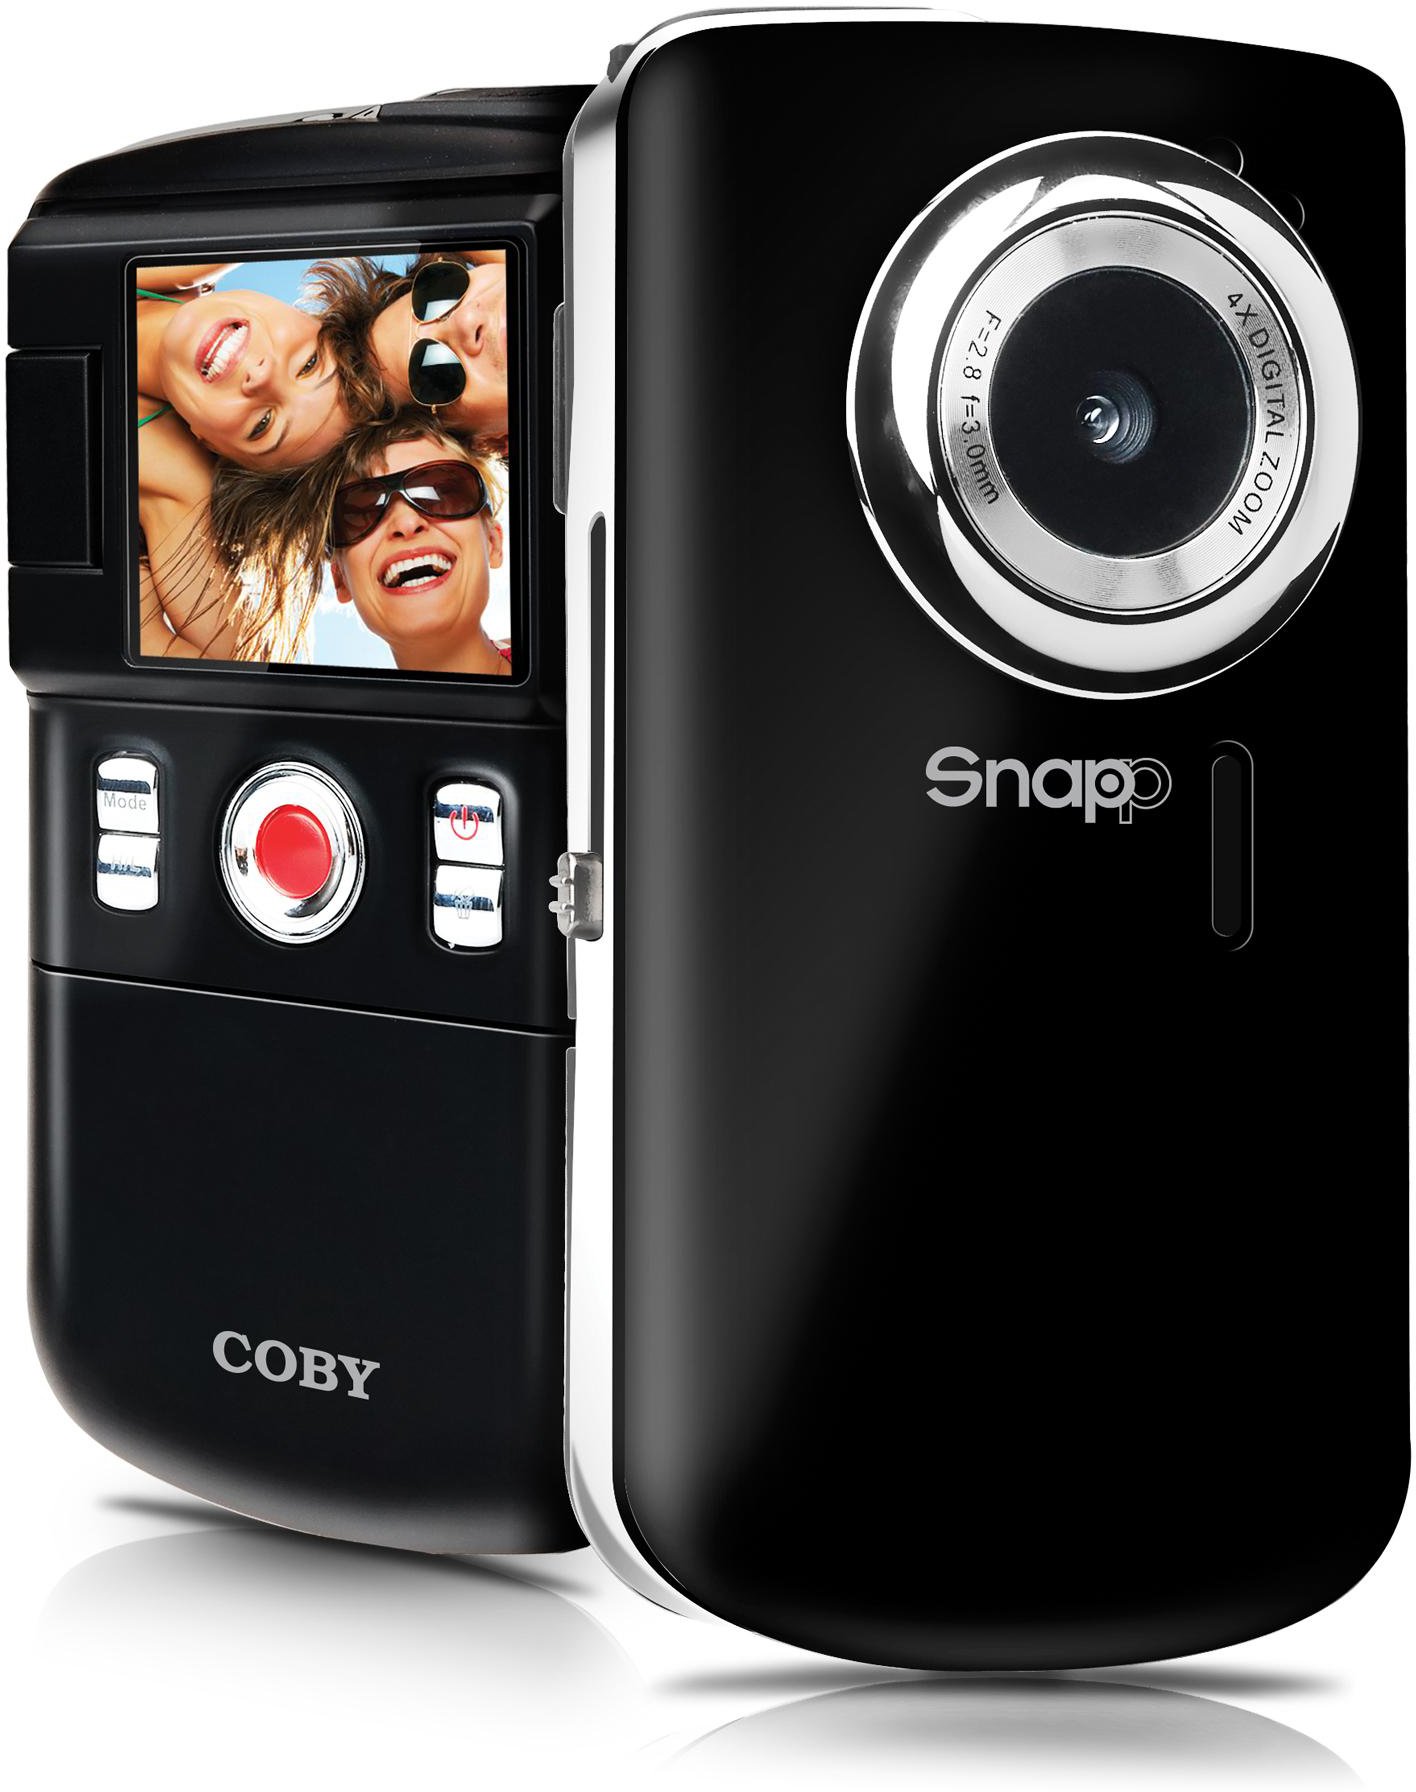
This image displays the front of the Coby SNAPP CAM3002 Mini Camcorder. Visible features include the camera lens, a small microphone opening, and several control buttons on the side, indicating its compact and portable design.
- אַפּאַראַט לענס: כאַפּט ווידעא און סטיל בילדער.
- מיקראָפאָן: רעקאָרדירט אַודיאָ בעת ווידעאָ קאַפּטשער.
- 1.8-אינטש לקד פאַרשטעלן: Displays menus, live view, and playback. This screen can flip out for self-portraits.
- קאָנטראָל קנעפּלעך: For power, mode selection, recording, photo capture, and navigation.
- באַטערי אָפּטייל: Holds 2 AA alkaline batteries.
- SD/SDHC קאָרט שפּעלטל: For inserting a memory card (up to 16GB).
- Integrated USB Plug: For direct connection to a computer for file transfer and charging (if rechargeable batteries are used).
- TV Out Port: For connecting to a television using the included cable.
4. סעטאַפּ
4.1. ינסטאָלינג באַטעריז
- Locate the battery compartment cover on the camcorder.
- שלעפּט אָדער הייבט דעם דעקל צו עפֿענען עס.
- Insert two (2) AA alkaline batteries, ensuring correct polarity (+/-) as indicated inside the compartment.
- פאַרמאַכן די באַטאַרייע אָפּטייל דעקן סיקיורלי.
4.2. אַרייַנלייגן אַ זכּרון קאָרט
The camcorder requires an SD or SDHC memory card (up to 16GB) to store videos and photos.
- Locate the SD/SDHC card slot on the camcorder.
- Insert the memory card with the metal contacts facing down (or as indicated by a diagram near the slot) until it clicks into place.
- כדי ארויסצונעמען די קארטל, שטופט זי אריין מיט א קליינעם טון ביז זי קליקט, דערנאך לאזט זי ארויס, און זי וועט זיך אביסל ארויסשטויסן.
4.3. פּאָווערינג אויף / אויסגעלאשן
- To power on, press and hold the Power button until the LCD screen illuminates.
- To power off, press and hold the Power button again until the screen turns off. The camcorder may also power off automatically after a period of inactivity to conserve battery life.
5. אפערירן די קאַמעראַ
5.1. מאָדע סעלעקציע
Use the Mode button to switch between the following functions:
- ווידעא רעקאָרדינג מאָדע: For capturing moving images with sound.
- סטיל פאָטאָ מאָדע: For taking single photographs.
- פּלייבאַק מאָדע: פֿאַר ריviewing recorded videos and photos.
5.2. אויפנעמען ווידעא
- איבערגיין צו ווידעא רעקארדינג מאָדע.
- Frame your subject using the 1.8-inch LCD screen. The screen can be flipped out for self-recording.
- Press the Record/Capture button to start recording. A red indicator or timer will appear on the screen.
- Press the Record/Capture button again to stop recording.
5.3. גענומען פאָטאָס
- טוישן צו סטיל פאָטאָ מאָדע.
- ראַם דיין סוביעקט ניצנדיק דעם LCD עקראַן.
- Press the Record/Capture button to take a photo. The image will be saved to the memory card.
5.4. פּלייַבאַקק
- Switch to Playback Mode.
- ניצט די נאַוויגאַציע קנעפּלעך צו בלעטערן דורך אייערע רעקאָרדירטע ווידעאָס און פאָטאָס.
- Press the Record/Capture button to play a video or view אַ פאָטאָ אין פולן עקראַן.
5.5. Connecting to a Television
איר קענען view your recorded content on a larger screen using the included TV connection cable.
- Ensure both the camcorder and the television are powered off.
- Connect one end of the TV connection cable to the TV Out port on the camcorder.
- Connect the other end of the cable to the corresponding video (yellow) and audio (white) input jacks on your television.
- Power on the television and select the correct AV input source.
- Power on the camcorder and switch to Playback Mode to view דיין מידיאַ.
5.6. טראַנספערינג Fileס צו אַ קאָמפּיוטער
The camcorder features an integrated USB plug for easy file אַריבערפירן.
- מאַכן זיכער אַז די קאַמקאָרדער איז פּאַוערד אויף.
- Extend the integrated USB plug from the camcorder.
- Plug the camcorder directly into an available USB port on your computer (Mac or PC).
- Your computer should recognize the camcorder as a removable storage device. You can then access the files (videos and photos) and copy them to your computer.
5.7. Using Muvee Software
The included Muvee software is designed to help you edit your videos and photos, and facilitate uploading them to online platforms.
- Install the Muvee software on your computer using the provided CD or download link.
- Follow the software's on-screen instructions for editing and sharing your media.
6. וישאַלט
6.1. רייניקונג
- ניצט אַ ווייכן, טרוקענעם שטאָף צו רייניקן די אויסערלעכע טייל פון דער קאַמקאָרדער.
- פֿאַר די לענס און LCD עקראַן, ניצט אַ ספּעציאַליזירטע לענס רייניקונג שטאָף און לייזונג צו ויסמיידן קראַצן.
- דו זאלסט נישט נוצן האַרב קעמיקאַלז אָדער אַברייסיוו קלינערז.
6.2. סטאָרידזש
- ווען נישט אין באַנוץ פֿאַר לענגערע פּעריאָדן, אַרויסנעמען די באַטעריעס צו פאַרמייַדן ליקאַדזש.
- Store the camcorder in a cool, dry place, away from direct sunlight and extreme temperatures.
7. טראָובלעשאָאָטינג
אויב איר טרעפט פּראָבלעמען מיט אייער קאַמקאָרדער, זעט די פאלגענדע געוויינטלעכע פּראָבלעמען און לייזונגען:
| פּראָבלעם | מעגלעך לייזונג |
|---|---|
| די קאַמעראַ גייט נישט אָן. | Check if batteries are correctly inserted and fully charged. Replace with fresh AA alkaline batteries if necessary. |
| Poor video or photo quality. | Ensure sufficient lighting in the environment. Hold the camcorder steady during recording/capture. Clean the lens if it appears smudged. |
| קענען ניט אַריבערפירן fileס צו קאָמפּיוטער. | Ensure the camcorder is powered on and correctly connected via the integrated USB plug. Try a different USB port on your computer. Verify your computer's operating system recognizes the device. |
| קורץ באַטאַרייע לעבן. | Use fresh, high-quality AA alkaline batteries. Reduce screen brightness if possible (check settings). |
| זכּרון קאַרטל טעות. | Ensure the memory card is correctly inserted. Try reformatting the card (this will erase all data). Try a different compatible SD/SDHC card. |
8. ספּעסאַפאַקיישאַנז
| שטריך | באַשרייַבונג |
|---|---|
| מאָדעל נאָמען | CAM3002 |
| ווייַז | 1.8-inch Full-color LCD Electronic Viewfinder (flips out) |
| ווידעא האַכלאָטע | 480p (640x480) |
| נאָך פאָטאָ רעזאָלוציע | 0.3 מפּ |
| דיגיטאַל פארגרעסער | 4x |
| סטאָרידזש מידיאַ | SD/SDHC Memory Card (up to 16GB) |
| קאַנעקטיוויטי | Integrated Hi-speed USB 2.0 plug, TV Out (RCA) |
| מאַכט מקור | 2 רענטגענ אַאַ אַלקאַלינע באַטעריז |
| געשטיצט File פאָרמאַץ | Video: MP4, Photo: JPEG |
| ספּעציעלע פֿעיִקייטן | Built-in speaker, Muvee software included |
9. וואָראַנטי און שטיצן
Coby products are manufactured to high-quality standards. This product is covered by a limited warranty against defects in materials and workmanship. Please refer to the warranty card included with your purchase for specific terms and conditions.
For technical support or customer service inquiries, please visit the official Coby website or contact their customer support line. Keep your purchase receipt as proof of purchase for warranty claims.


