1. הקדמה
This manual provides detailed instructions for the installation, operation, and maintenance of your AZZA Solano 1000R CSAZ-1000R Full Tower Computer Case. Please read this manual thoroughly before beginning installation to ensure proper setup and to maximize the performance and longevity of your system components.
2. פּראָדוקט פֿעיִקייטן
- Optimized Thermal Management: Features multiple fans for superior cooling, including a 230mm top fan, a 230mm side fan, two 140mm front fans, and a 120mm rear fan.
- Bottom-Mounted Power Supply: Designed for improved thermal separation and stability, allowing installation facing up or down.
- Advanced Cable Management: Pre-drilled motherboard tray and ample space behind for organized cable routing, enhancing airflow and aesthetics.
- Tool-Less Design: Thumb screws for easy installation of optical drives and hard disk drives.
- Convenient Front I/O: USB and audio ports, along with an eSATA port, located on the top panel for easy access.
- ראַכוועסדיק ינלענדיש: Full tower design accommodates large components, including extended graphics cards and tall CPU coolers.
- עסטעטיש פּלאַן: Black exterior with a vibrant red painted interior and red LED fans.
3. פּעקל אינהאַלט
ביטע באַשטעטיקן אַז אַלע זאכן זענען פאַראַן אין דיין פּעקל:
- AZZA Solano 1000R CSAZ-1000R Full Tower Case
- אַקסעסאָרי קעסטל (מיט שרויפן, סטאַנדאָפס, קאַבל טייז, אאז"וו)
- באַניצער מאַנואַל (דעם דאָקומענט)
4. קאָמפּאָנענט איבערview
4.1 פונדרויסנדיק Views
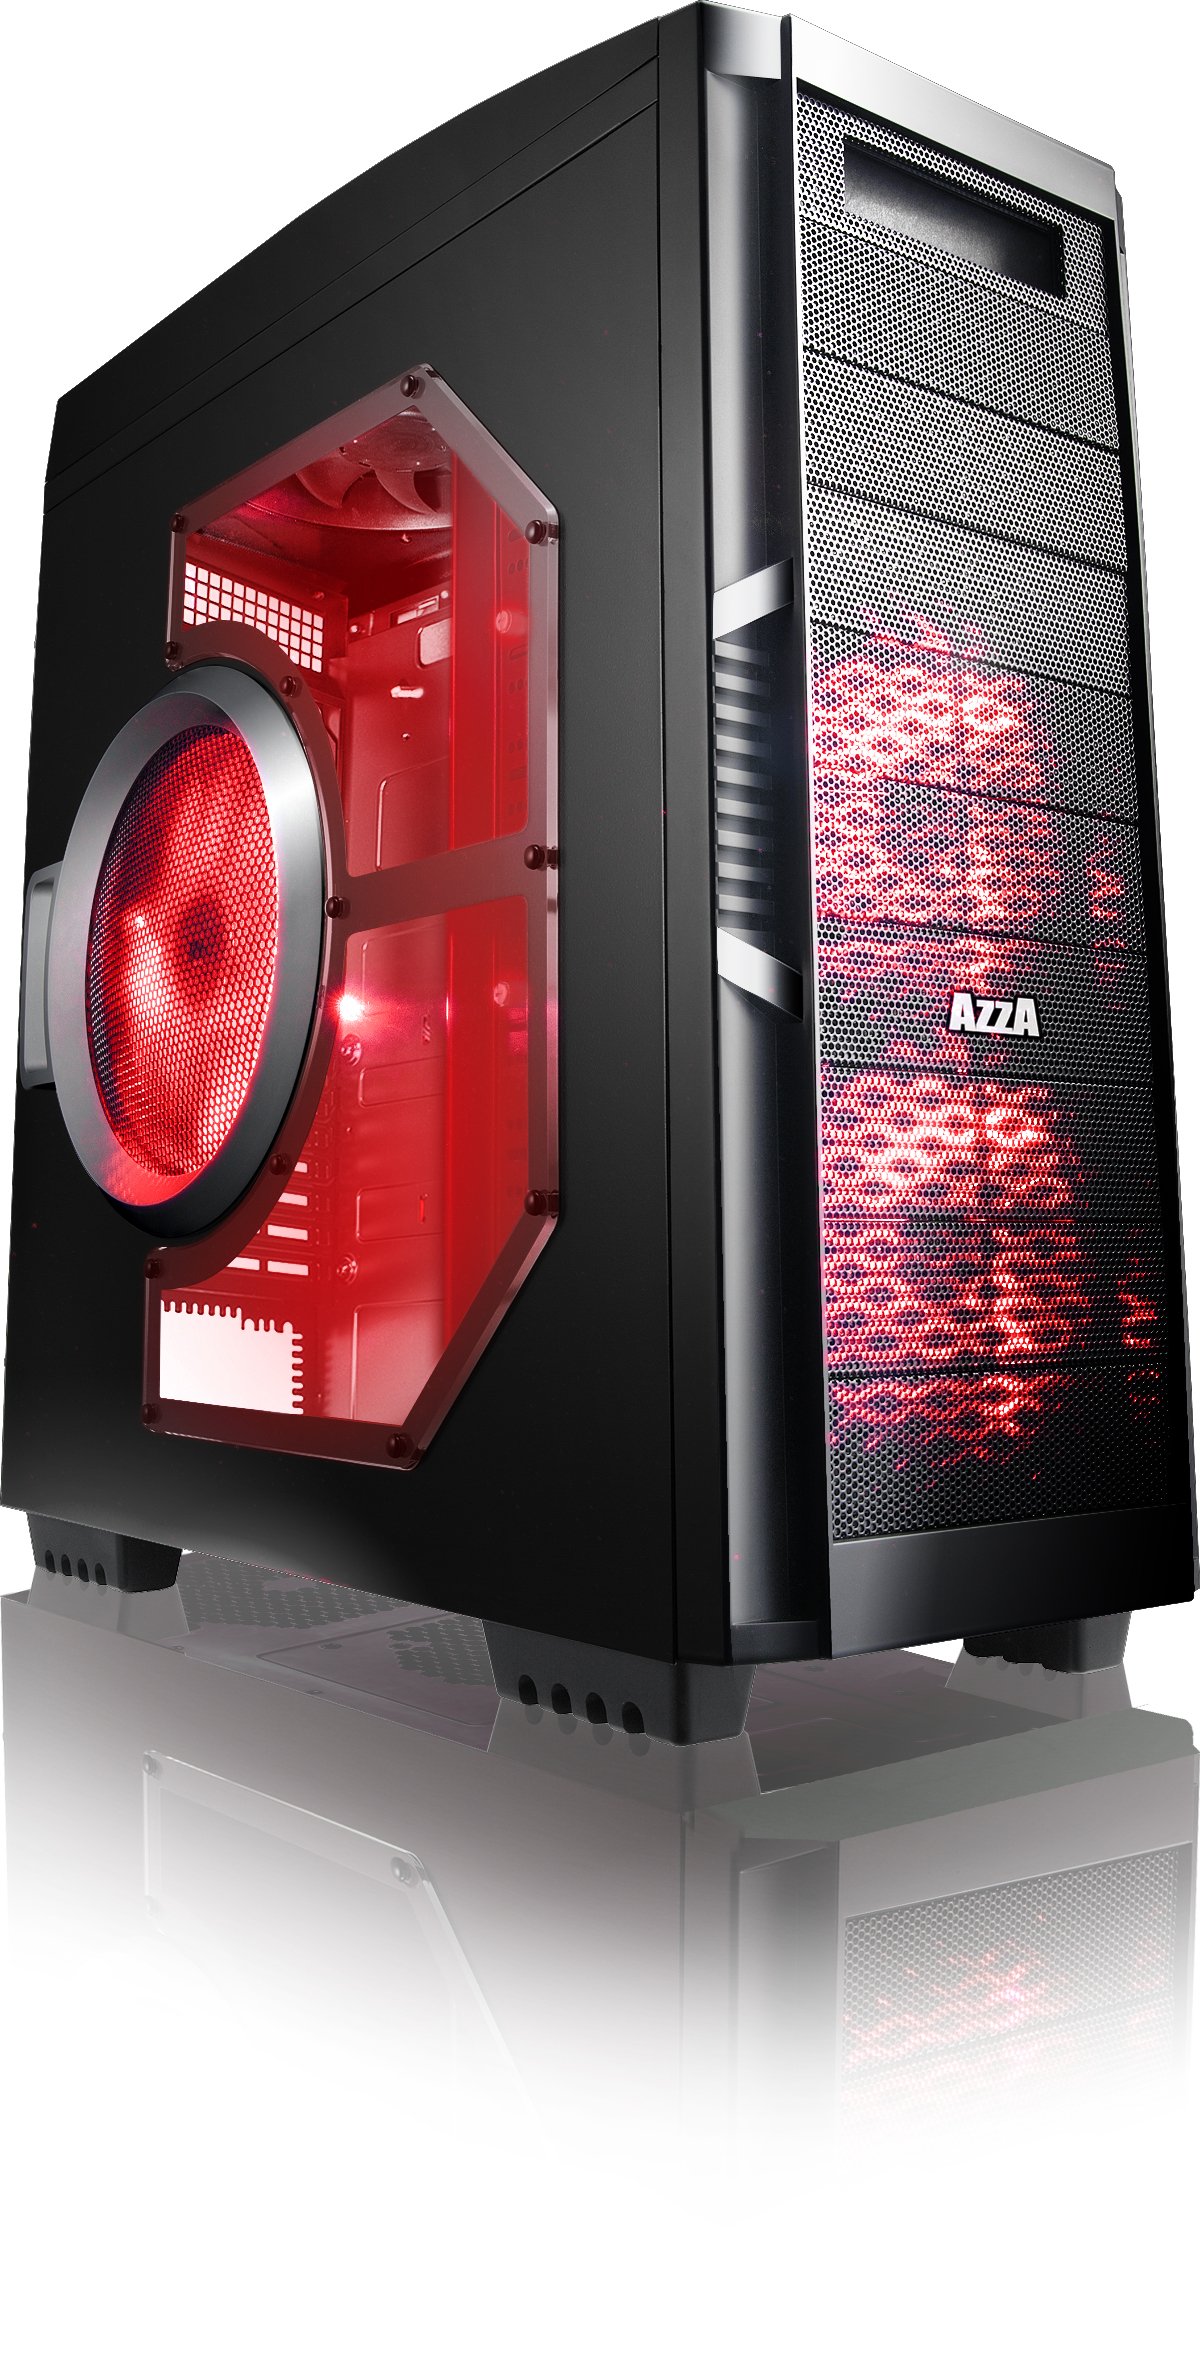
פיגור 4.1: פראָנט-זייט view of the AZZA Solano 1000R case, showcasing the red LED fans on the front and side panel.

פיגורע 4.2: פראָנט view of the AZZA Solano 1000R case, highlighting the two 140mm red LED intake fans behind the mesh panel.

פיגורע 4.3: זייַט view of the AZZA Solano 1000R case, showing the large 230mm red LED side panel fan and the transparent window.

Figure 4.4: Top-front angled view of the AZZA Solano 1000R case, showing the top ventilation grille, front I/O panel with USB and audio ports, and power button.
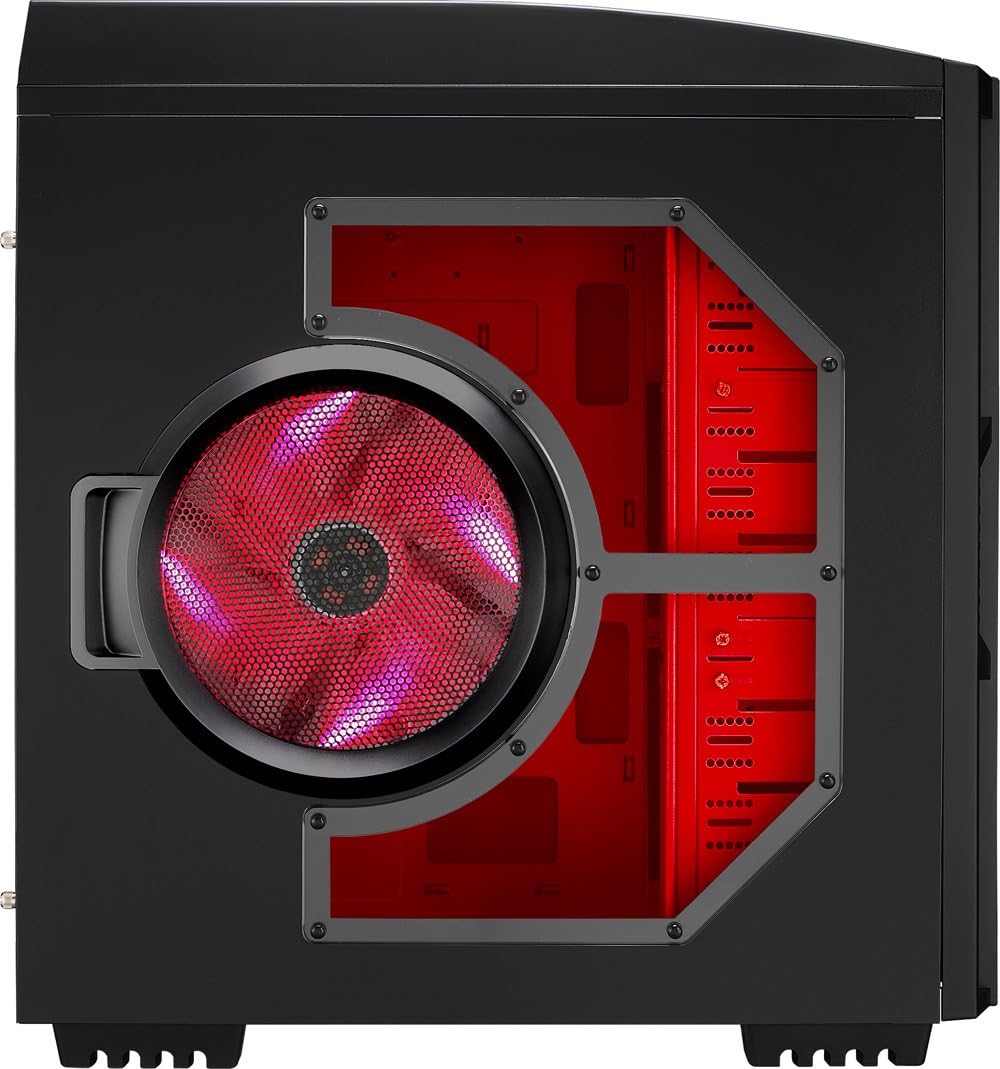
Figure 4.5: Rear-side view of the AZZA Solano 1000R case, displaying the red interior, rear exhaust fan, and expansion slots.
4.2 אינערלעכער Views

פיגורע 4.6: ינלענדיש view of the AZZA Solano 1000R case with the left side panel removed, revealing the red painted motherboard tray, drive bays, and cable routing cutouts.

Figure 4.7: Angled interior view of the AZZA Solano 1000R case, focusing on the multiple 5.25" and 3.5" drive bays.

Figure 4.8: Angled interior view of the AZZA Solano 1000R case, showing the rear 120mm exhaust fan, expansion slots, and the extensive drive bay structure.

פיגורע 4.9: ינלענדיש view of the AZZA Solano 1000R case with the right side panel removed, showing the space behind the motherboard tray for cable management.
5. ינסטאַללאַטיאָן גייד
Before beginning installation, ensure your workspace is clean and static-free. It is recommended to wear an anti-static wrist strap.
5.1 צוגרייטן דעם פאַל
- שטעלט דעם קעסטל אויף א פלאַכער, סטאַבילער ייבערפלאַך.
- אַראָפּנעמען די זייט פּאַנאַלז דורך אַנשרויפן די גראָבע שרויפן אין דער הינטערשטער טייל פון דעם קעסטל און שלעפּן די פּאַנאַלז צוריק.
5.2 מאָטהערבאָאַרד ינסטאַללאַטיאָן
- Install the I/O shield provided with your motherboard into the opening at the rear of the case.
- Align the motherboard with the pre-installed standoffs. If necessary, install additional standoffs according to your motherboard's form factor.
- Carefully place the motherboard onto the standoffs, ensuring the I/O ports align with the shield.
- באַפֿעסטיקן דאָס מוטערבאָרד מיט די פּאַסיקע שרויפֿן פֿון דער אַקסעסאָרי קעסטל.
5.3 אינסטאַלאַציע פון מאַכט צושטעל
- Position the power supply unit (PSU) in the bottom-rear compartment of the case. You can orient it with the fan facing up or down, depending on your cooling preference and PSU design.
- באַפֿעסטיקן די PSU צום קעיס מיט די שרויפֿן וואָס זענען צוגעשטעלט געוואָרן מיט אייער מאַכט צושטעל.
5.4 סטאָרידזש דרייוו אינסטאַלאַציע (HDD/SSD)
- For 3.5" HDDs, slide the drive into an available drive bay until it clicks into place. Use the provided thumb screws for additional security if desired.
- For 2.5" SSDs, an adapter bracket (not included) may be required to fit into the 3.5" bays. Secure the SSD to the adapter, then install the adapter into a 3.5" bay.
- Connect the SATA data and power cables to your installed drives.
5.5 Optical Drive Installation
- Remove the desired 5.25" front bay cover from the case.
- Slide the optical drive into the bay from the front until it aligns with the screw holes.
- Secure the optical drive using the provided thumb screws.
- Connect the SATA data and power cables to the optical drive.
5.6 אינסטאַלאַציע פון עקספּאַנסיע קאַרטל
- אַראָפּנעמען די נייטיקע יקספּאַנשאַן סלאָט דעקל אויף די הינטערשטע טייל פון די קעסטל.
- Insert your graphics card or other expansion card into the appropriate PCIe/PCI slot on your motherboard.
- Secure the card with the provided screw or tool-less latch mechanism.
5.7 קאַבלע מאַנאַגעמענט
Utilize the cutouts and space behind the motherboard tray to route and organize your cables. This improves airflow and gives your build a cleaner appearance. Use cable ties from the accessory box to bundle cables.
5.8 Connecting Front Panel I/O
Connect the front panel cables (USB, Audio, Power Switch, Reset Switch, Power LED, HDD LED) to the corresponding headers on your motherboard. Refer to your motherboard manual for exact header locations.
6. אָפּעראַציע
6.1 מאַכט אויף / אַוועק
Press the power button located on the top panel to turn your system on or off. A power LED will illuminate when the system is active.
6.2 פאָכער קאָנטראָל
The case features a fan speed control switch (L/M/H) at the rear, primarily for the top, side, and rear fans. Adjust this switch to balance cooling performance and noise levels according to your preference.
7. וישאַלט
7.1 רייניקונג
Regular cleaning helps maintain optimal airflow and component longevity.
- עקסטעריע: ווישן די יקסטיריער סערפאַסיז מיט אַ ווייך, דamp שטאָף. ויסמיידן אַברייסיוו קלינערז.
- שטויב פילטערס: The case includes mesh filters at the bottom. Periodically remove and clean these filters to prevent dust buildup.
- ינלענדיש: Use compressed air to remove dust from inside the case, especially from fans and heatsinks. Ensure the system is powered off and unplugged before cleaning the interior.
8. טראָובלעשאָאָטינג
- סיסטעם גייט נישט אן: Ensure all power cables (24-pin ATX, 8-pin CPU, GPU power) are securely connected. Verify the PSU switch is in the 'ON' position. Check front panel power switch connection to the motherboard.
- פעןס דרייען זיך נישט: Check fan power connections to the motherboard or fan controller. Ensure the fan speed switch is not set to 'Off' or 'Low' if fans are not spinning at all.
- Side Panel Not Closing: If a large CPU cooler or tall components prevent the side panel from closing, especially due to the side fan, consider relocating the side fan to the exterior of the panel if possible, or ensure your cooler fits within the case's clearance specifications.
- Cable Management Difficulty: If the rear panel bulges due to thick cables, try rerouting cables more efficiently or using flatter cables where possible.
9. ספּעסאַפאַקיישאַנז
| שטריך | דעטאַל |
|---|---|
| מאָדעל נומער | CSAZ-1000R |
| טיפּ פון קאַסטן | גאַנץ טאַוער |
| קאָליר | שוואַרץ / רויט |
| פּראָדוקט דימענשאַנז (L x W x H) | 19.7 X 8.1 X 21.5 אינטשעס (500 X 206 X 546 מם) |
| פּונקט וואָג | 24 פונט (10.89 קג) |
| קאָאָלינג אופֿן | לופט |
| מאַכט צושטעלן מאַונטינג טיפּ | דנאָ בארג |
| גאַנץ וסב פּאָרץ | 2 (USB 2.0) + 1 (eSATA) |
| Hard Disk Form Factor Support | 3.5 אינטשעס |
| אַרייַנגערעכנט פאַנס | 2x 230mm (Top, Side), 2x 140mm (Front), 1x 120mm (Rear) |
10. וואָראַנטי און שטיצן
For warranty information and technical support, please refer to the official AZZA webזייטל אדער קאָנטאַקט אייער לאקאלן הענדלער. האַלט אייער קויפן-באַווייַז פֿאַר וואָראַנטי-קליימז.


