
הקדמה
This manual provides essential information for the safe and efficient operation of your Vissani 5,000 BTU (DOE) 115-Volt Portable Air Conditioner Unit. Please read all instructions carefully before installation and use, and retain this manual for future reference.
זיכערקייַט אינפֿאָרמאַציע
ווארענונג: To reduce the risk of fire, electrical shock, or injury, observe the following safety precautions:
- ניצט שטענדיק אַ געערדטע 3-שטיקיקע אַוטלעט. נעמט נישט אַראָפּ דעם געערדטן שטיק.
- דו זאלסט נישט אַרבעטן די אַפּאַראַט מיט אַ דאַמידזשד מאַכט שנור אָדער צאַפּן.
- זיכער מאַכן אַז די אַפּאַראַט איז געשטעלט אויף אַ פלאַך, סטאַביל ייבערפלאַך צו פאַרמייַדן קיפּינג.
- Keep at least 20 inches (50 cm) clearance from walls and other objects for proper airflow.
- דו זאלסט נישט פאַרשפּאַרן לופט ינלעץ אָדער אַוטלעץ.
- אָפּשטעקן די אַפּאַראַט איידער רייניקונג אָדער סערוויסינג.
- נישט נוצן אין נאַסע געביטן ווי קלאָזעטן אָדער וועש צימערן.
פּראָדוקט איבערview
The Vissani Portable Air Conditioner is designed to provide cooling, dehumidification, and air circulation for rooms up to 150 sq. ft.
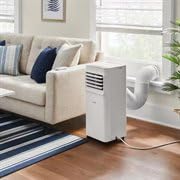
Image: The Vissani portable air conditioner unit positioned in a living room, connected to a window with its exhaust hose.
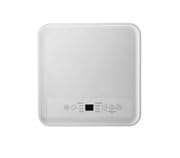
בילד: א פון אויבן אראפ view of the portable air conditioner's control panel, showing various buttons and a digital display.

Image: A graphic illustrating the 3-in-1 climate control features: Cool, Dehumidify, and Circulate, with corresponding visual representations.
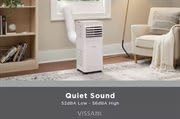
Image: A graphic highlighting the quiet sound operation of the Vissani unit, indicating sound levels of 52dBA Low and 56dBA High.
סעטאַפּ
1. ונפּאַקקינג
Carefully remove the unit from its packaging. Inspect for any shipping damage. Keep the original packaging for future storage or if servicing is required.
2. פֿענצטער קיט אינסטאַלאַציע
The window kit is designed to fit most standard vertical and horizontal windows. Adjust the window slider panel to the width or height of your window opening. Secure the panel in place.
3. Exhaust Hose Connection
Attach the exhaust hose to the unit and then to the window kit adapter. Ensure a tight seal to prevent hot air from re-entering the room.

בילד: א נאָענטע בילד view of the white exhaust hose securely connected to the window kit, venting air outside.
4. דריינאַדזש סעטאַפּ
For continuous drainage in Dehumidifier mode, connect the drain hose (not included) to the continuous drain port at the back of the unit and direct it to a floor drain or suitable container.

בילד: א זייט view of the portable air conditioner, highlighting the rear panel where the drain port and power cord are located.
5. מאַכט קאַנעקשאַן
Plug the power cord into a grounded 115-Volt, 60 Hz electrical outlet. Do not use extension cords.
אַפּערייטינג ינסטראַקשאַנז
קאָנטראָל פּאַנעל און רימאָוט קאָנטראָל
The unit can be operated using the control panel on top of the unit or the included remote control. Ensure the remote control has working batteries.
אַפּערייטינג מאָדעס
- קיל מאָדע: Press the MODE button until the COOL indicator lights up. Use the UP/DOWN arrows to set the desired temperature.
- דעהומידיפיקאַטיאָן מאָדע: Press the MODE button until the DRY indicator lights up. The fan speed will be set to low automatically.
- פאָכער מאָדע: Press the MODE button until the FAN indicator lights up. Use the FAN SPEED button to select desired fan speed (Low, Medium, High).
טעמפּעראַטור באַשטעטיקן
In Cool mode, the temperature can be set between 61°F (16°C) and 89°F (32°C).
טייַמער פֿונקציע
To set the timer for automatic shut-off or turn-on, press the TIMER button and use the UP/DOWN arrows to select the desired hours (1-24 hours).
וישאַלט
לופט פילטער רייניקונג
The air filter should be cleaned every two weeks or more frequently depending on usage. A dirty filter reduces efficiency. To clean:
- אָפּשטעקן די אַפּאַראַט.
- אַראָפּנעמען די פילטער פון די צוריק פון די אַפּאַראַט.
- וואַשט דעם פילטער מיט וואַרעם זייף־וואַסער. שווענקט גוט אויס.
- לאָזן די פילטער צו לופט טרוקן גאָר איידער ריינסטאַללינג.
Internal Water Tank Drainage
When the internal water tank is full, the unit will stop operating and display an error code (e.g., 'FL'). To drain:
- אָפּשטעקן די אַפּאַראַט.
- שטעלט א פלאַכע פאַן אָדער טאַץ אונטער דעם דריינאַדזש פּאָרט אין דער אונטערשטער הינטערשטער טייל פון דער אַפּאַראַט.
- אַראָפּנעמען דעם אַראָפּגאַנג פּלאָג כּדי וואַסער זאָל אַרויסרינען.
- פֿאַרבייטן דעם אַראָפּגאַנג פּלאָג אַמאָל דער טאַנק איז ליידיק.
סטאָרידזש
Before storing the unit for an extended period, ensure the internal water tank is completely drained. Clean the air filter and store the unit in a dry, upright position.
טראָובלעשאָאָטינג
| פּראָבלעם | מעגלעך סיבה | לייזונג |
|---|---|---|
| אַפּאַראַט טוט נישט קער אויף | No power; Power cord not plugged in; Circuit breaker tripped | Check power outlet; Plug in power cord securely; Reset circuit breaker |
| אַפּאַראַט קילט נישט עפֿעקטיוו | Dirty air filter; Room too large; Exhaust hose not properly installed; Doors/windows open | Clean air filter; Ensure room size is within specifications; Check exhaust hose connection; Close all doors and windows |
| וואַסער ליקאַדזש | Drain plug loose; Unit not level; Internal water tank full (in Dehumidify mode) | Tighten drain plug; Place unit on a level surface; Drain internal water tank |
| Error Code 'FL' | Internal water tank is full | דריינאַדזש די ינערלעך וואַסער טאַנק |
ספּעסאַפאַקיישאַנז
- מאָדעל נומער: VAP05R1AWTFR
- קאָאָלינג קאַפּאַציטעט: 5,000 BTU (DOE)
- Voltage: 115-וואלט
- אָפטקייַט: 60 הז
- קאַווערידזש שטח: אַרויף צו 150 סק.
- פאַנגקשאַנז: לופטקילונג, לופט-טרוקענער, ווענטילאַטאָר
- קאָליר: ווייַס
- UPC: 840296508244
וואָראַנטי און שטיצן
For warranty information or technical support, please refer to the warranty card included with your product or contact Vissani customer service. Keep your purchase receipt as proof of purchase.