
1. הקדמה און איבערview
This manual provides essential instructions for the setup, operation, and maintenance of your Prechen HD-173 16.2-inch 2K Touchscreen Portable Monitor. Please read this manual thoroughly before using the device to ensure proper functionality and longevity.
שליסל פֿעיִקייטן:
- 16.2" 2K QHD IPS Panel: Features an 800 nits brightness, 178° viewing angle, and 1000:1 contrast ratio for vivid colors and sharp details.
- 10-פונקט מולטי-טאטש: Responsive touch functionality, optimized for interactive monitoring with Aida64 on Windows. (Note: iOS devices support single touch only).
- Dedicated Aida64 Monitoring: Designed as a secondary display for real-time CPU/GPU usage, temperatures, fan speeds, and custom sensor panels.
- צווייענדיק קאַנעקטיוויטי: Equipped with HDMI and USB-C ports for easy connection to laptops, PCs, and gaming consoles.
- פּרעמיום מעטאַל קאַנסטראַקשאַן: Durable full-metal casing suitable for PC case integration, portability, or DIY projects.
Important Note on Power and Touchscreen Configuration:
Due to its higher power consumption, always connect the monitor to a power source before plugging in the HDMI or USB-C signal cable. This ensures full touchscreen functionality and stable operation, especially with high brightness settings.

Image 1.1: The Prechen HD-173 16.2-inch 2K Touchscreen Portable Monitor, showcasinזײַן גלאַטן דיזײַן און לעבעדיקן אַרויסווײַז.

Image 1.2: Multiple Prechen monitors arranged to display vibrant graphics, highlighting the visual quality.
2. סעטאַפּ
Follow these steps to connect your Prechen HD-173 monitor to your device.
2.1 פּאָרט איבערview
Familiarize yourself with the available ports on your monitor:
- אַודיאָ דזשאַק: פֿאַר פֿאַרבינדן עקסטערנע כעדפאָונז אָדער רעדנערס.
- Type-C (Full-featured USB-C): שטיצט מאַכט, ווידעא, און פאַרבינדן סיגנאַל טראַנסמיסיע.
- הדמי: For video signal input.
- דק מאַכט: פֿאַר עקסטערנער מאַכט צושטעל.
- וסב 2.0: For connecting peripherals or additional power.
- Luminance + / Volume - / Menu / ON / OFF buttons: For monitor control.

בילד 2.1: דעטאַלירט view of the monitor's ports and control buttons.
2.2 קאַנעקשאַן מעטהאָדס
Always connect the power adapter to the monitor first to ensure stable power before connecting any signal cables.
Method 1: Full-featured USB-C Connection (USB-C 3.1 or higher)
This method requires a single USB-C to USB-C cable and a power adapter (required).
- Connect the power adapter to the monitor's DC Power or Type-C port.
- Connect one end of the USB-C to USB-C cable to the monitor's Type-C port.
- Connect the other end of the USB-C to USB-C cable to your device's full-featured USB-C port.
This connection provides video, touch, and power (if your device supports power delivery through USB-C).
Method 2: HDMI and USB Connection
This method requires an HDMI cable, a USB-A to USB-C cable (for touch functionality), and a power adapter (required).
- Connect the power adapter to the monitor's DC Power or Type-C port.
- Connect one end of the HDMI cable to the monitor's HDMI port.
- Connect the other end of the HDMI cable to your device's HDMI port.
- Connect one end of the USB-A to USB-C cable to the monitor's Type-C port.
- Connect the USB-A end of the cable to your device's USB-A port for touch signal.
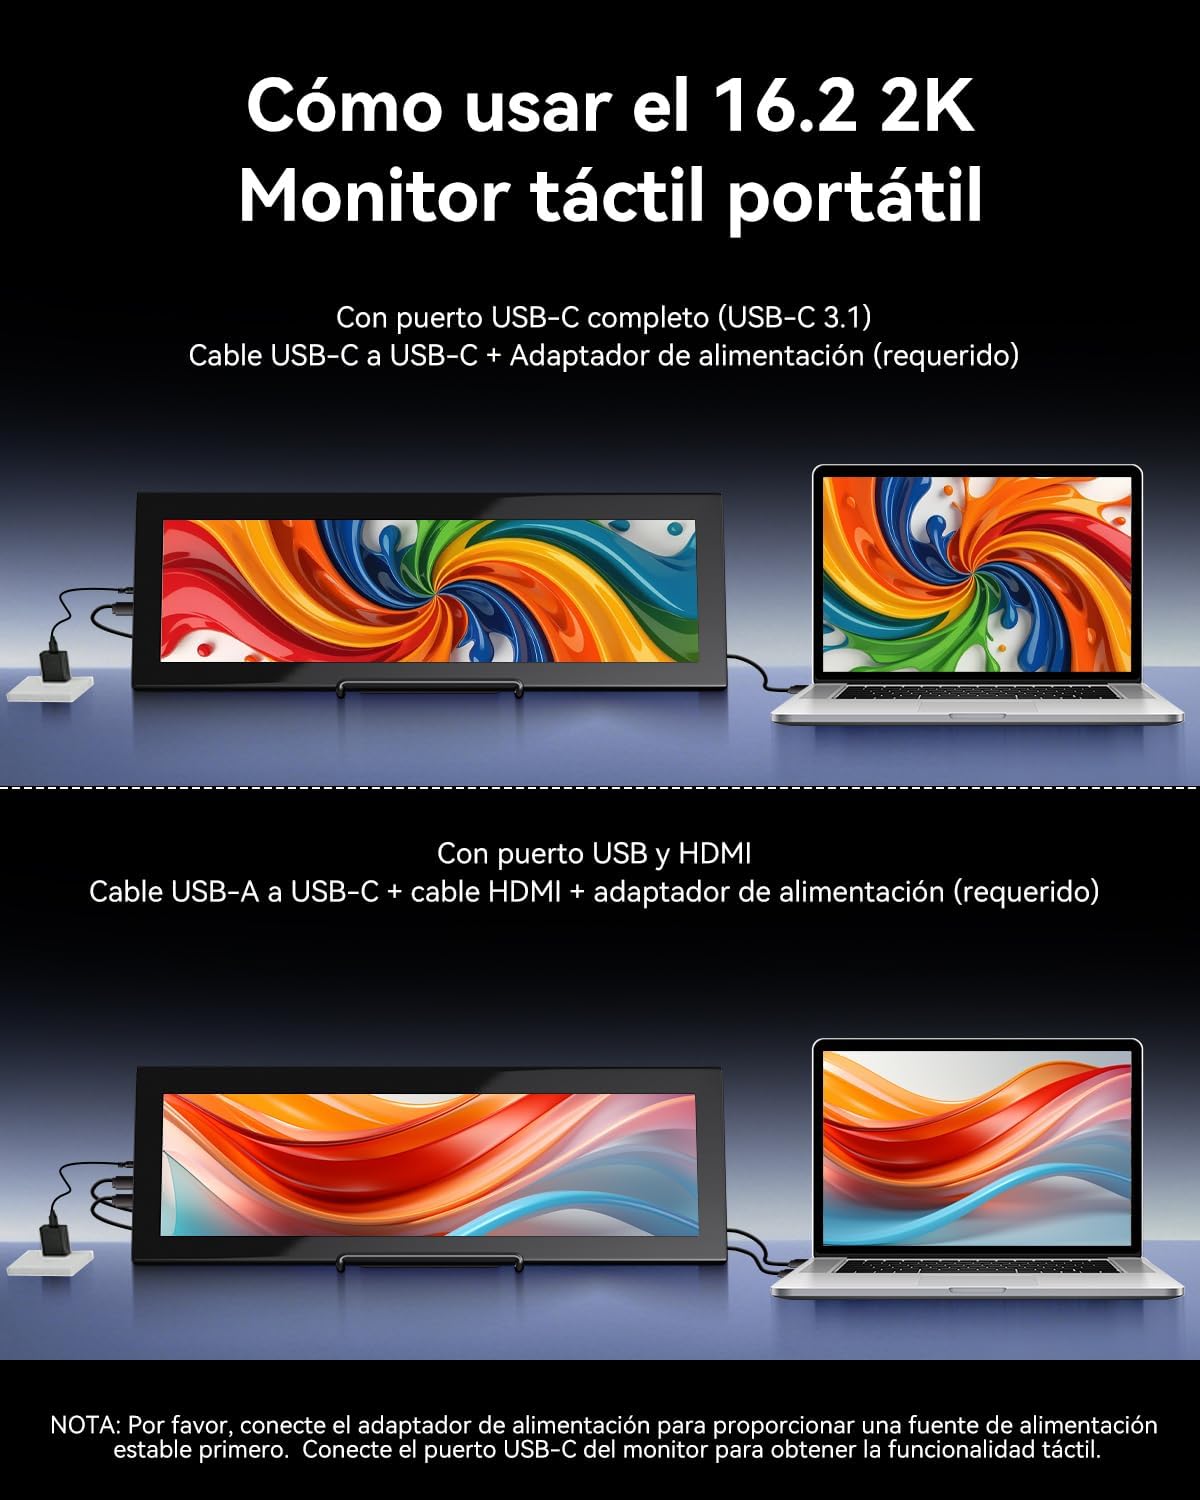
Image 2.2: Visual guide for connecting the monitor using either a single USB-C cable or HDMI with a USB-A cable for touch.

Image 2.3: Illustration of the monitor's broad compatibility with devices like cameras, PCs, Xbox, PS4/5 via HDMI, and Switch, MacBooks, phones, tablets via USB-C.
3. אַפּערייטינג ינסטרוקטיאָנס
3.1 אײַנשטעלן/אויסשטעלן און גרונטלעכע קאָנטראָלן
Use the buttons on the side of the monitor to control its functions:
- ON/OFF: Press and hold to power the monitor on or off.
- מעניו: Press to access the On-Screen Display (OSD) menu.
- Luminance +: Increases brightness. Also used for navigation in the OSD menu.
- באַנד -: Decreases volume. Also used for navigation in the OSD menu.
3.2 טאָוטשסקרין פאַנגקשאַנאַליטי
The monitor supports 10-point multi-touch for interactive use.
- Windows דעוויסעס: Fully plug-and-play; no drivers required for touch functionality.
- Apple Devices (iOS/macOS): Only supports single-touch input. Multi-touch gestures are not supported.
- Linux Devices: Not compatible with touch functionality.

Image 3.1: Illustration of various 10-point multi-touch gestures supported by the monitor.

Image 3.2: A compatibility chart indicating which devices support multi-touch, single-touch, or no touch functionality.
3.3 Aida64 Monitoring
This monitor is specifically designed as a secondary display for Aida64 on Windows. It allows you to view real-time hardware statistics without cluttering your primary screen.
- Connect the monitor to your Windows PC as described in the Setup section.
- Install and configure Aida64 software on your PC.
- Utilize Aida64's sensor panel feature to display CPU/GPU usage, temperatures, fan speeds, and other custom data on the Prechen monitor.

Image 3.3: The monitor displaying Aida64 hardware monitoring data, showing CPU and GPU statistics.

Image 3.4: The monitor seamlessly integrated into a PC case, demonstrating its use for Aida64 hardware monitoring.
4. וישאַלט
געהעריגע זאָרג און וישאַלט וועט פֿאַרלענגערן דאָס לעבן פֿון אײַער מאָניטאָר.
4.1 רייניקן דעם עקראַן
- שטענדיק אויסלעשן און ארויסציען דעם מאָניטאָר איידער איר רייניגט.
- Use a soft, lint-free cloth (microfiber is recommended).
- פֿאַר שווערע פֿלעקן, לײַכט דריקןampווישט דעם שטאָף מיט וואַסער אָדער אַ רייניקונג לייזונג וואָס איז זיכער פֿאַרן עקראַן. שפּריצט נישט קיין פליסיקייט גלייך אויפן עקראַן.
- Avoid using harsh chemicals, alcohol, or abrasive cleaners, as these can damage the screen coating.
4.2 אַלגעמיינע קער
- האַלט דעם מאָניטאָר אַוועק פון דירעקטער זון, איבערגעטריבענער היץ און הומידיטי.
- ויסמיידן פּלייסינג שווער אַבדזשעקץ אויף די מאָניטאָר.
- דו זאלסט נישט פאַרשפּאַרן ווענטאַליישאַן אָופּאַנינגז.
- If transporting the monitor, use appropriate protective packaging.
5. טראָובלעשאָאָטינג
אויב איר טרעפט פּראָבלעמען מיט אייער מאָניטאָר, זעט די פאלגענדע געוויינטלעכע פּראָבלעמען און לייזונגען:
| פּראָבלעם | מעגלעך סיבה | לייזונג |
|---|---|---|
| Screen flickering or unstable display | ניט גענוגיק מאַכט צושטעלן. | Ensure the monitor is connected to a dedicated power adapter (PD20W or higher recommended). Always connect power before signal cables. Use a high-quality Type-C to Type-C cable if using USB-C for power. |
| טאָוטשסקרעען ריספּאַנד נישט | Incorrect connection order or insufficient power. Incompatible device. | 1. Ensure the power adapter is connected to the monitor first, then the signal cable (HDMI or USB-C). 2. Verify your device's USB-C port supports video and touch (full-featured USB 3.1). 3. If using HDMI, ensure the USB-A to USB-C cable is connected for touch. 4. Note: iOS devices only support single touch. Linux devices are not supported for touch. |
| קיין סיגנאַל דיטעקטאַד | Incorrect cable connection or input source. | 1. Check all cable connections (HDMI, USB-C) are secure. 2. Ensure the correct input source is selected on the monitor (if applicable via OSD menu). 3. Test with another device or cable if possible. |
| מאָניטאָר גייט נישט אָן | No power or faulty power adapter. | 1. Ensure the power adapter is securely connected to a working power outlet and the monitor. 2. Try a different power adapter if available. |
| Apple device touch is single-point only | This is a known compatibility limitation. | Apple devices (iOS/macOS) are designed to support only single-touch input with this monitor. Multi-touch gestures are not available. |
| No support for Linux devices | אפערירן סיסטעם אינקאמפאטיביליטעט. | This monitor is not compatible with Linux-based devices or consoles. |
6. ספּעסאַפאַקיישאַנז
Detailed technical specifications for the Prechen HD-173 monitor:
| שטריך | באַשרייַבונג |
|---|---|
| סאָרט | פּרעטשען |
| מאָדעל נומער | הד-173 |
| פאַרשטעלן גרייס | 16.2 אינטשעס |
| מאַקסימום האַכלאָטע | 2608x720 Pixels (2K QHD) |
| טאַפליע טיפּ | IPS |
| ווייַז טעכנאָלאָגיע | געפירט |
| דערפרישן קורס | 60 הז |
| ענטפער צייט | 3 מיליסעקאַנדז |
| קאַנטראַסט פאַרהעלטעניש | 1000:1 |
| באַשרייַבונג פון דער אויבערפלאַך פון דעם עקראַן | גלאָסי |
| קאַנעקטיוויטי טעכנאָלאָגיע | USB Type-C, HDMI, USB |
| ייַזנוואַרג צובינד | HDMI |
| קאָליר | שוואַרץ |
| נומער דימענשאַנז (ד רענטגענ וו רענטגענ ה) | 3 X 15 X 44.3 סענטימעטער |
| פּונקט וואָג | 2.3 קג |
| פאַבריקאַנט | Shenzhen Kenowa Electronics Co., LTD |
| לאַנד פון אָריגין | כינע |
| UPC | 753018887476 |

Image 6.1: Visual comparison highlighting the superior detail of 2K (2608x720) resolution compared to 1080P.

Image 6.2: The monitor showcasing its 800 nits brightness for clear and brilliant images.
7. וואָראַנטי און שטיצן
7.1 פּראָדוקט וואָראַנטי
This product comes with a 1-year limited warranty from the date of purchase. Please retain your proof of purchase for warranty claims. The warranty covers manufacturing defects but does not cover damage caused by misuse, accidents, unauthorized modifications, or normal wear and tear.
7.2 קונה שטיצן
For technical assistance, warranty claims, or any questions regarding your Prechen HD-173 monitor, please contact the seller or manufacturer through the platform where you purchased the product. Provide your model number (HD-173) and a detailed description of the issue for faster service.