
IIWEY Q7
IIWEY Q7 Dual 4K Dash Cam with CPL Filter User Manual
מאָדעל: ק 7
1. פּראָדוקט איבערview
The IIWEY Q7 is a dual-channel dash camera system designed to record both front and rear views of your vehicle in 4K resolution. It features advanced STARVIS sensors and High Dynamic Range (HDR) for enhanced low-light performance. The system includes a 40mm Circular Polarizing Lens (CPL) filter to reduce glare and improve video clarity, along with a 128GB microSD card for immediate use.
שליסל פֿעיִקייטן:
- דואַל 4K רעקאָרדינג: Captures front and rear video at 3840x2160p resolution simultaneously.
- Dual STARVIS + HDR Night Vision: Utilizes 2nd-generation STARVIS sensors and f/1.6 lenses with dual-channel HDR for clear recordings in various lighting conditions.
- Integrated CPL Filter: A 40mm polarizing lens reduces glare from reflections and enhances color saturation for clearer video.
- 128GB MicroSD Card Included: Ready for immediate use with ample סטאָרידזש.
- שלייף רעקאָרדינג און G-סענסאָר: אויטאָמאַטיש אָווועררייץ אַלט פאָאָtage and locks important incident videos to a protected folder.
- ברייט View & IPS Screen: קסנומקס ° ברייט-ווינקל view for comprehensive coverage and a 3.18" IPS screen for live view און פּלייבאַק.

בילד: איבערview of the IIWEY Q7 Dual 4K Dash Cam system, illustrating front and rear camera views and STARVIS technology.
2. סעטאַפּ און ייַנמאָנטירונג
2.1 מיקראָSD קאַרטל אַריינשטעלן
- זייט זיכער אז די דאַש קאַם איז אויסגעלאָשן.
- Locate the microSD card slot on the dash cam.
- Insert the provided 128GB microSD card with the contacts facing the correct direction until it clicks into place.
- It is recommended to format the microSD card within the dash cam settings before first use.
2.2 אַפּאַראַט מאַונטינג
- פראָנט אַפּאַראַט: קלייבט אויס א פלאץ אויף אייער ווינטשילד וואס שטערט נישט אייער view, טיפּיש הינטערן הינטןview mirror. Clean the area thoroughly. Attach the suction cup mount or adhesive mount firmly.
- דערציען אַפּאַראַט: מאָנטירט די הינטערשטע קאַמעראַ אויף דער הינטערשטער ווינטשויב, זיכער מאַכנדיק אַ קלאָרע view of the road behind. Route the cable discreetly to the front camera.
- Adjust the lens angles of both cameras to cover the desired field of view (170° for each).
2.3 מאַכט קאַנעקשאַן
- Connect the power cable to the dash cam and plug the other end into your vehicle's 12V power outlet (cigarette lighter socket).
- Route the power cable along the edges of the windshield and dashboard to keep it tidy and out of the way.
2.4 CPL Filter Attachment
The CPL filter is designed to be easily attached and removed from the front camera lens.
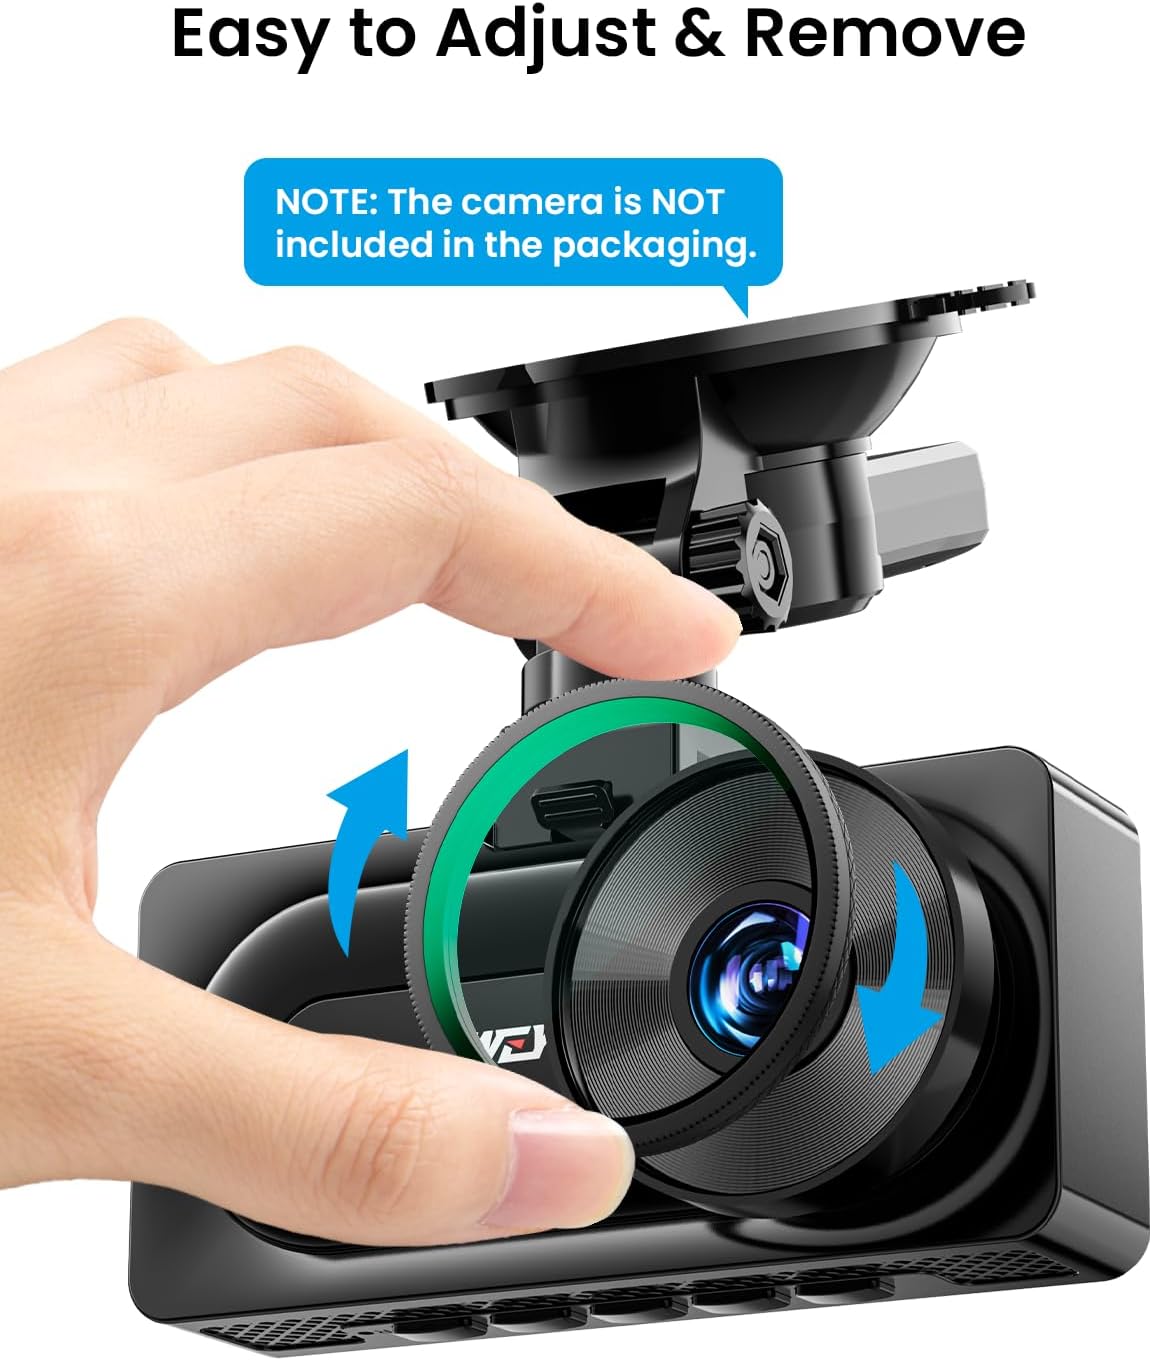
Image: Illustration of how to easily attach and remove the CPL filter from the dash cam lens.
- Ensure your IIWEY Q7 dash cam has pre-threaded lens for CPL filter attachment.
- Gently screw the 40mm CPL filter onto the front camera lens until secure.
- Rotate the CPL filter while observing the screen to achieve the desired glare reduction and color enhancement.

Image: Compatibility check for the CPL filter, confirming it fits the IIWEY Q7 model with pre-threaded lenses.
3. אַפּערייטינג ינסטרוקטיאָנס
3.1 מאַכט אויף / אַוועק
- די דאַש קאַם וועט זיך אויטאָמאַטיש אנצינדן און אָנהייבן רעקאָרדירן ווען אייער פאָרמיטל'ס איגנישאַן ווערט אָנגעצונדן.
- It will automatically power off shortly after the ignition is turned off.
- צו מאַנועל אָנצינדן/אויסלאָשן, דריק און האַלט דעם מאַכט קנעפּל.
3.2 רעקאָרדינג מאָדעס
- שלייף רעקאָרדינג: The dash cam continuously records video in short segments (e.g., 1, 3, or 5 minutes). When the microSD card is full, the oldest unprotected files זענען אָוווערריטאַן.
- G-סענסאר (נויטפאַל רעקאָרדינג): In the event of a sudden impact or collision, the built-in G-sensor will detect the event and automatically lock the current video segment, preventing it from being overwritten by loop recording. These files are stored in a separate, protected folder.
- Parking Monitor (Optional): If supported and properly wired (requires a hardwire kit, sold separately), the dash cam can record when motion or impact is detected while the vehicle is parked.
3.3 CPL Filter Adjustment
The CPL filter can be rotated to optimize its effect. Rotate the filter until reflections on the windshield or dashboard are minimized, and colors appear more vibrant on the dash cam's screen.

Image: Visual comparison demonstrating how the CPL filter reduces reflections and glare on the road.

Image: Explanation of CPL filter benefits, including enhanced color tone, improved details, and reduced light reflection.
4. וישאַלט
4.1 MicroSD Card Care
- Format the microSD card regularly (e.g., once a month) within the dash cam's settings to ensure optimal performance and prevent data corruption.
- Use only high-quality, high-endurance microSD cards recommended for dash cam use.
4.2 לינז רייניקונג
- Gently wipe the camera lenses (front, rear, and CPL filter) with a soft, lint-free cloth.
- Avoid using abrasive cleaners or solvents that could damage the lens coating.
4.3 אַלגעמיינע קער
- פֿאַרמײַדן אויסצושטעלן די דאַש קאַם צו עקסטרעמע טעמפּעראַטורן פֿאַר פֿאַרלענגערטע פּעריאָדן.
- Do not attempt to disassemble or modify the dash cam, as this will void the warranty.
5. טראָובלעשאָאָטינג
5.1 דאַש קאַם גייט נישט אָן
- Check the power connection to ensure it is securely plugged into both the dash cam and the vehicle's 12V outlet.
- Verify that the vehicle's 12V outlet is functioning correctly.
- Try a different power cable or outlet if available.
5.2 רעקארדירונג פראבלעמען
- Video not recording: Ensure a microSD card is inserted and properly formatted. Check if the card is full (if loop recording is off or protected files occupy too much space).
- נעבעך ווידעא קוואַליטעט: Clean the camera lenses. Ensure the CPL filter is correctly adjusted. Check dash cam settings for resolution and exposure.
- G-sensor too sensitive/not sensitive enough: Adjust the G-sensor sensitivity setting in the dash cam menu.
5.3 Screen Display Issues
- If the screen is black, check if the screen saver function is enabled in the settings.
- Restart the dash cam.
5.4 General Reset
If issues persist, try performing a factory reset through the dash cam's menu settings. This will revert all settings to their default values.
6. ספּעסאַפאַקיישאַנז
| מאָדעל | IIWEY Q7 |
| ווידעא האַכלאָטע | Front: 4K (3840x2160p), Rear: 4K (3840x2160p) |
| בילד סענסאָר | 2nd-gen STARVIS |
| לענס עפענונג | f/1.6 |
| פעלד פון View | 170° (Front & Rear) |
| ווייַז סקרין | 3.18" IPS |
| סטאָרידזש | שטיצט ביז 128 גיגאבייט מיקראָסד קאַרטל (128 גיגאבייט אַרייַנגערעכנט) |
| ספּעציעלע פֿעיִקייטן | CPL Filter (40mm), HDR, G-Sensor, Loop Recording |
7. וואָראַנטי און שטיצן
For warranty information and technical support, please refer to the documentation included with your product packaging or visit the official IIWEY webזייטל. איר קענט אויך קאָנטאַקטירן דעם פארקויפער גלייך פֿאַר הילף.
פֿאַרבונדענע דאָקומענטן - Q7
 |
IIWEY N5 Dash Cam User Manual and Troubleshooting Guide Comprehensive user manual and troubleshooting guide for the IIWEY N5 dash cam. Includes instructions for app usage, video playback, memory card management, and connectivity solutions. |
 |
IIWEY IK7 Dash Cam User Manual User manual and installation guide for the IIWEY IK7 Dash Cam, featuring setup instructions, wiring diagrams, audio output options, and troubleshooting. |
 |
IIWEY N5 Dash Cam User Manual Comprehensive user manual for the IIWEY N5 Dash Cam, covering installation, operation, settings, WiFi connectivity, and troubleshooting. |
 |
IIWEY IK7 Smart Car Display User Manual Comprehensive user guide for the IIWEY IK7 smart car display, covering setup for CarPlay, Android Auto, AirPlay, Miracast, Dash Cam connectivity, multimedia playback, and troubleshooting. |
 |
IIWEY C3 PRO Dash Cam User Manual Comprehensive user manual for the IIWEY C3 PRO dash cam, covering installation, setup, button functions, specifications, and troubleshooting. |
 |
IIWEY S2 דאַש קאַם באַניצער מאַנואַל אן אויספירלעכער באַניצער מאַנואַל פֿאַר די IIWEY S2 דאַש קאַם, וואָס דעקט ינסטאַלירונג, אָפּעראַציע, פֿעיִקייטן ווי GPS און WiFi, טראָובלעשווטינג, און סיסטעם דערהייַנטיקונגען. |
Ask a question about this manual
Ask about setup, troubleshooting, compatibility, parts, safety, or missing instructions. Manuals+ will review the question and use this page’s manual context to help answer it.