Firstriver T2-SWF
Firstriver T2-SWF WiFi Smart Lock User Manual
Comprehensive instructions for installation, setup, and operation.
1. הקדמה
Welcome to the Firstriver T2-SWF WiFi Smart Lock user manual. This guide provides detailed instructions to help you install, set up, and operate your new smart lock. The Firstriver T2-SWF offers multiple secure access methods including biometric fingerprint, digital keypad, IC card, mechanical key, and app control with built-in Wi-Fi, compatible with Alexa and Google Assistant for enhanced home security and convenience.
2. וואָס איז אין דער קעסטל
ביטע באַשטעטיקן אַז אַלע קאָמפּאָנענטן זענען פאַראַן איידער איר הייבט אָן די אינסטאַלאַציע:
- אויסערלעכער שלאָס פֿאַרזאַמלונג
- אינעווייניקסטע שלאָס פֿאַרזאַמלונג
- דעדבאָלט לאַטש
- מאַונטינג פּלאַטע
- סטרייק פּלאַטע
- סטרייק באָקס
- IC Cards (2)
- מעכאנישע שליסלען (2)
- Installation Screws (various sizes)
- באַניצער מאַנואַל (דעם דאָקומענט)
- דיאַגראַם מוסטער
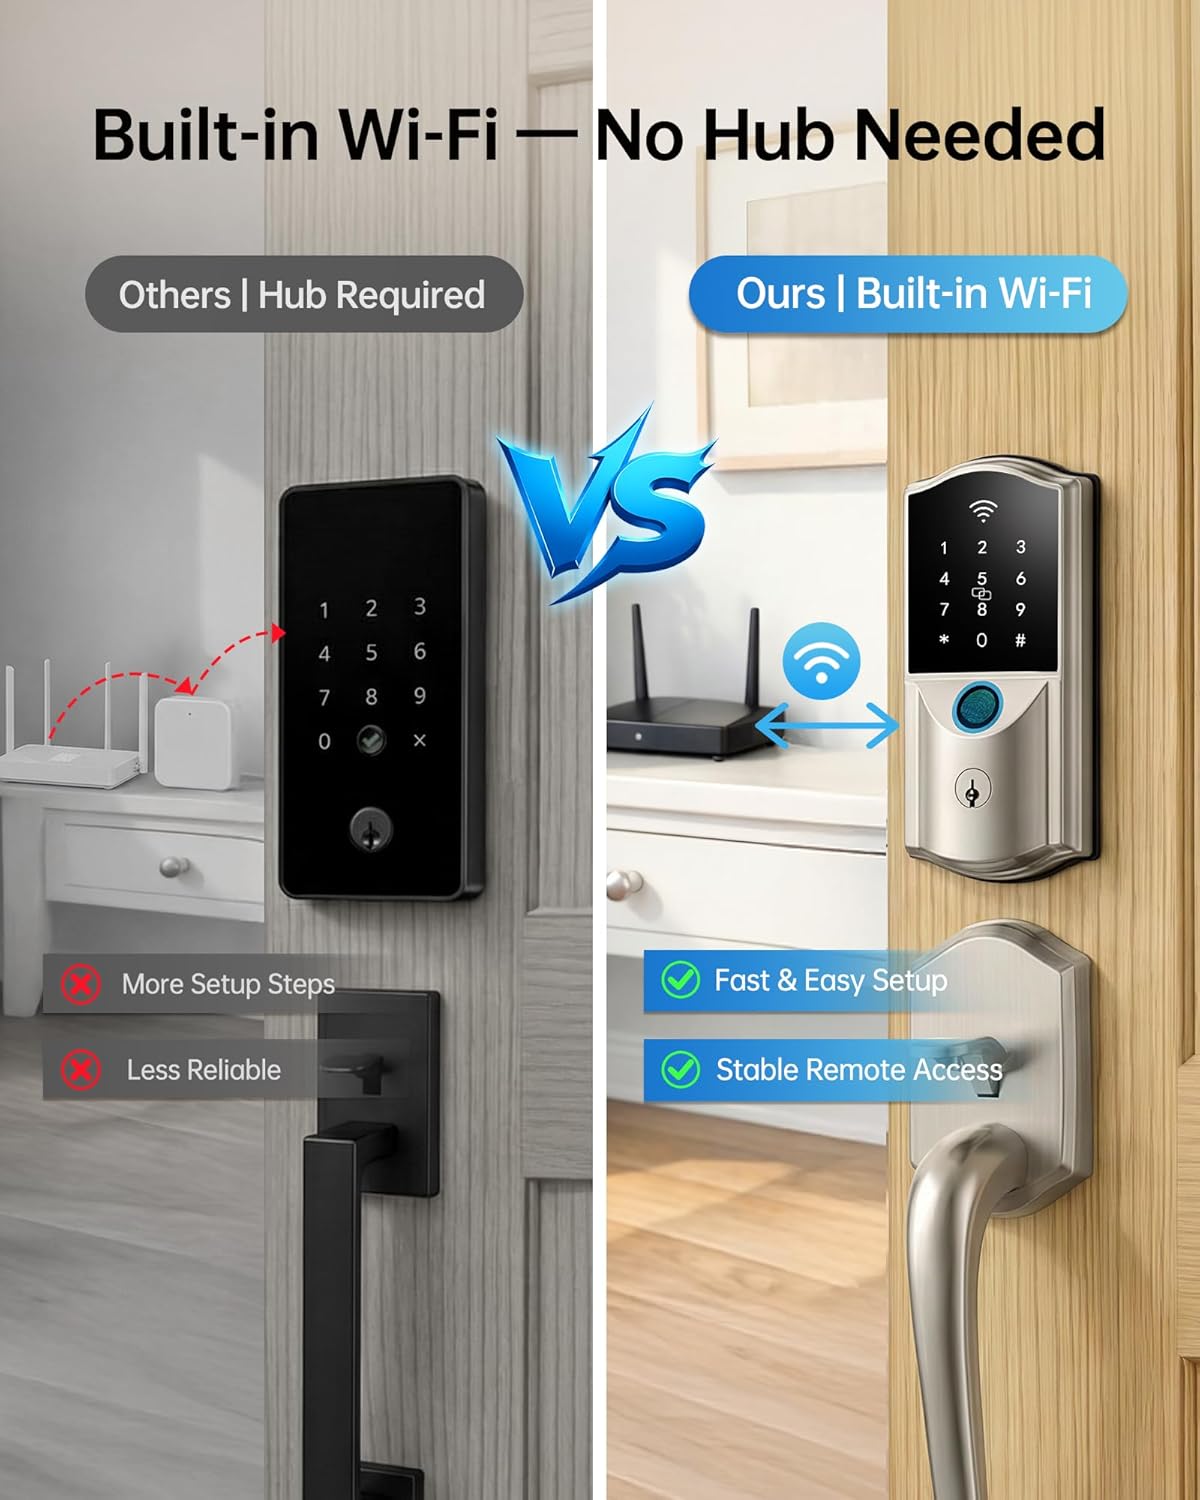
Image: All components of the Firstriver T2-SWF Smart Lock, including exterior and interior units, deadbolt, mounting hardware, IC cards, and keys.
3. ינסטאַללאַטיאָן גייד
3.1. Check Door Dimensions
איידער די אינסטאַלאַציע, זיכער מאַכן אַז אייער טיר טרעפט די פאלגענדע ספּעסיפיקאַציעס:
- טיר לאָך דיאַמעטער: 1-1/2" אדער 2-1/8" (38 מ"מ אדער 54 מ"מ)
- טיר גרעב: 1-3/8" to 2-3/16" (35-55mm)
- באַקקסעט: 2-3/8" or 2-3/4" (60mm-70mm)
- Deadbolt Plate Width: 1" (25 מ"מ)

Image: A diagram illustrating the required door dimensions and hole placements for proper installation of the smart lock.
3.2. אינסטאַלירן דעם דעדבאָלט
- Make sure the "Up" mark on the deadbolt faces upward.
- Keep the deadbolt retracted and insert it into the door frame.
- Check if the T-shaped slot is centered in the door hole. If it is, no adjustment is needed. If not, adjust the deadbolt to the correct length to center it in the hole.
- Install the strike plate on the door frame and secure the deadbolt with screws.
Video: A step-by-step guide demonstrating how to install the deadbolt component of the Firstriver T2-SWF Smart Lock into a door frame, including checking alignment and securing with screws.
3.3. Exterior Lock Installation
- Measure the diameter of the hole in the door. If it's 1-1/2" (38mm), remove the spacer first. If it's 2-1/8" (54mm), proceed to the next step.
- Place the lock spindle with the protrusion facing up.
- Test the deadbolt movement and ensure the lock spindle remains horizontal while passing the IC wire under the deadbolt.

Image: The exterior keypad and fingerprint scanner of the Firstriver T2-SWF Smart Lock, showing its sleek design and keyhole.
3.4. Interior Lock Installation
- Pass the lock spindle through the central hole.
- Route the cable through the right-side hole in the mounting plate.
- Secure the mounting plate using the two screws, making sure it is properly aligned and sits flush against the surface.
- Remove the battery cover from the interior lock assembly.
- Firmly insert the cable connector into the socket on the interior assembly until it clicks into place.
- If the cable is too long, carefully tuck it into the cable slot and the door hole.
- Align the spindle with the knob slot and insert it fully. Ensure the knob is in the vertical position before installation.
- Attach the interior assembly to the mounting plate. Secure it with 2 interior assembly screws.

Image: The interior unit of the Firstriver T2-SWF Smart Lock, showing the battery compartment and manual turn knob.
3.5. Place the Battery
- Install 8 AA batteries following the polarity marks inside the battery holder.
- Place the ribbon underneath the batteries for easy removal.
- פּוש די באַטאַרייע דעקן צוריק אין פּלאַץ.

Image: A close-up of the interior smart lock unit with the battery cover removed, showing the proper placement of 8 AA batteries.
4. סעטאַפּ גייד
4.1. App Pairing Guide
The Firstriver T2-SWF Smart Lock requires the iCSee Home app for full functionality. Download the app from the App Store or Google Play by scanning the QR code provided in the manual or searching directly. Register your account using an email address or phone number. This step should be performed by the home owner.
- Tap on "+" to add the lock in the app.
- Wake up the keypad touchscreen to enter pairing mode.
- Add the device found, then modify the device name and choose the device location.
- Tap on "Next Step".
- Tap on "Start Check" to adjust the unlock direction and click "Next Step".
- Configure the network and click "Connect".
- Click "Complete" to finish setup.
Video: A detailed tutorial on how to pair the Firstriver T2-SWF Smart Lock with the iCSee Home app, including initial setup, device naming, and network configuration.
4.2. Change the Administrator Password
- Tap on the Settings icon in the app.
- At the Settings page, click "Device info".
- Tap on "Administrator Password".
- Click "Modify administrator password" and save changes.
- After setting up the administrator password, please use it to unlock your lock once to activate the code.
4.3. Set Passcodes in the App
Follow the instructions on the app to finish settings. Tap on "PassWord" and click "Generate Password". You can create Permanent, Timed, One-time, or Cycle passcodes.

Image: Screenshot of the Firstriver T2-SWF Smart Lock app interface, displaying options for generating various types of passcodes (permanent, one-time, scheduled) for different users.
4.4. Add Fingerprints in the App
Tap on "Fingerprint" then "Add Fingerprint". Enter a name for this fingerprint. Tap on "Start Adding". Place your finger on the scanner 8 times. Ensure your finger is clean and dry. Place your finger at different angles and press slightly harder for optimal recognition.

Image: A hand placing a finger on the biometric sensor of the Firstriver T2-SWF Smart Lock for quick and secure unlocking.
4.5. Add IC Cards in the App
Tap on "Card" then "Add Card". Enter a name for this card. Tap on "Start Adding". When prompted, place the card on the center of the screen.
4.6. Set Up Alexa Sharing
- Tap "iCSee Home" app.
- Tap "Me".
- Tap "Amazon Alexa".
- Tap "Login to Amazon account", and tap "LINK".
- Tap "back".
- Now, you can tap the pop-up window to open the Amazon Alexa App.
- Tap "Home".
- Refresh, and you'll see the lock added.
- צאַפּן אויף די מיטל.
- Tap the "Settings" icon.
- Turn on "Unlock by App" and "Enable Unlock".
- Create access code and confirm.
- Tap the lock icon to unlock through Alexa.
- Tap the lock icon to lock through Alexa.

Image: The Firstriver T2-SWF Smart Lock integrated with voice assistants like Alexa and Google Assistant for convenient voice control.
5. אַפּערייטינג ינסטרוקטיאָנס
5.1. Multiple Unlock Options
The Firstriver T2-SWF Smart Lock offers 6 secure ways to access your home:
- אַפּ קאָנטראָל: Lock, unlock, and manage your door from anywhere using the smartphone app.
- פינגערפּרינט: Unlock instantly with advanced fingerprint recognition (0.3 seconds detection, 1.5 seconds unlock).
- שפּריכוואָרט: Use the digital keypad for keyless entry.
- IC קאָרט: Tap an authorized IC card for quick access.
- מעטשאַניקאַל שליסל: Use the traditional key as a backup.
- קול קאָנטראָל: Compatible with Alexa and Google Assistant for hands-free unlocking.

Image: A visual representation of the multiple convenient unlock options available with the Firstriver T2-SWF Smart Lock, including fingerprint, app, keypad, IC card, voice, and mechanical key.
5.2. Auto-Lock Feature
Customize your lock to automatically secure the door 5–900 seconds after closing. Alternatively, press the “#” key for instant locking. This automatic function ensures your home remains secure, providing peace of mind.

Image: The Firstriver T2-SWF Smart Lock automatically engaging its deadbolt, demonstrating the customizable auto-lock feature.
6. וישאַלט
6.1. נידעריק באַטערי אַלערט
The smart lock provides a smart low-battery alert through app notifications and voice reminders, ensuring you are aware when batteries need replacement. In case of complete battery depletion, a Type-C emergency port is available for temporary power.

Image: A smartphone displaying a low battery notification for the smart lock, with the lock itself showing a Type-C emergency charging port.
6.2. All-Weather Performance
The Firstriver T2-SWF Smart Lock is designed for all-weather performance, with an IP64 waterproof rating. It is cold-resistant down to -13°F and heat-resistant up to 158°F, ensuring reliable operation in various environmental conditions.

Image: The Firstriver T2-SWF Smart Lock on a door during winter, illustrating its IP64 waterproof, cold-resistant, and heat-resistant features for all-weather performance.
7. טראָובלעשאָאָטינג
7.1. External Reset Lock
To perform an external reset:
- צינדט אָן דעם קלאַוויאַטור, נעמט אַרויס 5 באַטעריעס פֿאַר 5 סעקונדעס, און דערנאָך לאָדט ווידער איין.
- דריק דעם טאָפּל-שלאָס קנעפּל פֿאַר 10-15 סעקונדעס ביז מען בעט אייך דעם איניציאַליזאַציע פּאַראָל.
- Enter 000#, you'll hear a Confirmation message.
- Reload the rest of the batteries.
7.2. Internal Reset Lock
To perform an internal reset:
- Remove the battery cover, then unscrew the interior lock.
- Press and hold the reset button for 5 seconds until prompted for the initialization passcode.
- אַרייַן 000# צו באַשטעטיקן דעם ריסעט.
- Reattach the battery cover and reinstall the interior lock.
8. ספּעסאַפאַקיישאַנז
| שטריך | דעטאַל |
|---|---|
| סאָרט | Firstriver |
| מאָדעל נומער | T2-SWF |
| לאַק טיפּ | Biometric, Combination Lock, Deadbolt, Keypad |
| ספּעציעלע פֿעיִקייטן | Auto-Lock, Fingerprint, One-Touch Lock, Passcode Unlock, Touchscreen |
| קאַנעקטיוויטי | Built-in Wi-Fi (2.4GHz), Bluetooth |
| סמאַרט היים קאַמפּאַטאַבילאַטי | אַמאַזאָן אַלעקסאַ, Google אַססיסטאַנט |
| מאַטעריאַל | אַלומינום |
| נומער דימענשאַנז | 7.6 X 7 X 3.14 אינטשעס |
| מאַכט מקור | 8 אַאַ באַטעריז (ניט אַרייַנגערעכנט) |
| וועטער קעגנשטעל | IP64 Waterproof, Cold-resistant (-13°F), Heat-resistant (158°F) |
9. וואָראַנטי און שטיצן
The Firstriver T2-SWF Smart Lock comes with a 3-Year Full Replacement Support plan. This premium coverage ensures reliable access security and peace of mind. For any inquiries or support, please refer to the contact information provided with your purchase or visit the official Firstriver webפּלאַץ.

Image: A family holding a shield-shaped frame, symbolizing the 3-year premium coverage and full replacement support offered by Firstriver.
Ask a question about this manual
Ask about setup, troubleshooting, compatibility, parts, safety, or missing instructions. Manuals+ will review the question and use this page’s manual context to help answer it.