
1. הקדמה
This manual provides essential information for the safe operation and maintenance of your FINOTI RG806 MAX GPS Drone. Please read it thoroughly before operating the drone to ensure proper function and to prevent damage or injury. The RG806 MAX features a 5.6-inch integrated screen, GPS, three-sided obstacle avoidance, optical flow positioning, and a 4K camera for high-quality aerial photography and videography.
2. זיכערקייַט גיידליינז
- פאַר-פלי טשעק: Always inspect the drone, propellers, and battery before each flight. Ensure all components are securely attached and undamaged.
- ינווייראַנמענאַל טנאָים: Do not fly in strong winds (above 10 km/h), rain, snow, or fog. Maintain a clear line of sight to the drone at all times.
- פלי געגנט: Operate the drone in open areas, away from people, animals, buildings, and power lines. Avoid flying over private property without permission.
- באַטערי זיכערקייַט: Keep batteries away from naked flames or direct heat sources. Use only the provided charging cable and charger. Do not overcharge or puncture batteries.
- ויסמיידן מכשול: While the drone features three-sided visual obstacle avoidance, it is not foolproof. Always exercise caution and maintain manual control.
- עלטער באַגרענעצונג: This product is not suitable for children under 14 years old. Adult supervision is recommended for all users.
3. פּעקל אינהאַלט
באַשטעטיקן אַז אַלע זאכן זענען פאַראַן אין דיין פּעקל:
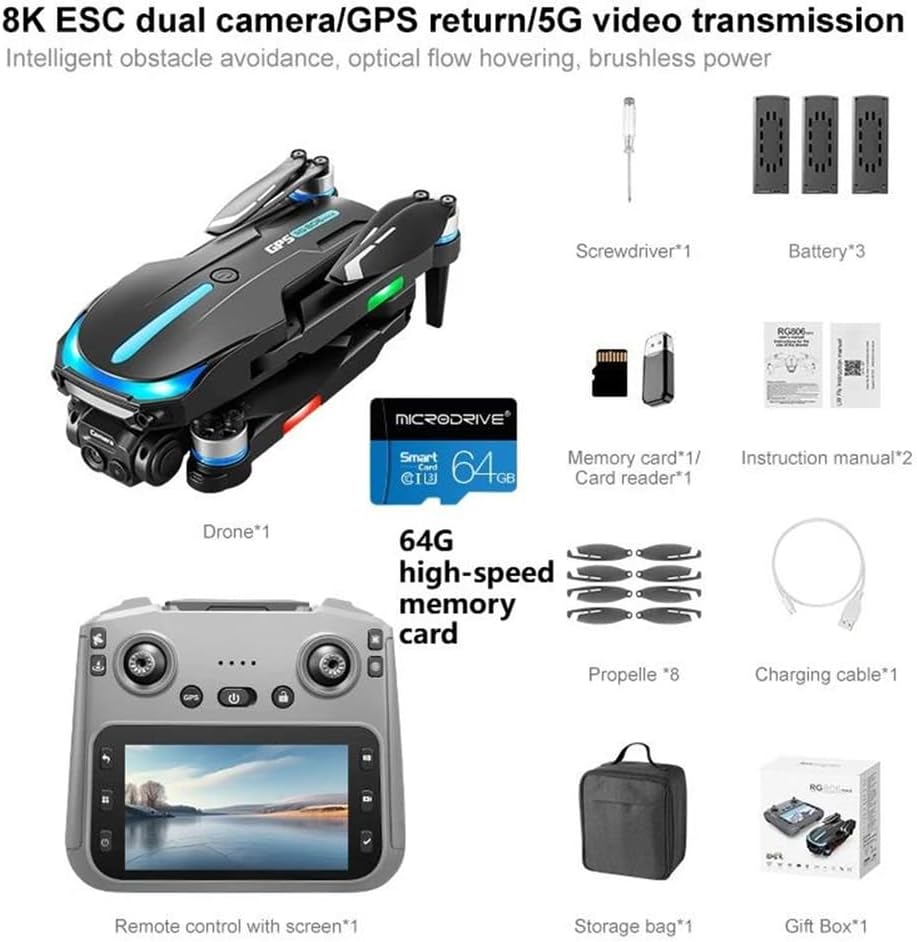
פיגור 3.1: פּאַקעט אינהאַלט. This image displays the drone, remote control with screen, screwdriver, one battery (for this variant), memory card, card reader, eight propellers, charging cable, storage bag, and gift box.
- דראָון (x1)
- Remote Control with Integrated Screen (x1)
- פלי באַטעריע (x1)
- פּראַפּעלערז (קס 8)
- טשאַרדזשינג קאַבלע (קס 1)
- שרויפנ - ציער (x1)
- 64GB High-Speed Memory Card (x1)
- קאַרטל לייענער (x1)
- סטאָרידזש זעקל (x1)
4. פּראָדוקט איבערview
4.1 דראָון קאָמפּאָנענטן

Figure 4.1: Drone with Obstacle Avoidance. This image shows the drone's design and the location of its three-way intelligent perception obstacle avoidance sensors.
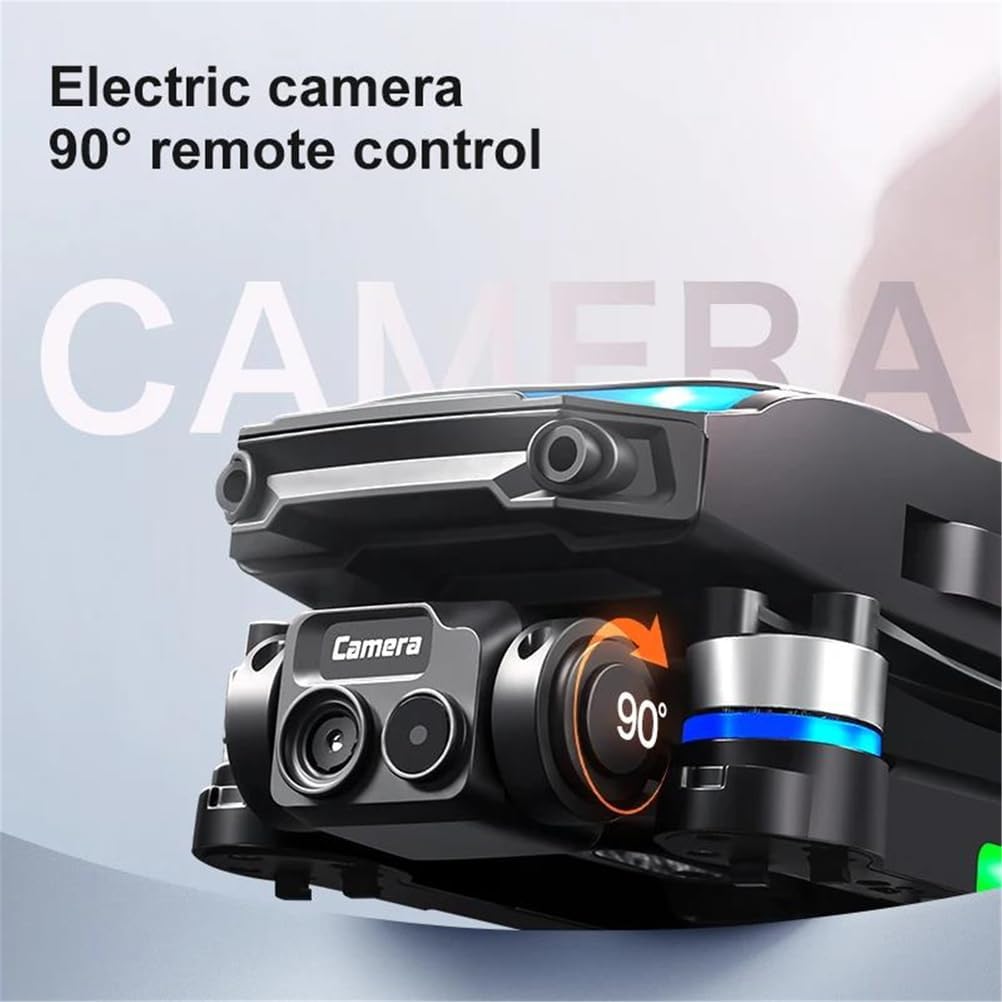
Figure 4.2: Electric Camera. This image highlights the drone's electric camera, which can be adjusted 90 degrees via remote control.
The RG806 MAX drone features a foldable design for portability. Key components include:
- 4K HD אַפּאַראַט: Located at the front, capable of 90-degree remote adjustment.
- סענסאָרן פֿאַר אויסמיידן שטערונגען: Integrated for three-sided intelligent perception.
- ברושלעס מאָטאָרן: Provide stable and powerful flight.
- GPS מאָדולע: For precise positioning and return-to-home functions.
- LED לייץ: Indicate drone status and aid visibility.
4.2 ווײַטקאָנטראָל אויסלייג
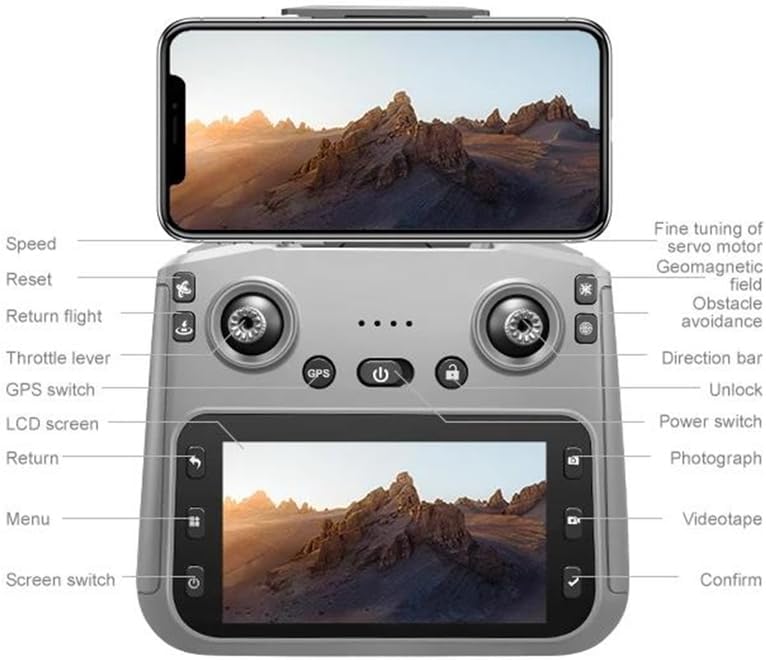
פיגור 4.3: ווײַט קאָנטראָל אויסלייג. This diagram illustrates the functions of each button and joystick on the remote control, including the integrated 5.6-inch display.
The remote control features an integrated 5.6-inch screen for real-time flight data and video feed. Key controls include:
- לינקס דזשויסטיק: Throttle lever (up/down), Yaw (left/right).
- רעכט דזשויסטיק: Direction bar (forward/backward, left/right).
- קנעפּלעך: Speed, Reset, Return flight, GPS switch, LCD screen, Return, Menu, Screen switch, Unlock, Power switch, Photograph, Videotape, Confirm.
- פיין טונינג: For servo motor, geomagnetic field, and obstacle avoidance adjustments.
5. סעטאַפּ
5.1 באַטעריע טשאַרדזשינג און ינסטאַלירונג
- Drone Battery: Connect the drone battery to the charging cable and a suitable USB power adapter (not included). Charge until the indicator light shows full. Insert the charged battery into the drone's battery compartment, ensuring it clicks into place.
- רימאָוט קאָנטראָל באַטערי: The remote control has a built-in rechargeable battery. Connect the remote control to the charging cable and a USB power adapter. Charge until fully indicated.
5.2 פּראָפּעלער ינסטאַלירונג
Attach the propellers to the corresponding motor shafts. Ensure the correct propeller type (A or B) is matched with the correct motor. Use the provided screwdriver to secure them firmly.
5.3 דראָון און ווײַטקאָנטראָל פּאָרינג
- Power on the drone by pressing and holding the power button.
- מאַכט אויף די ווייַט קאָנטראָל.
- The drone and remote control will automatically attempt to pair. Wait for the indicator lights on both devices to stabilize, indicating a successful connection.
5.4 דזשי-פי-עס קאליבראציע
For optimal GPS performance, perform a calibration before the first flight in a new location:
- שטעלט דעם דראָון אויף אַ פלאַכער, אָפֿענער ייבערפֿלאַך.
- Follow the on-screen prompts on the remote control or refer to the specific calibration sequence in the included manual. This typically involves rotating the drone horizontally and vertically.
6. אַפּערייטינג ינסטרוקטיאָנס
6.1 גרונטלעכע פלי קאָנטראָלן
Familiarize yourself with the remote control layout (Figure 4.3) before attempting flight.
- אָפּפֿליִען/לאַנדן: Use the dedicated one-key takeoff/landing button or manually control with the throttle lever.
- הייך קאָנטראָל: Push the left joystick up to ascend, pull down to descend.
- ריכטונג קאָנטראָל: Push the right joystick forward/backward to move the drone forward/backward. Push left/right to move left/right.
- Yaw Control: Push the left joystick left/right to rotate the drone left/right.
6.2 GPS and Optical Flow Positioning
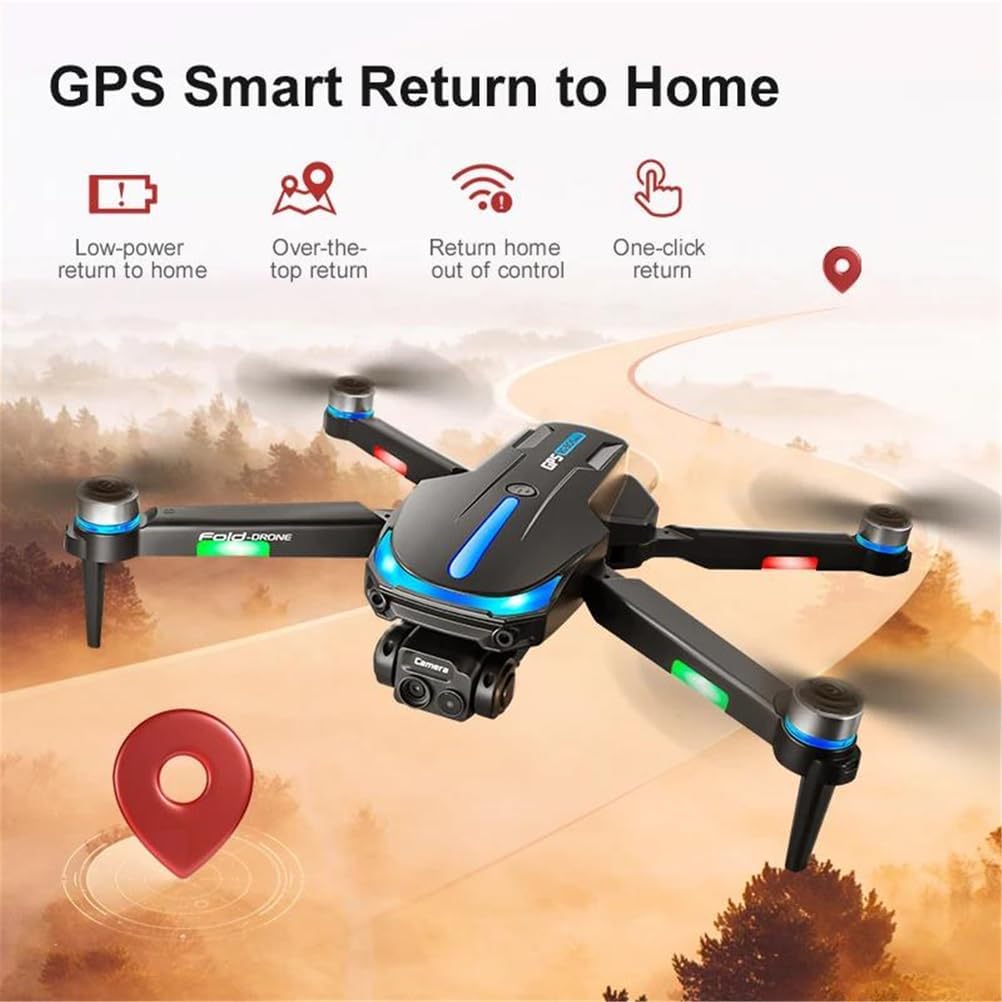
Figure 6.1: GPS Smart Return to Home. This image details the various return-to-home functions enabled by GPS, including low-power, over-the-top, out-of-control, and one-click return.
The drone utilizes GPS for outdoor stability and optical flow sensors for indoor hovering. Ensure GPS signal is strong before outdoor flights.
- GPS מאָדע: Provides precise positioning, altitude hold, and enables features like Return to Home and Custom Course.
- אָפּטיש פלאָו פּאַזישאַנינג: Automatically engages in indoor environments or when GPS signal is weak, using downward-facing sensors for stable hovering.
- צוריקקערן אהיים (RTH): Press the RTH button on the remote control, or the drone will automatically return if battery is low or connection is lost (if GPS signal is available).
- Custom Course: Plan flight paths directly on the remote control's screen for automated flight.
6.3 Obstacle Avoidance System
The RG806 MAX is equipped with three-sided visual obstacle avoidance. This system helps the drone detect and avoid obstacles in its path, enhancing flight safety. However, it is crucial to remain vigilant and not solely rely on this feature, especially in complex environments or at high speeds.
6.4 אַפּאַראַט אָפּעראַציע
The integrated 4K camera allows for high-resolution photo and video capture.
- נעמען פאָטאָ: Press the 'Photograph' button on the remote control.
- רעקאָרד ווידעא: Press the 'Videotape' button to start recording, press again to stop.
- אַפּאַראַט ווינקל אַדזשאַסטמאַנט: Use the dedicated buttons or fine-tuning controls on the remote to adjust the camera's 90-degree tilt.
- מעדיע סטאָרידזש: Photos and videos are saved to the installed 64GB memory card.
6.5 סמאַרט פֿעיִקייטן
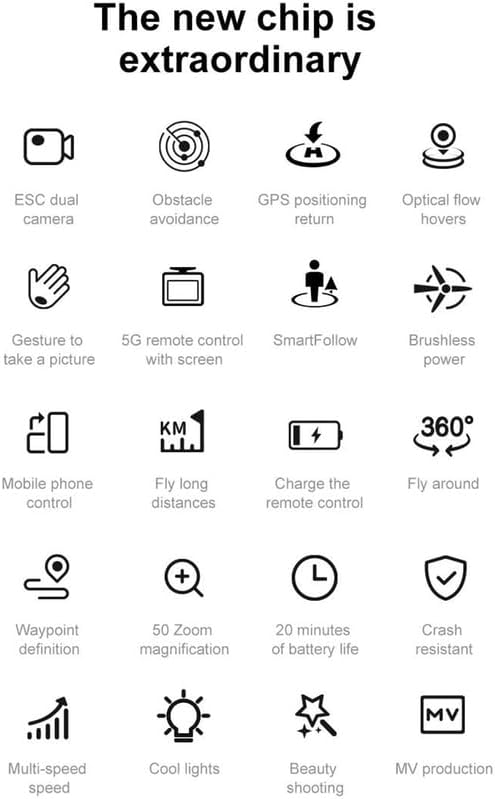
Figure 6.2: Drone Features Overview. This image displays icons representing various intelligent features of the drone, such as gesture control, SmartFollow, and waypoint definition.
- האַווייַע קאָנטראָל: Perform specific hand gestures to trigger photo or video capture. Refer to the detailed manual for specific gestures.
- SmartFollow: דער דראָון קען אויטאָמאַטיש נאָכפאָלגן אַ באַשטימטן סוביעקט.
- Fly Around: Program the drone to orbit a point of interest.
- Waypoint Definition: Set multiple waypoints for the drone to follow a pre-defined flight path.
7. וישאַלט
- רייניקונג: Use a soft, dry cloth to clean the drone and remote control. Avoid using liquids or solvents. Ensure camera lens and sensors are free of dust and debris.
- פּראָפּעלער פאַרבייַט: If propellers are damaged or bent, replace them immediately using the provided spares and screwdriver. Ensure correct A/B propeller types are installed.
- באַטערי זאָרגן: Store batteries in a cool, dry place. Do not fully discharge batteries for extended periods. Charge them to approximately 50-60% for long-term storage.
- סטאָרידזש: When not in use, store the drone and remote control in the provided storage bag in a dry environment, away from direct sunlight and extreme temperatures.
8. טראָובלעשאָאָטינג
| פּראָבלעם | מעגלעך סיבה | לייזונג |
|---|---|---|
| דראָון טוט זיך נישט אָן | Low battery; Battery not installed correctly | Charge drone battery; Reinstall battery securely |
| ווײַטקאָנטראָל פֿאַרבינדט זיך נישט | Low remote battery; Pairing failed | Charge remote control; Re-attempt pairing process |
| נישט-סטאַבילער פלי / דריפטינג | No GPS signal (outdoor); No optical flow (indoor); Calibration needed; Damaged propellers | Fly in open area with clear GPS; Ensure good lighting for optical flow; Perform GPS calibration; Replace damaged propellers |
| קאַמעראַ רעקאָרדירט נישט/נעמט נישט בילדער | Memory card full/not inserted; Camera not activated | Insert/replace memory card; Ensure camera is powered on and connected |
| שטערונג אויסמיידונג ארבעט נישט | Sensors blocked/dirty; System error | Clean sensors; Restart drone and remote; Avoid flying in complex environments |
9. ספּעסאַפאַקיישאַנז
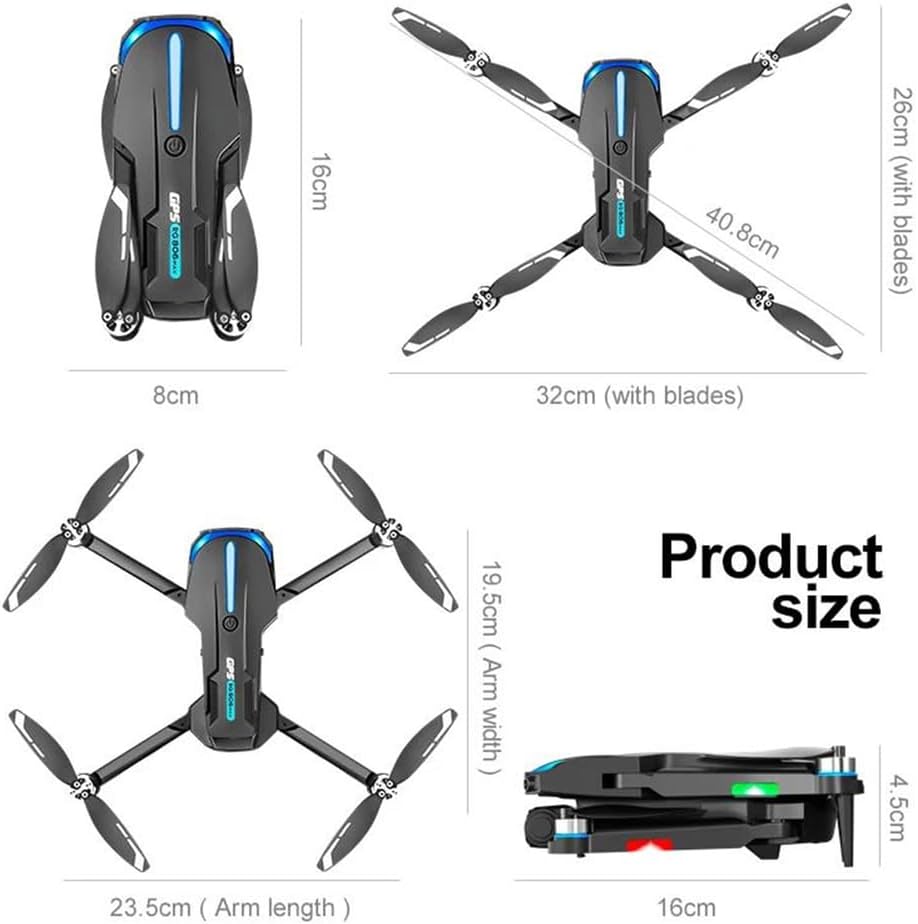
פיגור 9.1: פּראָדוקט דימענסיעס. This image provides the folded and unfolded dimensions of the drone.
- מאָדעל: RG806 MAX
- דראָון וואָג: 190ג
- פלי צייט: בעערעך 20 מינוט
- ווייַט דיסטאַנסע: אַרויף צו 250 ם
- אַפּאַראַט: 4K HD Video Recording, 1/1.28 Inches Sensor Size
- אַפּאַראַט אַדזשאַסטמאַנט: 90-degree remote control electric adjustment
- אַפּערייטינג אָפטקייַט: 5 גהז
- מאַקסימום ווינט גיכקייַט קעגנשטעל: <10 קילאמעטער/ה
- מאָטאָר טיפּ: ברושלעסס מאָטאָר
- ויסמיידן מכשול: Three-sided Visual Avoidance
- פּאַזישאַנינג: GPS, Optical Flow Positioning
- קאַנעקטיוויטי: WiFi
- Remote Control Display: Integrated 5.6-inch screen
- פאָולדיד דימענשאַנז: 16 סענטימעטער (לענג) x 8 סענטימעטער (ברייט) x 4.5 סענטימעטער (הייך)
- אַנפאָולד דימענשאַנז: 32cm (with blades) x 40.8cm (with blades)
- Arm Length (unfolded): 23.5 סענטימעטער
- Arm Width (unfolded): 19.5 סענטימעטער
10. וואָראַנטי און שטיצן
For warranty information, technical support, or service inquiries, please refer to the contact details provided with your purchase documentation or contact the manufacturer directly. Keep your proof of purchase for warranty claims.