
1. הקדמה
Thank you for choosing the Antec VCX300 ARGB ATX/M-ATX PC Case. This manual provides detailed instructions for the installation, operation, and maintenance of your new computer chassis. Please read this manual thoroughly before installation to ensure proper setup and optimal performance.
2. זיכערקייַט אינפֿאָרמאַציע
- שטענדיק אָפּשטעקן די מאַכט צושטעל איידער איר ינסטאַלירן אָדער אַראָפּנעמען קיין קאָמפּאָנענטן.
- Handle components with care to avoid damage from electrostatic discharge. Use an anti-static wrist strap if available.
- Keep the case away from water, moisture, and direct heat sources.
- זאָרגט פֿאַר געהעריקע ווענטילאַציע אַרום דעם קעסטל צו פֿאַרמייַדן איבערהיצונג.
- Do not attempt to open or repair the power supply unit inside the case. Refer to qualified service personnel.
3. פּעקל אינהאַלט
ביטע באַשטעטיקן אַז אַלע זאכן זענען פאַראַן אין דיין פּעקל:
- Antec VCX300 ARGB ATX/M-ATX PC Case
- Accessory Box (Screws, standoffs, cable ties)
- באַניצער מאַנואַל (דעם דאָקומענט)
4. פּראָדוקט איבערview
Familiarize yourself with the various parts of your Antec VCX300 ARGB PC Case.
4.1 פראָנט פּאַנעל י / אָ
- מאַכט קנעפּל
- באַשטעטיק קנעפּל
- וסב 3.0 פּאָרץ
- וסב 2.0 פּאָרץ
- אַודיאָ דזשעקס (כעדפאָון/מיקראָפאָן)
- LED Control Button (for ARGB lighting)
4.2 Internal Layout
The VCX300ARGB case supports ATX and Micro-ATX motherboards. It features multiple drive bays for storage and ampלע פּלאַץ פֿאַר קילונג סאַלושאַנז.
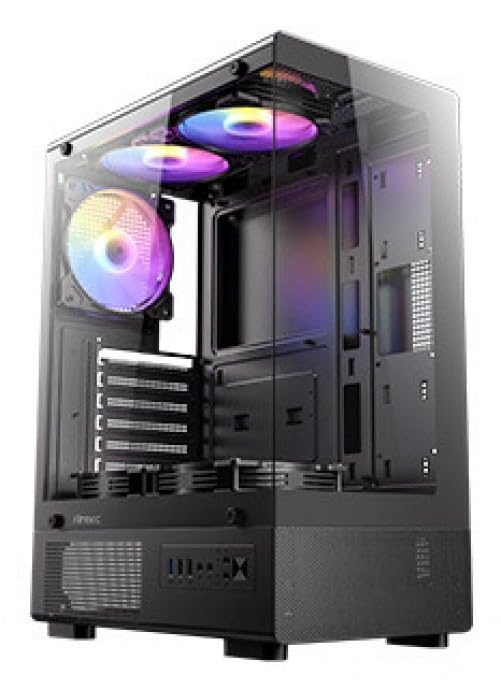
פיגורע 1: פראָנט view of the Antec VCX300 ARGB PC Case, showcasing the ARGB lighting elements and front panel I/O ports.
5. סעטאַפּ און ייַנמאָנטירונג
Follow these steps to install your components into the Antec VCX300 ARGB PC Case.
5.1 צוגרייטן דעם פאַל
- שטעלט דעם קעסטל אויף א פלאַכער, סטאַבילער ייבערפלאַך.
- אַראָפּנעמען די זייט פּאַנאַלז דורך אַפשרויען די גראָבע שרויפן אין דער הינטערשטער טייל פון דעם קעסטל און שלעפּן די פּאַנאַלז צוריק.
5.2 מאָטהערבאָאַרד ינסטאַללאַטיאָן
- אינסטאלירט דעם I/O שילד אין דער הינטערשטער עפענונג פונעם קעיס.
- Align the motherboard with the pre-installed standoffs. Ensure the screw holes on the motherboard match the standoffs.
- Secure the motherboard with the provided screws from the accessory box.
5.3 אינסטאַלאַציע פון מאַכט צושטעל
- Position the power supply unit (PSU) in the designated compartment at the bottom rear of the case.
- Secure the PSU with screws from the outside rear of the case.
5.4 סטאָרידזש דרייוו אינסטאַלאַציע (HDD/SSD)
- Locate the drive bays. The VCX300ARGB typically features dedicated bays for 3.5" HDDs and 2.5" SSDs.
- For 3.5" HDDs, slide the drive into the bay and secure it with screws or tool-less clips if available.
- For 2.5" SSDs, mount the drive onto the designated brackets or trays and secure with screws.
5.5 Expansion Card Installation (GPU, etc.)
- אַראָפּנעמען די נייטיקע יקספּאַנשאַן סלאָט דעקל פון די הינטערשטע טייל פון די קעסטל.
- Insert the expansion card (e.g., graphics card) into the appropriate PCIe slot on the motherboard.
- Secure the card with a screw.
5.6 קאַבלע מאַנאַגעמענט
ניצט די קאַבל רוטינג אויסשניטן און טיי-דאַון פונקטן הינטער די מאַדערבאָרד טאַץ צו פאַרוואַלטן קייבאַלז. דאָס פֿאַרבעסערט לופטפלוס און עסטעטיק.
- Connect all power cables from the PSU to the motherboard and components.
- Connect front panel I/O cables (USB, audio, power/reset switches, LED) to the corresponding headers on the motherboard.
- Connect ARGB cables from the case fans/strips to the motherboard's ARGB header or the integrated ARGB controller.
6. אָפּעראַציע
6.1 מאַכט אויף
- Ensure all components are correctly installed and cables are connected.
- Close and secure the side panels.
- פֿאַרבינדט דעם מאַכט קאַבל צום PSU און אַ וואַנט אַוטלעט.
- דרייט דעם מאַכט קנעפּל אויף די PSU צו די "ON" פּאָזיציע.
- Press the Power Button on the front panel of the case.
6.2 ARGB לייטינג קאָנטראָל
The Antec VCX300 ARGB case features customizable ARGB lighting. You can control the lighting effects in two ways:
- LED קאָנטראָל קנעפּל: Press the dedicated LED control button on the front panel to cycle through various pre-set ARGB lighting modes and colors. Hold the button for a few seconds to turn off/on the lighting.
- מוטערבאָרד ווייכווארג: If the ARGB cables are connected to a compatible motherboard ARGB header, you can synchronize and customize lighting effects using your motherboard's proprietary software (e.g., ASUS Aura Sync, MSI Mystic Light Sync, Gigabyte RGB Fusion, ASRock Polychrome Sync). Refer to your motherboard manual for specific instructions.
7. וישאַלט
רעגולערע אויפהאלטונג העלפט זיכער מאכן די בעסטע פאָרשטעלונג און לאַנגלעבעדיקייט פון אייערע פּיסי קאָמפּאָנענטן.
- שטויב פילטערס: The VCX300ARGB includes dust filters. Regularly remove and clean these filters to prevent dust buildup inside the case, which can impede airflow and cooling performance. Use compressed air or a soft brush.
- אינערלעכער רייניקונג: Periodically open the case and use compressed air to remove dust from fans, heatsinks, and other components. Ensure the system is powered off and unplugged before cleaning.
- עקסטעריאָר רייניקונג: ווישט אָפּ די אויסערלעכע זייט פון דער קעסטל מיט אַ ווייכן, דamp שטאָף. פֿאַרמײַדט שאַרפֿע כעמיקאַלן אָדער אַברייסיוו מאַטעריאַלן.
8. טראָובלעשאָאָטינג
| פּראָבלעם | מעגלעך סיבה | לייזונג |
|---|---|---|
| דער פּיסי גייט נישט אָן. | Power cable disconnected, PSU switch off, front panel power button not connected, faulty PSU. | Check power cable connections. Ensure PSU switch is ON. Verify front panel power button cable is correctly connected to motherboard. Test PSU if possible. |
| ARGB lighting not working. | ARGB cables disconnected, incompatible motherboard header, LED control button issue. | Ensure ARGB cables are securely connected to the motherboard or controller. Try cycling modes with the LED control button. Verify motherboard ARGB header compatibility. |
| שלעכטע לופט שטראָם/איבערהיצונג. | Dust buildup, incorrect fan orientation, obstructed vents. | Clean dust filters and internal components. Ensure fans are oriented correctly for optimal airflow (intake/exhaust). Check for any obstructions. |
9. ספּעסאַפאַקיישאַנז
| שטריך | דעטאַל |
|---|---|
| מאָדעל נאָמען | VCX300ARGB |
| טיפּ פון קאַסטן | מיד טאַוער |
| מאָטהערבאָאַרד סופּפּאָרט | ATX, מיקראָ-ATX |
| דימענשאַנז (די רענטגענ וו x ה) | 14.57"D x 8.07"W x 17.72"H (370mm x 205mm x 450mm approx.) |
| פּונקט וואָג | 3.6 קילאָגראַמס |
| ינערלעך דרייוו בייס | 5 (combination of 3.5" HDD and 2.5" SSD) |
| פראָנט איך / אָ פּאָרץ | USB 3.0, USB 2.0, Audio In/Out, Power, Reset, LED Control Button |
| ספּעציעלע פֿעיִקייטן | Built-In Fan, Dust Filter, LED Control Button, Noise Reduction Technology, Partition Plate Cooling Technology, ARGB Lighting |
| קאָליר | שוואַרץ |
10. וואָראַנטי און שטיצן
Antec products come with a limited warranty. Please refer to the official Antec website or your regional distributor for specific warranty terms and conditions applicable to your product.
For technical support, product registration, or further inquiries, please visit the official Antec support page: www.antec.com/support
Importer Contact Information: Ariisto House, 5th Floor, Junction of N.S.Phadke Road, Telli Gali, Andheri (E), Mumbai- 400 069 Maharashtra, India