
BONTEC GDM7505-FBA
BONTEC Single Monitor Arm (Model GDM7505-FBA) Instruction Manual
Model: GDM7505-FBA
הקדמה
This manual provides detailed instructions for the installation, operation, and maintenance of your BONTEC Single Monitor Arm, Model GDM7505-FBA. Designed for 15-34 inch screens weighing up to 26.5 lbs, this ergonomic gas spring monitor mount offers full motion adjustability, including tilt, swivel, and rotation, along with VESA compatibility (75x75mm and 100x100mm). Please read this manual thoroughly before installation and use to ensure proper setup and safe operation.
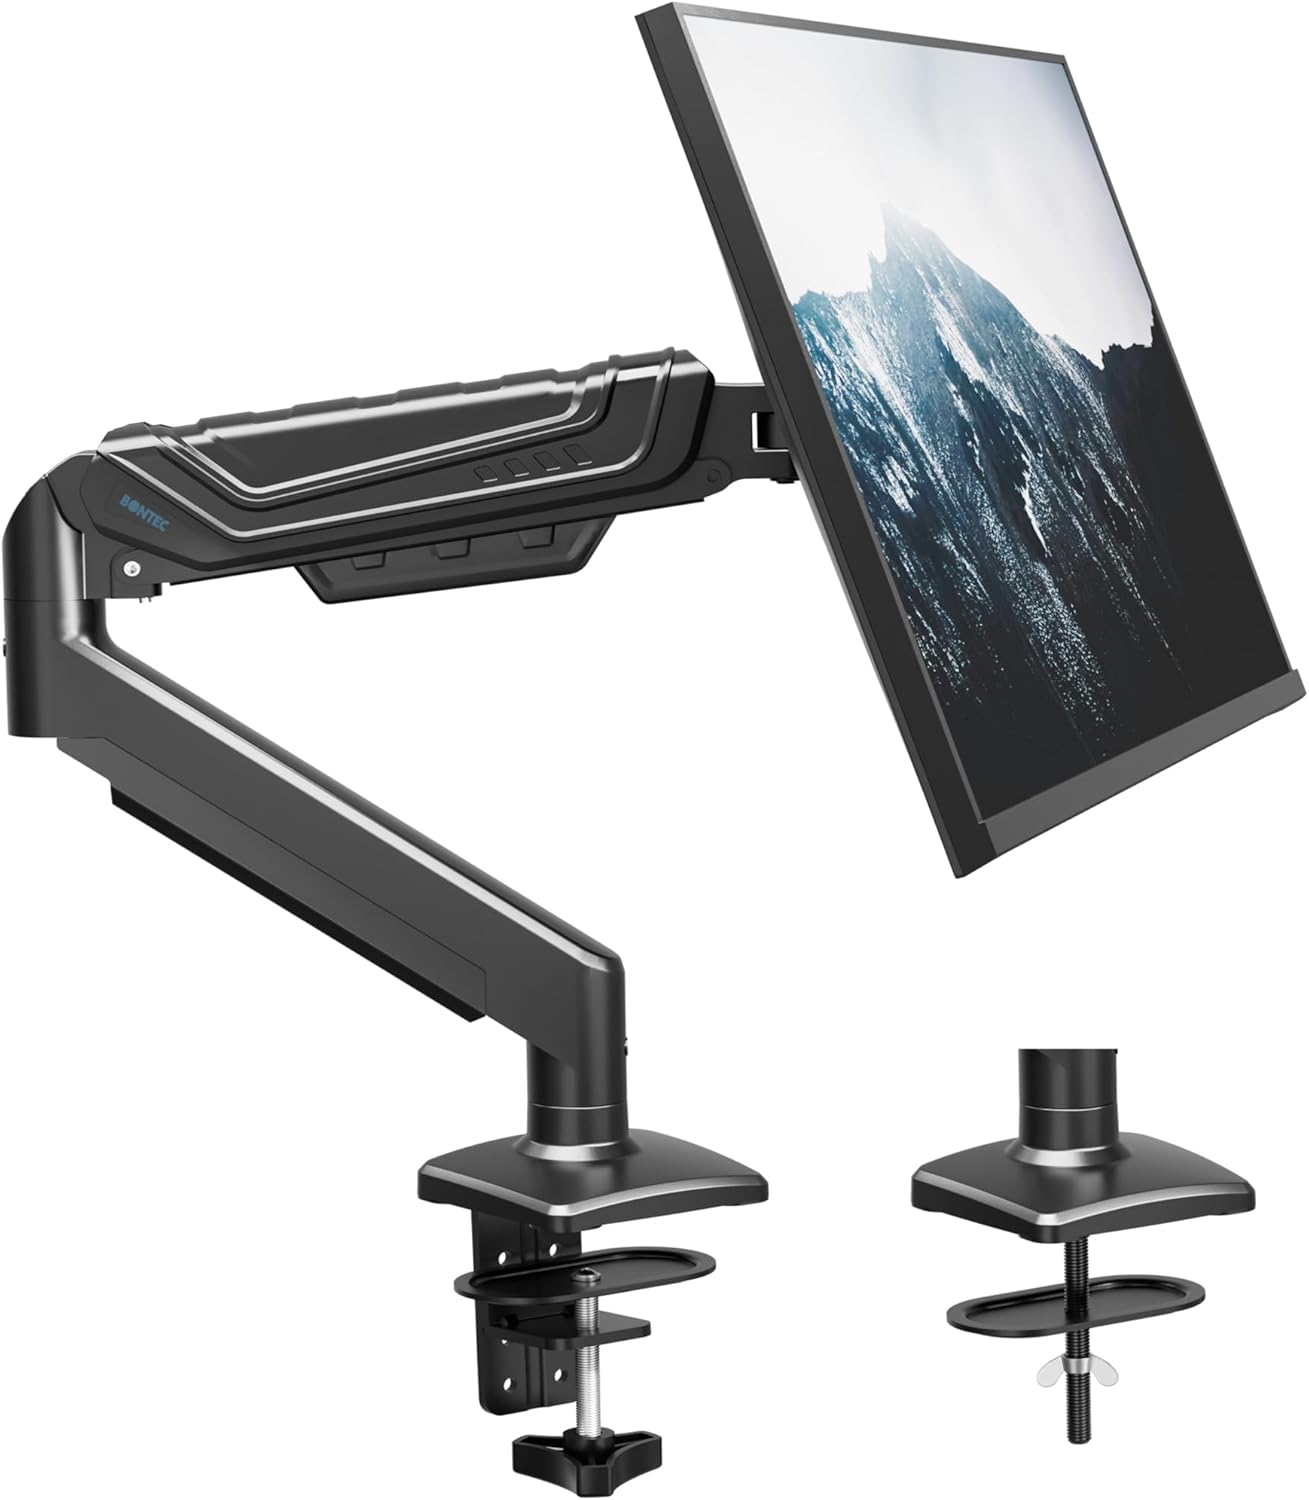
Image: The BONTEC Single Monitor Arm, showcasing its design and the two available mounting options (C-clamp and grommet base).
וויכטיק סאַפעטי אינפֿאָרמאַציע
- Ensure your desk surface is strong enough to support the combined weight of the monitor arm and your monitor.
- נישט איבערשטייגן די מאקסימום וואָג קאַפּאַציטעט פון 26.5 פונט (12 ק"ג).
- Verify that your monitor is VESA compatible (75x75mm or 100x100mm) before installation.
- Always follow the assembly instructions carefully. Incorrect installation may result in product damage or personal injury.
- האַלטן קינדער און פּעץ אַוועק בעשאַס ינסטאַלירונג.
- Do not use power tools to tighten screws when attaching the VESA plate to the monitor, as this may damage the monitor. Hand-tighten only.
- Adjust the gas spring tension only after the monitor is mounted to prevent the arm from springing up or down unexpectedly.
פּעקל אינהאַלט
Please check that all components are present and undamaged before proceeding with installation. Refer to the assembly video for a visual guide to the parts.
Video: Assembly Manual for BONTEC Upgraded Single Monitor Arm. This video provides a step-by-step visual guide for unpacking and assembling the monitor arm, including identifying all parts.
The package should include the following main components and hardware:
- Monitor Arm Assembly (A)
- אונטערשטער אָרעם (B)
- באַזע (C)
- C- קלamp (ד)
- Brace for C-clamp (E)
- Screws for C-clamp (ו)
- Wingnut (G)
- Carriage Bolt (H)
- Allen Keys (I, J, K)
- Monitor Mounting Screws (M-A, M-B, M-C, M-D, M-E) and Washers (M-C)
סעטאַפּ און ינסטאַלירונג
שריט 1: קלייבט אייער מאָנטירונג מעטאָד
The BONTEC Monitor Arm supports two installation methods: C-clamp mounting and Grommet mounting. Select the method suitable for your desk.

Image: Visual representation of the C-clamp mounting and grommet mounting options, including desk thickness and hole diameter requirements.
1A. C-clamp ייַנמאָנטירונג
- Attach the Brace (E) to the Base (C) using the provided screws (F).
- Position the assembled C-clamp (D) onto your desk edge. Ensure the desk thickness is between 0.39 and 3.15 inches (10-80mm).
- פאַרשטייַפן די C-קלamp securely to the desk using the Allen key.
1B. Grommet Base Installation
- Remove the clip plate from the clamp (D) if it's attached.
- Insert the Carriage Bolt (H) through the Base (C) and then through the grommet hole in your desk. Ensure the desk thickness is between 0.39 and 2.76 inches (10-70mm) and the hole diameter is between 0.39 and 2.36 inches (10-60mm).
- Secure the base from underneath the desk using the clip plate and Wingnut (G).
Step 2: Install the Arm onto the Base
Slide the lower arm (B) onto the pole of the installed base. Then, slide the main monitor arm assembly (A) onto the lower arm. Secure both arms by tightening the set screws with the appropriate Allen key.
שריט 3: צוטשעפּען די VESA פּלאַטע צום מאָניטאָר
Carefully attach the VESA plate of the monitor arm to the back of your monitor. Use the appropriate screws (M-A/M-B or M-C/M-D/M-E) and washers (M-C) that fit your monitor's VESA mounting holes. Ensure the screws are inserted loosely, leaving a 3-4mm gap, before hanging the monitor onto the arm. דו זאלסט נישט נוצן מאַכט מכשירים for this step to avoid damaging your monitor.
Step 4: Manage Cables
Route your monitor's power and video cables through the integrated cable management channels on the monitor arm. This helps maintain a clean and organized workspace.
אָפּעראַציע און אַדזשאַסטמאַנץ
The BONTEC Single Monitor Arm offers extensive adjustability for optimal viewing comfort. Adjustments include tilt, swivel, rotation, and gas spring tension.
Video: Tips for Using BONTEC Upgraded Single Monitor Mount. This video demonstrates how to adjust the monitor arm's tilt, swivel, and gas spring tension.
טילט אַדזשאַסטמאַנט
The monitor arm allows for a tilt range of +85° to -50°. If the monitor head is dropping down or is too loose, tighten the screw on the tilt mechanism clockwise using the appropriate Allen key until the desired tension is achieved. If it's too stiff, loosen it counter-clockwise.
סוויוואַל אַדדזשוסטמענט
The monitor can swivel ±90° at the VESA plate connection. If the monitor is too sensitive or moves too freely, tighten the screw on the swivel joint clockwise with the Allen key to increase resistance. If it's too stiff, loosen it counter-clockwise.
ראָוטיישאַן אַדדזשוסטמענט
The monitor can rotate 360° from landscape to portrait orientation. The base and arm joints also offer 360° rotation for flexible positioning.
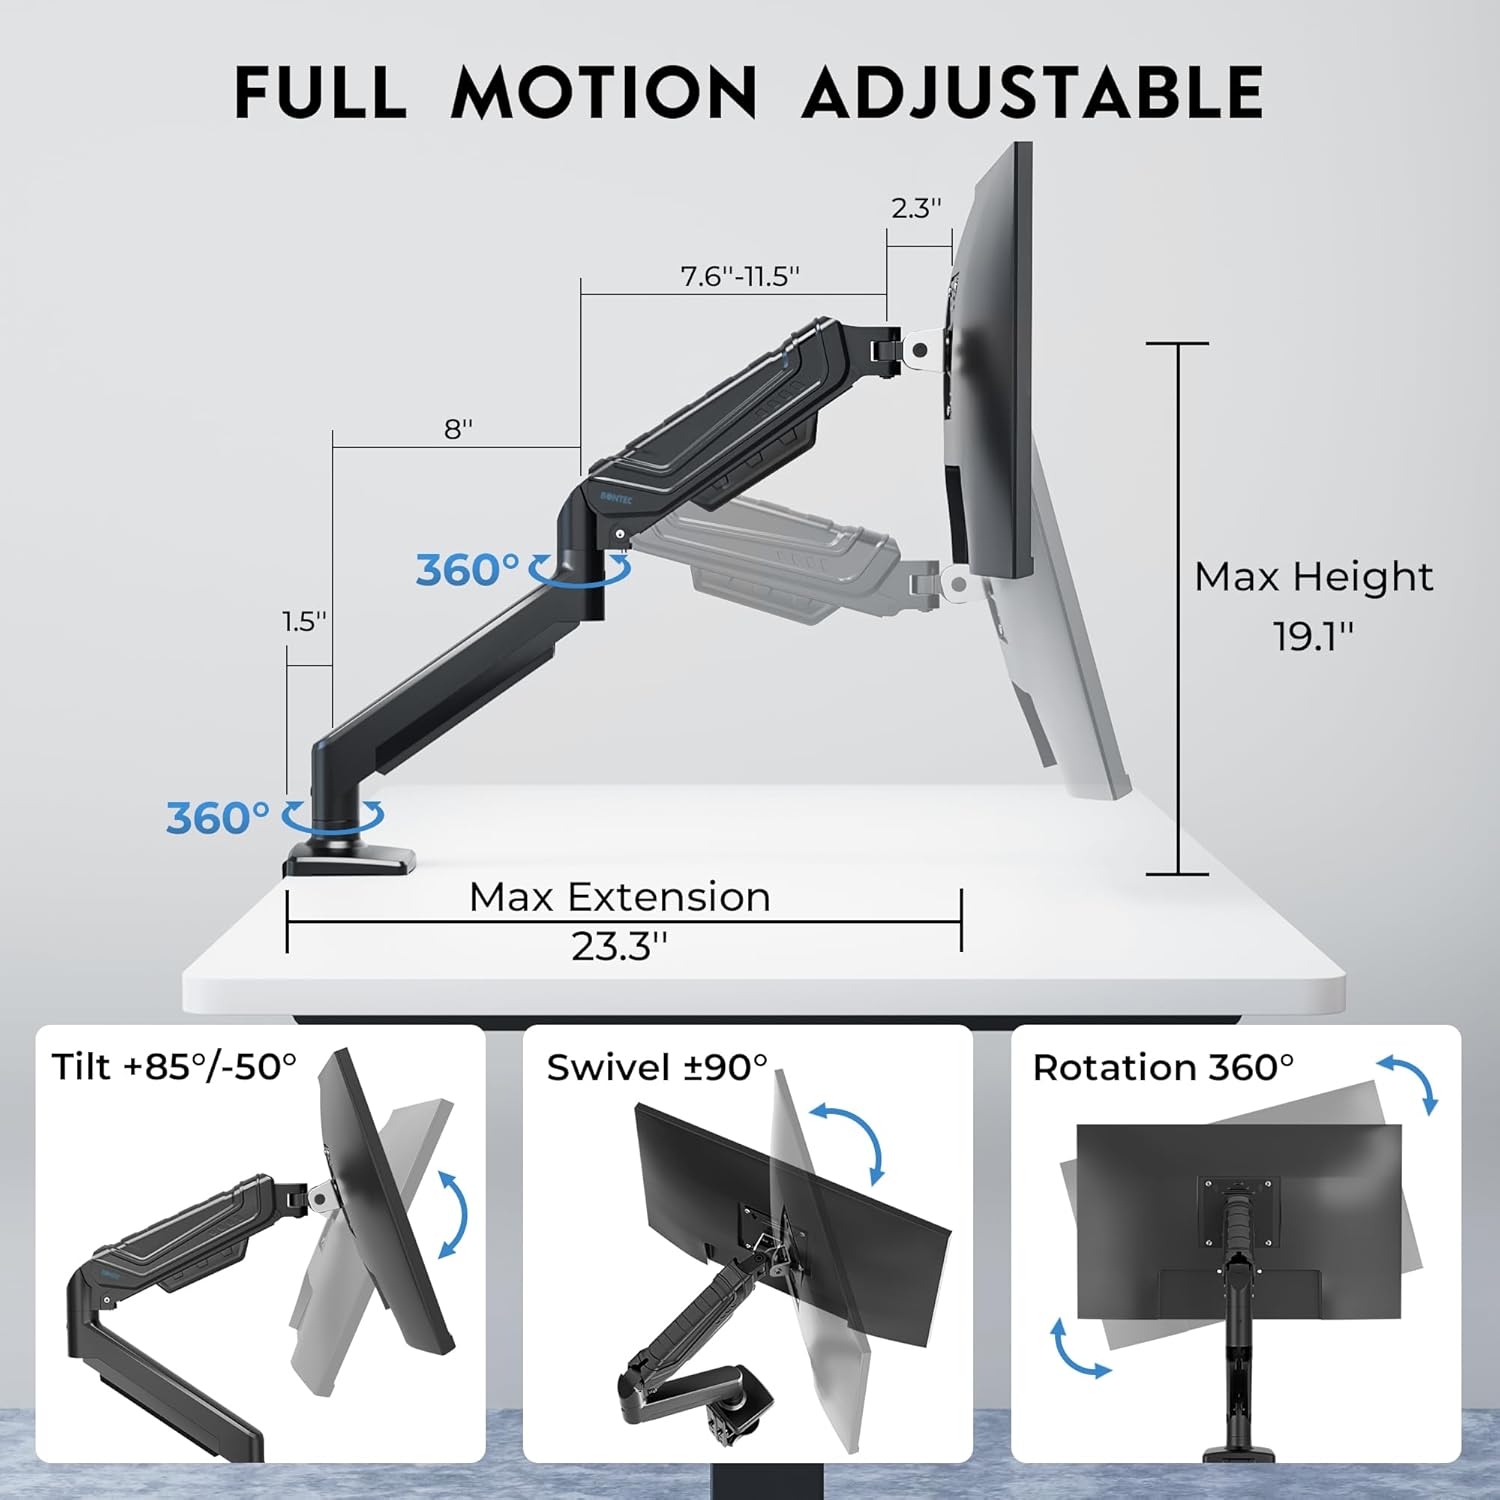
Image: Diagram illustrating the full motion capabilities of the monitor arm, including tilt (+85°/-50°), swivel (±90°), and 360° rotation.
גאַז ספּרינג שפּאַנונג אַדזשאַסטמאַנט
The gas spring tension needs to be adjusted according to your monitor's weight to ensure it stays balanced at any height.
- If the monitor is drooping or falling, turn the tension screw אַנטקעגן-קלאַקווייז to increase tension (up to 20 turns maximum).
- If the monitor is rising too easily or springing up, turn the tension screw קלאַקווייז to reduce tension (up to 20 turns maximum).
וישאַלט
- קאָנטראָלירט רעגולער אַלע שרויפן און פֿאַרבינדונגען צו זיכער מאַכן אַז זיי זענען זיכער.
- רייניקט דעם מאָניטאָר אָרעם מיט אַ ווייכן, דamp שטאָף. פֿאַרמײַדט אַברייסיוו רייניגער אָדער סאָלווענטן.
- Do not disassemble the gas spring cylinder, as it contains high-pressure gas.
טראָובלעשאָאָטינג & FAQ
- Q: My monitor is drooping or falling down.
- A: The gas spring tension is too low for your monitor's weight. Increase the tension by turning the adjustment screw אַנטקעגן-קלאַקווייז. Refer to the "Gas Spring Tension Adjustment" section in this manual or the "Tips for Using" video.
- Q: My monitor is rising too easily or springing up.
- A: The gas spring tension is too high for your monitor's weight. Reduce the tension by turning the adjustment screw קלאַקווייז. Refer to the "Gas Spring Tension Adjustment" section in this manual or the "Tips for Using" video.
- Q: The monitor swivels too freely or is too stiff.
- A: Adjust the swivel resistance by tightening or loosening the screw on the swivel joint with the Allen key. Refer to the "Swivel Adjustment" section.
- Q: The monitor arm is unstable or wobbles.
- A: Ensure that the C-clamp or grommet base is securely tightened to the desk. Also, check all connection points on the arm for tightness.
ספּעסאַפאַקיישאַנז
| סאָרט | BONTEC |
| מאָדעל נומער | GDM7505-FBA |
| קאָמפּאַטיבלע פאַרשטעלן גרייס | 15-34 אינטשעס |
| וואָג קאַפּאַסיטי | אַרויף צו 26.5 לבס (12 קג) |
| VESA קאַמפּאַטאַבילאַטי | 75 קס 75 מם, 100 קס 100 מם |
| מאַונטינג טיפּ | C- קלamp or Grommet Base |
| C- קלamp שרייַבטיש גרעב | 0.39 - 3.15 אינטשעס (10-80 מ״מ) |
| Grommet Desk Thickness | 0.39 - 2.76 אינטשעס (10-70 מ״מ) |
| Grommet Hole Diameter | 0.39 - 2.36 אינטשעס (10-60 מ״מ) |
| טילט ווינקל | +85° צו -50° |
| סוויוואַל ווינקל | ±90° |
| ראָוטיישאַן | 360° |
| מאַקס עקסטענסיאָן | 23.3 אינטשעס |
| הייך אַדדזשוסטמענט ראַנגע | 7.1 - 19.1 אינטשעס |
| מאַטעריאַל | מעטאַל |
| קאָליר | שוואַרץ |
וואָראַנטי און שטיצן
BONTEC products are designed for durability and performance. For specific warranty details and customer support, please refer to the warranty card included in your product packaging or visit the official BONTEC website. If you encounter any issues or have questions regarding your monitor arm, please contact BONTEC customer service for assistance.
איר קענט אויך געפֿינען נאָך רעסורסן און פּראָדוקט אינפֿאָרמאַציע אויף די BONTEC Store on Amazon.
פֿאַרבונדענע דאָקומענטן - GDM7505-FBA
 |
BONTEC MDM003A Monitor Desk Stand Installation Manual Installation and assembly guide for the BONTEC MDM003A Monitor Desk Stand. Includes instructions for desk clamp and grommet mounting, VESA plate attachment, and monitor adjustment. |
 |
BONTEC GDM7502 Dual Monitor Desk Mount Installation Guide Comprehensive installation instructions for the BONTEC GDM7502 Dual Monitor Desk Mount, featuring gas spring arm technology. Includes setup, adjustments, and safety precautions for VESA compatible monitors. |
 |
BONTEC GDM7501 Monitor Mount Installation Instructions Detailed installation guide for the BONTEC GDM7501 monitor mount, covering setup, adjustments, and cable management for desk mounting. |
 |
BONTEC MDM002A Dual Monitor Stand User Guide User guide and installation instructions for the BONTEC MDM002A dual monitor desk mount, featuring VESA compatibility and dual mounting options. |
 |
BONTEC GDM7503 Single Monitor Mount Installation Manual Comprehensive installation and setup guide for the BONTEC GDM7503 Single Monitor Mount. Includes safety warnings, desk and monitor compatibility specifications, assembly steps, and adjustment instructions. |
 |
BONTEC GDM7501 Gas Spring Monitor Mount Installation Instructions Detailed installation guide for the BONTEC GDM7501 gas spring monitor mount, covering clamp and grommet base setup, VESA plate attachment, arm installation, adjustments, and cable management. |
Ask a question about this manual
Ask about setup, troubleshooting, compatibility, parts, safety, or missing instructions. Manuals+ will review the question and use this page’s manual context to help answer it.