
1. הקדמה
This manual provides instructions for the assembly, operation, and maintenance of the MONTECH X5M Micro ATX Gaming PC Case. The X5M is designed for high airflow and features pre-installed ARGB fans, a glass side panel, and an integrated GPU holder.
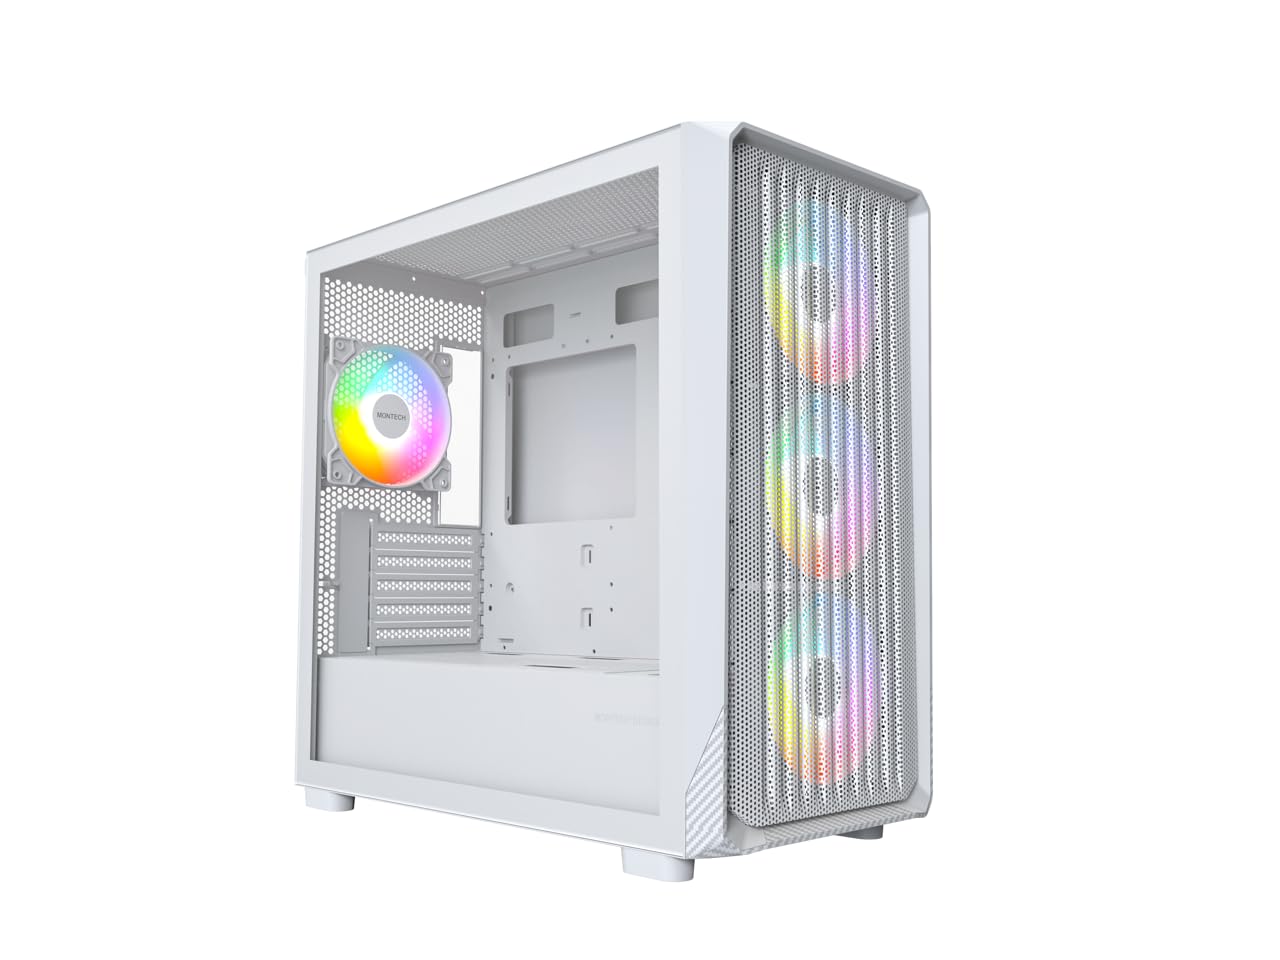
Figure 1: MONTECH X5M Micro ATX Gaming PC Case (White variant).
2. שליסל פֿעיִקייטן
- Integrated GPU Holder: An adjustable GPU support stand is included to provide physical support for graphics cards.
- הויך לופטפלוס פּלאַן: Optimized structure for efficient cooling.
- פאַר-אינסטאַלירטע ARGB פאַנס: Four 120mm ARGB fans are pre-installed for immediate cooling and customizable lighting.
- טעמפּערד גלאז זייט פּאַנעל: גיט אַ קלאָר view פון אינערלעכע קאמפאנענטן.
- Carbon Fiber Print Accents: Aesthetic detailing on the front panel.
- ווערסאַטאַל קאַנעקטיוויטי: Front I/O panel includes USB 2.0, USB 3.0, USB Type-C, and audio ports.

פיגורע 2: איבערview of the MONTECH X5M case highlighting internal layout and ARGB fans.
3. ספּעסאַפאַקיישאַנז
| סאָרט | Montech |
| מאָדעל נאָמען | X5M |
| טיפּ פון קאַסטן | מיקראָ אַטקס מיטן טאַוער |
| מאָטהערבאָאַרד קאַמפּאַטאַבילאַטי | מיקראָ אַטקס |
| פאַר-אינסטאַלירן פאַנס | 4 X 120 מם אַרגב פאַנס |
| GPU לענג שטיצע | אַרויף צו 405 מם |
| סי-פּי-יו קולער הייך שטיצע | אַרויף צו 165 מם |
| PSU Length Support | אַרויף צו 230 מם |
| סטאָרידזש בייס | Up to 2 HDDs & 4 SSDs |
| פראָנט איך / אָ פּאָרץ | 1x USB 2.0, 1x USB 3.0, 1x USB Type-C, Mic & Audio, LED Button, Power Button |
| קאָאָלינג אופֿן | לופט |
| AIO ראַדיאַטאָר שטיצן | Top: Up to 360mm; Front: Up to 360mm |
| מאַטעריאַל | Plastic with Carbon Fiber Accents, Tempered Glass |
| פּונקט וואָג | 14.3 פונט (6.49 קג) |

Figure 3: Close-up of the carbon fiber print detailing on the front panel of the X5M case.
4. סעטאַפּ און ייַנמאָנטירונג
Follow these steps for installing components into your MONTECH X5M PC case. Ensure your system is powered off and unplugged before beginning any installation.
4.1. צוגרייטן דעם פאַל
- Carefully remove the tempered glass side panel by unscrewing the thumb screws and sliding it off.
- אַראָפּנעמען די הינטערשטע זייט פּאַנעל צו צוטריט די קאַבל פאַרוואַלטונג געגנט.
4.2. מאָטהערבאָאַרד ינסטאַללאַטיאָן
- אינסטאלירט דעם I/O שילד (אויב נישט פריער אַטאַטשט צו אייער מוטערבאָרד) אין דער הינטערשטער עפענונג פון דעם קעיס.
- Align your Micro ATX motherboard with the standoffs inside the case.
- באַפֿעסטיקן די מאַדערבאָרד מיט די צוגעשטעלטע שרויפֿן.
4.3. מאַכט צושטעלן אַפּאַראַט (PSU) ינסטאַלירונג
- Place the PSU into the dedicated compartment at the bottom rear of the case.
- באַפֿעסטיקן די PSU מיט שרויפֿן פֿון דער הינטערשטער זײַט פֿון דער קעיס.
4.4. סטאָרידזש דעווייס ינסטאַלירונג (האַרד דיסקס/ססדס)
The X5M supports up to 2 HDDs and 4 SSDs.
- 2.5" SSDs: Mount SSDs onto the designated brackets behind the motherboard tray or on the PSU shroud.
- 3.5" האַרט דיסקס: Install HDDs into the drive cage located under the PSU shroud.
4.5. גראַפיקס קאַרטל (GPU) ינסטאַלירונג
- אַראָפּנעמען די נייטיקע PCIe סלאָט דעקל פון די הינטערשטע טייל פון די קעסטל.
- Insert the GPU into the appropriate PCIe slot on your motherboard.
- Secure the GPU with screws.
- Adjust the integrated GPU support stand to provide stability for your graphics card.
4.6. אינסטאַלאַציע פון ווענטילאַטאָר און ראַדיאַטאָר
The X5M comes with four 120mm ARGB fans pre-installed. Additional fans or AIO radiators can be installed as follows:
- אויבן: Supports 3x 120mm or 2x 140mm fans, or AIO radiators up to 360mm.
- פראָנט: Supports 3x 120mm or 2x 140mm fans, or AIO radiators up to 360mm.
- הינטן: Supports 1x 120mm fan.
- PSU שראַוד: Supports 2x 120mm fans.

Figure 4: Illustration of airflow within the MONTECH X5M case and the pre-installed ARGB fans.

Figure 5: Diagram detailing fan and radiator support locations and sizes within the X5M case.
4.7. קאַבלע מאַנאַגעמענט
ניצט די קאַבל רוטינג אויסשניטן און בינדפּונקטן הינטערן מאַדערבאָרד טאַץ צו אָרגאַניזירן קאַבלען. דאָס פֿאַרבעסערט לופֿטפֿלוס און עסטעטיק.
4.8. פראָנט I/O פּאַנעל קאַנעקשאַנז
Connect the front panel cables (USB 2.0, USB 3.0, USB Type-C, HD Audio, Power Switch, Reset Switch, LED) to the corresponding headers on your motherboard. Refer to your motherboard manual for specific header locations.

Figure 6: Front I/O panel of the MONTECH X5M, showing USB 2.0, USB 3.0, USB Type-C, Mic & Audio jacks, LED button, and Power button.
5. אָפּעראַציע
5.1. פּאַוערינג אויף
After all components are installed and cables connected, replace the side panels. Connect your monitor, keyboard, mouse, and power cable. Press the Power Button on the front I/O panel to start your system.
5.2. ARGB פען קאנטראל
The pre-installed ARGB fans can be controlled in two ways:
- Dedicated LED Button: Use the LED button on the front I/O panel to cycle through 25 built-in lighting modes.
- מוטערבאָרד סינקראָניזאַציע: Connect the ARGB cables to a compatible 5V 3-pin ARGB header on your motherboard. Use your motherboard's RGB software (e.g., ASUS Aura Sync, MSI Mystic Light Sync, GIGABYTE RGB Fusion, ASRock Polychrome Sync) to synchronize and customize lighting effects.
6. וישאַלט
רעגולערע אויפהאלטונג העלפט זיכער מאכן די בעסטע פאָרשטעלונג און לאַנגלעבעדיקייט פון אייערע פּיסי קאָמפּאָנענטן.
- שטויב פילטער רייניקונג: Periodically remove and clean the dust filters (located on the top, front, and bottom) to maintain optimal airflow. Use compressed air or a soft brush.
- עקסטעריאָר רייניקונג: ווישן די יקסטיריער סערפאַסיז מיט אַ ווייך, דamp שטאָף. ויסמיידן אַברייסיוו קלינערז.
- ינלענדיש רייניקונג: With the system powered off and unplugged, use compressed air to remove dust from internal components and fans.
7. טראָובלעשאָאָטינג
- סיסטעם טוט זיך נישט אן:
- זיכער מאַכן אַז דער מאַכט קאַבל איז זיכער פארבונדן צו די PSU און די וואַנט ווענטיל.
- Check that the PSU switch is in the "ON" position.
- Verify all front panel connectors (especially the Power Switch) are correctly attached to the motherboard.
- Confirm the 24-pin ATX and 8-pin CPU power cables are securely connected to the motherboard.
- פעןס דרייען זיך נישט / RGB ליכט זיך נישט אויף:
- Check that all fan power cables are securely connected to the fan hub or motherboard headers.
- Ensure ARGB cables are properly connected to the fan hub or a compatible 5V 3-pin ARGB header on the motherboard.
- If using motherboard synchronization, verify that the RGB software is installed and configured correctly.
- Try cycling through modes using the dedicated LED button on the front panel.
- קיין אַרויסווייַז רעזולטאַט:
- Ensure your monitor cable is connected to the graphics card (GPU) and not the motherboard's integrated graphics port (unless you are using integrated graphics).
- לייג צוריק די גראַפיקס קאַרטל אין איר PCIe סלאָט.
- Check that the GPU power cables are securely connected.
8. וואָראַנטי און שטיצן
8.1. וואָראַנטי אינפֿאָרמאַציע
The MONTECH X5M PC Case comes with a 1 יאָר מאַנופאַקטורער וואָראַנטי. This warranty covers defects in materials and workmanship under normal use. For specific terms and conditions, please refer to the official Montech webפּלאַץ אָדער קאָנטאַקט קונה שטיצן.
8.2. קונה שטיצן
For further assistance, technical support, or warranty claims, please visit the official Montech website or contact their customer service department. You can find contact information on the Montech webפּלאַץ: www.montechpc.com


