
1. הקדמה
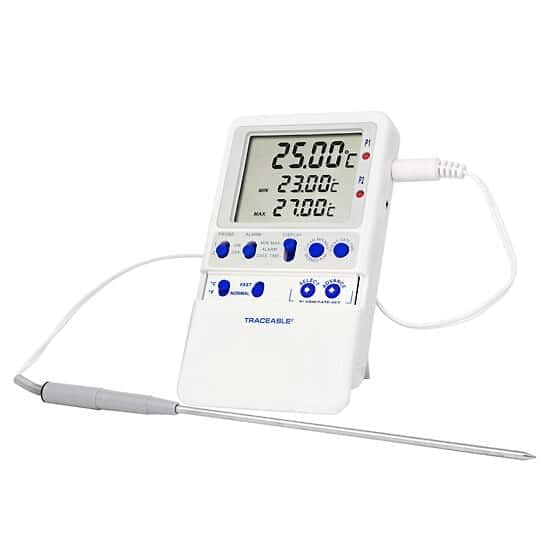
This manual provides instructions for the proper setup, operation, and maintenance of your Traceable High-Accuracy Refrigerator/Freezer Thermometer. This device is designed to monitor temperatures in various environments such as liquids, baths, air/gas, incubators, refrigerators, and freezers. It features a triple display for current, minimum, and maximum temperatures, along with programmable alarms and a stainless steel probe.
2. פּראָדוקט איבערview
2.1 פֿעיִקייטן
- דרייַיק ווייַז: Simultaneously shows current, minimum, and maximum temperatures.
- געבויט-אין זכּרון: Stores minimum and maximum temperatures until manually cleared.
- Precise Temperature Alarms: Allows setting of high and low alarms in 1° increments. An audible alarm activates when temperatures exceed or fall below set points.
- ווערסאַטאַל פּראָבע: Includes a 10-ft (3-m) submersible stainless steel micro-cable probe.
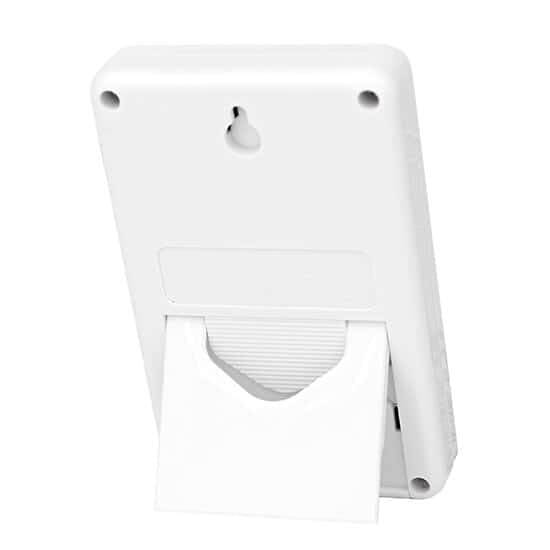
- עטלעכע מאַונטינג אָפּציעס: Can be mounted using included hook-and-loop strips, wall-mount slots, or the integrated flip-open stand.
- NIST-Traceable Calibration: Supplied with a NIST-traceable calibration certificate.
2.2 וואָס איז אין דער קעסטל
- Traceable High-Accuracy Refrigerator/Freezer Thermometer unit
- 1 Stainless Steel Probe
- NIST-traceable calibration certificate with data
- פּלאַסטיק שטיין
- Double-back tape and hook-and-loop fastener for mounting
- צוויי אַאַ באַטעריז
3. סעטאַפּ
3.1 באַטאַרייע ייַנמאָנטירונג
- געפינט די באַטאַרייע אָפּטייל אויף דער צוריק פון די טערמאָמעטער אַפּאַראַט.
- עפענען די אָפּטייל דעקן.
- אַרײַנשטעלן די צוויי AA באַטעריעס, און זיכער מאַכן אַז די פּאָלאַריטעט איז ריכטיק (+/-).
- פאַרמאַכן די באַטאַרייע אָפּטייל דעקן סיקיורלי.
3.2 Probe Connection and Placement
- Connect the stainless steel probe cable to the designated port on the thermometer unit.
- Place the probe in the desired monitoring location (e.g., inside a refrigerator or freezer). The micro-cable design allows doors to close over it without damage.
3.3 מאָונטינג די אַפּאַראַט
The thermometer unit offers several mounting options:
- Benchtop: Use the integrated flip-open stand on the back of the unit to place it on a flat surface.
- וואנט בארג: Utilize the wall-mount slots on the back of the unit with appropriate screws (not included).
- ייבערפלאַך בארג: Apply the provided double-back tape or hook-and-loop fastener to attach the unit to any clean, flat surface.
4. אַפּערייטינג ינסטרוקטיאָנס
4.1 מאַכט אויף / אַוועק
The thermometer typically powers on automatically once batteries are installed. Refer to the unit's buttons for a dedicated power button if available, or it may operate continuously.
4.2 Reading Temperatures
The display simultaneously shows three temperature readings:
- קראַנט טעמפּעראַטור: The real-time temperature at the probe's location.
- Minimum Temperature (MIN): The lowest temperature recorded since the last reset.
- Maximum Temperature (MAX): The highest temperature recorded since the last reset.
4.3 Clearing Memory (MIN/MAX)
To clear the stored minimum and maximum temperature readings, press the designated "CLEAR" or "RESET" button on the unit. This will reset the MIN/MAX values to the current temperature, allowing for a new monitoring period.
4.4 שטעלן אַלאַרמס
The thermometer allows you to set high and low temperature alarms:
- Press the "ALARM SET" button (or similar) to enter alarm setting mode.
- Use the "UP" and "DOWN" arrows (or similar buttons) to adjust the desired high temperature limit.
- Press "ALARM SET" again to confirm the high limit and proceed to set the low temperature limit.
- Adjust the low temperature limit using the "UP" and "DOWN" arrows.
- Press "ALARM SET" one more time to save the settings and exit alarm mode.
- When the temperature goes above the high limit or below the low limit, an audible alarm will sound. The alarm will continue until acknowledged or the temperature returns to the non-alarm range.
4.5 טעמפּעראַטור איינהייט אויסוואַל (°C/°F)
To switch between Celsius (°C) and Fahrenheit (°F), locate and press the "°C/°F" button on the unit. The display will update to show temperatures in the selected unit.
5. וישאַלט
5.1 רייניקונג
To clean the thermometer unit and probe, wipe them with a soft, damp cloth. Do not immerse the main unit in water. The stainless steel probe is submersible and can be cleaned with mild soap and water. Avoid using abrasive cleaners or solvents.
5.2 באַטערי פאַרבייַט
When the display becomes dim or the unit stops functioning, it is time to replace the batteries. Follow the battery installation steps in Section 3.1.
5.3 קאַלאַבריישאַן
The thermometer comes with a NIST-traceable calibration certificate. Regular calibration checks are recommended to ensure continued accuracy, especially in critical applications. Refer to the calibration certificate for details on traceability and recommended recalibration intervals. For recalibration services, contact Traceable customer support.
6. טראָובלעשאָאָטינג
- קיין דיספּלעי/איינהייט טוט זיך נישט אן: קאָנטראָלירט די באַטעריע אינסטאַלאַציע און זיכערט זיך אַז די באַטעריעס זענען פריש. פאַרבייטן אויב נייטיק.
- ומפּינקטלעך רידינגז: Ensure the probe is correctly positioned and fully immersed in the substance being measured (if applicable). Verify the probe cable is securely connected. Consider recalibration if accuracy issues persist.
- שרעק ניט קלאַנג: Check alarm settings to ensure they are correctly configured. Verify the alarm volume is not muted or set too low (if applicable).
- אומרעכט רידינגז: This may indicate a loose probe connection or a damaged probe. Reconnect the probe or contact support for a replacement.
7. ספּעסאַפאַקיישאַנז
| באַשרייַבונג | דעטאַל |
|---|---|
| מאָדעל נומער | AO-94460-parent |
| סאָרט | טרייסאַבאַל |
| ספּעציעלע שטריך | הויך אַקיעראַסי |
| ווייַז טיפּ | דיגיטאַל |
| ויסווייניקסט מאַטעריאַל | נישט-ראַסטיק שטאָל (פּראָבע) |
| מאַכט מקור | באַטעריע געטריבן (2 AA באַטעריעס אַרייַנגערעכנט) |
| פּראָדוקט קער אינסטרוקציעס | פריזער זיכער, ווישן ריין |
| באַשרייַבונג באגעגנט | NIST |
| פּראָבע קאַבל לענג | 10-ft (3-m) |
| פּעקל דימענשאַנז | 10.3 X 3.7 X 3.7 אינטשעס |
| פּונקט וואָג | 7.83 אונסעס |
8. וואָראַנטי און שטיצן
8.1 וואָראַנטי אינפֿאָרמאַציע
Specific warranty details for this product are typically provided at the time of purchase or can be obtained directly from the manufacturer, TRACEABLE (an Antylia Scientific company). Please retain your proof of purchase for warranty claims.
8.2 קונה שטיצן
For technical assistance, troubleshooting beyond this manual, or inquiries regarding calibration services and replacement parts, please contact TRACEABLE customer support. Contact information can usually be found on the manufacturer's webוועבזייטל אדער אויף דער פּראָדוקט פּאַקאַדזשינג.


