
1. הקדמה
Thank you for choosing the Zemismart A270 Smart Digital Door Lock. This advanced lock offers multiple unlocking methods including fingerprint, IC card, password, and mechanical key, along with smart features like remote app control via Tuya and an integrated doorbell. This manual provides detailed instructions for installation, operation, and maintenance to ensure optimal performance and security.

This image displays the complete Zemismart A270 Smart Digital Door Lock, featuring its sleek black design. The front panel includes a numeric keypad, a fingerprint sensor integrated into the handle, and an IC card reader icon. The rear panel shows the internal mechanism and battery compartment.
2. זיכערקייַט אינפֿאָרמאַציע
- לייענען אַלע ינסטראַקשאַנז קערפאַלי איידער ייַנמאָנטירונג און נוצן.
- Do not attempt to disassemble or repair the lock yourself. Contact qualified personnel for assistance.
- Keep mechanical keys in a secure location outside the premises.
- Ensure batteries are inserted correctly and replace them promptly when low battery warnings appear.
- Protect the keypad and fingerprint sensor from excessive force or sharp objects.
- Avoid exposing the lock to extreme temperatures or direct water spray.
3. פּעקל אינהאַלט
ביטע באַשטעטיקן אַז אַלע קאָמפּאָנענטן זענען פאַראַן איידער איר הייבט אָן די אינסטאַלאַציע:
- פראָנט פּאַנעל אַסעמבלי
- דערציען פּאַנעל אַסעמבלי
- Mortise Lock Body (5050 type)
- סטרייק פּלאַטע און סטרייק קעסטל
- Mounting Screws and Spindle
- Mechanical Keys (2x)
- IC Cards (2x)
- באַניצער מאַנואַל (דעם דאָקומענט)
- ינסטאַללאַטיאָן מוסטער
4. ספּעסאַפאַקיישאַנז
| מאָדעל | A270 |
| סאָרט | Zemismart |
| מאַטעריאַל | אַלומינום צומיש |
| אַנלאַקינג מעטהאָדס | Fingerprint, IC Card, Password, Mechanical Key, Tuya App |
| קאַנעקטיוויטי | Zigbee (Requires Tuya Zigbee Gateway for remote functions) |
| מאַכט צושטעלן | 4 X AAA באַטעריז (ניט אַרייַנגערעכנט) |
| עמערגענסי מאַכט | וסב- C פּאָרט |
| טיר גרעב | [Refer to installation template for specific range] |
| פּונקט וואָג | 11 קילאָגראַמס |
| פּראָדוקט דימענשאַנז | 18.8 x 32.99 x 11 cm (Front/Rear Panel) |

This image provides detailed measurements for the mortise lock body of the Zemismart A270. Key dimensions include a faceplate length of 160mm (6.3in), a backset of 50mm (1.96in) from the edge to the spindle center, and a depth of 70mm (2.75in). These measurements are essential for proper installation and compatibility with door preparations.
5. ינסטאַלירונג
Installation requires basic tools such as a screwdriver and may involve drilling. If you are unsure, please consult a professional locksmith.
5.1 פאַר-אינסטאַלאַציע קאָנטראָלן
- Verify door thickness and ensure it falls within the compatible range (refer to the installation template).
- Check door handing (left-hand or right-hand) and adjust the mortise latch if necessary.
- Ensure the door frame is clear and free of obstructions for the strike plate.
5.2 ינסטאַללאַטיאָן סטעפּס
פאָלגט די סטעפּס קערפֿול פֿאַר ריכטיקער אינסטאַלאַציע:
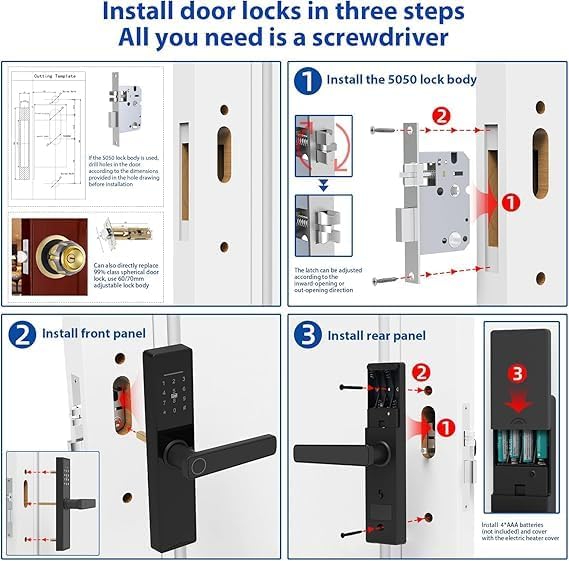
This infographic details the three main steps for installing the Zemismart A270 door lock. Step 1 shows how to install the 5050 lock body, including adjusting the latch direction. Step 2 illustrates the installation of the front panel, securing it to the door. Step 3 covers the installation of the rear panel, including inserting 4 AAA batteries and attaching the cover.
- Install the Mortise Lock Body:
Using the provided template, prepare the door for the mortise lock body. Insert the mortise into the door edge and secure it with screws. Ensure the latch direction is correct for your door's opening. The latch can be adjusted for inward or outward opening doors.
- אינסטאַלירן דעם פראָנט פּאַנעל:
Connect the cable from the front panel through the door hole to the mortise. Align the front panel with the mortise and secure it to the door using the appropriate screws. Ensure the spindle passes through the mortise correctly.
- Install the Rear Panel:
Connect the cable from the front panel to the rear panel. Align the rear panel with the spindle and mounting posts. Secure the rear panel to the door using screws. Insert 4 AAA batteries into the battery compartment and close the cover. Test the lock's basic functions.
6. אַפּערייטינג ינסטרוקטיאָנס
The Zemismart A270 offers multiple ways to unlock your door.
6.1 Initial Setup and Administrator Registration
Upon first use, you will need to register an administrator fingerprint or password. Refer to the specific instructions in the Tuya Smart app or the lock's voice prompts for this process. The administrator has full control over user management and lock settings.
6.2 פינגערפּרינט אַנלאָק
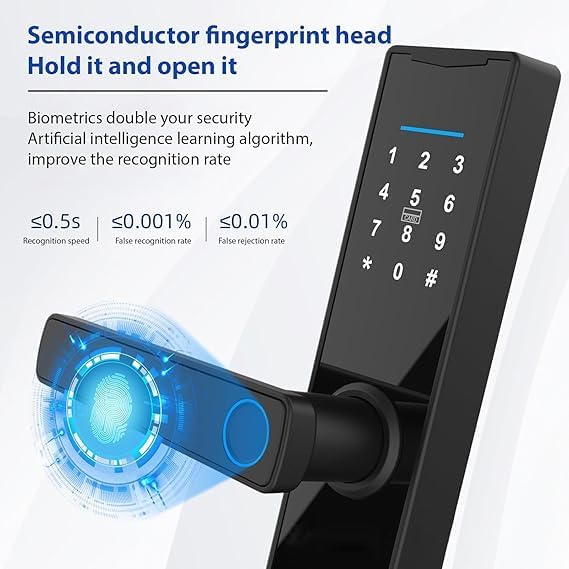
This image focuses on the semiconductor fingerprint head of the Zemismart A270 lock. It highlights the fingerprint recognition area on the handle and provides performance metrics: recognition speed of less than 0.5 seconds, false recognition rate of less than 0.001%, and false rejection rate of less than 0.01%. This demonstrates the lock's advanced biometric security.
- Place your registered finger flat on the fingerprint sensor located on the handle.
- The lock will emit a successful unlock sound or light indication.
- Push down the handle to open the door.
6.3 פּאַראָל אַנלאָקן
- דריק דעם קלאַוויאַטור צו עס אַקטיווירן.
- Enter your registered password followed by the '#' key.
- If the password is correct, the lock will unlock.
- אָפּטיאָנאַל: Use a random sequence of numbers before or after your actual password (anti-peep function) to prevent others from guessing your code.
6.4 IC Card Unlock
- Place your registered IC card against the card reader area on the front panel.
- The lock will verify the card and unlock.
6.5 מעכאנישע שליסל אויפשליסן

This image illustrates two security features of the Zemismart A270 lock. The top left shows the keypad and a hand inserting a mechanical key into the lock. The bottom section highlights the internal security switch, with 'Off' and 'Unpack' states, indicating how to activate or deactivate the administrator security.
In case of battery depletion or electronic malfunction, the mechanical key can be used:
- Locate the keyhole cover on the front panel (usually hidden).
- Insert the mechanical key and turn it to unlock the door.
6.6 Administrator Security Switch
The internal security switch, located on the rear panel, provides an additional layer of security. When activated, only the administrator password or mechanical key can unlock the door from the outside. This prevents other registered users (fingerprint, IC card, regular password) from gaining entry. This feature is useful when you want to restrict access temporarily.
6.7 Tuya App Remote Unlock and Management
To utilize smart features, connect your Zemismart A270 lock to the Tuya Smart app via a Zigbee gateway (sold separately).
- Download the "Tuya Smart" or "Smart Life" app from your app store.
- רעגיסטרירן אַ חשבון און קלאָץ אין.
- Add your Zigbee gateway to the app.
- Follow the in-app instructions to add the Zemismart A270 lock to your gateway.
- Once connected, you can remotely unlock the door, manage users (add/delete fingerprints, passwords, IC cards), view access logs, and adjust settings from anywhere.
6.8 טיר-גלאָק פונקציע
The lock features an integrated doorbell. When a visitor presses the doorbell button on the front panel, the lock will chime. If connected to the Tuya app, you may receive a notification on your smartphone.
7. וישאַלט
- רייניקונג: Wipe the lock's surface with a soft, dry cloth. Avoid abrasive cleaners, solvents, or harsh chemicals that could damage the finish or electronic components.
- באַטערי פאַרבייַט: The lock will provide a low battery warning. Replace all 4 AAA batteries promptly to avoid being locked out. Use high-quality alkaline batteries.
- מעטשאַניקאַל פּאַרץ: Periodically check screws for tightness. Do not lubricate the lock cylinder or internal mechanisms with oil-based lubricants, as this can attract dust and cause issues.
- Firmware דערהייַנטיקונגען: If available, update the lock's firmware via the Tuya Smart app to ensure optimal performance and security features.
8. טראָובלעשאָאָטינג
| פּראָבלעם | מעגלעך סיבה | לייזונג |
|---|---|---|
| לאַק טוט נישט ריספּאַנד. | טויט באַטעריז. | Replace batteries. Use emergency USB-C power if needed. |
| פינגער־אפדרוק נישט דערקענט. | Finger dirty/wet, sensor dirty, unregistered fingerprint. | Clean finger/sensor. Re-register fingerprint if necessary. Ensure proper placement. |
| פּאַראָל אַרבעט נישט. | Incorrect password, keypad not active. | Ensure keypad is active. Re-enter password carefully. Verify password in app. |
| Lock cannot connect to Tuya app. | No Zigbee gateway, gateway offline, incorrect pairing. | Ensure Zigbee gateway is powered and online. Follow app pairing instructions precisely. |
| Door cannot be locked/unlocked smoothly. | Misalignment, obstruction, loose screws. | Check door alignment and strike plate. Tighten all mounting screws. Ensure no debris in mortise. |
9. וואָראַנטי און שטיצן
The Zemismart A270 Smart Digital Door Lock comes with a standard manufacturer's warranty. Please refer to your purchase documentation or contact your retailer for specific warranty terms and conditions.
For technical support, troubleshooting assistance, or warranty claims, please contact Zemismart customer service or your authorized dealer. Provide your product model number (A270) and purchase details when seeking support.
באַמערקונג: נישט-ערלויבטע דיסאַסעמבלי אָדער מאָדיפיקאַציע פון דעם פּראָדוקט קען בטל מאַכן די וואָראַנטי.