
1. פּראָדוקט איבערview
The Varstrom Mid Drive Motor Kit is designed to convert standard bicycles into electric bikes, offering enhanced power and a natural riding experience through its integrated torque sensor technology. This manual provides essential information for the installation, operation, and maintenance of the TSDZ-2B, TSDZ8, and TSDZ16 models.
שליסל פֿעיִקייטן:
- Torque Sensor Technology: Provides a smooth and intuitive pedal assist by detecting rider effort.
- Mid-Drive Motor Configuration: Positioned at the bottom bracket for balanced weight distribution, improved handling, and efficient power transfer.
- וניווערסאַל פיט: Compatible with 68-73mm bottom brackets, suitable for a wide range of mountain and road bicycles.
- דוראַבאַל קאַנסטראַקשאַן: Components are designed for long-lasting performance in various riding conditions.

Image 1.1: Comparison of TSDZ-2B, TSDZ8, and TSDZ16 motor specifications including power, torque, speed, and waterproof rating.
2. פּאַקינג רשימה
Verify that all components are present in your kit before beginning installation.

Image 2.1: Visual representation of the components included in the Varstrom Mid Drive Motor Kit, such as the motor, display, throttle, cables, crank arms, speed sensor, and optional battery.
- Mid Drive Motor (TSDZ-2B, TSDZ8, or TSDZ16)
- Display (EKD01, DZ40, SW2-58, VD04, or VD18MT - optional)
- באַטאַרייע (אָפּטיאָנאַל)
- Brake Levers OR Brake Sensors
- גראָבער פינגער גערגל
- קראַנקס
- Chainwheel (44T/46T)
- Speed Sensor & Magnets
- 1T4 Wiring Harness
- Lock Nuts & Mounting Accessories
3. ינסטאַללאַטיאָן גייד
Follow these steps carefully to install your Varstrom Mid Drive Motor Kit. Professional installation is recommended if you are unfamiliar with bicycle mechanics.
3.1 מאָטאָר ינסטאַלירונג
Ensure your bicycle's bottom bracket is clean and compatible (68-73mm width).
- Insert the motor into the bottom bracket shell from the drive side.
- Ensure proper alignment and clearance with the chainstay. If needed, use the provided washers and longer screws for the fixing plate.
- Install the fixing plate and tighten the fixing nut to 40Nm.
- Secure the motor with the additional screws.
3.2 ספּיד סענסאָר ינסטאַללאַטיאָן
Mount the speed sensor on the non-drive side chainstay. The magnet should be installed on a spoke of the rear wheel.
- Attach the speed sensor to the chainstay using zip ties or appropriate fasteners.
- Install the magnet on a spoke of the rear wheel.
- Adjust the sensor and magnet position so that the gap between them is 10-15mm.
3.3 Cranks and Chainwheel Installation
Install the crank arms and chainwheel onto the motor spindle.
- Attach the chainwheel to the motor.
- Install the left and right crank arms, ensuring they are securely fastened.
- Route the bicycle chain correctly around the chainwheel and rear cassette.
3.4 וויירינג קאַנעקשאַנז
Connect all components to the motor using the provided 1T4 wiring harness.

Image 3.1: Diagram illustrating the motor connector and wiring for the speed sensor, battery, shift sensor (if applicable), brake levers/sensors, thumb throttle, and display.
- Connect the speed sensor cable.
- פאַרבינדן די באַטאַרייע קאַבלע.
- Connect the brake levers or brake sensors.
- Connect the thumb throttle.
- Connect the display unit.
- זיכער מאַכן אַז אַלע פֿאַרבינדונגען זענען זיכער און וואַסערפּרוף.
Video 3.1: This video demonstrates the installation process for the Tongsheng Mid Drive Motor kit, covering motor mounting, speed sensor placement, and crank installation.
4. אַפּערייטינג ינסטרוקטיאָנס
Familiarize yourself with the display and controls before riding.
4.1 ווייַז פאַנגקשאַנז
The display unit provides essential information and control over the motor's functions.
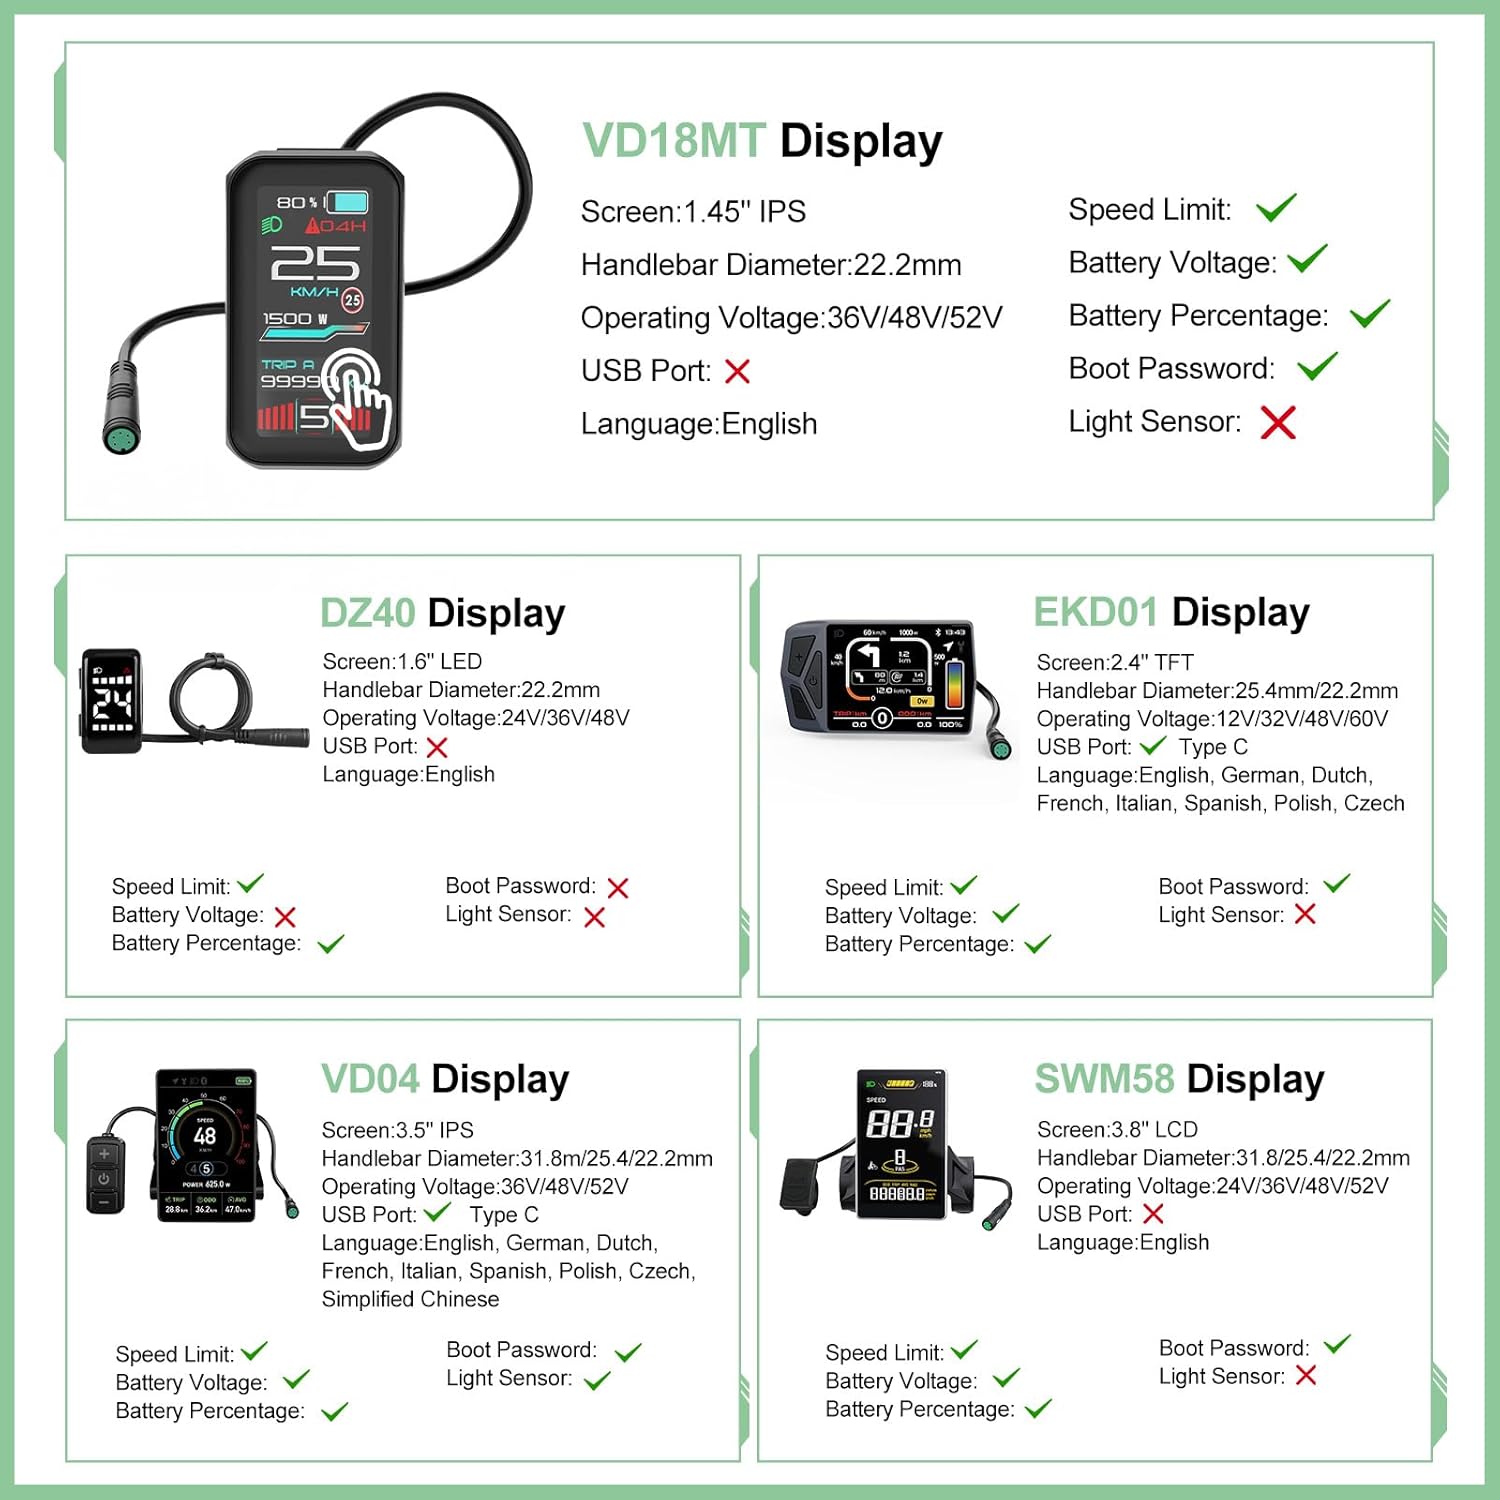
בילד 4.1: איבערview of various display options (VD18MT, DZ40, EKD01, VD04, SWM58) and their features, including screen size, operating voltage, USB port availability, and language support.
- מאַכט אויף / אַוועק: Press and hold the power button on the display.
- הילף לעוועלס: Use the '+' and '-' buttons to cycle through different pedal assist levels (e.g., 0-5). Level 0 provides no assist.
- אינפֿאָרמאַציע ווייַז: View current speed, battery level, trip distance, and other metrics.
- גיין מאָדע: Some displays offer a walk assist mode, typically activated by holding the '-' button.
4.2 Riding with Torque Sensor
The torque sensor provides a natural riding feel by adjusting motor assistance based on your pedaling effort.
- The motor will provide assistance as you pedal. The harder you pedal, the more assistance you receive.
- Shift gears as you normally would on a bicycle to maintain an efficient cadence.
- Use the thumb throttle for additional power without pedaling, if your kit includes one.
5. וישאַלט
Regular maintenance ensures the longevity and optimal performance of your ebike conversion kit.
- ריינקייַט: Keep the motor, battery, and electrical connections clean and free from dirt and debris. Use a damp שטאָף; פֿאַרמײַדן הויך-דרוק וואַשן גלייך אויף עלעקטרישע קאָמפּאָנענטן.
- פֿאַרבינדונגען: קאָנטראָלירט פּעריִאָדיש אַלע עלעקטרישע פֿאַרבינדונגען פֿאַר שטרענגקייט און קעראָוזשאַן.
- Chain & Drivetrain: Maintain your bicycle chain and drivetrain (cassette, derailleur) as you would a regular bike. Lubricate the chain regularly.
- באַטערי זאָרגן: האַלט די באַטעריע אין אַ קיל, טרוקן אָרט. פֿאַרמייַדט גאָר אויסצולאָדן די באַטעריע און לאָדט זי רעגולער אויף, אפילו ווען זי ווערט נישט גענוצט, כּדי צו פֿאַרלענגערן איר לעבן.
- פאַסטענערס: Ensure all bolts and nuts, especially those securing the motor and cranks, are tightened to the manufacturer's specifications.
6. טראָובלעשאָאָטינג
די סעקציע באהאנדלט אלגעמיינע פראבלעמען וואס איר קענט באגעגענען.
6.1 Motor Not Providing Assist
- קאָנטראָלירן די באַטאַרייע: פאַרזיכערן די באַטאַרייע איז באפוילן און רעכט קאָננעקטעד.
- ווייַז אויף: Verify the display is powered on and not showing any error codes.
- הילף מדרגה: Confirm that the pedal assist level is set above 0.
- גיכקייַט סענסער: Check if the speed sensor and magnet are correctly aligned (10-15mm gap) and clean.
- Brake Sensors: Ensure brake levers are not engaged, as brake sensors cut motor power.
6.2 Unusual Noises from Motor
- פרייַ קאַמפּאָונאַנץ: Check for any loose bolts on the motor, chainwheel, or cranks.
- Chain Rub: Ensure the chain is not rubbing against the motor casing or chain guard.
- Internal Issue: If the noise persists and is severe, discontinue use and contact customer support.
6.3 דיספּליי טוט זיך נישט אן
- באַטערי קשר: Recheck the battery connection to the motor.
- ווייַז קאַבלע: Ensure the display cable is securely connected to the 1T4 harness.
- באַטאַרייע אָפּצאָל: באַשטעטיקן אַז די באַטאַרייע האט גענוג אָפּצאָל.
7. ספּעסאַפאַקיישאַנז
Detailed specifications for the Varstrom Mid Drive Motor Kits.

Image 7.1: Detailed diagrams showing the dimensions and compatibility requirements for TSDZ-2B, TSDZ8, and TSDZ16 motors, including bottom bracket width and chainstay clearance.
| שטריך | TSDZ-2B | TSDZ8 | TSDZ16 |
|---|---|---|---|
| רייטאַד וואָלtage | 48V | ||
| וואָסtage | 500 וו | 750 וו | 1000 וו |
| Max Torque | 80 נם | 140 נם | 160 נם |
| מאַקס ספּיד | 38–45KM/H | 45–55KM/H | 50–60KM/H |
| Bottom Bracket Width | 68-73מם | ||
| וואָטערפּרוף גראַדע | IP65 | IPX6 | |
| מאָטאָר טיפּ | Brushless Geared Motor | ||
| קאָנטראָללער | Integrated, inside the Motor | ||
| אַפּערייטינג טעמפּעראַטור | -10-45℃ | ||
7.1 Battery Parameters (Optional)
If your kit includes a battery, refer to the following general parameters. Specific battery models may vary.

Image 7.2: Table detailing various battery options, including voltage, capacity (Ah), watt-hours, cell type, BMS, charger specifications, size, and weight.
8. וואָראַנטי און שטיצן
Varstrom offers a warranty for its products to ensure customer satisfaction.
- צוריקקער פּאָליטיק: 30 days return period.
- Repair/Replace: 365 days repair or replacement warranty.
For technical assistance, troubleshooting, or warranty claims, please contact Varstrom customer support through the retailer where the product was purchased.