
1. הקדמה
This manual provides essential information for setting up, operating, and maintaining your AITRIP Nano V3.0 microcontroller board. The Nano V3.0 is a compact, breadboard-friendly development board based on the ATmega328P microcontroller, featuring a CH340 USB-to-serial converter and a Type-C USB connector. It is designed for various electronics projects and is compatible with the Arduino IDE.
2. פּעקל אינהאַלט
באַשטעטיקט אַז אַלע זאכן וואָס זענען אויסגערעכנט אונטן זענען אַרייַנגערעכנט אין אייער פּעקל:
- 3 x AITRIP Nano V3.0 Microcontroller Boards (ATmega328P, CH340, Type-C USB)
- 1 x טיפּ-C וסב קאַבלע
- Pin headers (typically included for soldering)

Image: Contents of the AITRIP Nano V3.0 package, showing three Nano boards, a Type-C USB cable, and pin headers.
3. Board Layout and Components
Familiarize yourself with the key components and pinout of the AITRIP Nano V3.0 board.

Image: Detailed diagram illustrating the various components and pin functions on the AITRIP Nano V3.0 board, including digital pins, analog pins, power pins, Type-C USB, ATmega328P, reset button, and LEDs.
- ATmega328P Microcontroller: The main processing unit.
- CH340 USB-to-Serial Chip: Facilitates communication between the board and your computer via USB.
- Type-C USB Connector: For power and data communication.
- Digital I/O Pins (D0-D13): 14 pins for digital input/output, 6 of which support PWM (Pulse Width Modulation).
- Analog Input Pins (A0-A7): 8 pins for analog input.
- מאַכט פּינס: 5V, 3.3V, GND (Ground), VIN (External Voltage Input).
- באַשטעטיק קנעפּל: ריסעטירט דעם מיקראָקאָנטראָללער.
- TX/RX LEDs: Indicate data transmission and reception.
- Power LED: Indicates the board is powered on.
4. ספּעסאַפאַקיישאַנז
Key technical specifications of the AITRIP Nano V3.0 board:
| שטריך | באַשרייַבונג |
|---|---|
| מיקראָקאָנטראָללער | ATmega328P |
| וסב צו סעריאַל טשיפּ | CH340 |
| אַפּערייטינג וואָלtage | 5V |
| אַרייַנשרייַב וואָלtage (רעקאַמענדיד) | 7-12וו |
| אַרייַנשרייַב וואָלtage (Limit) | 6-20וו |
| דיגיטאַל איך / אָ פּינס | 14 (6 provide PWM output) |
| אַנאַלאָג אַרייַנשרייַב פּינס | 8 |
| דק קראַנט פּער איך / אָ שפּילקע | 40 מאַ |
| פלאַש זכּרון | 32 KB (ATmega328P), 2 KB used by bootloader |
| SRAM | 2 KB (ATmega328P) |
| EEPROM | 1 KB (ATmega328P) |
| זייגער ספּיד | 16 מהז |
| דימענשאַנז | 43 מ״מ x 18 מ״מ (1.69 אינטשעס x 0.70 אינטשעס) |
| וסב קאַנעקטער | טיפּ-C |

Image: AITRIP Nano V3.0 board showing its dimensions (43mm x 18mm) and the included Type-C USB cable with its length (22cm).
5. סעטאַפּ גייד
Follow these steps to prepare your AITRIP Nano V3.0 board for use with the Arduino IDE.
5.1. Driver Installation (CH340)
The AITRIP Nano V3.0 uses the CH340 chip for USB-to-serial communication. You may need to install specific drivers for your operating system if they are not automatically recognized.
- Download CH340 Driver: Search online for "CH340 driver" for your operating system (Windows, macOS, Linux). Reputable sources include the manufacturer's website or Arduino community forums.
- ינסטאַלירן דרייווער: Follow the installation instructions provided with the driver package. On Windows, this usually involves running an executable. On macOS, it might involve installing a
.pkgfile and potentially restarting your computer. - באַשטעטיקן ינסטאַלירונג: After installation, connect the Nano board to your computer using the provided Type-C USB cable. Open your computer's Device Manager (Windows) or System Information (macOS) and look for a new COM port (Windows) or USB serial device (macOS).
5.2. Arduino IDE Setup
To program your Nano V3.0 board, configure the Arduino IDE as follows:
- אינסטאַלירן אַרדוינאָ IDE: If you haven't already, download and install the Arduino IDE from the official Arduino webפּלאַץ (www.arduino.cc/en/software).
- Connect Board: Connect your AITRIP Nano V3.0 board to your computer using the Type-C USB cable.
- אויסקלייבן ברעט: In the Arduino IDE, go to מכשירים > ברעט און אויסקלייַבן "Arduino Nano".
- Select Processor: This is a critical step for many clone boards. Go to Tools > Processor און אויסקלייַבן "ATmega328P (Old Bootloader)". If this option is not available or if you encounter upload errors, try "ATmega328P".
- אויסקלייַבן פּאָרט: גיין צו מכשירים > פּאָרט and select the COM port (Windows) or
/dev/cu.usbserial-XXXX(macOS/Linux) corresponding to your connected Nano board.
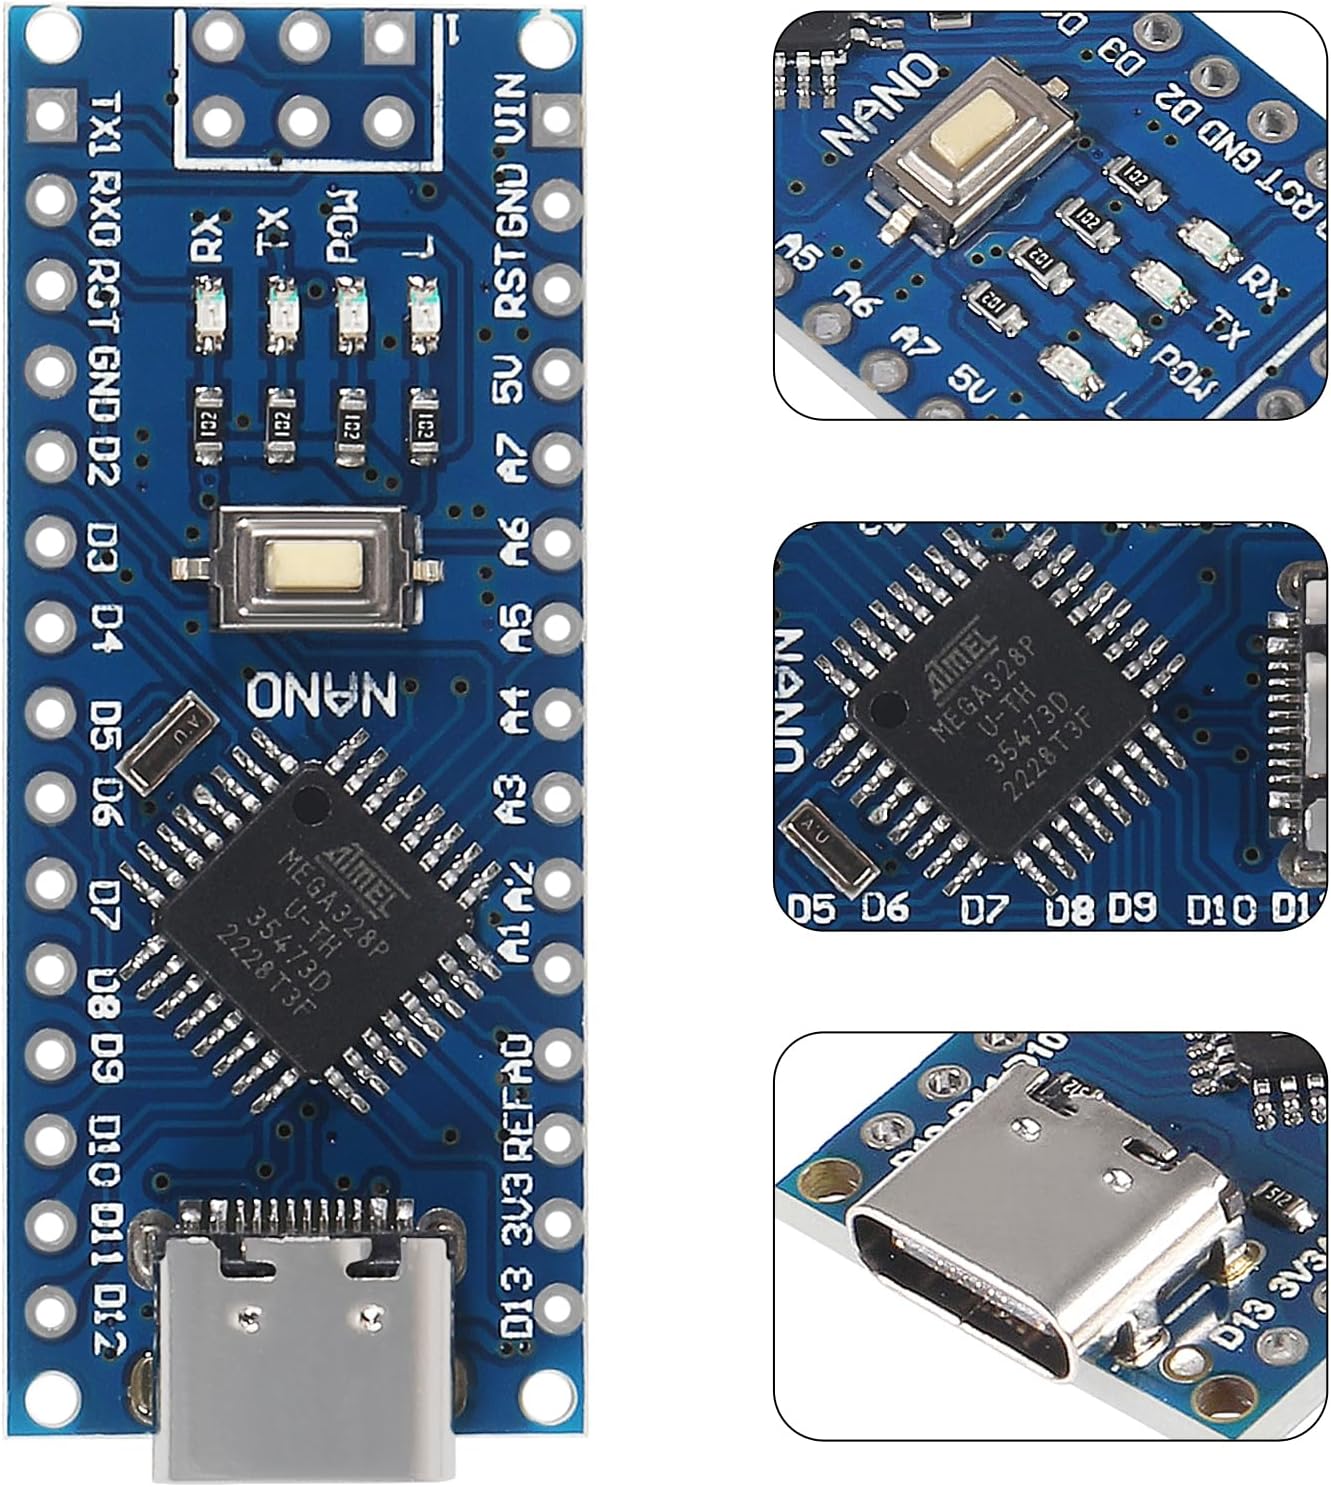
בילד: נאָענט-אַרויף view of the AITRIP Nano V3.0 board, highlighting the ATmega328P microcontroller and the CH340 USB-to-serial chip.
6. אַפּערייטינג ינסטרוקטיאָנס
Once your AITRIP Nano V3.0 board is set up, you can begin programming and using it in your projects.
6.1. Powering the Board
The Nano V3.0 offers several power options:
- USB-C קאַנעקשאַן: Connect the board to your computer via the Type-C USB cable. This provides 5V power and enables data communication.
- External Unregulated Power Supply (VIN pin): Provide 6-12V DC to the VIN pin. The onboard voltage regulator will convert this to 5V for the microcontroller.
- External Regulated 5V Power Supply: Provide a regulated 5V DC to the 5V pin.
The board automatically senses and switches to the higher potential power source, eliminating the need for a manual power selection jumper.
6.2. Uploading Sketches
To upload your code (sketch) to the Nano V3.0:
- Write or open a sketch in the Arduino IDE.
- Ensure the correct board (Arduino Nano), processor (ATmega328P (Old Bootloader)), and port are selected under the מכשירים מעניו.
- דריקט אויף צופֿעליקער button (right arrow icon) in the Arduino IDE. The TX/RX LEDs on the board will blink during the upload process.
- Upon successful upload, the IDE will display "Done uploading."
7. וישאַלט
The AITRIP Nano V3.0 board requires minimal maintenance to ensure longevity.
- סטאָרידזש: Store the board in an anti-static bag or container when not in use to protect it from electrostatic discharge.
- רייניקונג: If necessary, gently clean the board with a soft, dry brush or compressed air to remove dust. Avoid using liquids.
- האַנדלינג: Handle the board by its edges to avoid touching components, especially the pins, which can be sensitive to static electricity.
- מאַכט צושטעלן: שטענדיק זיכער מאַכן אַז אייער מאַכט צושטעלן איז אין קראַפטtage is within the recommended limits (7-12V for VIN, 5V for 5V pin) to prevent damage.
8. טראָובלעשאָאָטינג
Here are solutions to common issues you might encounter with your AITRIP Nano V3.0 board.
8.1. Board Not Recognized by Computer
- CH340 Driver: Ensure the CH340 driver is correctly installed for your operating system. Refer to Section 5.1.
- וסב קאַבלע: Try a different Type-C USB cable. Some cables are for charging only and do not support data transfer.
- וסב פּאָרט: פּרוּווט קאַנעקטינג צו אַ אַנדערש וסב פּאָרט אויף דיין קאָמפּיוטער.
8.2. Upload Errors (e.g., "avrdude: stk500_getsync(): not in sync")
- Processor Selection: The most common issue. Go to Tools > Processor און פאַרזיכערן "ATmega328P (Old Bootloader)" is selected. If this option is not present, ensure you have the correct board package installed in the Arduino IDE.
- פּאָרט סעלעקציע: Verify that the correct COM port is selected under מכשירים > פּאָרט.
- ברעט אויסוואל: באַשטעטיקן "Arduino Nano" איז אויסגעקליבן אונטער מכשירים > ברעט.
- באַשטעטיק קנעפּל: Sometimes pressing the reset button on the Nano board just before or during the upload process can help.
8.3. Board Not Powering On
- מאַכט מקור: Check your USB cable or external power supply. Ensure the power source is providing adequate voltagE און קראַנט.
- Power LED: If the power LED does not light up, there might be an issue with the power input or the board itself.
9. וואָראַנטי און שטיצן
Specific warranty details and official support contact information for the AITRIP Nano V3.0 board are not provided in the product information. For any issues or inquiries, please refer to the retailer or vendor from whom the product was purchased.