
MILEFA PAB04AR
MILEFA 3D Printer Table with Filament Storage and Power Outlet
Model: PAB04AR | User Manual
הקדמה
Thank you for choosing the MILEFA 3D Printer Table with Filament Storage and Power Outlet. This heavy-duty workstation is designed to optimize your 3D printing setup, providing ample space for multiple printers, extensive filament storage, and convenient integrated power. This manual will guide you through the assembly, operation, and maintenance of your new 3D printer table.
שליסל פֿעיִקייטן אַרייַננעמען:
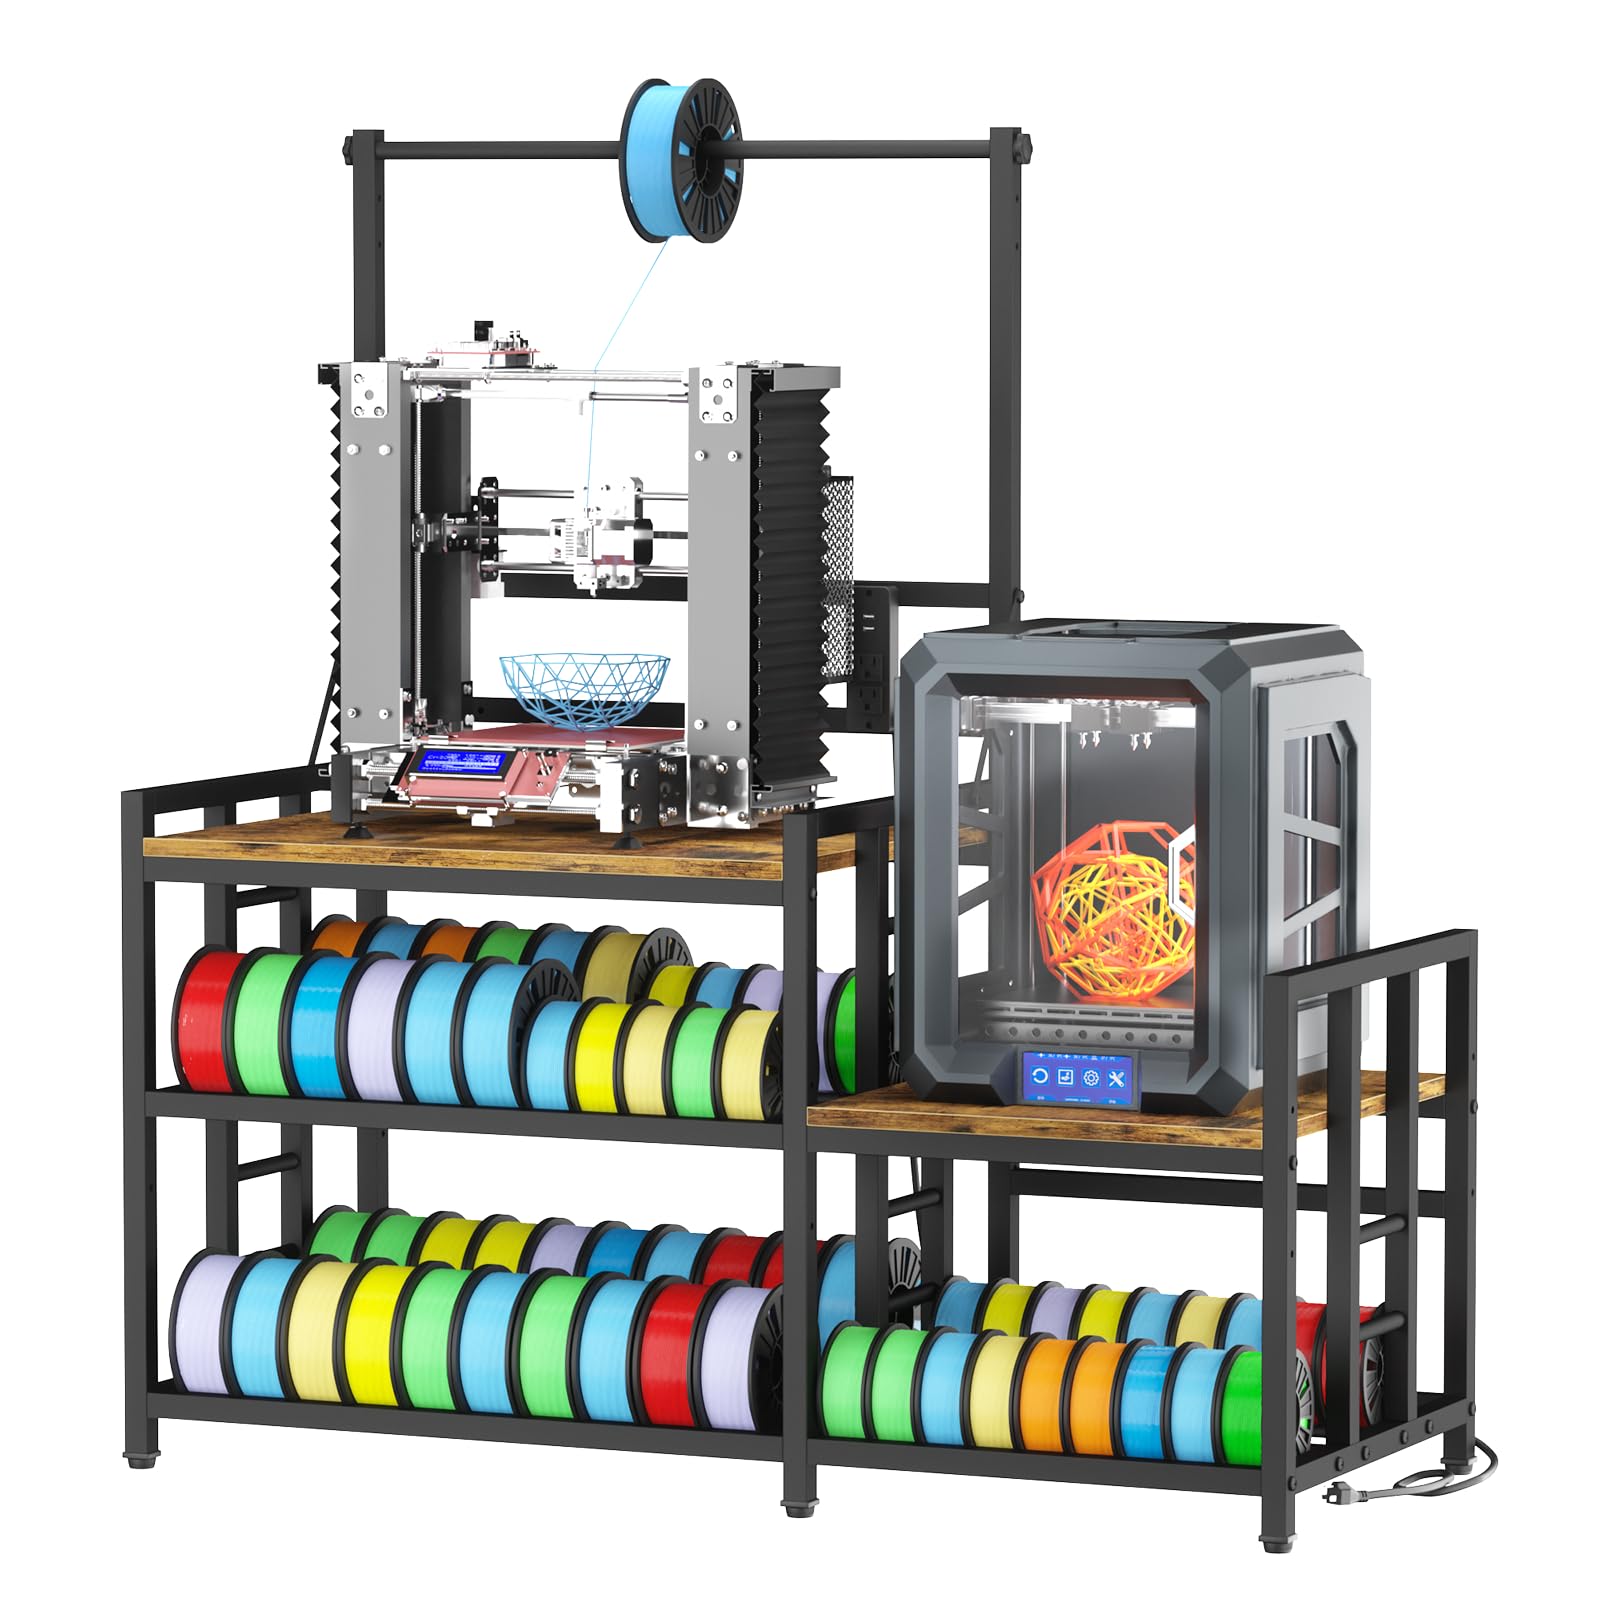
- Dual-Printer Workstation: Two spacious work surfaces (27.6"L×23.2"W and 25"L×23.2"W) accommodate multiple 3D printers.
- Integrated Filament Storage: An 80-spool filament rack (10 on top + 70 below) with a three-tier shelf system, compatible with 200g, 500g, and 1kg PLA/ABS/TPU spools.
- אַדזשאַסטאַבאַל פּלאַן: The top crossbar offers three-position height adjustment, and the second tier provides three settings for versatile spool sizes and printer heights.
- שטאַרק קאַנסטראַקשאַן: Built with a 20mm corrosion-resistant metal frame, scratch-resistant P2 particleboard, and H-beam side supports for a 350-lb load capacity.
- געבויט-אין מאַכט: Features two integrated AC outlets and two USB ports for convenient power access and cable management.
1. סעטאַפּ און אַסעמבלי
Before beginning assembly, ensure all parts are present and undamaged. Refer to the included parts list and diagrams. Assembly is designed to be straightforward with numbered parts and step-by-step instructions. A Phillips head screwdriver (not included) may be required in addition to any provided tools.
1.1 אויספּאַקן און טיילן אידענטיפיצירן
Carefully unpack all components. Lay them out on a clean, soft surface to prevent scratches. Identify each part using the provided labels and the assembly diagram.
1.2 אַסעמבלי סטעפּס
- ראַם אַסעמבלי: Begin by assembling the main metal frame components. Ensure all bolts are finger-tightened initially.
- פּאָליצע ינסטאַלירונג: Attach the P2 particleboard shelves to the frame. Note that the second tier offers three adjustable height settings. Choose the desired height during this step.
- Filament Rack Setup: Install the filament storage rods. The top crossbar for the filament holder is adjustable to three positions to accommodate different printer heights.
- מאַכט אַוטלעט ינטעגראַציע: Secure the integrated power strip to its designated location on the frame.
- לעצט טייטנינג: Once all components are in place and aligned, fully tighten all bolts using the provided tool. Do not overtighten.
- אַדזשאַסטאַבאַל פֿיס: Install the non-slip adjustable feet at the base of the table. Adjust them to ensure the table is level and stable on your floor.
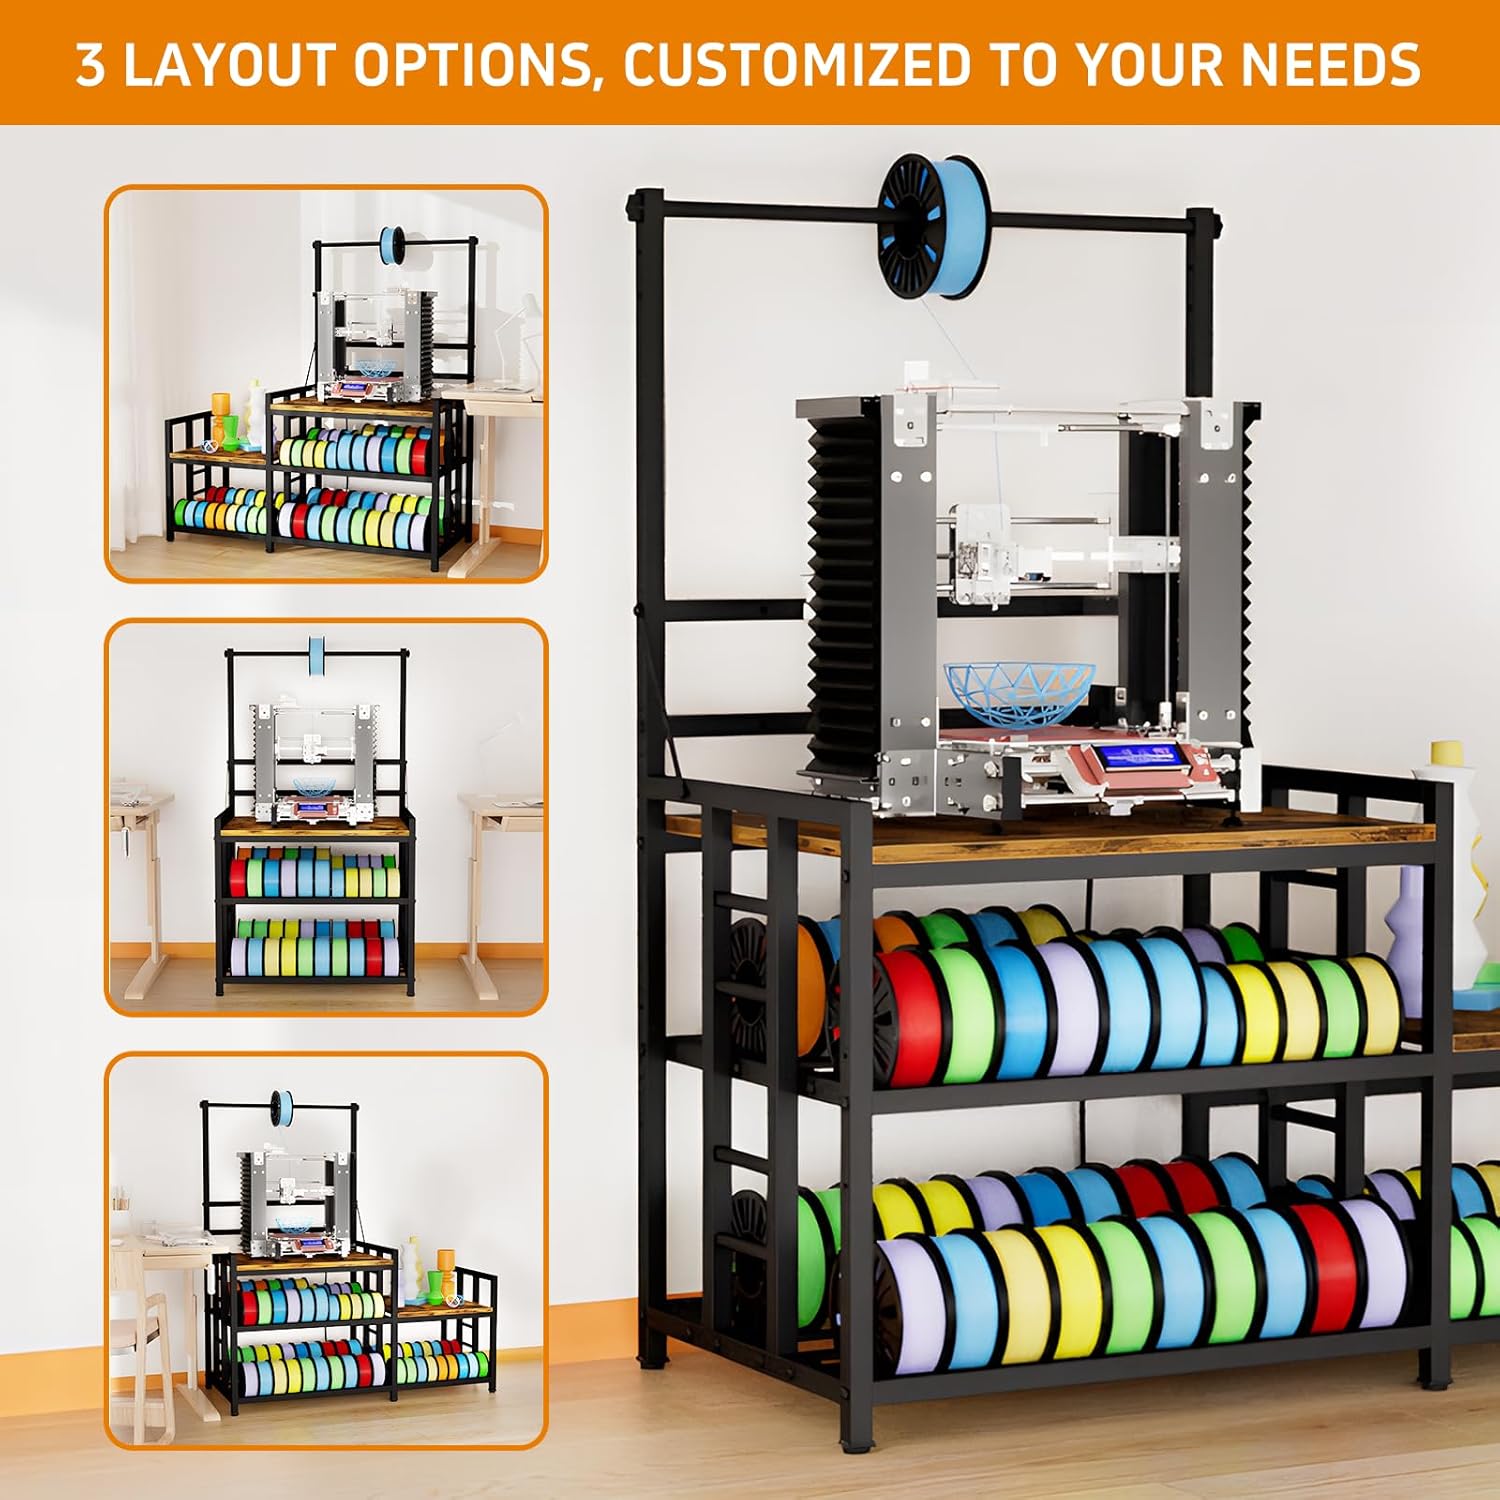
1.3 Layout Options
The MILEFA 3D Printer Table offers three primary layout configurations to suit your workspace needs:
- Workspace Extension: Maximizes surface area for larger projects or additional equipment.
- Compact Setup: Ideal for smaller spaces, providing a balanced footprint with ample סטאָרידזש.
- עקסטענדעד סטאָרידזש: Best for users with larger filament collections, offering maximum spool capacity.


1.4 ווידעא גייד פֿאַר פֿאַרזאַמלונג
For a visual guide to the assembly process and product features, please refer to the official product video:
Video 1: Official MILEFA overview שאָוקasing the 3D Printer Table's features and functionality.
2. אַפּערייטינג ינסטרוקטיאָנס
The MILEFA 3D Printer Table is designed for efficient and organized 3D printing operations.
2.1 Placing 3D Printers
Utilize the two main work surfaces to place your 3D printers. The larger surface (27.6"L×23.2"W) is suitable for most standard printers, while the smaller surface (25"L×23.2"W) can accommodate a second, more compact printer or other accessories. Ensure printers are centered and stable on the surfaces.

2.2 Filament Storage and Management
The integrated filament rack can store over 80 spools. Organize your 200g, 500g, and 1kg PLA, ABS, or TPU filament spools on the three-tier shelves. The top crossbar can be adjusted to ensure optimal feeding to your printer, preventing tangles and improving print quality.

2.3 Using the Integrated Power Outlets
The table includes two AC outlets and two USB ports. Plug your 3D printers, laptops, or other accessories directly into these outlets for a tidy and efficient power solution. Ensure that the total power draw does not exceed the rated capacity of the power strip.

3. וישאַלט
Regular maintenance will ensure the longevity and optimal performance of your MILEFA 3D Printer Table.
3.1 רייניקונג
The P2 particleboard surfaces are scratch-resistant and easy to clean. Use a soft, damp cloth to wipe down surfaces. Avoid abrasive cleaners or harsh chemicals that could damage the finish. For the metal frame, a dry or slightly damp שטאָף איז גענוג.
3.2 Stability Check
Periodically check all bolts and fasteners to ensure they remain tight. Vibrations from 3D printers can sometimes loosen connections over time. Re-tighten as necessary to maintain the table's stability.
3.3 Filament Rods
Ensure the filament rods are free of dust or debris that could impede smooth spool rotation. Clean them as needed.
4. טראָובלעשאָאָטינג
This section addresses common issues you might encounter with your 3D printer table.
4.1 Table Wobbles During Printing
- טשעק לעוועלינג: Ensure the adjustable feet are properly adjusted to level the table on uneven floors.
- טייטן פאַסטענערס: Re-check and tighten all assembly bolts. Loose connections can contribute to instability.
- דרוקער פּלאַצירונג: Ensure your 3D printer is centrally located on the work surface to distribute weight evenly.
- External Bracing: For high-speed printers or if significant wobble persists, consider placing the table against a sturdy wall or adding external bracing for enhanced stability.
- דרוקער סעטטינגס: If your 3D printer supports features like Input Shaping (vibration compensation), calibrate these settings to mitigate the impact of table movement on print quality.
4.2 Difficulty Accessing Filament Spools
Due to the depth of the storage shelves, accessing spools at the very back can sometimes be challenging. Consider organizing frequently used spools towards the front or utilizing the adjustable shelf heights to create more accessible rows.
4.3 Power Outlets Not Working
- Check Main Power: זיכער מאַכן אַז דער טיש'ס עלעקטרישער שנור איז זיכער אַרייַנגעשטעקט אין אַ פונקציאָנירנדיקן וואַנט ווענטיל.
- באַשטעטיק ברעאַקער: The integrated power strip may have a reset button if it has tripped due to overload.
- דורכקוקן קאַנעקשאַנז: Verify that the power strip is correctly connected to the table's internal wiring during assembly.
5. ספּעסאַפאַקיישאַנז
| שטריך | דעטאַל |
|---|---|
| סאָרט | MILEFA |
| מאָדעל נומער | PAB04AR |
| קאָליר | פּויעריש ברוין |
| מאַטעריאַל | ענדזשאַנירד האָלץ, מעטאַל |
| פּונקט וואָג | 46 פונט |
| נומער דימענשאַנז (L X W X H) | 23.2 X 29.2 X 59 אינטשעס |
| מאַסע קאַפּאַציטעט | 350 lbs (Manufacturer stated), 300 lbs (Specification listed) |
| נומער פון לעוועלס | 5 |
| מאַכט אַוטלעץ | 2 אַק אַוטלעץ, 2 וסב פּאָרץ |
| Filament Spool Capacity | Over 80 spools (200g/500g/1kg compatible) |
| אַסעמבלי פארלאנגט | יא |
6. וואָראַנטי אינפֿאָרמאַציע
MILEFA stands behind the quality of its products. This 3D printer table is covered by a manufacturer's warranty against defects in materials and workmanship. For specific warranty terms and conditions, please refer to the documentation included with your purchase or contact MILEFA customer support directly. We offer "360° AFTER-PURCHASE CARE" to ensure your satisfaction.
7. קונה שטיצן
If you have any questions regarding the assembly, operation, maintenance, or troubleshooting of your MILEFA 3D Printer Table, please do not hesitate to contact our customer support team. We are here to help.
קאָנטאַקט אינפֿאָרמאַציע:
- Webפּלאַץ: Visit the MILEFA Store on Amazon
- בליצפּאָסט: [אריינשטעלן קונה שטיצע אימעיל דא]
- טעלעפֿאָן: [אַריינשטעלן קונה שטיצע טעלעפאָן נומער דאָ]
פּראָדוקט איבערview
Here are additional views of the MILEFA 3D Printer Table:

Ask a question about this manual
Ask about setup, troubleshooting, compatibility, parts, safety, or missing instructions. Manuals+ will review the question and use this page’s manual context to help answer it.