
1. הקדמה
This manual provides detailed instructions for the setup, operation, and maintenance of your AITRIP Nano V3.0 development board and its accompanying terminal adapter expansion board. The AITRIP Nano V3.0 is a compact, breadboard-friendly microcontroller board based on the ATmega328P, featuring a CH340G USB-to-serial converter and a convenient Type-C USB connector. The Nano IO Shield terminal adapter simplifies wiring for various projects, offering a robust alternative to traditional breadboards.
2. פּראָדוקט איבערview
The AITRIP Nano V3.0 kit includes the following components:
- AITRIP Nano V3.0 Board: A compact microcontroller board with ATmega328P and CH340G chip.
- Nano Terminal Adapter Expansion Board (IO Shield): A breakout board designed to simplify connections to the Nano V3.0.
- וסב טיפּ-C קאַבלע: For connecting the Nano board to your computer.
2.1. קאָמפּאָנענט לעגיטימאַציע
Familiarize yourself with the main components of the Nano V3.0 board and the expansion board.

Figure 1: AITRIP Nano V3.0 Board with labeled components including Type-C USB, Digital Pins, Power Pins, Analog Pins, I2C, ATmega328P, Reset Button, TX/RX LEDs, Power LED, and ICSP Header.

פיגור 2: פאָרנט און הינטן views of the AITRIP Nano V3.0 board and the Nano Terminal Adapter V1.0, showing pin headers and screw terminals.
3. סעטאַפּ אינסטרוקציעס
3.1. Connecting the Nano Board to the Expansion Board
- Align the pin headers of the AITRIP Nano V3.0 board with the corresponding female headers on the Nano Terminal Adapter Expansion Board.
- Gently press the Nano board into the expansion board until it is securely seated. Ensure all pins are correctly aligned to prevent damage.

Figure 3: Proper alignment and connection of the Nano V3.0 board onto the Nano Terminal Adapter.
3.2. Driver Installation (CH340G)
The AITRIP Nano V3.0 uses the CH340G chip for USB-to-serial communication. Most modern operating systems (Windows 10/11, macOS, Linux) may automatically install the necessary drivers. If the board is not recognized, you may need to manually install the CH340G driver.
- Windows: Search online for "CH340G driver Windows" and download from a reputable source. Follow the installation instructions.
- macOS: Search online for "CH340G driver macOS". Note that newer macOS versions might require specific security settings adjustments.
- לינוקס: Drivers are typically built into the kernel. If issues arise, consult Linux community forums for specific distributions.
After installation, connect the Nano board to your computer using the provided USB Type-C cable. Verify successful driver installation by checking your device manager (Windows) or system information (macOS/Linux) for a new COM port (Windows) or /dev/ttyUSBx device (Linux/macOS).
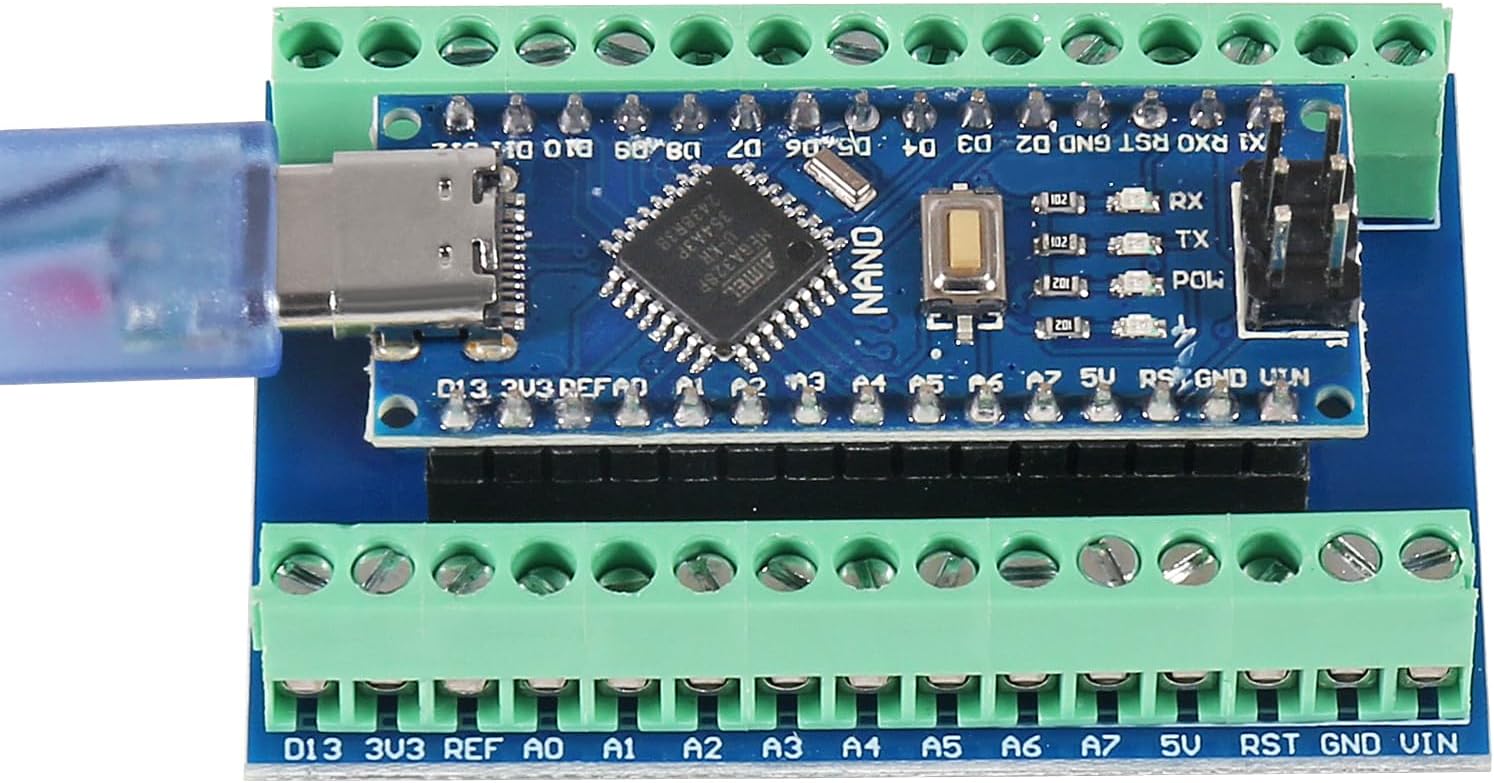
Figure 4: The AITRIP Nano V3.0 board securely connected to the expansion board and powered via the USB Type-C cable.
3.3. Powering the Board
The AITRIP Nano V3.0 board can be powered in several ways:
- USB טיפּ-C קאַנעקשאַן: Connect the board to your computer or a USB power adapter (5V).
- Unregulated External Power Supply (VIN pin): Provide 6-12V DC to the VIN pin.
- Regulated External Power Supply (5V pin): Provide a regulated 5V DC to the 5V pin.
די רעקאַמענדיד אַרייַנשרייַב וואָלtage for the VIN pin is 7-12V. The board's operating voltagE איז 5 וו.
4. אַפּערייטינג ינסטרוקטיאָנס
4.1. Programming the Nano V3.0
The AITRIP Nano V3.0 is compatible with the Arduino IDE. Follow these steps to upload your first program:
- אינסטאַלירן אַרדוינאָ IDE: אראפקאפיע און ינסטאַלירן די Arduino IDE פֿון דער באַאַמטער Arduino webפּלאַץ (www.arduino.cc/en/software).
- אויסקלייבן ברעט: In the Arduino IDE, go to Tools > Board > Arduino Nano.
- Select Processor: גיין צו Tools > Processor > ATmega328P (Old Bootloader). If you encounter upload errors, try ATmega328P (without "Old Bootloader").
- אויסקלייַבן פּאָרט: גיין צו מכשירים > פּאָרט and select the COM port associated with your CH340G device.
- Upload Sketch: עפֿענען אַן עקסample sketch (e.g., File > עקסamples > 01.Basics > Blink) and click the "Upload" button (right arrow icon).
The built-in LED (connected to D13) should start blinking if the upload is successful.
4.2. Using the Nano Terminal Adapter
The expansion board provides screw terminals for easy and secure connection of wires to the Nano's pins. This is particularly useful for permanent or semi-permanent projects where breadboards might be unreliable.
- Identify the desired pin on the Nano (e.g., D2, A0, 5V, GND).
- Locate the corresponding screw terminal on the expansion board.
- Loosen the screw, insert the stripped end of your wire, and tighten the screw to secure the connection.
Refer to the pinout diagram for accurate pin identification.
5. וישאַלט
- האַנדלינג: Handle the boards by their edges to avoid touching components, especially the microcontroller chip, to prevent electrostatic discharge (ESD) damage.
- סטאָרידזש: Store the boards in an anti-static bag or container when not in use, away from dust and moisture.
- רייניקונג: If necessary, gently clean the board with a soft, dry brush or compressed air. Avoid using liquids.
- מאַכט צושטעלן: שטענדיק זיכער מאַכן אַז אייער מאַכט צושטעלן איז אין קראַפטtage and current are within the specified limits to prevent damage to the board.
6. טראָובלעשאָאָטינג
- Board Not Recognized by Computer:
- זיכער מאַכן אַז דער USB טיפּ-C קאַבל איז גאָר אַרײַנגעשטעלט און פֿונקציאָנירט.
- Verify that the CH340G driver is correctly installed (refer to Section 3.2).
- פּרוּווט אַ אַנדערש וסב פּאָרט אויף דיין קאָמפּיוטער.
- Upload Errors in Arduino IDE:
- Confirm that "Arduino Nano" is selected under מכשירים > ברעט.
- Try both "ATmega328P (Old Bootloader)" and "ATmega328P" options under Tools > Processor.
- Ensure the correct COM port is selected under מכשירים > פּאָרט.
- קוק נאָך סינטאַקס טעותים אין דיין קאָד.
- ברעט גייט נישט אן:
- Verify the power source (USB or external) is providing the correct voltagE און קראַנט.
- Check for any visible damage to the board or connections.
- Incorrect Sensor Readings or Output:
- Double-check your wiring connections, especially to the expansion board terminals.
- Review דיין קאָד פֿאַר לאָגישע טעותים.
- Ensure external components are correctly powered and functioning.
7. ספּעסאַפאַקיישאַנז
7.1. AITRIP Nano V3.0 Board Specifications
| שטריך | באַשרייַבונג |
|---|---|
| מיקראָקאָנטראָללער | ATmega328P |
| וסב צו סעריאַל טשיפּ | CH340G |
| אַפּערייטינג וואָלtage | 5V |
| אַרייַנשרייַב וואָלtage (רעקאָמענדירט) | 7-12וו |
| אַרייַנשרייַב וואָלtage (limit) | 6-20וו |
| דיגיטאַל איך / אָ פּינס | 14 (6 provide PWM output) |
| אַנאַלאָג אַרייַנשרייַב פּינס | 8 |
| דק קראַנט פּער איך / אָ שפּילקע | 40 מאַ |
| פלאַש זכּרון | 32 KB (ATmega328P) of which 2 KB used by bootloader |
| SRAM | 2 KB (ATmega328P) |
| EEPROM | 1 KB (ATmega328P) |
| זייגער ספּיד | 16 מהז |
| וסב קאַנעקטער | טיפּ-C |
| דימענשאַנז | 43 mm x 18 mm (approx.) |
| וואָג | בעערעך 7 ג |

Figure 5: Detailed specifications table for the AITRIP Nano V3.0 board, including connector types, pin functions, communication protocols, power requirements, clock speed, and memory.
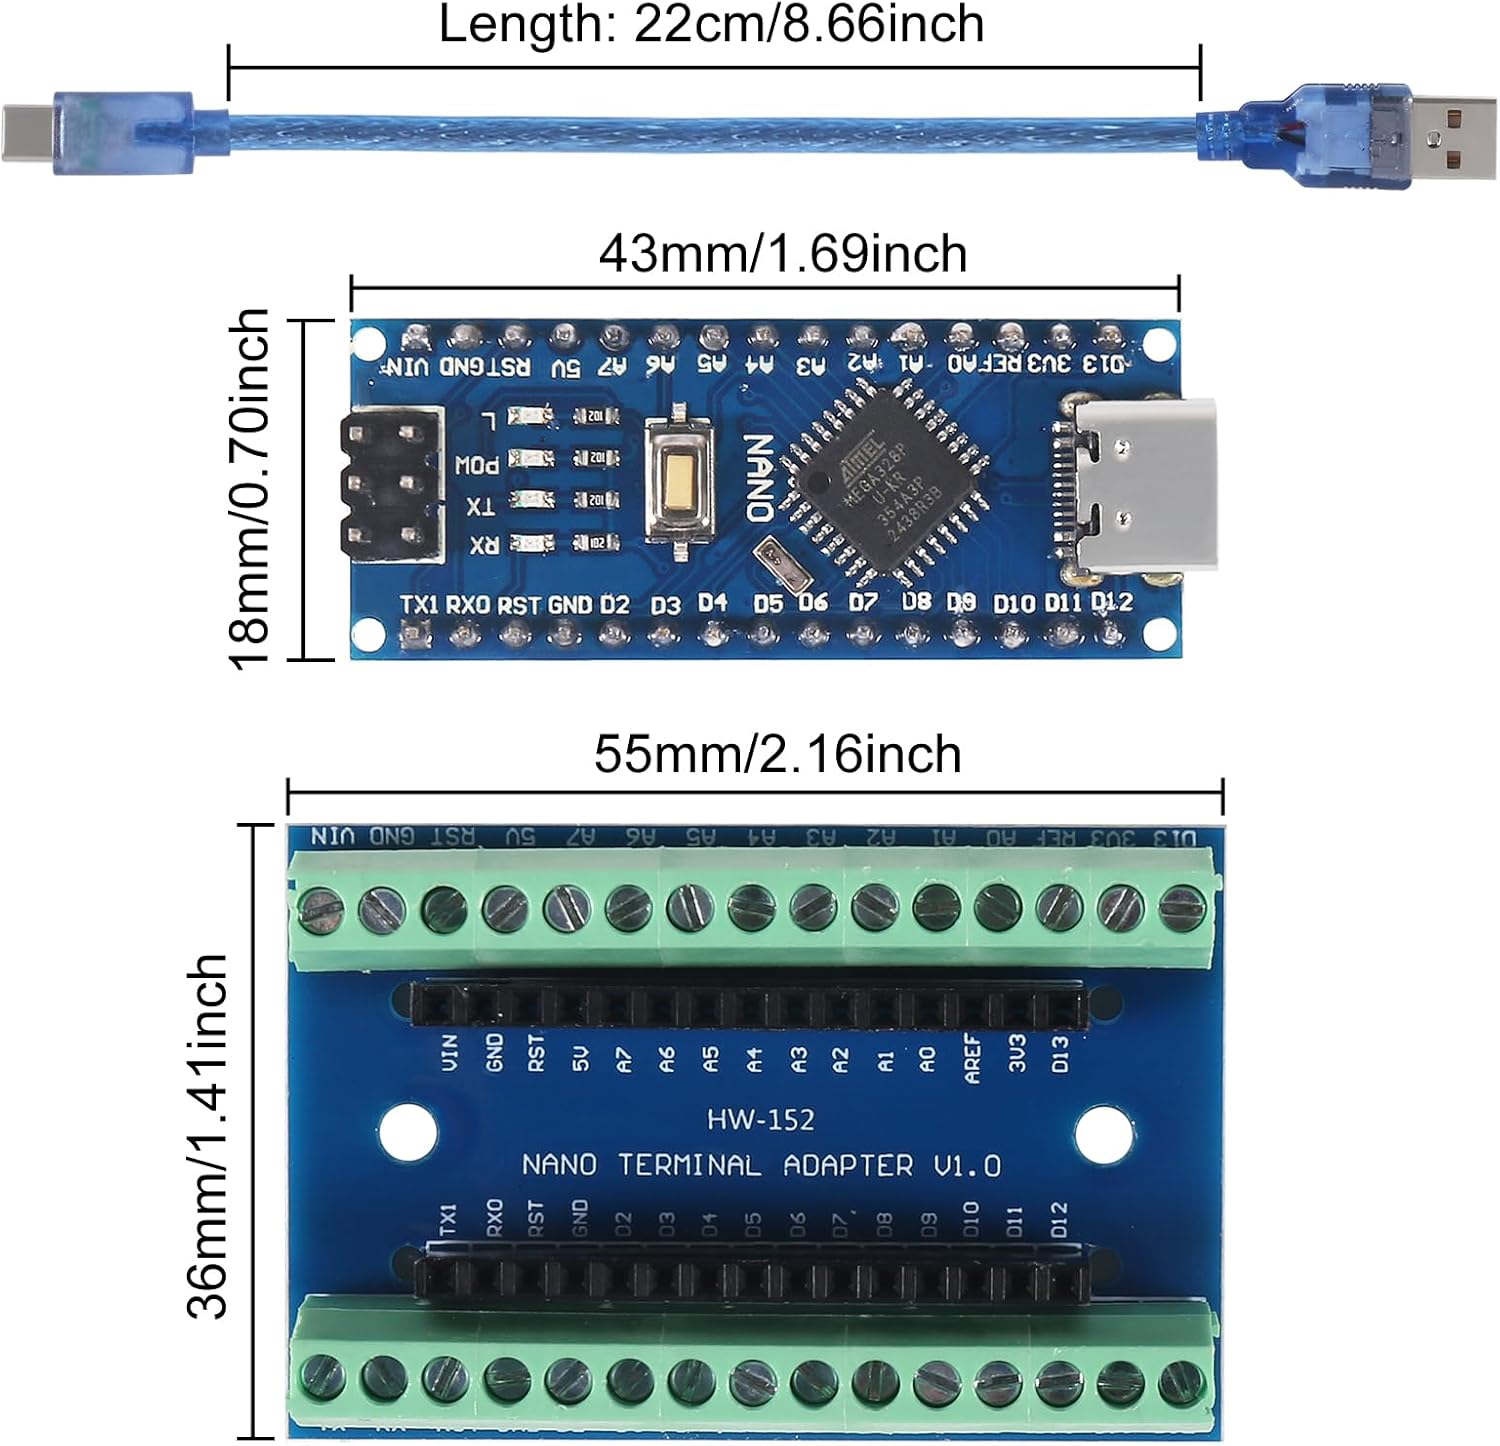
Figure 6: Dimensional measurements for both the AITRIP Nano V3.0 board and the Nano Terminal Adapter V1.0.
7.2. Nano Terminal Adapter Expansion Board Specifications
- קאַמפּאַטאַבילאַטי: Designed for Arduino Nano V3.0.
- פֿעיִקייטן: Terminal expansion adapter, fully assembled, no soldering required.
- דימענסיעס: Approximately 56 mm x 42 mm x 13 mm (2.21" x 1.65" x 0.50" L*W*H).
8. וואָראַנטי און שטיצן
AITRIP products are designed for reliability and performance. For specific warranty information, please refer to the product listing on the retailer's website or contact AITRIP customer support directly.
If you encounter any issues or have questions regarding the AITRIP Nano V3.0 board or expansion board, please contact AITRIP customer service through the platform where you purchased the product. Provide your order number and a detailed description of the issue for prompt assistance.