הקדמה
This manual provides detailed instructions for the assembly, operation, maintenance, and troubleshooting of your new Queen LED Bed Frame. Please read all instructions carefully before beginning assembly and retain this manual for future reference.
זיכערקייַט אינפֿאָרמאַציע
- זיכער מאַכן אַז אַלע טיילן זענען פאַראַן און נישט געשעדיגט איידער איר אַסעמבלט עס. ניצט עס נישט אויב עס פעלט אָדער זענען צעבראָכן.
- צוזאַמענשטעלן דעם בעט ראַם אויף אַ ווייכער, ריינער ייבערפלאַך צו פאַרמייַדן קראַצן.
- נישט צו שטארק אנציען די שרויפן בעתן צוזאמענשטעלן.
- האַלטן קליין טיילן אַוועק פון קינדער בעשאַס פֿאַרזאַמלונג.
- This bed frame is designed to support a maximum weight of 500 LBS. Do not exceed this limit.
- קאָנטראָלירט רעגולער אַלע פֿאַרבינדונגען צו זיכער מאַכן אַז זיי בלייבן פֿעסט.
- Only use the provided power adapter for the LED lights and USB charging station.
סעטאַפּ און אַסעמבלי
Before you begin, ensure you have enough space and a clean, soft surface for assembly. Two people are recommended for easier assembly.
מכשירים פארלאנגט (ניט אַרייַנגערעכנט)
- פיליפּס קאָפּ שרויפנ - ציער
- גומע האַמער (אַפּשאַנאַל, פֿאַר מילד טאַפּינג)
פּעקל אינהאַלט
Verify all components are present against the parts list provided in your packaging. Key components include:
- Headboard sections (upholstered and metal frame)
- Footboard sections (upholstered and metal frame)
- זייט רעלסן (מעטאַל)
- Center support beams and legs
- מעטאַל בעט לאַטעס
- 4 Storage drawers with wheels
- LED light strip and remote control
- USB charging station unit
- האַרדווער פּאַק (שרויף, באָלץ, וואַשערס, אַלען שליסל)
אַסעמבלי סטעפּס
Step 1: Assemble the Headboard and Footboard Frames.
Attach the upholstered panels to the metal headboard and footboard frames using the provided bolts and Allen wrench. Ensure all connections are secure but do not fully tighten until the entire frame is assembled.

Image: The bed frame structure, including the headboard, footboard, and metal slat system, ready for mattress placement.
Step 2: Connect Side Rails.
Attach the side rails to the assembled headboard and footboard sections. Use the appropriate bolts and washers. Ensure the frame is square before tightening all bolts.

בילד: זייט view of the bed frame, illustrating how the side rails connect the headboard and footboard, with storage drawers visible underneath.
Step 3: Install Center Support and Slats.
Place the center support beam(s) and legs into position. Then, lay the metal bed slats across the frame, securing them to the side rails as per the instructions. This forms the mattress support.

בילד: דעטאַלירט view of the metal slat system and the rolling mechanism for the under-bed storage drawers.
Step 4: Assemble and Install Storage Drawers.
Assemble the four storage drawers according to the separate drawer instructions, attaching the wheels and upholstered fronts. Once assembled, slide the drawers into position under the bed frame. The image below shows the components of the drawer system.

Image: An exploded diagram of the bed frame, detailing the separate components such as the headboard, footboard, side rails, slats, and the four individual storage drawers.
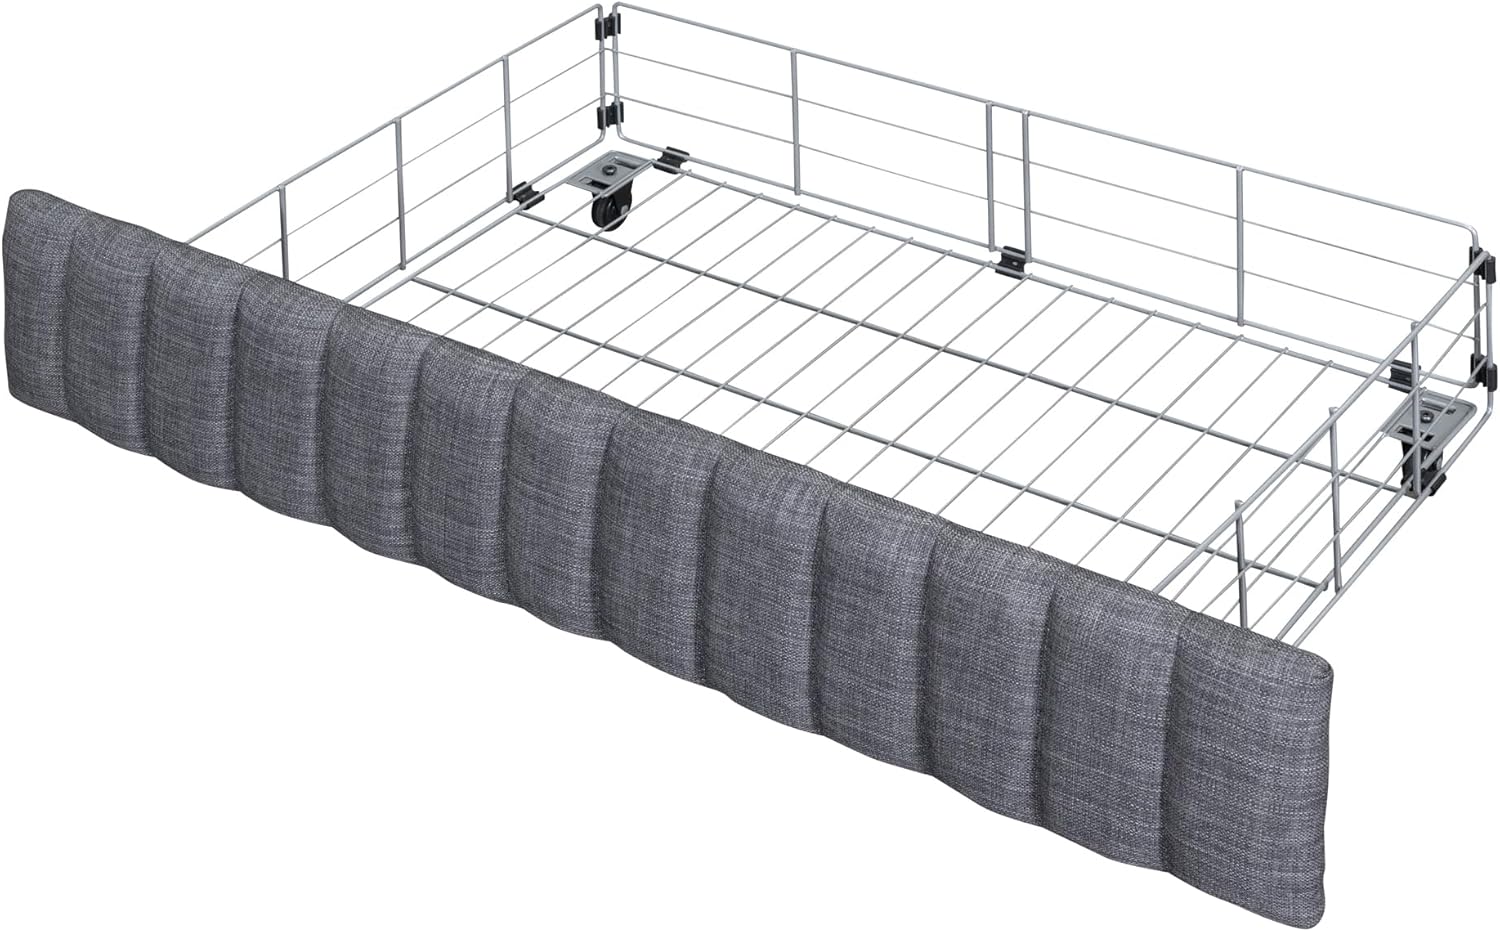
Image: A single, fully assembled under-bed storage drawer with its upholstered front and wheels.
Step 5: Install LED Lights and USB Charging Station.
Attach the LED light strip to the designated area on the headboard, typically along the back or underside of the shelf. Connect the USB charging station unit to the pre-drilled slot on the headboard shelf and connect its power cable. Plug the power adapter into a wall outlet.

Image: Close-up of the upholstered headboard, highlighting the design and the integrated shelf where the LED lights and USB charging station are located.
שריט 6: לעצטער צושטייַגונג.
אזוי שנעל ווי אלע קאמפאנענטן זענען אויף זייער פלאץ און אויסגעריכט, גייט צוריק און ציהט גוט אן אלע באָלטן און שרויפן. נישט צו שטארק אנציהען.
אַפּערייטינג ינסטראַקשאַנז
LED Headboard Lights
- מאַכט אויף / אַוועק: ניצט די צוגעשטעלטע ווײַטקאָנטראָל צו צינדן אָדער אויסלעשן די LED לייץ.
- קאָליר סעלעקציע: The remote allows you to choose from multiple RGB colors.
- ברייטנאַס אַדזשאַסטמאַנט: Adjust the light intensity using the brightness controls on the remote.
- מאָדע סעלעקציע: Select various lighting modes (e.g., flash, strobe, fade, smooth) for different ambiance.
- Ensure the LED light strip is securely attached and the power adapter is plugged into a functional wall outlet.
וסב טשאַרדזשינג סטאַנציע
- The headboard features 2 standard outlets and 2 USB ports.
- Plug your electronic devices (phones, tablets, etc.) directly into the USB ports or standard outlets for charging.
- Ensure the bed frame's power cord is plugged into a live wall outlet for the charging station to function.
סטאָרידזש גאַטקעס
- The four under-bed drawers are on wheels for easy access.
- Pull the drawers out gently to access stored items.
- Push the drawers back in until they are fully under the bed frame.
- Avoid overloading drawers to ensure smooth operation and prevent damage to the wheels.
וישאַלט
- רייניקונג שטאָף: For upholstered parts, gently spot clean with a damp שטאָף און מילד וואַשפּולווער. דו זאלסט נישט נוצן האַרב קעמיקאַלז.
- Cleaning Metal: Wipe metal surfaces with a soft, dry cloth.
- פאַרשטאַרקן קאַנעקשאַנז: Periodically check all bolts and screws and tighten them as needed to maintain stability and prevent noise.
- Drawer Wheels: האַלט די שופלאָד רעדער פריי פון שמוץ צו ענשור אַ גלאַט אָפּעראַציע.
- עלעקטריקאַל קאַמפּאָונאַנץ: Ensure the LED light strip and USB charging station connections are secure and free from damage.
טראָובלעשאָאָטינג
| פּראָבלעם | מעגלעך סיבה | לייזונג |
|---|---|---|
| Bed frame is noisy/squeaks. | לויזע באָלץ אדער פֿאַרבינדונגען. | Check and tighten all bolts and screws on the frame. |
| די על-אי-די לייץ ארבעטן נישט. | Power adapter unplugged, remote battery dead, loose connection, faulty LED strip. | Ensure power adapter is plugged in. Check remote battery. Verify LED strip connection. Contact support if issue persists. |
| USB ports/outlets not charging. | Bed frame power cord unplugged, faulty charging unit. | Ensure the bed frame's main power cord is securely plugged into a live wall outlet. Test with another device. |
| שופלאדן זענען שווער צו עפענען/פארמאכן. | Overloaded, debris in wheels, misaligned. | Reduce drawer contents. Clean wheels. Ensure drawers are properly aligned on their tracks. |
ספּעסאַפאַקיישאַנז
| שטריך | דעטאַל |
|---|---|
| פּראָדוקט דימענשאַנז (אַלגעמיין) | 81.7"L x 62"W x 41.7"H (Approximate, refer to diagram for detailed measurements) |
| גרייס | מלכּה |
| קאָליר | Grey (with 4 drawers variant) |
| וואָג קאַפּאַסיטי | 500 לבס |
| רעקאָמענדירטע מאַטראַץ גרעב | 10-12 אינטשעס |
| פּראָדוקט מאַטעריאַל | Linen fabric, Metal frame |
| קעסטל פרילינג פארלאנגט | ניין |
| טשאַרדזשינג סטאַנציע | 2 Standard Outlets, 2 USB Ports |
| געפירט ליגהץ | Multi-color RGB with remote control |
| סטאָרידזש | 4 Under-bed drawers, Headboard shelf |

Image: Dimensional diagram of the Queen LED Bed Frame, showing overall length, width, height, and specific measurements for the headboard, footboard, and drawer units.
וואָראַנטי און שטיצן
For any questions, missing parts, or issues not covered in this manual, please contact the manufacturer or your retailer for assistance. Please have your model number (HSHTTNXHN) and purchase information ready when contacting support.
While specific warranty details are not provided in this document, standard consumer rights apply. Please refer to your purchase receipt or retailer's policy for warranty information.