
1. הקדמה
This manual provides detailed instructions for the setup, operation, maintenance, and troubleshooting of your Maxtang MTN-6900HX Mini PC. Please read this manual thoroughly before using the device to ensure proper functionality and safety. The Maxtang MTN-6900HX is a compact, high-performance mini PC featuring an AMD Ryzen 9 6900HX processor, designed for various applications including everyday computing, photo editing, video editing, and gaming.

בילד 1.1: פראָנט view of the Maxtang MTN-6900HX Mini PC. This image shows the compact design of the device.
2. זיכערקייַט אינפֿאָרמאַציע
- Always disconnect the power adapter before cleaning or performing any maintenance.
- שטעלט נישט אויס דעם אפאראט צו וואסער, פייכטקייט, אדער עקסטרעמע טעמפעראטורן.
- פאַרזיכערן געהעריק ווענאַליישאַן צו פאַרמייַדן אָוווערכיטינג. דו זאלסט נישט פאַרשפּאַרן די לופט ווענץ.
- ניצט נאָר דעם צוגעשטעלטן מאַכט אַדאַפּטער אָדער אַ קאָמפּאַטיבלע ערזאַץ.
- ויסמיידן דראַפּינג אָדער אונטערטעניק די מיטל צו שטאַרק ימפּאַקץ.
- פרובירט נישט צו עפענען אדער פאררעכטן דעם אפאראט אליין. ווענדט זיך צו קוואַליפֿיצירטע סערוויס פּערסאָנעל.
3. פּעקל אינהאַלט
באַשטעטיקן אַז אַלע זאכן זענען פאַראַן אין פּעקל:
- 1x Maxtang MTN-6900HX Mini PC (No RAM, No SSD, No OS)
- 1x HDMI קאַבלע
- 1x מאַכט אַדאַפּטער
- 1 קס מאַכט שנור
- 1x וועסאַ מאָונט
- 4x מאַונטינג סקרוז
- 1x פּראָדוקט מאַנואַל (דאָס דאָקומענט)
4. פּראָדוקט איבערview
The Maxtang MTN-6900HX Mini PC features a comprehensive set of ports and internal expansion options. Familiarize yourself with the device's layout before proceeding with installation.
4.1 External Ports

Image 4.1: Detailed diagram of the Maxtang MTN-6900HX Mini PC's front and rear ports.
פראָנט פּאַנעל:
- וסב 3.2: Two USB 3.2 Gen2 ports (10Gbps) for high-speed data transfer.
- USB-C (USB 3.2 10Gb): One USB-C port for data transfer.
- אַודיאָ: 3.5 מ״מ אַודיאָ דזשעק פֿאַר כעדפאָונז אָדער רעדנער.
- באַשטעטיק: באַשטעטיק קנעפּל.
- מאַכט קנעפּל: צו מאַכט אויף / אַוועק די מיטל.
ריר פּאַנעל:
- DC-in (Power input): פאַרבינדן די מאַכט אַדאַפּטער דאָ.
- הדמי: One HDMI port for video output (up to 4K@60Hz).
- לופט ווענט: פֿאַר היץ דיסיפּיישאַן.
- דפּ: One DisplayPort for video output (up to 8K@60Hz).
- וסב 4.0: Two USB4 ports (40Gbps, 100W PD, 8K video output).
- וסב 2.0: איין וסב 2.0 פּאָרט.
- LAN RJ45 2.5G: One 2.5 Gigabit Ethernet port for wired network connection.
- קענסינגטאָן שלאָס: זיכערהייַט שפּעלטל.
4.2 אינערלעכע קאָמפּאָנענטן

בילד 4.2: אינעווייניק view of the Mini PC, highlighting the M.2 2280 NVMe SSD slots and DDR5 SO-DIMM slots.
The Mini PC supports:
- M.2 2280 NVMe SSD: Two PCIe Gen4 2280 slots for NVMe SSDs, supporting up to 4TB each (total 8TB).
- DDR5 SO-DIMM: Two dual-channel DDR5 SO-DIMM slots, supporting up to 64GB RAM.
- WiFi/Bluetooth Module: One M.2 slot for a WiFi and Bluetooth module (pre-installed or user-installable depending on configuration).
5. האַרדווער אינסטאַלאַציע (ראַם און SSD)
This Mini PC is shipped without RAM, SSD, or an operating system. Follow these steps to install the necessary components.
5.1 Installing RAM (DDR5 SO-DIMM)

Image 5.1: Illustration of installing DDR5 SO-DIMM modules into the memory slots.
- מאַכט אַוועק: זיכער מאַכן אַז דער מיני פּיסי איז אויסגעלאָשן און אָפּגעטיילט פֿון דער מאַכט מקור.
- אפענער קעיס: Carefully open the Mini PC case. Refer to the specific model's instructions for case removal.
- געפינען סלאָץ: Identify the two DDR5 SO-DIMM slots on the motherboard.
- אַרײַנשטעלן ראַם: Align the notch on the DDR5 SO-DIMM module with the key in the slot. Insert the module at a 45-degree angle and push down firmly until the side clips snap into place, securing the module.
- איבערחזרן: If installing two modules for dual-channel operation, repeat for the second slot.
5.2 Installing NVMe SSD (M.2 2280)
בילד 5.2: View of the M.2 2280 NVMe SSD slots, indicating where to install storage.
- געפינען סלאָץ: Identify the M.2 2280 NVMe SSD slots on the motherboard.
- אריינשטעלן SSD: Gently slide the M.2 SSD into the slot, ensuring the gold contacts are fully engaged.
- זיכערע SSD: Once inserted, push down the end of the SSD and secure it with the provided screw.
- שליסן פאַל: After installing all components, carefully close the Mini PC case.
6. Initial Setup and Operating Instructions
6.1 קאַנעקטינג פּעריפעראַלס
- ווייַז: Connect your monitor(s) to the HDMI, DisplayPort, or USB4 ports using the appropriate cables.
- קלאַוויאַטור / מויז: Connect your USB keyboard and mouse to the available USB ports.
- נעץ: For a wired connection, connect an Ethernet cable to the 2.5GbE LAN port. For wireless, ensure your WiFi module is installed.
- מאַכט: Connect the power adapter to the DC-in port on the Mini PC, then plug the power cord into an electrical outlet.
6.2 Powering On and OS Installation
- מאַכט אויף: Press the power button on the front panel. The power indicator should illuminate.
- בייאָס/UEFI: Upon first boot, you may need to enter the BIOS/UEFI settings (usually by pressing דעל or F2 during startup) to configure boot options or verify hardware detection.
- אַפּערייטינג סיסטעם ינסטאַלירונג: Since the device comes without an OS, you will need to install one. Prepare a bootable USB drive with your preferred operating system (e.g., Windows 11 Pro 64-bit or Linux 64-bit). Insert the USB drive and follow the on-screen instructions to install the OS onto your NVMe SSD.
6.3 ווייַז קאַנפיגיעריישאַן
The Mini PC supports multiple displays, including triple screen output via HDMI, DisplayPort, and USB4.

בילד 6.1: עקס.ample setup showing the Mini PC connected to three external displays.
- Connect up to three monitors using the HDMI (4K@60Hz), DisplayPort (8K@60Hz), and USB4 (4K@60Hz) ports.
- After OS installation, you can configure display settings (resolution, orientation, extended/duplicate desktop) within your operating system's display settings.
6.4 נעץ קאָנעקטיוויטי
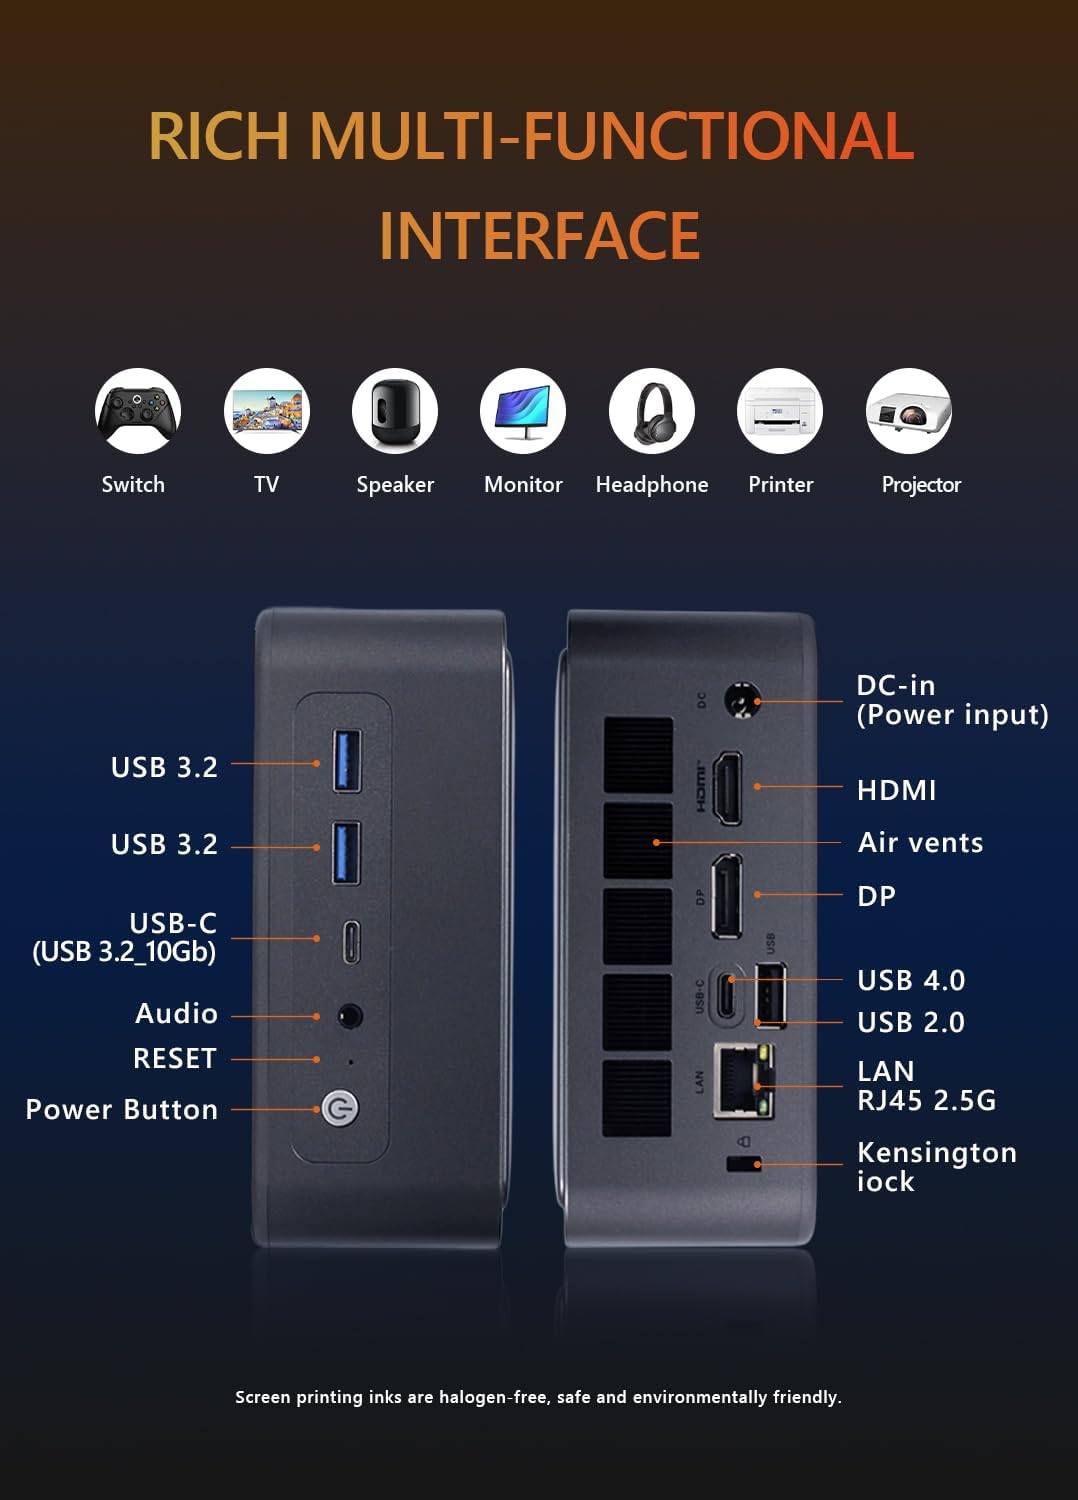
Image 6.2: Visual representation of the Mini PC's network capabilities, including 2.5GbE LAN, WiFi 6, and Bluetooth 5.2.
- ווייערד לאַן: Connect an Ethernet cable to the 2.5GbE RJ45 port for a stable and high-speed wired network connection.
- ווי-פי: If a Wi-Fi module is installed, connect to your wireless network through the operating system's network settings. The device supports Wi-Fi 6.
- בלועטאָאָטה: If a Bluetooth module is installed, pair Bluetooth devices (e.g., headphones, keyboards) through the operating system's Bluetooth settings. The device supports Bluetooth 5.2.
7. וישאַלט
- רייניקונג: Use a soft, dry cloth to clean the exterior of the Mini PC. For dust in vents, use compressed air. Do not use liquid cleaners directly on the device.
- ווייכווארג דערהייַנטיקונגען: Regularly update your operating system, drivers, and applications to ensure optimal performance and security.
- ווענטילאַטיאָן: Ensure the Mini PC is placed in a well-ventilated area and that its air vents are not obstructed to prevent overheating.
- דאַטאַ באַקקופּ: Periodically back up important data to an external storage device or cloud service.
8. טראָובלעשאָאָטינג
If you encounter issues with your Mini PC, refer to the following common troubleshooting steps:
- קיין מאַכט:
- Check if the power adapter is securely connected to both the Mini PC and the electrical outlet.
- מאַכן זיכער אַז די מאַכט ווענטיל איז פאַנגקשאַנאַל.
- פּרוּווט אַ אַנדערש מאַכט ווענטיל.
- קיין ווייַז:
- באַשטעטיקן אַז דער מאָניטאָר איז אנגעצונדן און אַז די ריכטיקע אַרייַנגאַנג מקור איז אויסגעקליבן.
- Ensure the video cable (HDMI, DP, USB4) is securely connected to both the Mini PC and the monitor.
- פרובירט אן אנדערן ווידעא קאבל אדער מאָניטאָר אויב פאַראַן.
- אפערירן סיסטעם בוט נישט:
- Confirm that RAM and SSD are correctly installed as per Section 5.
- Check BIOS/UEFI settings to ensure the boot order is correct and the SSD is detected.
- If installing a new OS, ensure the bootable USB drive is properly created and selected as the boot device.
- קיין נעץ פֿאַרבינדונג:
- פֿאַר דראָטיקע פֿאַרבינדונגען, קאָנטראָלירט דעם עטהערנעט קאַבל און ראַוטער/מאָדעם סטאַטוס.
- For Wi-Fi, ensure the Wi-Fi module is installed and drivers are updated. Check your Wi-Fi network settings in the OS.
- איבערהייצונג:
- Ensure the Mini PC's vents are clear and not obstructed.
- Place the device in a location with good airflow.
- רייניקט רעגולער שטויב פון די ווענץ.
9. ספּעסאַפאַקיישאַנז
Detailed technical specifications for the Maxtang MTN-6900HX Mini PC:
| שטריך | באַשרייַבונג |
|---|---|
| מאָדעל נאָמען | MTN-6900HX |
| פּראַסעסער | AMD Ryzen 9 6900HX (8 Cores/16 Threads, up to 4.9GHz) |
| גראַפיקס | AMD Radeon Graphics (Radeon 680M) |
| זכּרון (RAM) | Dual Channel DDR5 SO-DIMM, Max 64GB (User-installed) |
| סטאָרידזש | 2x M.2 2280 NVMe PCIe Gen4 SSD slots, Max 4TB each (User-installed) |
| אָפּערייטינג סיסטעם | No OS pre-installed (Supports Windows 10/11 64-bit, Linux 64-bit) |
| ווידעא רעזולטאַט | 1x HDMI (4K@60Hz), 1x DisplayPort (8K@60Hz), 2x USB4 (4K@60Hz) |
| וסב פּאָרץ | 2x USB4 (40Gbps), 2x USB 3.2 Gen2 (10Gbps), 1x USB 2.0 |
| נעץ | 1x 2.5GbE RJ45 LAN, Wi-Fi 6, Bluetooth 5.2 |
| אַודיאָ | 1x 3.5 מ״מ אַודיאָ דזשעק |
| מאַכט אַרייַנשרייַב | 19V/20V DC-in |
| דימענשאַנז | 127 מם רענטגענ 135 מם רענטגענ 55 מם |
| נאָך פֿעיִקייטן | Kensington Lock slot, VESA Mount support |
9.1 Processor Details

Image 9.1: Details of the AMD Ryzen 9 6900HX processor, including core count, threads, boost clock, and L3 cache.
9.2 Graphics Details
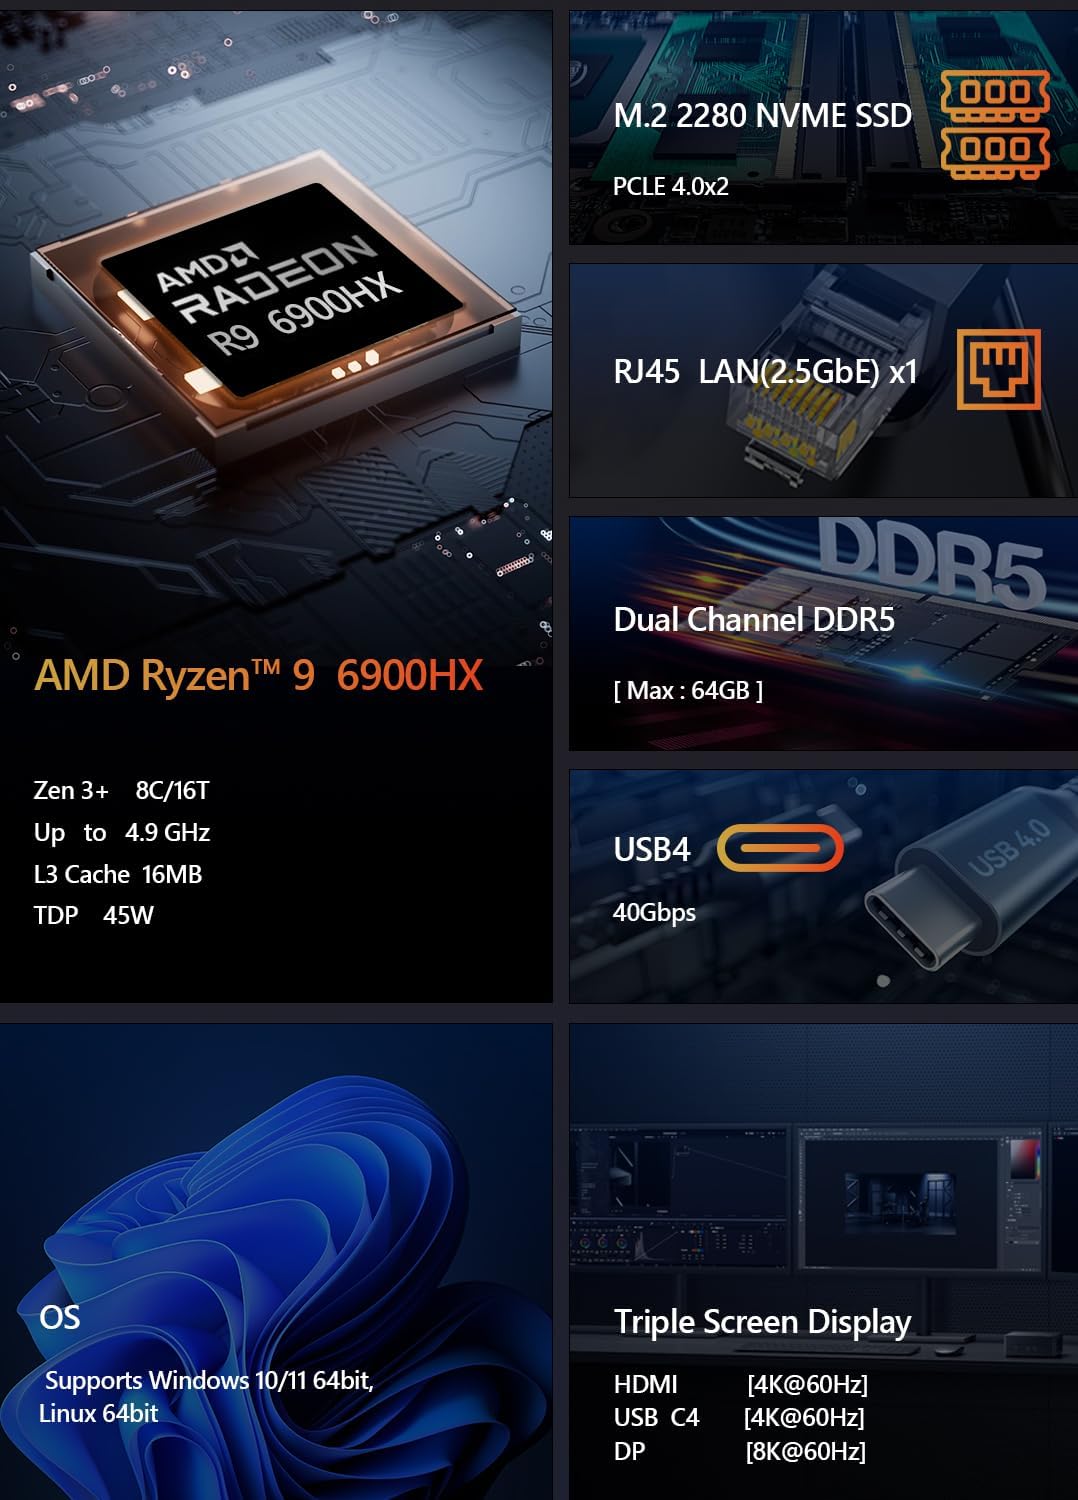
Image 9.2: Specifications for the integrated AMD Radeon 680M graphics, including shader count and GPU memory.
10. וואָראַנטי און שטיצן
וואָראַנטי: This product comes with a 12-month product warranty from the date of order. Please retain your proof of purchase for warranty claims.
קונה סערוויס: For technical support or warranty inquiries, please contact Maxtang customer service. Refer to your purchase platform or the Maxtang official webפּלאַץ פֿאַר קאָנטאַקט דעטאַילס.
פאַבריקאַנט קאָנטאַקט אינפֿאָרמאַציע: 6/F, Bldg 3, Honghui Industrial Park, Liuxian 2nd Road, Bao'an Dist, Shenzhen, China 518101