
הקדמה און זיכערהייט וואָרענונגען
This EIELEDIY DIY Drone Soldering Kit is designed for electronics enthusiasts aged 14 and up. It offers a hands-on experience in assembling and soldering a functional quadcopter. The assembly process requires basic knowledge of electronic circuits, manual dexterity, and patience.
וויכטיק זיכערהייט באַמערקונג:
- Assembly and soldering are estimated to take approximately 2 hours.
- Essential tools required include a soldering iron, solder wire, and a screwdriver (not included in the kit).
- This project has a relatively high difficulty level. It is not recommended for individuals who are careless or lack problem-solving skills. Patience and the ability to identify and resolve issues are crucial for successful completion.
- Always ensure proper ventilation when soldering and wear appropriate safety gear, such as safety glasses.
- The drone contains a Lithium-ion battery. Handle with care and follow all battery safety guidelines.
This kit also serves as an excellent STEM educational tool, helping users understand the basic operating principles of drones through practical assembly and soldering.
אינסטרוקציעס פֿאַר אויפֿשטעלן און פֿאַרזאַמלען
Follow these steps carefully to assemble your EIELEDIY DIY Drone Kit. Most components are pre-assembled, simplifying the soldering process.
1. Kit Contents and Required Tools
Before starting, verify all components are present and gather the necessary tools.
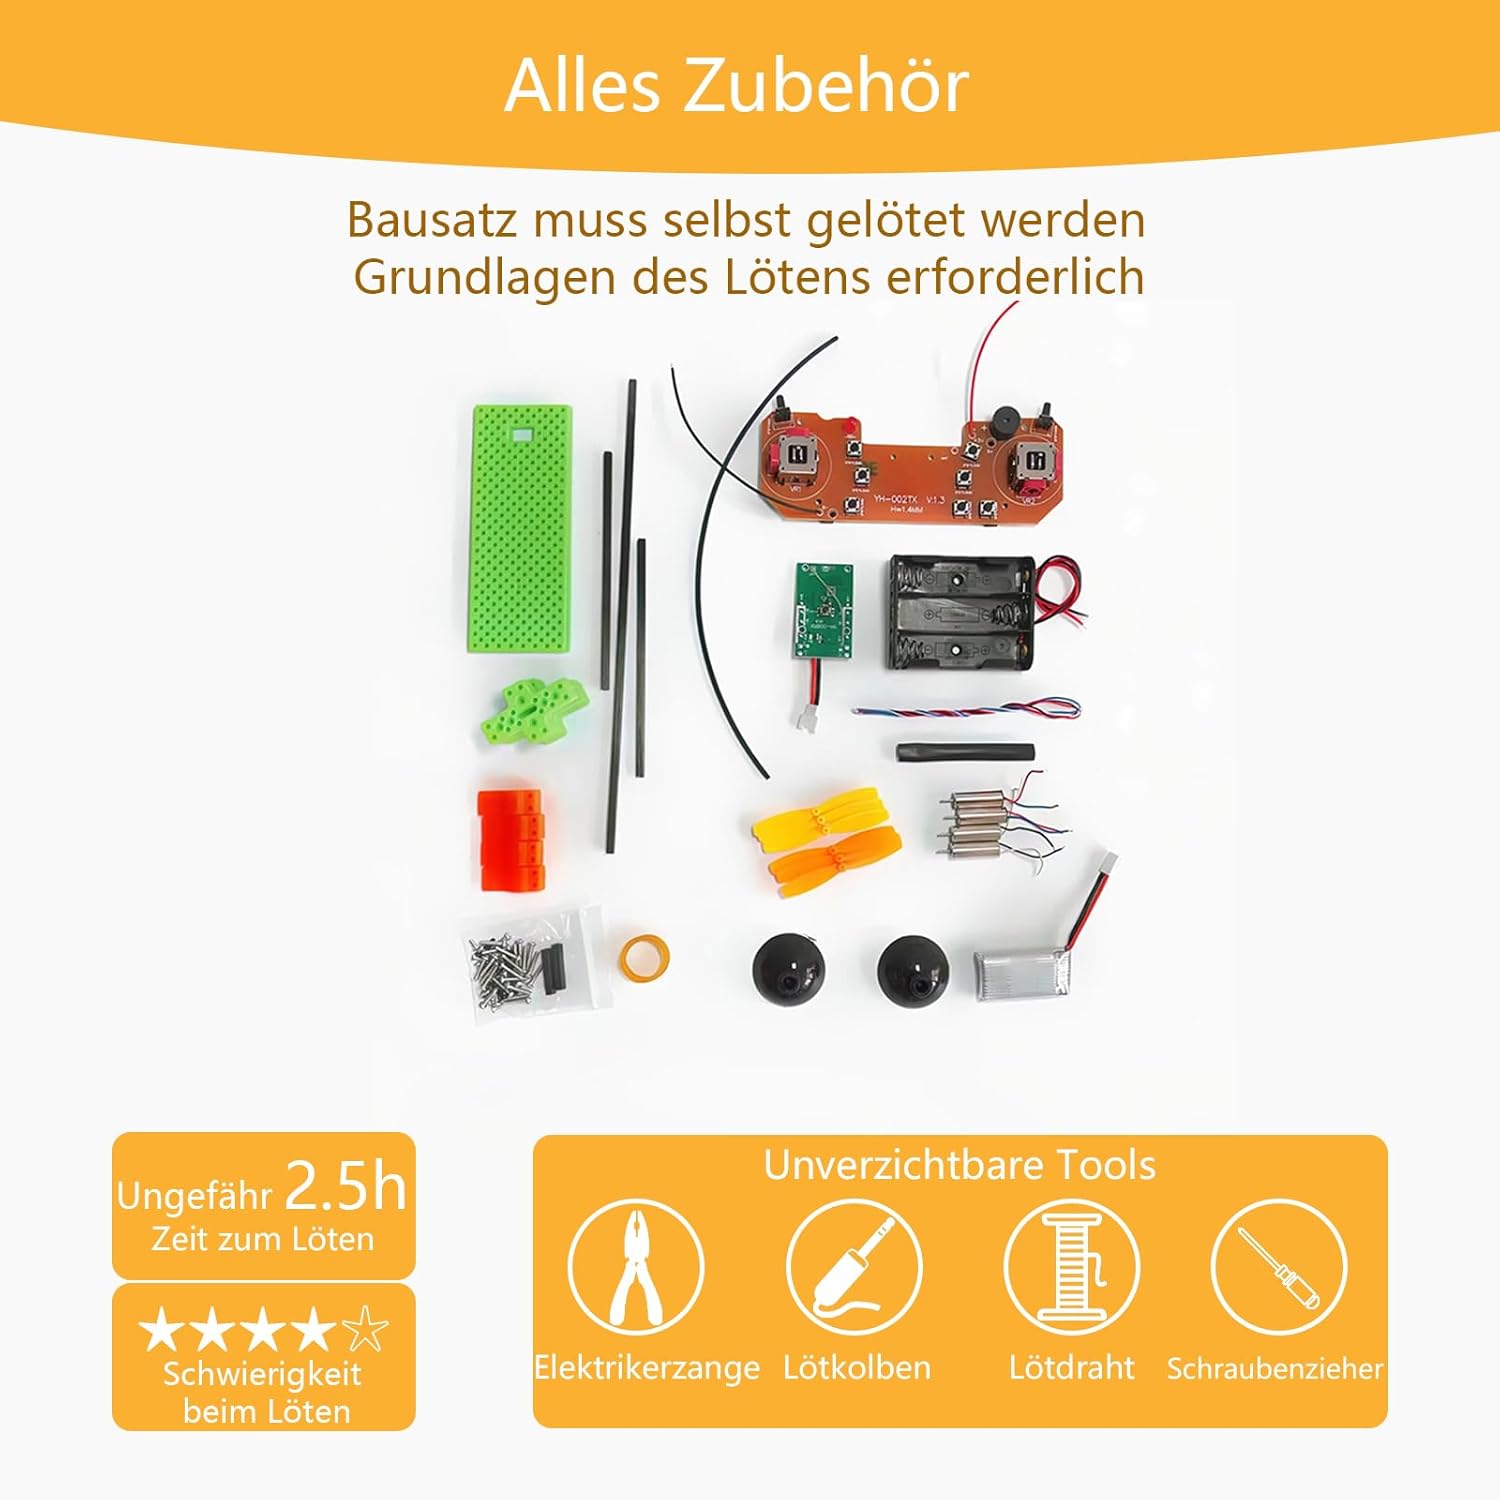
בילד באַשרייַבונג: This image displays all components included in the DIY drone kit, along with essential tools required for assembly: electrician's pliers, soldering iron, solder wire, and screwdriver. It indicates an approximate soldering time of 2.5 hours and highlights the high difficulty level for soldering.
2. Component Assembly and Soldering
The kit features pre-assembled components, requiring only simple soldering steps. Refer to the diagrams for correct connections.

בילד באַשרייַבונג: This image illustrates the pre-assembled components of the drone kit, indicating that most parts are pre-soldered, requiring only simple soldering. It also shows a diagram for wire board battery cable side connection and carbon rod measurements (10cm).
- Connect the Battery Board: Solder the battery board to the main control board. Ensure correct polarity.
- Attach Motors: Solder the motor wires to the designated points on the main control board. Pay attention to the motor rotation direction for each arm.
- Install Carbon Rods: Insert the 10cm carbon rods into the drone frame, ensuring they are securely fastened.
- Mount Propellers: Attach the propellers to the motor shafts. Ensure the correct propeller type (CW/CCW) is used for each motor. A set of spare propellers is included to replace any damaged ones during flight or assembly.
- Secure the Shell: Assemble the drone's shell around the internal components.
אַפּערייטינג ינסטראַקשאַנז
Your EIELEDIY drone is equipped with multiple flight functions for an engaging experience. The remote control requires its own batteries (not included).
ווייַט קאָנטראָל איבערview
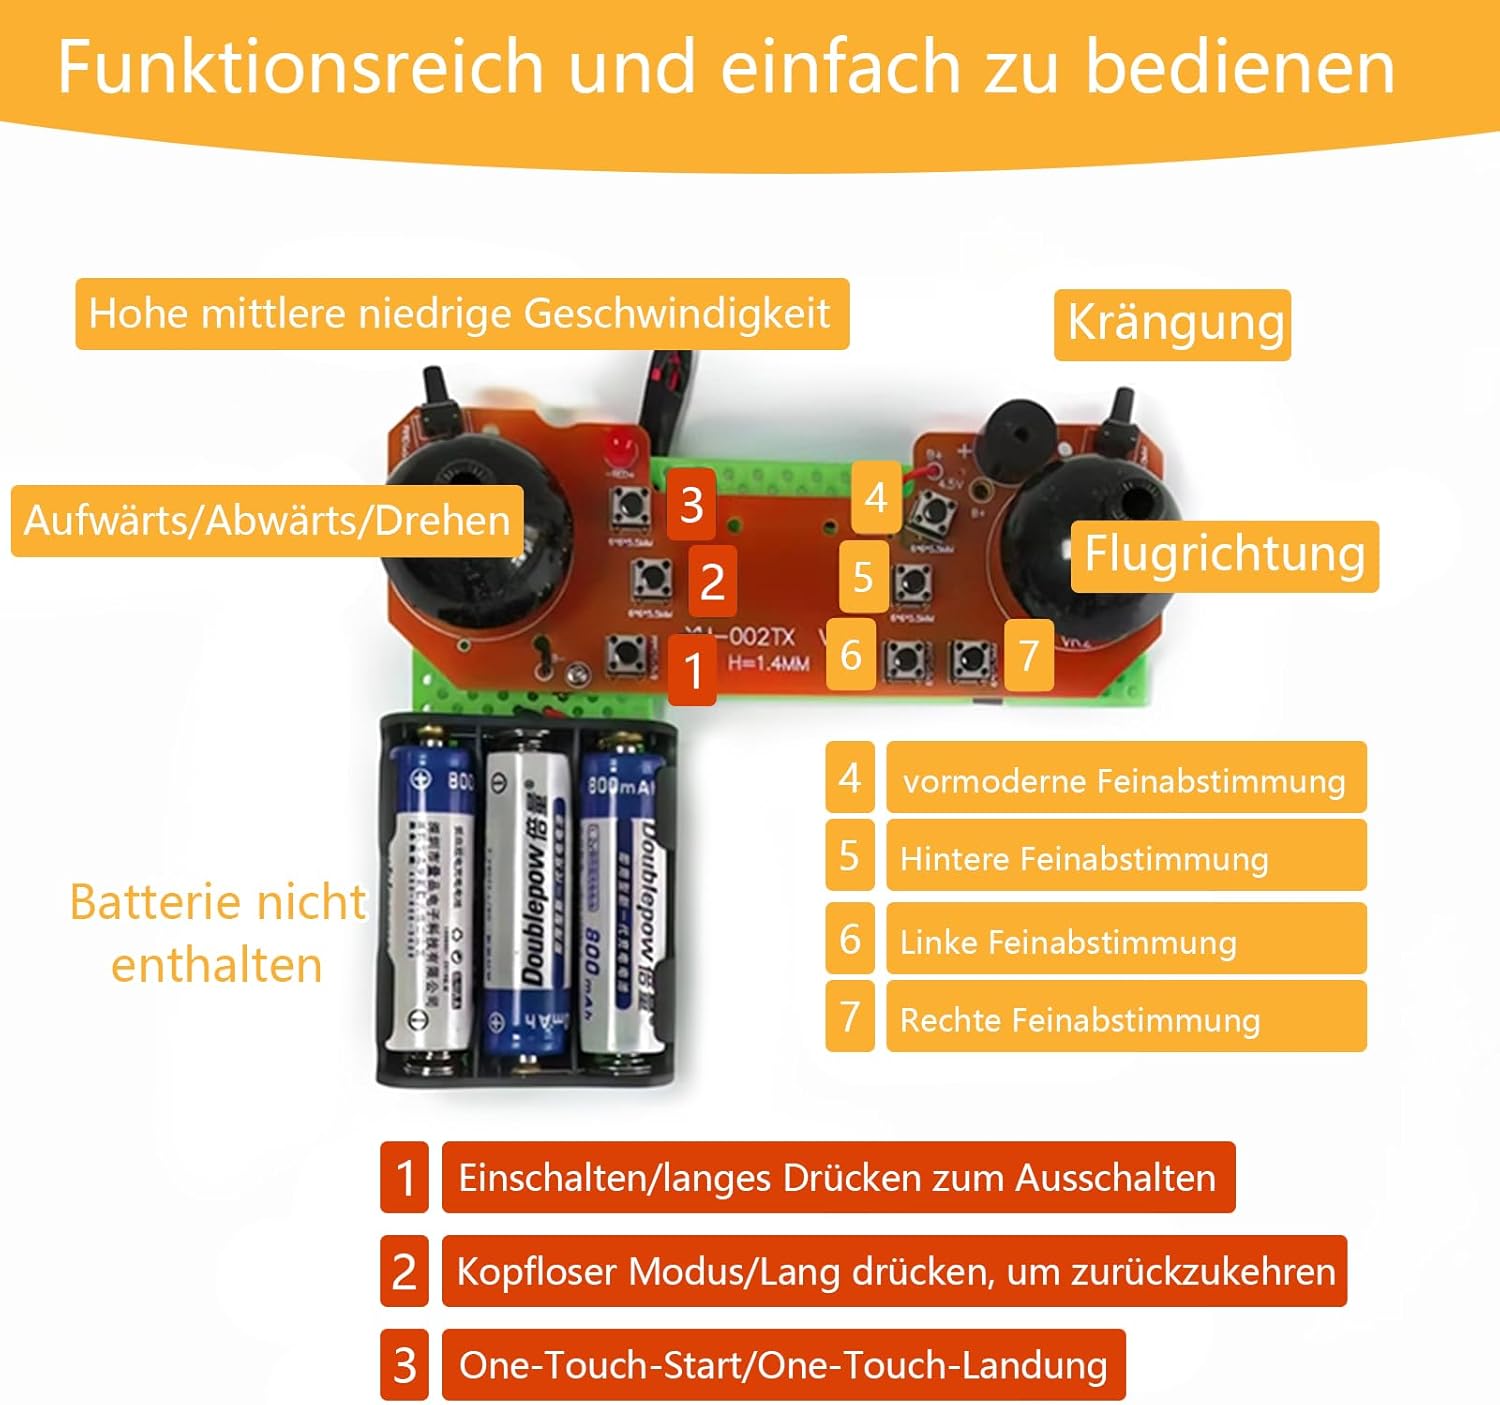
בילד באַשרייַבונג: This image details the remote control's layout and functions. It shows controls for high, medium, low speed, banking, ascend/descend/rotate, and flight direction. Key functions are numbered: 1. Power On/Long press for Off, 2. Headless Mode/Long press to return, 3. One-Touch Start/Land, 4. Forward Fine-tuning, 5. Backward Fine-tuning, 6. Left Fine-tuning, 7. Right Fine-tuning. Note: Batteries for the remote are not included.
פלי פאַנגקשאַנז
- מאַכט אויף/אויס (1): Press briefly to power on. Long press to power off.
- Headless Mode (2): Press briefly to activate Headless Mode. Long press to exit. In Headless Mode, the drone's orientation is relative to the pilot, regardless of its actual front.
- One-Touch Start/Land (3): Press to initiate automatic takeoff or landing.
- גיכקייט אַדזשאַסטמאַנט: Toggle between high, medium, and low speeds to suit your flying skill level and environment.
- 360° ראָוטיישאַן: Execute impressive 360-degree flips for enhanced flying fun.
- Fine-tuning (4, 5, 6, 7): Use the fine-tuning buttons to adjust the drone's stability and drift in forward, backward, left, and right directions.
Operating the drone requires practice to master. Start in a clear, open area and gradually increase complexity as you gain experience.
וישאַלט
רעגולערע אויפהאלטונג גאראנטירט די לאנגעוויטי און אפטימאלע פערפארמאנס פון אייער דראָון.
- פּראָפּעלער דורכקוק: Regularly check propellers for damage (cracks, bends). Replace any damaged propellers immediately using the included spare set to maintain flight stability.
- באַטערי זאָרגן: Charge the Lithium-ion battery using the provided Micro-USB cable connected to a USB-A port. Do not overcharge or completely drain the battery. Store the battery in a cool, dry place.
- רייניקונג: Keep the drone free from dust and debris. Use a soft, dry cloth to clean the body and components. Avoid using liquids.
- מאָטאָר קאָנטראָל: Ensure motors spin freely and are not obstructed by hair or small particles.
- פֿאַרבינדונג אָרנטלעכקייט: Periodically check soldered connections for any signs of loosening or corrosion. Re-solder if necessary.
טראָובלעשאָאָטינג
Encountering issues is part of the learning process with a DIY kit. Here are some common problems and solutions:
- דראָון טוט זיך נישט אָן:
- קוק די באַטאַרייע אָפּצאָל מדרגה.
- Ensure battery is correctly connected to the main board.
- Verify all power-related solder joints are secure.
- Drone does not take off or flies erratically:
- Ensure propellers are installed correctly (CW/CCW on the right motors).
- Check for any damaged propellers and replace them.
- Calibrate the drone before flight (refer to remote control instructions for calibration steps, typically involving stick movements).
- Verify all motor connections are secure and motors spin freely.
- Use the fine-tuning buttons on the remote to correct any drift.
- Remote control does not connect to drone:
- זיכער מאַכן אַז ביידע די דראָון און ווײַט קאָנטראָל זענען אנגעצונדן.
- קוק ווייַט קאָנטראָל באַטעריז.
- Follow the pairing procedure (usually power on drone, then remote, move left stick up then down).
- קורצע פלי צייט:
- ענשור אַז די באַטאַרייע איז גאָר באפוילן.
- Battery degradation can occur over time; consider replacing if flight time significantly decreases.
If you encounter persistent issues, carefully re-examine your assembly and soldering. EIELEDIY offers comprehensive technical support for this product.
ספּעסאַפאַקיישאַנז
Detailed specifications for the EIELEDIY DIY Drone Kit (Model EU-D04F6-A).

בילד באַשרייַבונג: This image provides the dimensions of the assembled drone and its remote control. The drone measures approximately 15.2 cm x 15.2 cm, with propeller arms extending 5.5 cm from the center.
| שטריך | דעטאַל |
|---|---|
| מאָדעל נומער | EU-D04F6-A |
| סאָרט | EIELEDIY |
| פּראָדוקט דימענשאַנז (L x W x H) | 15 x 15 x 3 cm (assembled drone) |
| פּראָדוקט וואָג | 180 גראַמז |
| רעקאַמענדיד עלטער | 14 years and up (Manufacturer recommends 18 months and up, but given soldering and difficulty, 14+ is more appropriate for assembly) |
| בילדונגקרייז ווערט | STEM, Design Skills, Practical Skills, Electronic Technology Knowledge |
| אַסעמבלי פארלאנגט | יא |
| באַטעריע טיפּ (אַרייַנגערעכנט) | ליטיום-יאָן (1 ליטיום-פּאָלימער באַטאַרייע אַרייַנגערעכנט) |
| הויפּט מאַטעריאַל | אַקריליק |
| נומער פון פּלייַערס | 1 שפּילער |
וואָראַנטי און שטיצן
EIELEDIY is committed to providing a quality product and support for your DIY drone kit.
- טעכניש שטיצן: For any assembly, operation, or troubleshooting questions, please contact EIELEDIY customer support.
- וואָראַנטי אינפֿאָרמאַציע: Specific warranty details are not provided in the product description. Please refer to the retailer's return policy or contact EIELEDIY directly for warranty claims.