
הקדמה
This manual provides detailed instructions for the installation, operation, and maintenance of your ARES WING GDT1004WLBK Single Monitor Wall Mount. This heavy-duty gas spring wall mount is designed to support 17-49 inch ultrawide screens, including 1000R curved monitors, with a weight capacity of up to 44 lbs. It offers full flexibility and adjustability to optimize your viewing experience and workspace.
סעטאַפּ און ינסטאַלירונג
Before beginning installation, ensure all components are present and undamaged. Refer to the included hardware list in your product packaging.
1. Check Monitor Compatibility
- VESA מוסטער: Compatible with 75x75mm and 100x100mm VESA patterns.
- פאַרשטעלן גרייס: Fits monitors from 17 inches to 49 inches.
- וואָג קאַפּאַציטעט: Supports monitors weighing between 4.4 lbs and 44 lbs.
If your monitor does not have VESA holes, a VESA mount adapter (not included) must be purchased separately. Some monitors, like the Samsung G9, may come with a compatible VESA adapter.

This image illustrates the monitor arm's compatibility with VESA 75x75mm and 100x100mm patterns, its support for 17-49 inch flat and curved monitors, and a maximum weight capacity of 44 lbs.
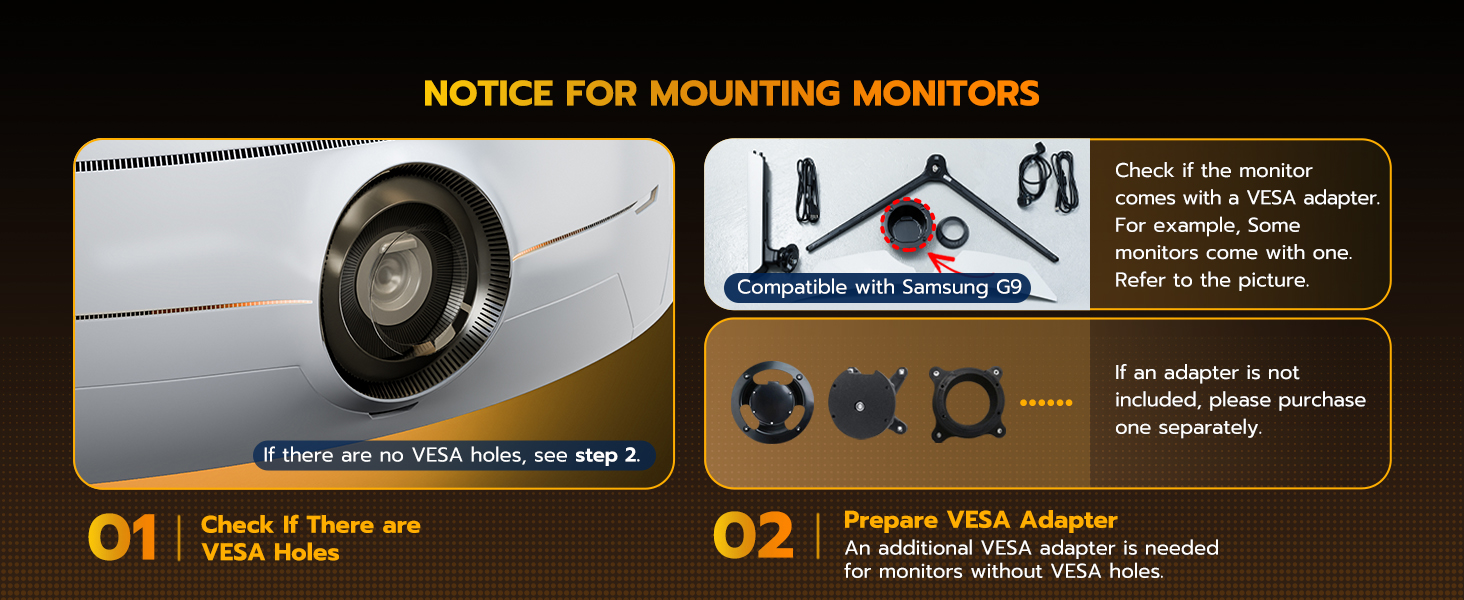
This diagram provides guidance on checking for existing VESA holes on your monitor and the necessity of a VESA adapter for monitors without them.
2. Choose a Suitable Wall Type
For maximum security and stability, the monitor arm must be attached to one of the following wall types:
- האָלץ שטיפט
- Solid Concrete Wall
- ציגל וואנט
NOTE: Do not use the provided anchors on drywall or wood alone. Always secure to a structural element.

This image demonstrates the appropriate wall types for installation: wood stud, brick, and solid concrete. It also includes a crucial warning against installing on drywall alone.
3. פֿאַרזאַמלונג און מאָנטירונג
Follow the detailed instructions and diagrams provided in your product packaging for step-by-step assembly. Ensure all screws are tightened securely.
Quick-Release VESA Plate
The quick-release VESA plate simplifies attaching the monitor to the arm. Install the VESA plate to your monitor first, then slide it onto the arm's mounting head until it clicks into place.
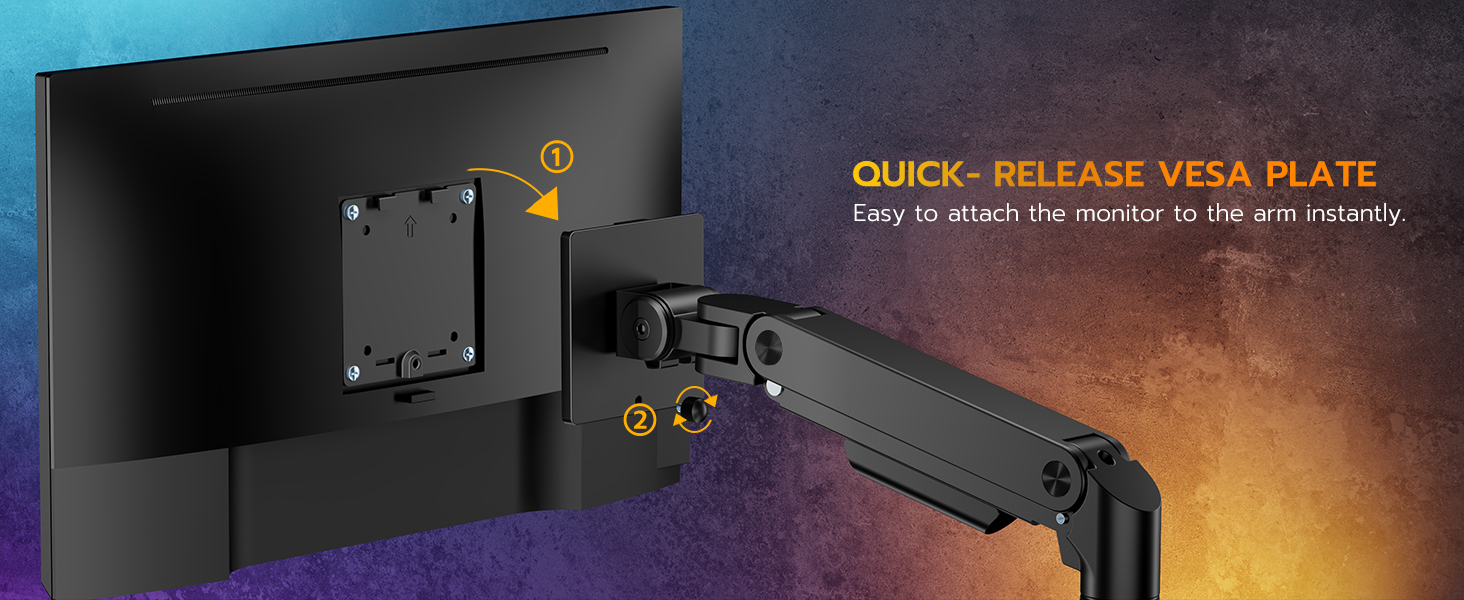
This diagram shows the two-step process for using the quick-release VESA plate to easily attach your monitor to the arm.
Operating the Monitor Arm
The ARES WING monitor arm offers extensive adjustability to achieve an ergonomic viewינג שטעלע.
1. Adjusting Gas Spring Tension
The internal gas spring allows for smooth height adjustment. Adjust the tension to match your monitor's weight for optimal balance.
- קער קלאַקווייז to increase tension (if the arm drops).
- קער אַנטקעגן-קלאַקווייז to decrease tension (if the arm rises too easily).
Important: Before mounting the monitor, adjust the gas spring tension (points A & B on the arm) to the maximum setting. This provides initial stability for heavier monitors.
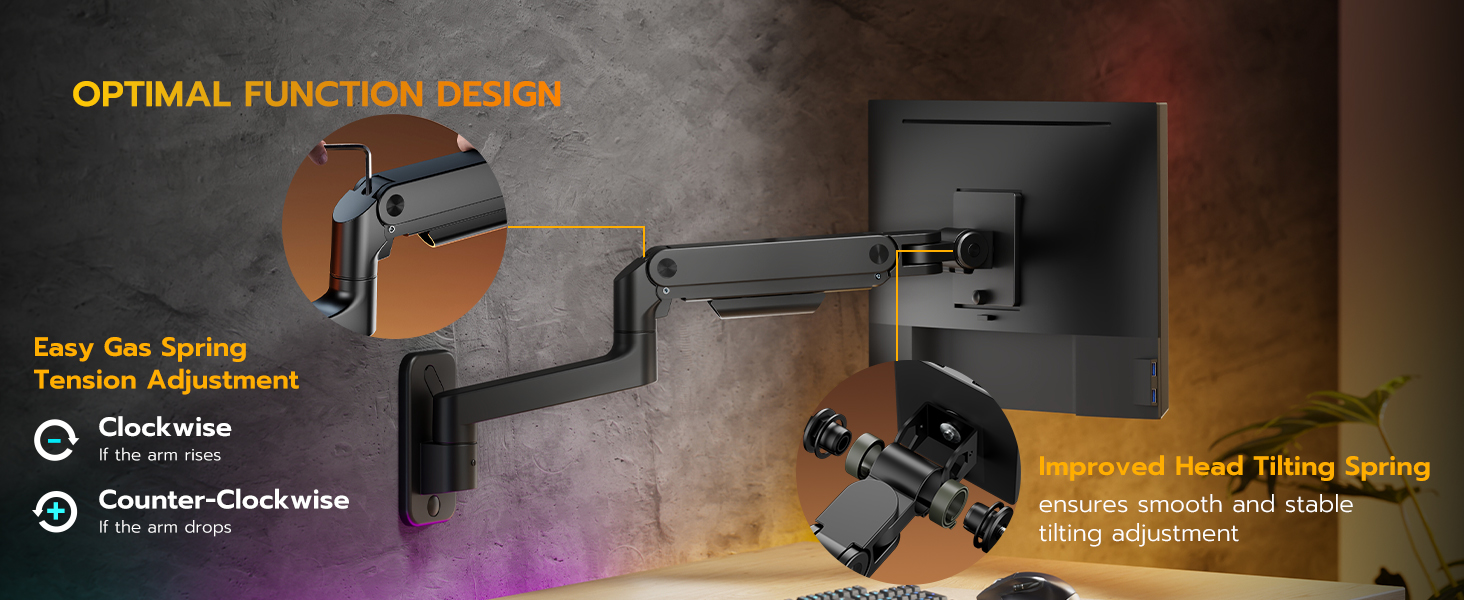
This image illustrates the gas spring tension adjustment points and the direction to turn for increasinג אדער דעקרעasinג שפּאַנונג.
2. Adjusting Monitor Position
The arm provides the following movement capabilities:
- טילט: +50° to -20° for optimal vertical viewינג אַנגלעס.
- סוויוול: 180° for horizontal screen orientation.
- ראָוטיישאַן: 360° for switching between landscape and portrait modes.
- הייך אַדזשאַסטמאַנט: 10-inch range.
- אָרעם אויסשטרעק: Retracts to 5 inches from the wall, extends up to 23.9 inches.

This image highlights the arm's range of motion, including its retraction, extension, height adjustment, and tilt capabilities.

This image illustrates how the arm allows for easy swiveling and 360-degree rotation of the monitor.
3. קאַבלע מאַנאַגעמענט
Utilize the integrated cable management system to route and conceal cables along the arm, maintaining a clean and organized workspace.
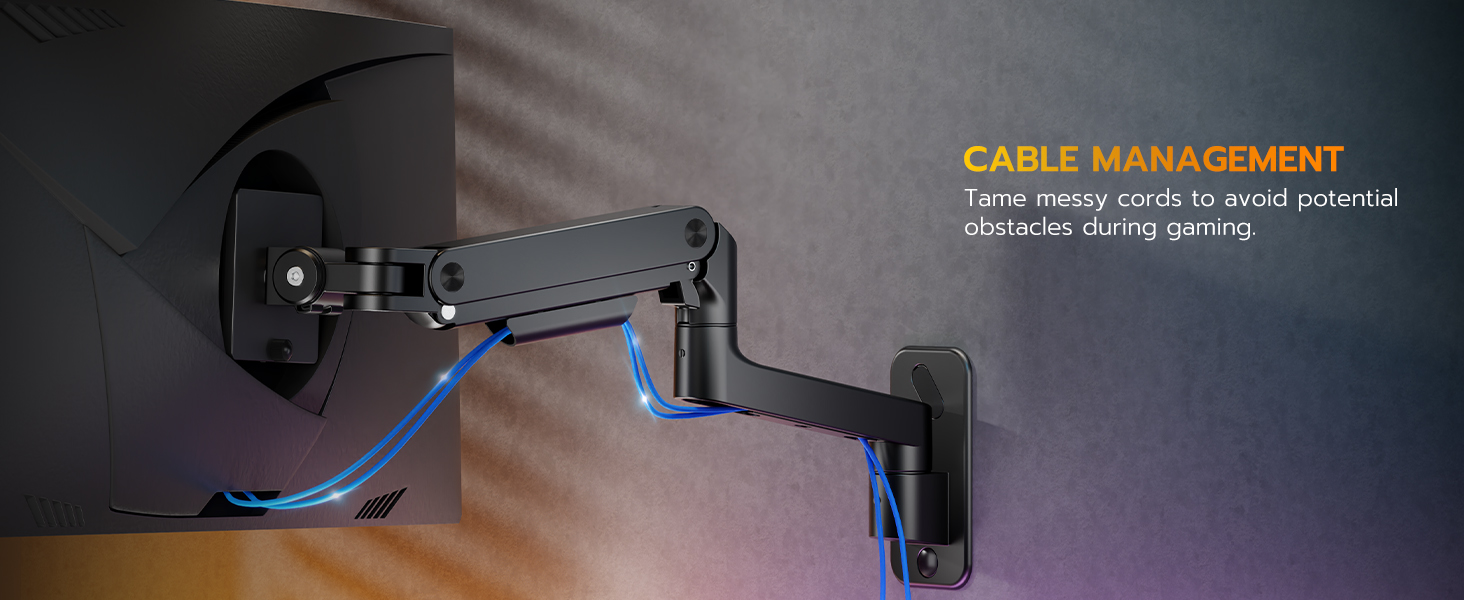
This image demonstrates the effective use of the built-in cable management system to keep cables tidy.
וישאַלט
To ensure the longevity and optimal performance of your ARES WING monitor arm, follow these simple maintenance guidelines:
- רייניקונג: Wipe the arm surfaces with a soft, dry cloth. Avoid abrasive cleaners or solvents.
- פּעריאָדיש טשעקס: Regularly inspect all mounting screws and connections to ensure they remain tight and secure.
- גאז פרילינג אַדזשאַסטמענט: Re-adjust the gas spring tension if your monitor's weight changes or if the arm no longer holds its position smoothly.
טראָובלעשאָאָטינג
Monitor Does Not Hold Position (Sags or Rises Too Easily)
This indicates incorrect gas spring tension for your monitor's weight.
- לייזונג: Adjust the gas spring tension using the provided Allen wrench. Turn clockwise if the arm sags, and counter-clockwise if it rises too easily. Make small adjustments and test the arm's movement.
Monitor Cannot Tilt Smoothly or Stays Fixed
The tilt mechanism may be too tight or too loose.
- לייזונג: If the monitor is not tiltable, locate the tilt screw on the VESA plate connection point and loosen it slightly until smooth tilting is achieved. If it tilts too freely, tighten the screw.
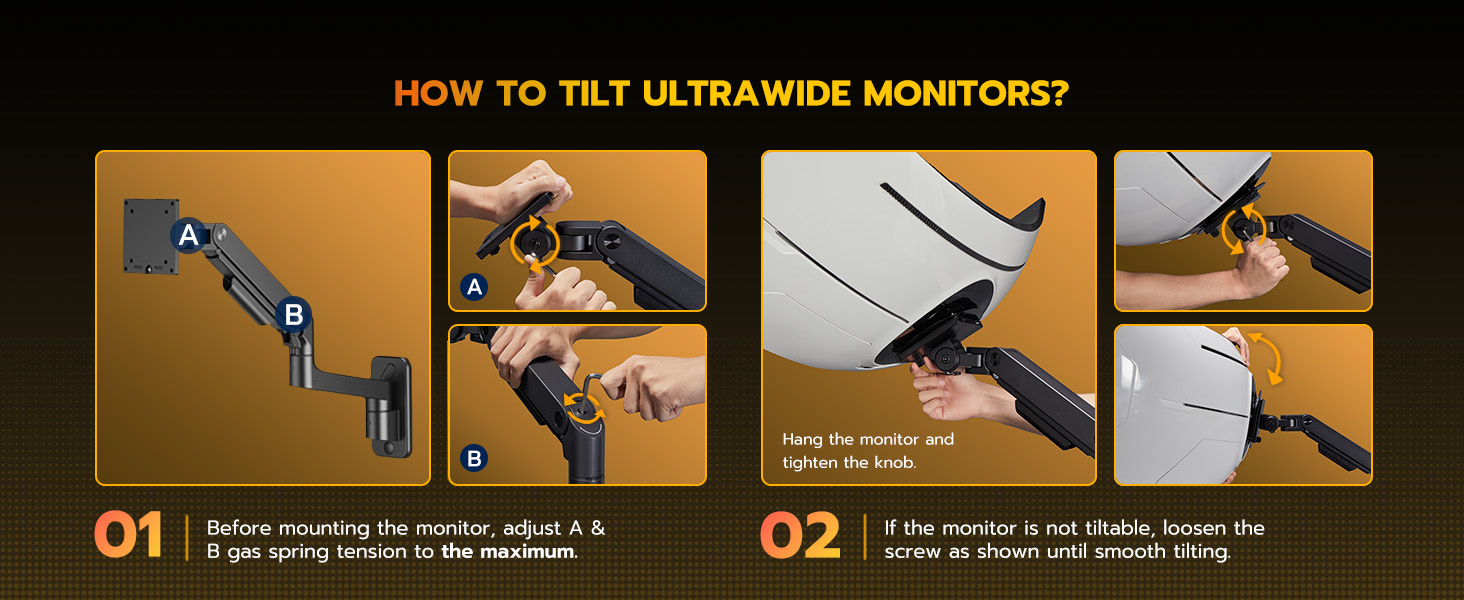
This diagram illustrates the steps for adjusting gas spring tension and loosening the tilt screw to ensure proper monitor movement.
Mount Feels Unstable on the Wall
This is often due to improper installation or unsuitable wall anchors.
- לייזונג: Ensure the mount is securely fastened to a wood stud, solid concrete, or brick wall. If the provided anchors failed during installation, replace them with higher-quality anchors suitable for your specific wall material. Never install on drywall alone.
- לייזונג: Verify all mounting screws are fully tightened.
ספּעסאַפאַקיישאַנז
| שטריך | דעטאַל |
|---|---|
| מאָדעל נומער | GDT1004WLBK |
| סאָרט | אַרעס פליגל |
| מאַונטינג טיפּ | וואנט בארג |
| מאַטעריאַל | Premium-grade Steel and Aluminum |
| קאָליר | שוואַרץ |
| קאָמפּאַטיבלע פאַרשטעלן גרייס | 17 - 49 אינטשעס |
| וואָג קאַפּאַסיטי | 4.4 - 44 פונט |
| VESA קאַמפּאַטאַבילאַטי | 75 קס 75 מם, 100 קס 100 מם |
| טילט ראַנגע | +50° צו -20° |
| סוויוואַל ראַנגע | 180° |
| ראָוטיישאַן | 360° |
| הייך אַדדזשוסטמענט ראַנגע | 10 אינטשעס |
| מאַקס אָרעם עקסטענשאַן | 23.9 אינטשעס |
| ריטראַקשאַנז דיסטאַנסע | 5 אינטשעס |
| Item Weight (Mount Only) | 8 פונט |
וואָראַנטי אינפֿאָרמאַציע
For detailed warranty information, please refer to the documentation included with your product or visit the official ARES WING webפּלאַץ. וואָראַנטי טערמינען דעקן טיפּיש פאַבריקאַציע חסרונות און מאַטעריאַל חסרונות אונטער נאָרמאַל נוצן.
קונה שטיצן
If you encounter any issues or have questions regarding your ARES WING GDT1004WLBK Single Monitor Wall Mount that are not addressed in this manual, please contact ARES WING customer support through their official webזייטל אדער די קאָנטאַקט אינפֿאָרמאַציע וואָס איז צוגעשטעלט אין אייער פּראָדוקט פּאַקאַדזשינג.