
1. הקדמה
Thank you for choosing the Villastar Pool Heat Pump. This manual provides essential information for the safe and efficient operation, installation, and maintenance of your new pool heater. Please read this manual thoroughly before use and retain it for future reference.

Figure 1: Villastar Pool Heat Pump Model YC-005
This image displays the main unit of the Villastar Pool Heat Pump, featuring its compact design, front fan, and digital display. The power cord and water connections are visible on the side.
2. זיכערקייַט אינפֿאָרמאַציע
שטענדיק האַלטן זיך צו די פאלגענדע זיכערהייט מיטלען צו פאַרמייַדן שאָדן אָדער שעדיקן צו די אַפּאַראַט.
- Ensure the unit is installed by a qualified professional if you are not familiar with plumbing and electrical work.
- Do not operate the unit if any part is damaged or if the power cord is frayed.
- האַלט קינדער און חיות אַוועק פון דער אַפּאַראַט בעת אָפּעראַציע.
- Ensure proper ventilation around the unit. Do not block the fan or air vents.
- Always disconnect power before performing any maintenance or troubleshooting.
- The unit features automatic leakage protection, low-voltage switch, and high/low temperature protection for enhanced safety.
3. פּעקל אינהאַלט
באַשטעטיקן אַז אַלע קאָמפּאָנענטן זענען פאַראַן און נישט געשעדיגט ביים אויספּאַקן:
- Villastar Pool Heat Pump Unit (Model YC-005)
- Inlet and Outlet Joints
- Water Pump Unions
- קישקע קלamps
- Corrugated Pipes (Hoses)
- באַניצער מאַנואַל
4. סעטאַפּ און ייַנמאָנטירונג
The Villastar Pool Heat Pump is designed for easy installation with 1-1/4" water pipe connections. No special plumbing or electrical work is typically needed for standard setups.
4.1 פּלאַץ סעלעקציע
- Place the unit on a stable, level surface near your pool and existing filtration system.
- ענשור טויגן לופט סערקיאַליישאַן אַרום די אַפּאַראַט.
- The unit operates between 23°F to 109.4°F air temperature.
4.2 קאַנעקטינג די אַפּאַראַט
- Prepare Auxiliary Materials: Gather all necessary pipes, joints, and clamps. Ensure you have a filter pump and the swimming pool ready.
- צוטשעפּען קלamps to Pipes: רוק די קישקע קלamps onto the corrugated pipes.
- Connect Heat Pump Joints: Securely attach the heat pump inlet and outlet joint fittings to the corresponding ports on the heat pump unit.
- Connect Water Pump Union: Connect the water pump union to the pipe leading from your filter pump.
- Connect Pipes to System: Connect the corrugated pipes from the heat pump to your filter pump and then to the pool. Ensure all connections are tight using the hose clampס צו פאַרמייַדן ליקס.
- Remove Air from System: Before powering on, add water to the system to remove any trapped air. This is crucial for proper operation.
Video 1: Villastar Above Ground Pool Heat Pump Easy to Install
This video demonstrates the step-by-step process of connecting the Villastar pool heat pump to an existing pool filtration system, including preparing materials, attaching hoses, and ensuring proper water flow.
Video 2: Villastar Mini Swimming Pool Heat Pump for Above-Ground Pool Overview
דאס ווידעא גיט אן אלגעמיינע איבערבליקview of the Villastar Mini Swimming Pool Heat Pump, showcasing its features and compact size, and briefly touching upon its installation process.
5. אַפּערייטינג ינסטרוקטיאָנס
The Villastar Pool Heat Pump features an intuitive LED control panel for easy temperature and mode adjustments.
5.1 קאָנטראָל פּאַנעל איבערview

Figure 2: Control Panel for Villastar Pool Heat Pump
This image highlights the digital LED display and control buttons on the unit, including power, mode selection, and temperature adjustment buttons.
- מאַכט קנעפּל: טורנס די אַפּאַראַט אויף / אַוועק.
- אַרויף / אַראָפּ אַראָוז: אַדזשאַסטירן די געוואונטשענע וואַסער טעמפּעראַטור.
- מאָדע (M) קנעפּל: Switches between heating mode, cooling mode, and automatic mode (heating + cooling).
- The LED screen displays the current pool water temperature.
5.2 Initial Startup and Temperature Setting
- מאַכט אויף: Plug in the unit. The display will show "OFF". Press the Power button to start the unit.
- View טעמפּעראַטור: The set temperature will flash three times, then the actual water temperature will be displayed.
- טוישן מאָדע: Press the "M" key to cycle through heating mode (sun icon), cooling mode (snowflake icon), and automatic mode (both icons).
- סטרויערן טעמפּעראַטור: Use the Up or Down arrow keys to set your desired water temperature. The unit will automatically work to reach and maintain this temperature.
The unit efficiently warms pools up to 5,000 gallons, maintaining water temperatures between 59°F-104°F for heating and 46°F-82°F for cooling.
Video 3: Villastar Pool Heat Pump Display and Operation
This video demonstrates how to power on the unit, view the current temperature, switch between heating and cooling modes, and adjust the desired temperature using the control panel.
6. וישאַלט
Regular maintenance ensures optimal performance and longevity of your Villastar Pool Heat Pump.
- רייניקן די ווענטילאַטאָר און ווענטילאַטאָרן: Periodically inspect and clean the fan blades and air intake/exhaust vents to ensure unobstructed airflow.
- טשעק וואַסער קאַנעקשאַנז: Regularly inspect all pipe connections for leaks and tighten clampס ווי דארף.
- ווינטעריזאַטיאָן: If you live in an area with freezing temperatures, ensure the unit is properly winterized by draining all water from the system to prevent damage.
- פאַכמאַן סערוויס: For complex issues or annual checks, consider professional servicing.
7. טראָובלעשאָאָטינג
דאָ זענען עטלעכע געוויינטלעכע פּראָבלעמען און זייערע מעגלעכע לייזונגען:
| פּראָבלעם | מעגלעך סיבה | לייזונג |
|---|---|---|
| אַפּאַראַט איז נישט אויסגעדרייט | קיין עלעקטרע, אויסגעלאזטער ברעיקער, פרייע פארבינדונג. | Check power supply, reset breaker, ensure secure connections. |
| Pool not heating/cooling | Incorrect temperature setting, low water flow, air in system, unit too small for pool size. | Verify settings, check filter pump operation, bleed air from system, allow more time for larger pools. |
| אומגעוויינטלעכע גערויש פון אַפּאַראַט | Debris in fan, loose components, internal issue. | Inspect fan for obstructions, check for loose parts. If persistent, contact support. |
| וואַסער ליקאַדזש | Loose pipe connections, damaged seals. | פאַרשטייַפן קישקע קלamps, inspect seals for damage. |
For further assistance, please contact Villastar customer support.
8. ספּעסאַפאַקיישאַנז
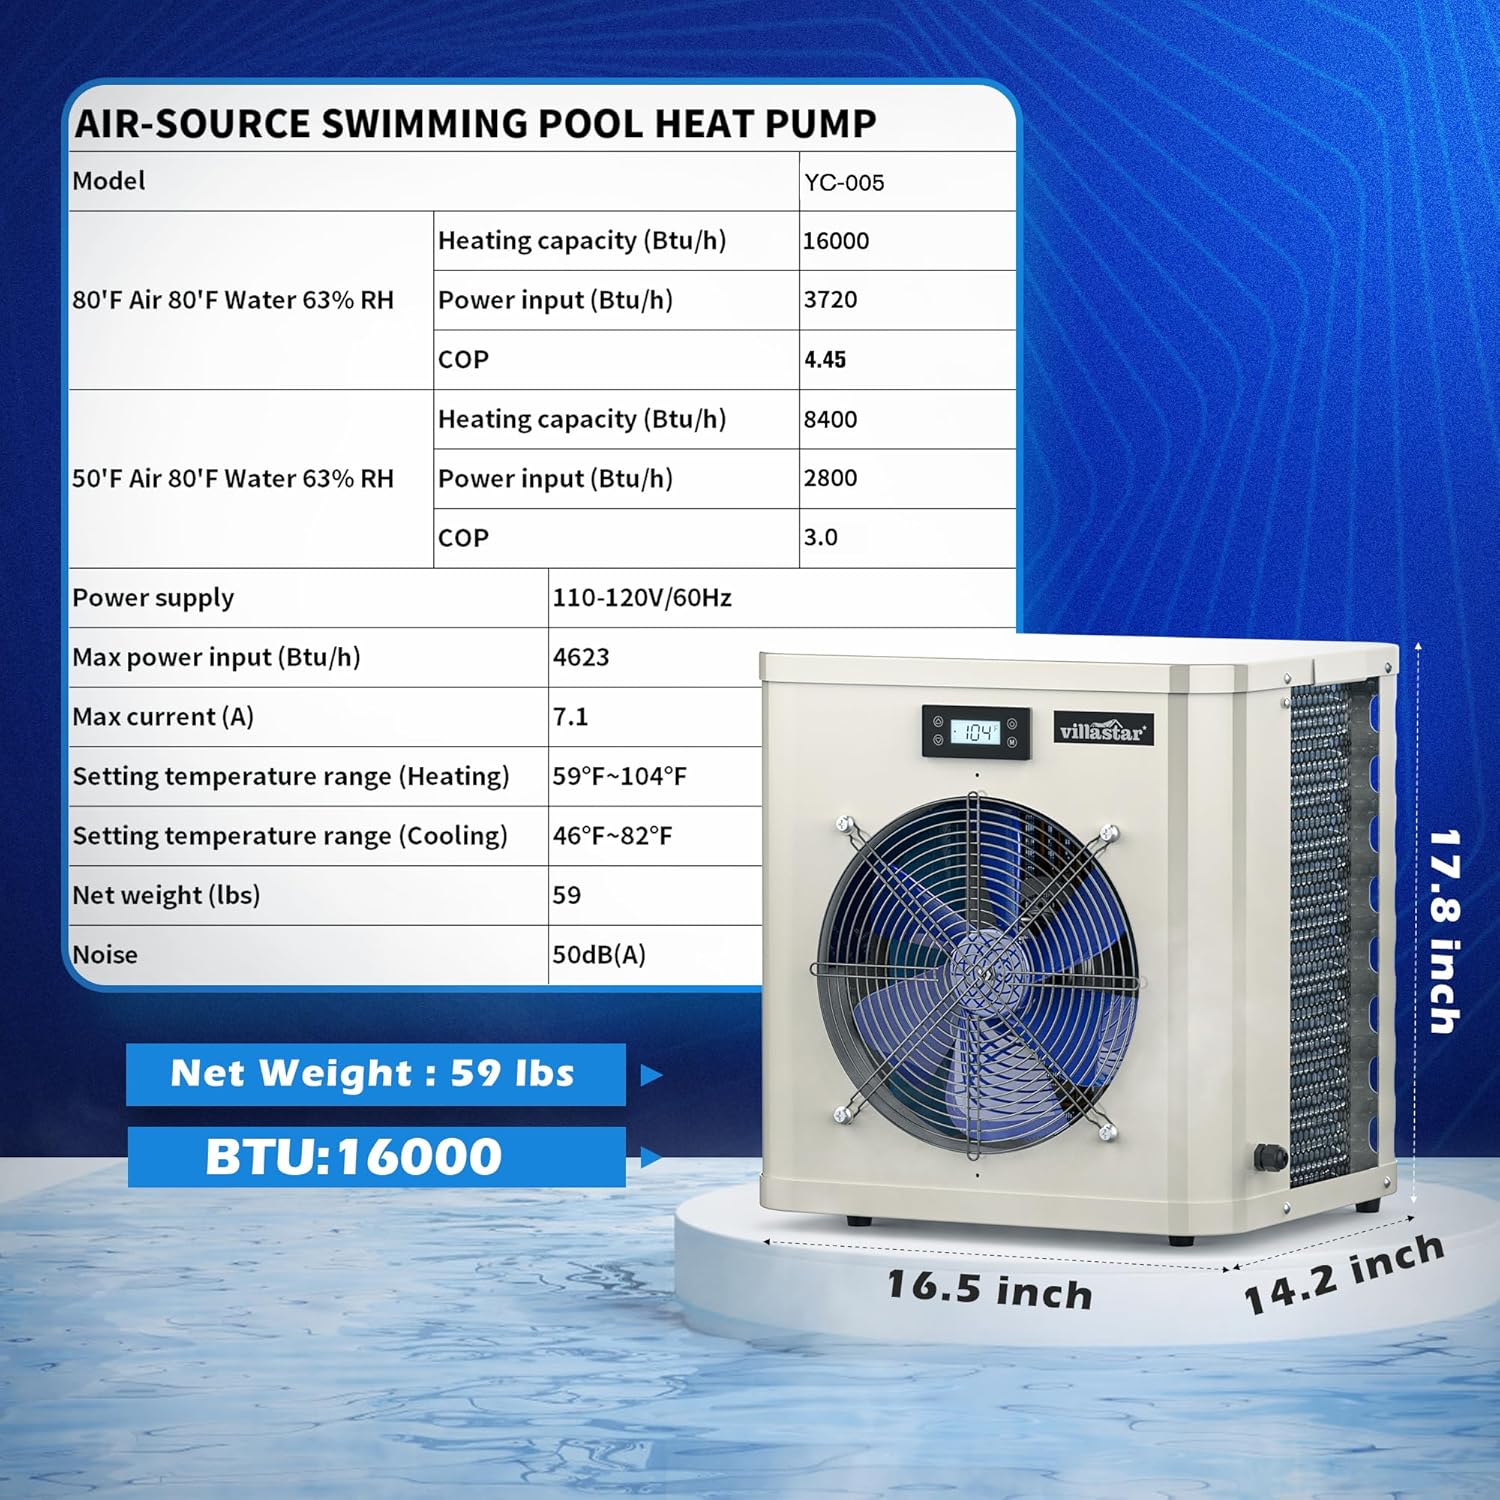
Figure 3: Air-Source Swimming Pool Heat Pump Specifications
This image provides a detailed table of technical specifications for the YC-005 model, including heating capacity, power input, COP, temperature ranges, and dimensions.
| שטריך | דעטאַל |
|---|---|
| מאָדעל | YC-005 |
| באַהיצונג קאַפּאַציטעט (BTU / hr) | 16,036 (at 80°F Air, 80°F Water, 63% RH) |
| Power Input (BTU/hr) | 3,599 (at 80°F Air, 80°F Water, 63% RH) |
| COP | 4.45 (at 80°F Air, 80°F Water, 63% RH) |
| רעקאָמענדירטע בעקן גרייס | אַרויף צו 5,000 גאלאנען |
| באַהיצונג טעמפּעראַטור ראַנגע | 59°F - 104°F |
| קאָאָלינג טעמפּעראַטור קייט | 46°F - 82°F |
| אַפּערייטינג לופט טעמפּעראַטור | 23°F - 109.4°F |
| מאַכט צושטעלן | 110-120 וו / 60 הז |
| מאַקס קראַנט | 7.1 א |
| נעץ וואָג | 67.9 פונט |
| פּראָדוקט דימענשאַנז | 15 X 16.5 X 20 אינטשעס |
| ראַש מדרגה | 50 dB(A) |
| פאַבריקאַנט | villastar |
| לאַנד פון אָריגין | כינע |
9. וואָראַנטי און שטיצן
Villastar is committed to providing exceptional products and customer service.
- שוץ פלענער: Extended protection plans are available for purchase (e.g., 2-Year, 3-Year Protection Plans).
- קערט: דער פּראָדוקט איז בארעכטיגט פֿאַר 30-טאָג גרינג צוריקקער.
- קונה שטיצן: Villastar offers 24-hour online support to assist with any questions or issues you may encounter.
- For specific warranty details or to contact support, please refer to the contact information provided with your purchase or visit the official Villastar store.