
1. הקדמה
Thank you for choosing the Zapco ST-1000XM III Monoblock Class D Ampליפיער. דאס amplifier is designed to deliver high-quality audio performance for your vehicle's sound system. Please read this manual thoroughly before installation and operation to ensure proper use and to maximize the amplifier's potential.
The ST-1000XM III is a single-channel, Class D bass amplifier featuring a new aluminum chassis, variable input gain control, variable electronic crossover, variable subsonic filter, variable bass boost control, variable center frequency for bass boost, and variable phase control. It is also strappable for use with a second amplifier on a single voice coil and includes a dash-mount remote gain control.
2. זיכערקייַט אינפֿאָרמאַציע
שטענדיק אָבסערווירן די פאלגענדע זיכערהייט מיטלען בעת ינסטאַלירונג און אָפּעראַציע:
- Disconnect the vehicle's battery negative terminal before starting any installation.
- זיכער מאַכן אַז אַלע וויירינג איז ריכטיק ראָוטאַד און סיקיורד צו פאַרמייַדן שאָדן אָדער קורץ קרייזן.
- Use appropriate gauge wiring for power, ground, and speaker connections as specified.
- ינסטאַלירן די amplifier in a dry, well-ventilated location, away from direct sunlight, heat sources, and moisture.
- דו זאלסט נישט אַרבעטן די amplifier if it is damaged or malfunctioning. Refer servicing to qualified personnel.
- High sound pressure levels can cause permanent hearing loss. Adjust volume levels responsibly.
3. סעטאַפּ און ייַנמאָנטירונג
Proper installation is crucial for optimal performance and safety. If you are unsure about any part of the installation process, consult a professional installer.
3.1 מאָנטירן די Ampליפער
Choose a secure, dry, and well-ventilated location for mounting the amplifier. Ensure there is sufficient airflow around the heatsink. Use the provided mounting hardware to secure the amplifier firmly to a solid surface in your vehicle.
3.2 וויירינג קאַנעקשאַנז
Refer to the diagram below for proper wiring connections.
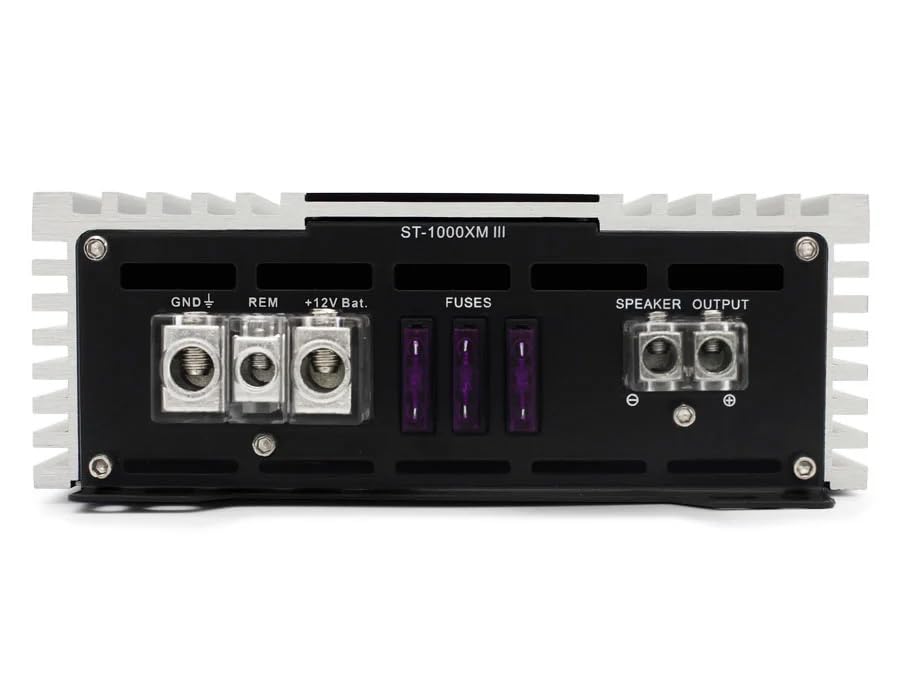
Figure 1: Rear panel connections for power, ground, remote, fuses, and speaker output.
- מאַכט (באַטעריע +12V): Connect a heavy-gauge wire (e.g., 4 AWG or larger, depending on cable length) directly from the vehicle's positive battery terminal to the +12V terminal on the ampאינסטאלירט א פאסיגע פיוז האלטער (נישט צוגעשטעלט) אינערהאלב 18 אינטשעס (45 ס״מ) פון דער באטעריע.
- ערד (GND): Connect a heavy-gauge wire of the same size as the power wire from the GND terminal on the ampלייגט דעם עלעקטרישן לײַכטער צו אַ ריינער, נישט-געפֿאַרבטער מעטאַלענער ייבערפֿלאַך אויף דער שאַסי פֿונעם פֿאָרמיטל. זאָרגט פֿאַר אַ גוטע עלעקטרישע פֿאַרבינדונג.
- ווײַט (REM): Connect a smaller gauge wire (e.g., 18 AWG) from the REM terminal on the ampלייט צו די ווײַט-אויסלעשונג ארויסגאַנג פון אײַער קאָפּ-איינהייט. דער דראָט דרייט דעם amplifier on and off with your stereo.
- פוסעס: די amplifier is equipped with internal fuses. Ensure these are correctly rated (refer to specifications). Do not replace with higher-rated fuses.
- רעדנער רעזולטאַט: Connect your subwoofer(s) to the SPEAKER OUTPUT terminals. Observe correct polarity (+ to + and - to -). This is a monoblock amplifier, designed for a single channel output.
- אריינגאנג (RCA): Connect RCA cables from your head unit's subwoofer or full-range pre-out to the IN (RCA) terminals on the ampליפער.
- רימאָוט געווינען קאָנטראָל: Connect the included remote gain control to the 'REMOTE' port on the amplifier's front panel. This allows for convenient bass level adjustment from the driver's seat.
4. Operating Controls and Adjustments
The Zapco ST-1000XM III features several controls to fine-tune your audio system. Refer to the diagram below for control locations.
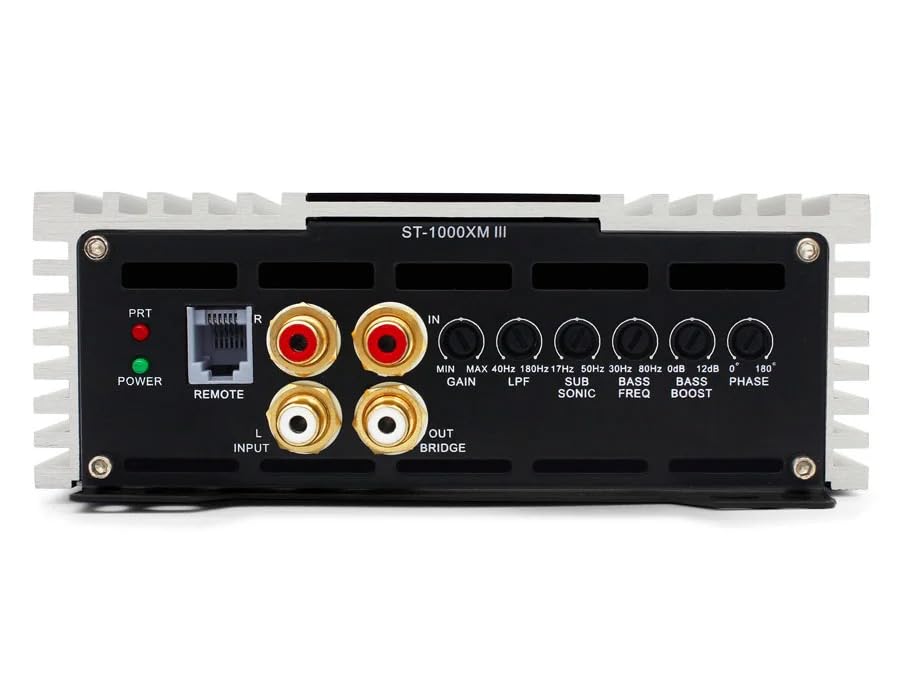
Figure 2: Front panel controls for audio adjustments.
- POWER/PRT Indicators: The POWER LED indicates the amplifier is on. The PRT (Protection) LED illuminates if the amplifier enters protection mode due to overheating, low impedance, or other faults.
- GAIN (Input Sensitivity): אַדזשאַסטיד די amplifier's input sensitivity to match the output voltage of your head unit. Start with the gain at minimum and slowly increase until desired volume is achieved without distortion. Range: 0.25V to 5V.
- לפּף (נידעריק פּאַס פילטער): This control sets the upper frequency limit for the amplifier's output. Only frequencies below the set point will pass through. Typically set between 50Hz and 200Hz for subwoofers.
- SUB SONIC (Subsonic Filter): Filters out extremely low frequencies that are inaudible and can damage subwoofers. Typically set below the port tuning frequency of a ported enclosure, or around 20-30Hz for sealed enclosures. Range: 17Hz to 50Hz.
- באַס בוסט: Increases the output level at a specific bass frequency. Use sparingly to avoid distortion. Range: 0dB to 12dB.
- BASS FREQ (Bass Boost Frequency): Selects the center frequency for the bass boost control.
- FASE: Adjusts the phase of the subwoofer output relative to the main speakers. This helps to ensure all sound waves arrive at the listener's ears in sync, improving bass impact and clarity. Adjustable from 0° to 180°.
5. וישאַלט
The Zapco ST-1000XM III ampדער ליפיער דאַרף מינימאַלע אויפהאלטונג. פאָלגט די גיידליינז צו ענשור לאַנגלעבעדיקייט:
- האַלטן די ampדער ליפיער איז ריין און פריי פון שטויב און שמוץ. ניצט א ווייכן, טרוקענעם שטאָף פארן רייניגן.
- ענשור טויגן ווענאַליישאַן אַרום די amplifier at all times. Do not block cooling fins.
- קאָנטראָלירט פּעריִאָדיש אַלע וויירינג פֿאַרבינדונגען פֿאַר שטרענגקייט און קעראָוזשאַן.
- ויסמיידן ויסשטעלן די ampליפיער צו עקסטרעם טעמפּעראַטורעס אָדער נעץ.
6. טראָובלעשאָאָטינג
אויב איר דערפאַרונג ישוז מיט דיין amplifier, consult the following troubleshooting guide before contacting support.
- קיין מאַכט:
- Check the in-line fuse near the battery and the fuses on the ampליפער.
- Verify all power, ground, and remote turn-on connections are secure and have proper voltage.
- Ensure the head unit is on and sending a remote signal.
- קיין קול:
- קאָנטראָלירט די RCA אַרייַנגאַנג קייבלס פֿאַר ריכטיקע פֿאַרבינדונג און פֿאַר שעדיקן.
- Verify speaker wires are correctly connected and not shorted.
- Adjust the GAIN control.
- Check head unit settings (e.g., subwoofer output enabled, volume up).
- פאַרקרימט סאָונד:
- פֿאַרקלענער די GAIN איינשטעלונג.
- Check speaker impedance; ensure it is within the amplifier's rated limits.
- Adjust LPF, Subsonic, and Bass Boost settings.
- Ensure speaker wires are not shorted or damaged.
- Amplifier Goes into Protection Mode (PRT LED on):
- Check for speaker wire shorts or impedance too low.
- ענשור טויגן ווענאַליישאַן צו פאַרמייַדן אָוווערכיטינג.
- Check for proper power and ground connections.
7. ספּעסאַפאַקיישאַנז
| שטריך | באַשרייַבונג |
|---|---|
| Ampליבער טיפּ | Single channel, Class D, Bass Ampליפער |
| Power @ 1Ω | 1 קס 1050 וואטס רמס |
| Power @ 2Ω | 1 קס 750 וואטס רמס |
| Power @ 4Ω | 1 קס 450 וואטס רמס |
| THD @ Rated Power | <0.2% |
| סיגנאַל צו ראַש פאַרהעלטעניש | > 100 דב |
| THD + ראַש | <0.1% |
| עפעקטיווקייַט | > 85% |
| אָפטקייַט ענטפער | 10Hz to 200Hz ±1dB |
| אַרייַנשרייַב סענסיטיוויטי | 0.25 וו צו 5 וו |
| דימענשאַנז (B x H x L) | 160mm x 58mm x 300mm (Chassis) |
| Overall Dimensions (W x H x L) | 160 מם X 58 מם X 325 מם |
| פּונקט וואָג | 8 פונט |
| מאַונטינג טיפּ | ייבערפלאַך בארג |
| באַשרייַבונג באגעגנט | פקק |
8. וואָראַנטי און שטיצן
The Zapco ST-1000XM III ampליפיער קומט מיט א 1-יאָר וואָראַנטי from the date of purchase, covering defects in materials and workmanship under normal use. This warranty does not cover damage caused by improper installation, accident, misuse, abuse, neglect, or unauthorized modification.
For technical support or warranty claims, please contact your authorized Zapco dealer or visit the official Zapco website for contact information. Please have your product model number and proof of purchase ready.