
1. הקדמה
This user manual provides comprehensive instructions for the safe and efficient operation of your OLTEANP 2200 Watts Pure Sine Wave Inverter. This device is designed to convert 12V DC power from a battery source into stable 110V AC power, suitable for a wide range of electronics and home appliances. Its advanced pure sine wave technology ensures clean power output, protecting sensitive equipment from damage. Ideal for use in trucks, vehicles, RVs, during power outages, and for various outdoor applications.
2. זיכערקייַט אינפֿאָרמאַציע
Please read and understand all safety warnings and instructions before operating the inverter. Failure to do so may result in electric shock, fire, serious injury, or property damage.
- ווענטילאַטיאָן: Ensure adequate ventilation around the inverter. Do not block ventilation openings. Overheating can cause the inverter to shut down or be damaged.
- סוויווע: Operate the inverter in a dry, well-ventilated area, away from direct sunlight, heat sources, flammable materials, and moisture.
- וויירינג: Use appropriate gauge wiring for battery connections as specified in the setup section. Incorrect wiring can lead to overheating and fire hazards. Ensure all connections are tight and secure.
- אָווערלאָאַד שוץ: Do not exceed the inverter's continuous power rating (2200W) or peak power rating (4400W). Overloading can damage the inverter and connected appliances.
- Spark-Free Protection: The inverter is equipped with a professional spark-free protection circuit. However, always exercise caution when connecting or disconnecting battery cables to minimize sparking.
- גראָונדינג: Ensure the inverter is properly grounded as per local electrical codes.
- קינדער און פּעץ: האַלט דעם ינווערטער אַוועק פון קינדער און חיות.
- וישאַלט: Disconnect all power sources before performing any maintenance or cleaning.
3. פּראָדוקט איבערview
The OLTEANP 2200W Pure Sine Wave Inverter is designed for reliable power conversion. Key components and features include:
- פּורע סינע וואַווע רעזולטאַט: Provides clean, stable AC power, ideal for sensitive electronics.
- הויך מאַכט רעזולטאַט: 2200 Watts continuous power, 4400 Watts peak power.
- קייפל רעזולטאַט פּאָרץ: Four (4) 110V AC outlets, one (1) 5V/3.1A USB port, and one (1) 30W Type-C port.
- אַדזשאַסטאַבאַל אַרייַנשרייַב וואָלtage: Allows setting low voltage shutdown points (9.5V-11V) for compatibility with various battery types, including lithium batteries, and to extend battery life.
- ווײַטקאָנטראָל מיט LCD דיספּלעי: A wired remote control with an LCD screen provides real-time monitoring of inverter status, battery voltage, AC output, load wattage, and displays fault codes.
- Multi-functional Safety Protection: Includes high-voltage, overload, high-temperature, low-voltagE, און קורץ-קרייַז שוץ.
- עפעקטיוו קאָאָלינג: Equipped with intelligent cooling fans that activate automatically to prevent overheating.

Figure 3.1: OLTEANP 2200W Pure Sine Wave Inverter and included accessories (remote control, battery cables).

Figure 3.2: The inverter providing power to multiple appliances simultaneously via its AC outlets, USB, and Type-C ports.

פיגורע 3.3: עקסamples of devices that can be powered by the inverter, highlighting its versatility for various applications.

Figure 3.4: The inverter's intelligent chip provides comprehensive safety protections for reliable operation.
4. סעטאַפּ
Follow these steps to set up your OLTEANP Pure Sine Wave Inverter:
- אָרט: Choose a dry, cool, and well-ventilated location for the inverter. Ensure there is sufficient space around the unit for airflow.
- באַטערי קשר:
- פֿאַרבינדט דעם רויטן באַטעריע קאַבל צום פּאָזיטיוון (+) טערמינאַל פֿונעם ינווערטער און צום פּאָזיטיוון (+) טערמינאַל פֿון אייער 12V באַטעריע.
- פֿאַרבינדט דעם שוואַרצן באַטעריע קאַבל צום נעגאַטיוון (-) טערמינאַל פֿונעם ינווערטער און צום נעגאַטיוון (-) טערמינאַל פֿון אייער 12V באַטעריע.
- זיכער מאַכן אַז אַלע פֿאַרבינדונגען זענען פֿעסט און זיכער צו פֿאַרמייַדן וואָלקןtagE קאַפּ און אָוווערכיטינג.
- Refer to Figure 4.2 for a typical wiring diagram.
- גראָונדינג: Connect a ground wire from the inverter's grounding terminal to a suitable earth ground point (e.g., vehicle chassis, ground rod). This enhances safety and reduces interference.
- רימאָוט קאָנטראָל קאַנעקשאַן: Plug the remote control cable into the designated port on the inverter. The remote control allows for convenient operation and monitoring from a distance.
- אַדזשאַסטאַבאַל אַרייַנשרייַב וואָלtage באַשטעטיקן: Before turning on the inverter, you can adjust the low voltage shutdown threshold using the DIP switches on the inverter. This feature is crucial for optimizing battery health, especially with lithium batteries.
- Consult the table below or on the inverter for specific switch positions and corresponding voltage settings (e.g., 9.5V, 10V, 10.5V, 11V).
- וויכטיק: סטרויערן די וואַלtage setting only when the inverter is turned off.

Figure 4.1: Table showing selectable input voltage shutdown settings based on DIP switch positions, compatible with various battery types.

פיגורע 4.2: עקסample wiring diagram illustrating connections between solar panels, charge controller, battery, and the inverter.
5. אַפּערייטינג ינסטרוקטיאָנס
Once the inverter is properly set up, follow these steps for operation:
- מאַכט אויף: Press the power button on the inverter or the remote control. The LCD display on the remote will illuminate, showing current status.
- פאַרבינדן אַפּפּליאַנסעס: Plug your AC appliances into the 110V AC outlets. For USB-powered devices, use the 5V/3.1A USB port or the 30W Type-C port.
- מאָניטאָר סטאַטוס: The remote control's LCD display provides real-time information:
- באַטאַרייע קאַפּאַציטעט: Indicated by a battery icon.
- דק אַרייַנשרייַב חלקtage: Shows the current battery voltage.
- אַק רעזולטאַט וואָלtage: Displays the inverter's output voltage (typically 110V-120V).
- מאַסע וואַטtage: Shows the total power consumption of connected devices.
- שולד ינדיקאַטאָרס: Symbols will flash to indicate issues such as high voltagE, נידעריק באַנדtage, overload, short-circuit, or overheat. Refer to the Troubleshooting section for details.
- מאַכט אַוועק: When finished, disconnect all appliances, then press the power button on the inverter or remote control to turn off the unit.
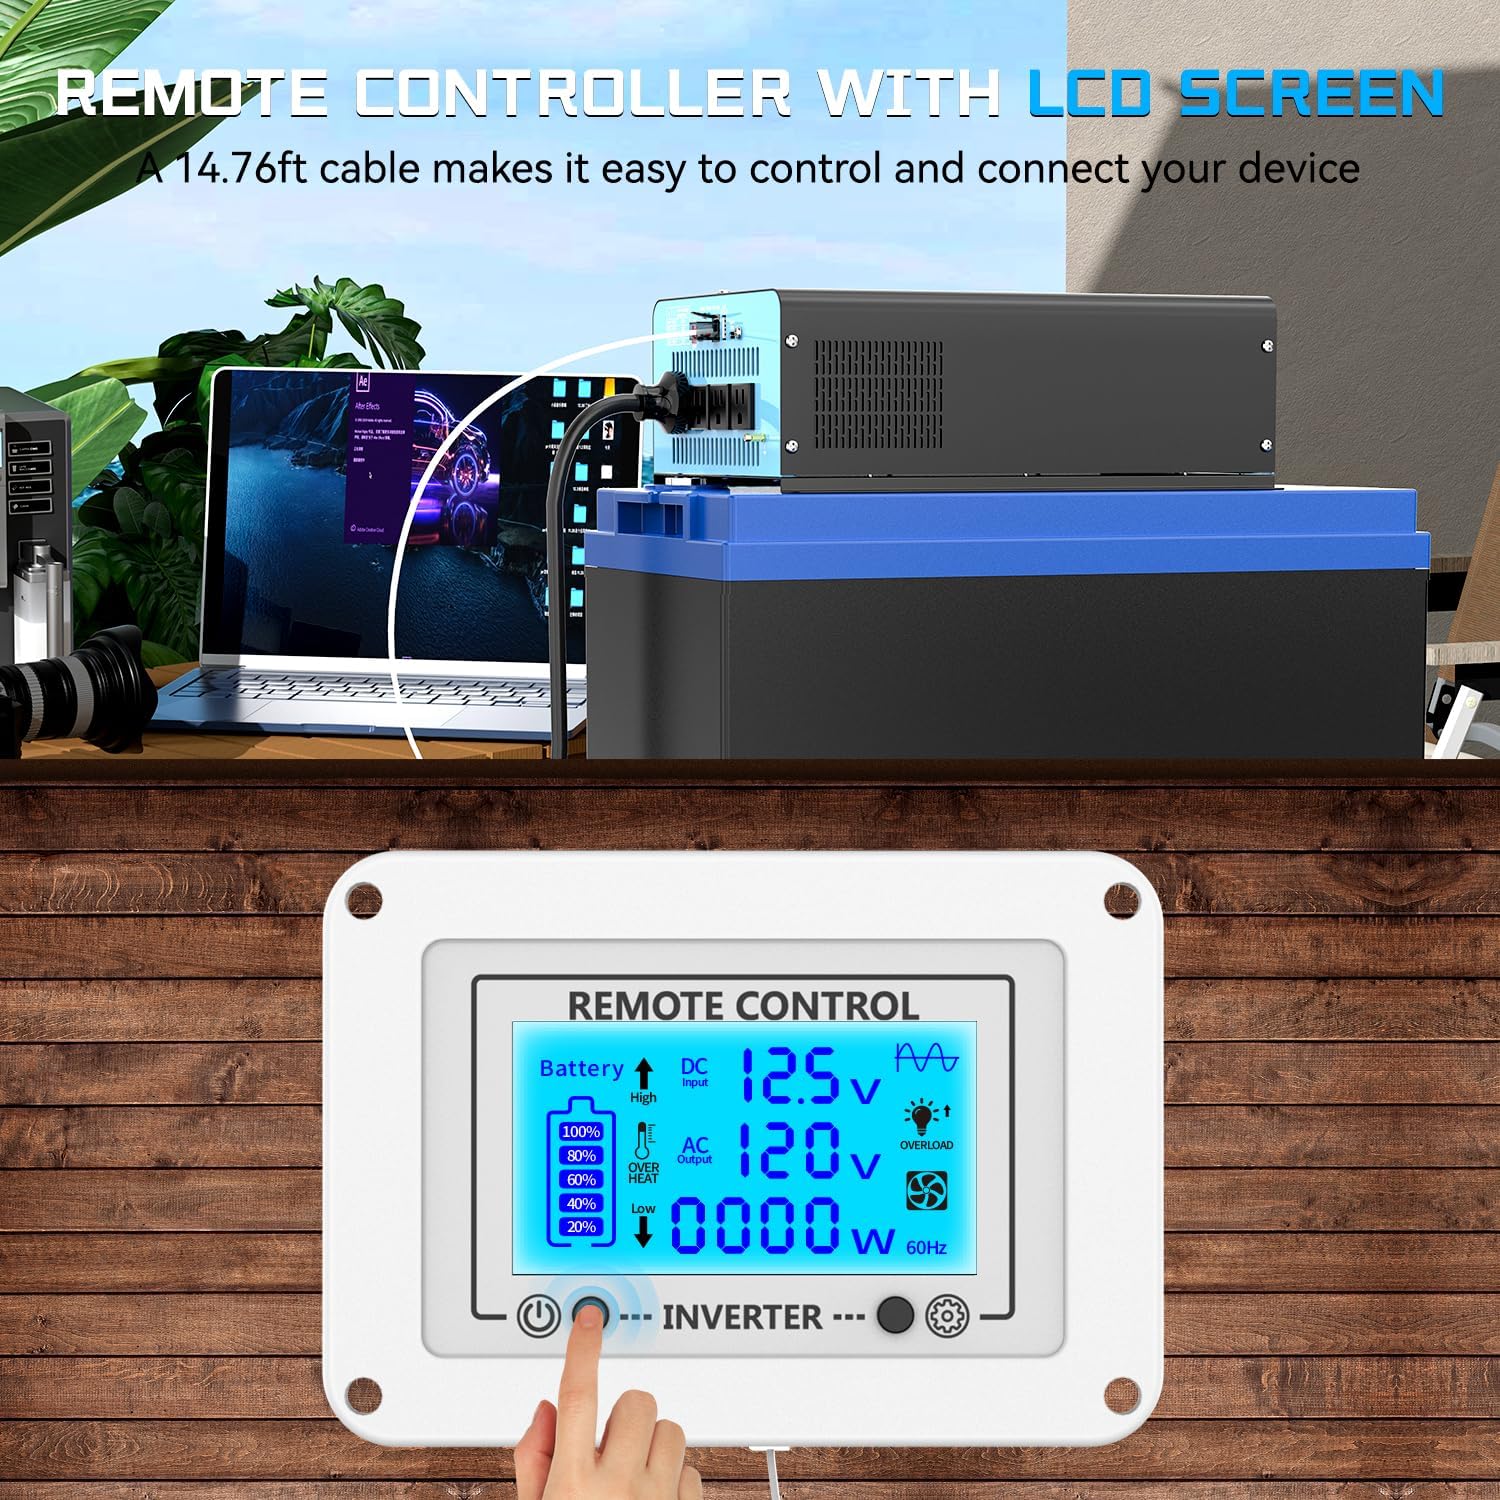
Figure 5.1: The remote control connected to the inverter, allowing convenient monitoring and operation from a distance.

Figure 5.2: Detailed explanation of the remote control LCD display, including input voltage, battery capacity, output voltage, load wattage, and various fault indicators.
6. וישאַלט
רעגולערע אויפהאלטונג גאראנטירט די לאנגעוויטי און אפטימאלע פערפארמאנס פון אייער אינווערטער:
- רייניקונג: Periodically clean the exterior of the inverter with a soft, dry cloth. Do not use liquid cleaners or solvents. Ensure ventilation openings are free from dust and debris.
- קשר טשעק: Regularly inspect all battery cable connections to ensure they are tight and free from corrosion. Loose connections can cause voltage drops and heat buildup.
- ווענטילאַטיאָן: Ensure the inverter's cooling fans are not obstructed. The intelligent cooling fans will activate as needed to maintain optimal operating temperature. If fans are not spinning when the unit is under load and warm, check for obstructions or contact support.
- סטאָרידזש: אויב איר לייגט אַוועק דעם ינווערטער פֿאַר אַ לענגערע צייט, זאָלט איר עס אָפּשטעקן פֿון דער באַטאַרייע און עס אַוועקלייגן אין אַ קיל, טרוקן אָרט.
7. טראָובלעשאָאָטינג
The remote control's LCD display provides valuable diagnostic information. Refer to the flashing symbols to identify and resolve common issues:
| Symptom / LCD Indicator | מעגלעך סיבה | לייזונג |
|---|---|---|
| No Power Output / Inverter Off | באַטערי וואָלtage too low or too high; Loose battery connections; Overload; Inverter internal fault. | קוק די באַטאַרייע וואָלtage. Ensure connections are secure. Reduce load. Power cycle the inverter. |
| נידעריק וואָלtage Shutdown (Flashing Low Voltage Symbol) | באַטערי וואָלtage has dropped below the set low voltagע שאַטדאַון שוועל. | Recharge or replace the battery. Check battery connections for looseness or corrosion. Adjust low voltage shutdown setting if necessary (when inverter is off). |
| הויך חלקtage Shutdown (Flashing High Voltage Symbol) | אַרייַנשרייַב דק וואָלtage exceeds the inverter's maximum allowable input. | באַשטעטיקן באַטאַרייע וואָלtage is within the specified operating range (12V nominal). Disconnect any charging sources that might be overcharging the battery. |
| Overload (Flashing Overload Symbol) | Connected appliances draw more power than the inverter's continuous or peak rating. | Disconnect some appliances to reduce the load. Ensure total wattage does not exceed 2200W continuous or 4400W peak. |
| Overheat (Flashing Overheat Symbol) | Inverter internal temperature is too high. | Ensure proper ventilation around the inverter. Clear any obstructions from cooling fans. Allow the inverter to cool down before restarting. Reduce load. |
| Short-Circuit (Flashing Short-Circuit Symbol) | A short circuit detected in the output. | Disconnect all AC loads. Check AC cables and appliances for short circuits. Reconnect one by one to identify the faulty device. |


פיגורע 7.1: עקסamples of fault indicators on the LCD display for high voltagE, נידעריק באַנדtage, short-circuit/overload, and overheat conditions.
8. ספּעסאַפאַקיישאַנז
| שטריך | באַשרייַבונג |
|---|---|
| מאָדעל | 12V-2200W (ae2c0f40-ec8b-4bf7-bfe5-c2fd435f5fd6) |
| קעסיידערדיק מאַכט | 2200 וואטס |
| שפּיץ מאַכט | 4400 וואטס |
| אַרייַנשרייַב דק חלקtage | 12V DC |
| רעזולטאַט AC Voltage | 110V AC |
| רעזולטאַט וואַוועפאָרם | ריין סיין וואַווע |
| AC אַוטלעץ | 4 |
| וסב פּאָרט | 1 (5V/3.1A) |
| טיפּ-C פּאָרט | 1 (30 וו) |
| פּראָדוקט דימענשאַנז | 13 X 7.87 X 4 אינטשעס (330 X 200 X 102 מם) |
| פּונקט וואָג | 10.58 פונט (4.8 קג) |
| רעקאָממענדעד ניצט | Home, Car, Power Outage, Vehicles, Truck, Outdoors, Boat, RV, Trip |
| מאַכט מקור | זונ - און באַטעריע געטריבן |
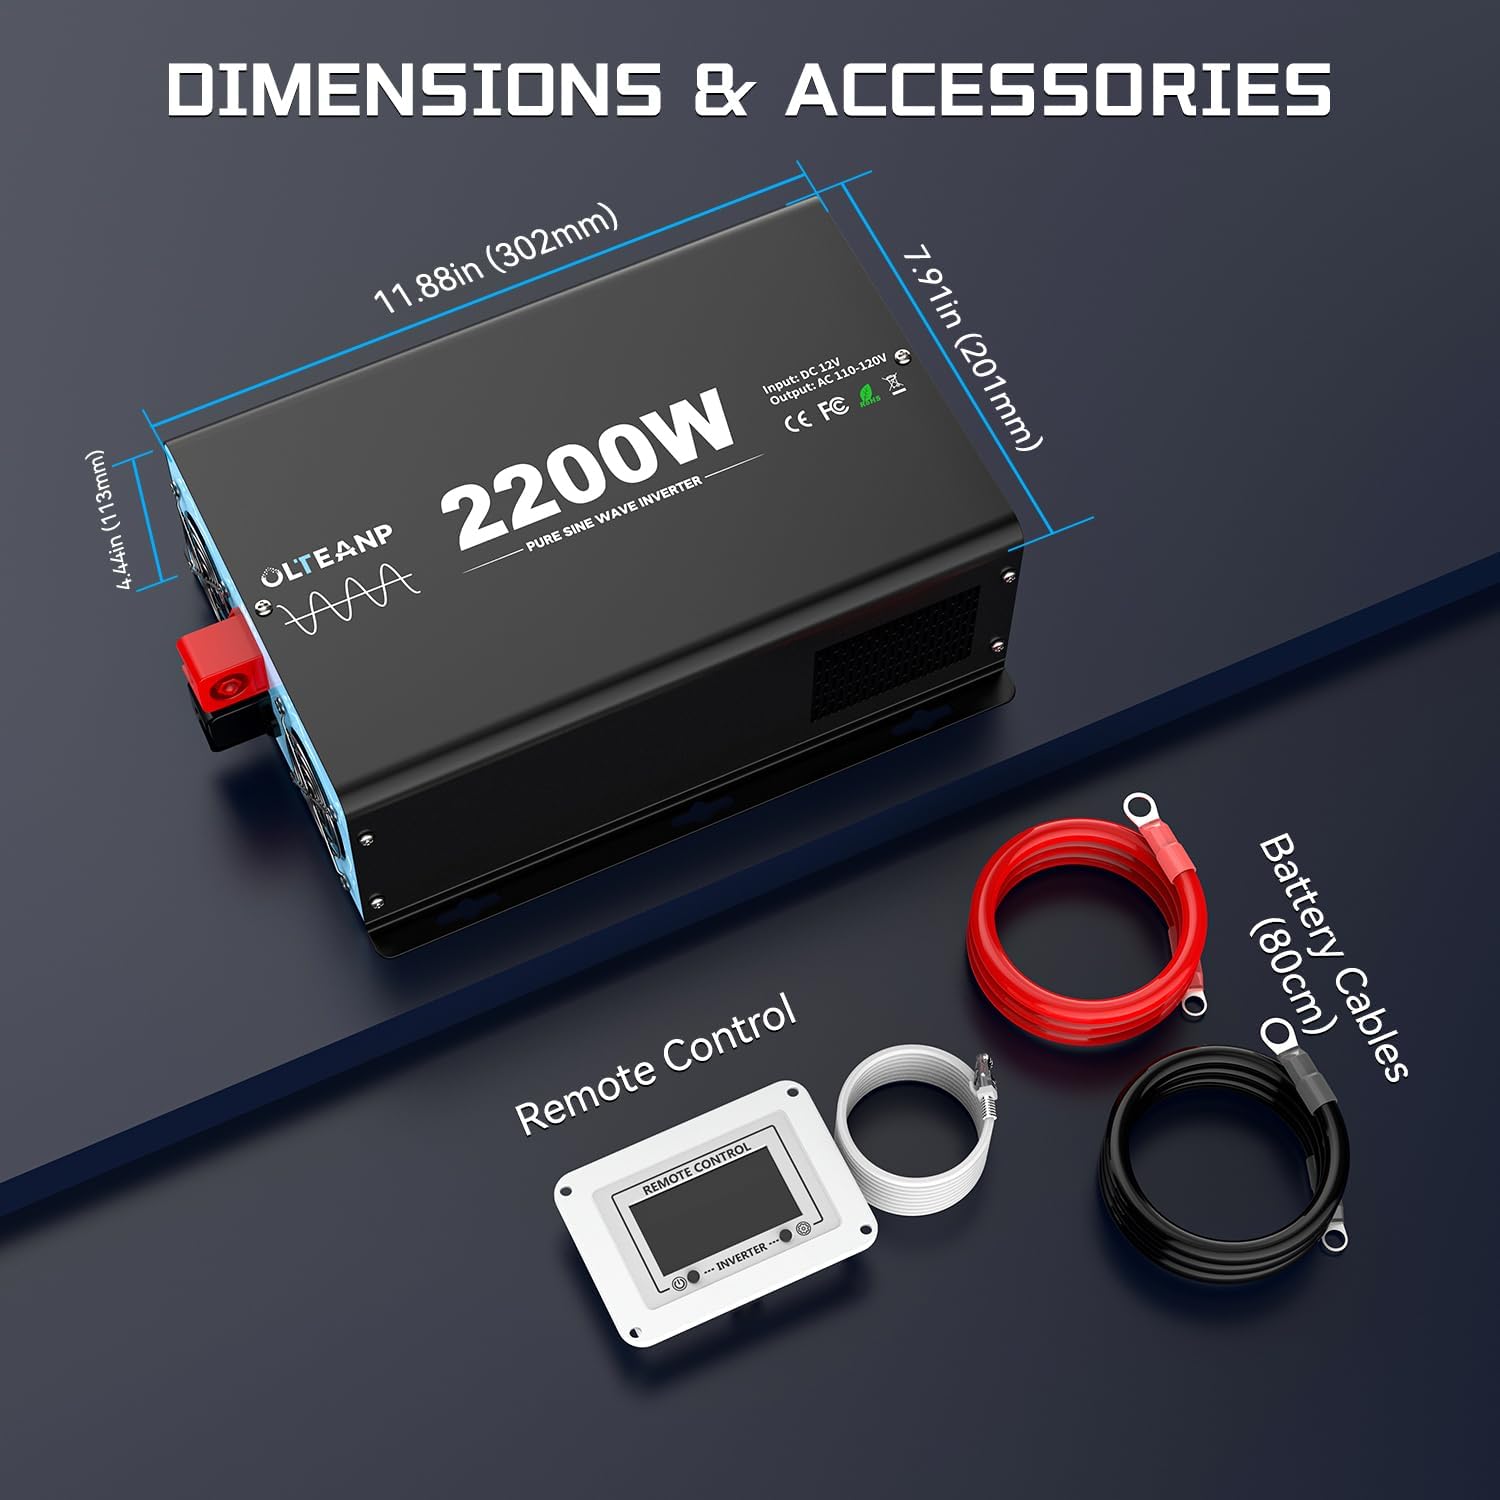
Figure 8.1: Product dimensions and a visual representation of included accessories: battery cables and remote control.
9. וואָראַנטי און שטיצן
For warranty information and technical support, please contact OLTEANP directly through their official channels or the retailer from whom the product was purchased. Protection plans may be available for purchase separately to extend coverage beyond the manufacturer's standard warranty.
For further assistance, refer to the contact information provided with your product packaging or visit the OLTEANP brand store online.